Welcome to Our Community

Some features disabled for guests. Register Today.

New Workbee Z Axis

Discussion in 'CNC Mills/Routers' started by DarkPenguin, Apr 6, 2022.
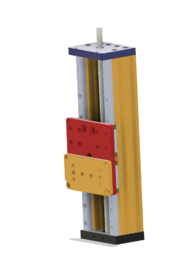
  1. DarkPenguin

    DarkPenguin Well-Known
    Builder

    Joined:
    Sep 16, 2017
    Messages:
    201
    Likes Received:
    65
  2. DarkPenguin

    DarkPenguin Well-Known
    Builder

    Joined:
    Sep 16, 2017
    Messages:
    201
    Likes Received:
    65
    The bottom plate is the workbee plate. The top plate is an extended workbee plate. This *might* end up attached to rails in which case the bottom plate will likely be replaced with a machined angle bracket. The top plate would be the same. Not seeing any reason to get rid of the wheels on the x axis at this point, tho. Would rather not add that much weight to the X axis. 175 wheels are lighter than HGR20.
     
    Alex Chambers likes this.
  3. DarkPenguin

    DarkPenguin Well-Known
    Builder

    Joined:
    Sep 16, 2017
    Messages:
    201
    Likes Received:
    65
    Some mistakes have been made. A divot on the bottom side of the top plate where the broken tap extraction went south. I'm not using that lead screw block. Since I cut the top at 6.35 instead of the 10 I designed it as I didn't countersink the screws so I had to print the mount with some domes to allow space for the screws.

    The mgn12 blocks need to be lubed but I'm not entirely certain how to do that.

    Might flip the stepper and hang it behind just to consolidate the mass towards a point.

    If I can figure out how to get the zaxis off the workbee without removing the x axis I might give this a test run. This version mounts to the existing plate via the openbuilds cbeam plate attached to the back.

    spindle.jpg
     
  4. Ehask71

    Ehask71 New
    Builder

    Joined:
    Jun 2, 2022
    Messages:
    10
    Likes Received:
    8
    DarkPenguin likes this.
  5. Yanou Fishel

    Builder

    Joined:
    Dec 21, 2019
    Messages:
    35
    Likes Received:
    14
    I just bought a syringe and thick gauge (not too thick) needles, just press some superlube in there
     
    DarkPenguin and Ehask71 like this.
  6. Alex Chambers

    Alex Chambers Master
    Moderator Builder

    Joined:
    Nov 1, 2018
    Messages:
    2,695
    Likes Received:
    1,326
    To remove the Z axis (unless it's a very recent workbee from Ooznest) you will have to dismantle the X axis gantry plates - remove all the wheels from the X axis. You shouldn't have to remove the X axis C-beam as far as I recall (got linear rails now so can't go and have a look).
    Alex.
     
    DarkPenguin and Ehask71 like this.
  7. DarkPenguin

    DarkPenguin Well-Known
    Builder

    Joined:
    Sep 16, 2017
    Messages:
    201
    Likes Received:
    65
    This seems a plan. Looking at the document Ehask71 linked I have to assume I want grease in the bearings but I think an 18ga needles should still be able to push this.
     
    Ehask71 likes this.
  8. DarkPenguin

    DarkPenguin Well-Known
    Builder

    Joined:
    Sep 16, 2017
    Messages:
    201
    Likes Received:
    65
    Oh, yeah, I can just remove the lower wheels to get access. Might try machining an special hex key that can slip behind the plate.

    Still working on how I want to go linear rail for this. I have a bunch of HGR 20 which should be great for the y-axis but seems awfully heavy for the x-axis.

    Also, MGN12 isn't great with v-slot. A little too narrow. 15 (mgn and hgr) would be better all around.
     
    Ehask71 likes this.
  9. Ehask71

    Ehask71 New
    Builder

    Joined:
    Jun 2, 2022
    Messages:
    10
    Likes Received:
    8
    Yeah 15 or 20 for sure! I am planning on doing a linear bearing upgrade on my Lead1515 whenever I finally get home to build it ... I planned on 20 for x & y and 15 for the Z
     
  10. Alex Chambers

    Alex Chambers Master
    Moderator Builder

    Joined:
    Nov 1, 2018
    Messages:
    2,695
    Likes Received:
    1,326
    @DarkPenguin, lower wheels, yes, but you'll also have to detach the nut blocks from the X gantry plates or remove the leadscrew. If I recall correctly the Z plate is attached to the X plate from the inside - Ooznest have changed that design recently so you can unscrew the Z plate from the outside.
    Alex.
     
  11. DarkPenguin

    DarkPenguin Well-Known
    Builder

    Joined:
    Sep 16, 2017
    Messages:
    201
    Likes Received:
    65
    I have to remove everything to use some new plates so I think I'm just going to suck it up.

    Current plan is to use some of my hgr 20 because, well, I bought it. Still trying to sort out how I'm filling the back of this. I'm thinking a handfull of spacers on the back side and 3d print the rest. Cable track will mount to the 3d printed filler piece.

    No way in hell am I buying that many black corner brackets. They are more expensive than gold.

    I think this is the extent of what I can do without buying more aluminum.


    snip1.png snip2.png snip3.png
     
  12. worldofbecraft

    Builder

    Joined:
    May 2, 2019
    Messages:
    3
    Likes Received:
    2
    I have a workbee 1010 and I bought High Z Mod for Lead 1010 CNC , not realizing that they were different machines. Where can I find out what parts I need to connect the upper selection like the lower section from the attached pic I have not been able to do anything on this machine. I contacted customer support and they treated me like the idiot I was for not realizing that the two 1010 builds were different. and that I should contact the forums. Any help would be awesome. I know what I want to do I just don't know what I need to buy.
     

    Attached Files:

  13. sharmstr

    sharmstr OpenBuilds Team
    Staff Member Moderator Builder Resident Builder

    Joined:
    Mar 23, 2018
    Messages:
    2,035
    Likes Received:
    1,431
    Its been discussed a few times. Here's one post with info: Larger CNC Machine Search for the rest.
     

Share This Page

  1. This site uses cookies to help personalise content, tailor your experience and to keep you logged in if you register.
    By continuing to use this site, you are consenting to our use of cookies.
    Dismiss Notice