
I had been thinking about buying/building a cnc router for about a year. I was eye'ing the x-carve and was waiting for either a used one in my area to come up for sale or for a project that would justify buying/building one. I found Openbuilds while building a cnc back gauge for my press break. Though I didnt end up using Openbuild parts for it, I was impressed with the company and the community here.
I now have a project that would be a lot easier with a cnc router and as luck would have it, Openbuilds had a Fathers day sale on their new version of the Workbee. I took it as a sign and bought the 1510.
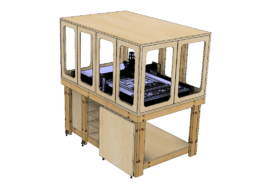
I've started building the machine, but am in a holding pattern due to missing parts. Openbuilds has been great dealing with the parts issues, so no complaints there. In the meantime, I've started designing a base and enclosure for it. I'm still not sold on the idea of an enclosure, so that will be built after I have some hours on the machine and see how well the dust boot works.
[UPDATE 7/23/18]
Two weekends ago I built the workbench. Its not complete as I'm not sure where everything it going to go yet. But it was complete enough to get the machine frame built this weekend.
I built the machine before attaching the top so I could figure out where to add supports and where to cut access holes for the vacuum and for the vertical stock support.
[UPDATE: 9/1/2018]
From the beginning I knew I didnt want the 20x80 mounted on their sides, but I wasnt sure how low I wanted to them to go. Thanks to @Metalguru for posting their suggested improvements. After seeing that I knew I wanted to do something similar. I ordered 3 additional pieces of 20x40 and mounted them perpendicular to the 20x80s. I had about 5" left over from each piece so I cut them down to 2" and mounted them underneath the ends of the 20x80s for a bit more support.
I also implemented his suggestion to swap out the end caps for 3 hole brackets as to connect the C-Beam to the ends.
I used the left over 3 hole brackets to attach the frame to the table.
Since I dont want to have to unmount the frame when I have to change the wasteboard, I opted to weld nuts to the wasteboard brackets.
Before making these changes, I had about .017" of play when pushing down on the 20x80. After I have about .004".
I've been doing a bunch of 3D printing for this build. Here's just a few things I've designed an printed.
Drag chain mounts for wires and the vacuum hose:
A double elbow to route the hose from the side of the machine to above the dust collector located under the table.
A dust shoe that I found on Thingiverse. Still need to attached the brush. Also need to design the brackets to get the hose from the drag chain to the shoe.
[Update: 1/17/19]
After using the machine for a bit, I decided I hated the wheels and belts, especially on the Y axis. I could never get it set right. After seeing @Jacob Lotter Modified Workbee build (1510 Workbee Modified) I set out to do the same.
Jacob was kind enough to post the drawings for the linear bearing blocks, so I milled the Y axis blocks using my Tormach.
Install was pretty straight forward. I propped up my X axis, removed the Y axis end plates and removed the Y axis C beams. Then I removed the inner Y axis plates, wheels and motor. The only thing to watch out for is making sure the oil fittings on the bearings are facing out.
![[IMG]](https://openbuilds.com/attachments/20181216_113801-jpg.37447/)
With the machine back together, I set out to add the lead screws. This took several days of tweaking, but in the end I was able to run them with the OG motors and xpro. I plan on upgrading the motors switching to a arduino/driver setup, I just havent ordered them yet.
Like @Giarc (build link), I used 1/2"-10 5 start screws from McMaster (link). I also found nut blocks that fit within the C-beam (eBay link). I used Dayton flange bearings (ebay link). Here's some details on how I did this.
First thing I did was made some spacers on the lathe that would center the screw within the end plate holes. This would allow me to figure out where I needed to make the new holes for the nut blocks.
![[IMG]](https://openbuilds.com/attachments/20181216_145818-jpg.37432/)
![[IMG]](https://openbuilds.com/attachments/20181216_145821-jpg.37433/)
![[IMG]](https://openbuilds.com/attachments/20181216_153210-jpg.37435/)
Once I figured that out, I milled out a drill guide that fit within the c-beam and over the X plates. I drilled two holes for both top and bottom. I removed the extra material with a end mill attached to the drill. This allowed me to make slots so I have some adjustability when the nut blocks start wearing down.
![[IMG]](https://openbuilds.com/attachments/20190117_081945-jpg.37444/)
![[IMG]](https://openbuilds.com/attachments/20181221_113327-jpg.37436/)
Instead of drilling mounting holes for the bearings, I decided to modify them to make them work with 2 of the existing motor mount holes.
First I made the hole spacing wider, then I milled a bit off the back in one corner so it would clear the head of one of the cbeam screws. Sits nice and flat now.
![[IMG]](https://openbuilds.com/attachments/20190115_093221-jpg.37438/)
![[IMG]](https://openbuilds.com/attachments/20190115_093212-jpg.37437/)
![[IMG]](https://openbuilds.com/attachments/20190115_093259-jpg.37439/)
Since the bearing sits outside of the end plates, it was a bit of pain to line up the screws with the motors attached. So, I cut one of my spacers that I made in half and used that to keep everything lined up while I screwed the motor/bearing into the plate.
![[IMG]](https://openbuilds.com/attachments/20190115_094857-jpg.37441/)
![[IMG]](https://openbuilds.com/attachments/20190115_094832-jpg.37440/)
![[IMG]](https://openbuilds.com/attachments/20190117_081847-jpg.37442/)
![[IMG]](https://openbuilds.com/attachments/20190117_081858-jpg.37443/)
And here it is all back together.
![[IMG]](https://openbuilds.com/attachments/20190117_082113-jpg.37445/)
![[IMG]](https://openbuilds.com/attachments/20190117_093211-jpg.37446/)
Now its time to work on the X and Z upgrades.
Shawn's Workbee 1510
Build in 'Cartesian Style CNC' published by sharmstr, Jan 21, 2019.
Shawn's adventure in assembling and customizing the Openbuild's version of the 1500x1000 Workbee.
-
-
Build Author sharmstr, Find all builds by sharmstr
-
- Loading...
-
Build Details
- Build License:
-
- GNU (GPL3+) General Public Licence
-
-
Attached Files:
-


