Welcome to Our Community

Some features disabled for guests. Register Today.

Sphinx Derived Router

Discussion in 'CNC Mills/Routers' started by Corey Corbin, Mar 8, 2020.
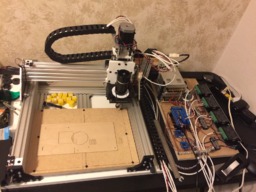
  1. Corey Corbin

    Corey Corbin Well-Known
    Builder

    Joined:
    Feb 27, 2016
    Messages:
    135
    Likes Received:
    62
    Corey Corbin published a new build:

    Read more about this build...
     
  2. Corey Corbin

    Corey Corbin Well-Known
    Builder

    Joined:
    Feb 27, 2016
    Messages:
    135
    Likes Received:
    62
    Hi all. wondering about Machine Zero. When I home the machine it travels in positive direction Z axis travels up till limit switch Y axis travels away from front of machine an X+ to far right. Then I guess I would consider Machine Zero to be front left of machine? Is machine zero considered floating cause every time you change a tool you have to redo machine zero? And since I have gotten machine running all I have ever done was jog machine to top of part hit set zero for work zero then move machine 10mm above that and set G28.1 position and hit run. So really I have not used or needed machine zero. Is this normal or should I set machine zero?
    Using Openbuildscontrol software. On Arduino mega 2560hex GRBL 1.1.
    Thanks Corey
     
  3. Peter Van Der Walt

    Peter Van Der Walt OpenBuilds Team
    Staff Member Moderator Builder Resident Builder

    Joined:
    Mar 1, 2017
    Messages:
    13,676
    Likes Received:
    4,060
    Refer to gnea/grbl for details

    No, machine coordinates is static = space inside the machine frame. Tool length is either set as Tool Length offset or by zeroing out Z in work coordinates again

    Correct, Setzero tells Grbl where the origin of the currently loaded stock/file is relative to each other - usually you have to setzero for each new job or new piece of stock unless you have a little production line setup in which case you can use multiple coordinate systems, fixed positioning jigs, etc to get the repeatability between runs.

    Used to the reprap way? Correct gcode to set offsets (zero) in Grbl is G10 L20
    G10 L20: G Codes
    G28: G Codes


    Most people don't - except maybe for Z safe moves (move to G53 Z-5 for safe travel moves, like the Fusion post does) as it is a good reference that tool is pulled up as far as possible. Why Z-5? because Z0 trips the limit switch (; - so any space below that)
     
  4. Corey Corbin

    Corey Corbin Well-Known
    Builder

    Joined:
    Feb 27, 2016
    Messages:
    135
    Likes Received:
    62
    So the whole reason why I would save a G28.1 position was because if I hit start from work zero that's exactly what it would do spindle would climb till it hit the limit switch. Now if i start from G28.1 it stays at the height 10mm above the work zero and travels to the start of the path for cutting. So G53 Z5 would be a better solution? I can see in the post process of Fus360 section changing options from G28 to G53 but I'm not a 100% on how to implement the Z5. Thanks for your time I do try to research before I ask but the amount of information on the GRBL wiki is vast and it kind of pass's over my head more then I would like to admit. I haven't grasp its concept of implementing the G commands. I think the whole reason why I have been able at least cut parts is in Openbuilds control software is really good for the new guy it just makes sense. And I am thankful for that. Just a couple of hiccups but still trucking.
     
  5. Peter Van Der Walt

    Peter Van Der Walt OpenBuilds Team
    Staff Member Moderator Builder Resident Builder

    Joined:
    Mar 1, 2017
    Messages:
    13,676
    Likes Received:
    4,060
    That's mainly been our goal, open the door for the beginner. Same thing with OpenBuilds CAM > try to make it easier

    Fusion360 has a very steep learning curve, even I have been offput by some of the complications

    Though the Swarfer post swarfer/GRBL-Post-Processor luckily got headed up by our long time forum buddy @David the swarfer so feel free to ask about specifics about it :)
     
  6. Corey Corbin

    Corey Corbin Well-Known
    Builder

    Joined:
    Feb 27, 2016
    Messages:
    135
    Likes Received:
    62
    Updated learning process so I have tried to cut aluminum. #1 cut 3d Printed z plate acouple pics down "ch" used 2 flute endmill. The z plate was working for cutting acrylic and I knew it would probably would not work with aluminum but I had to try. It bounced around and look horrible. So tore it apart got a piece of aluminum placed old z pate to the new piece and drilled all the important holes to rebolt it back on.
    [​IMG]
    [​IMG]
    Now I have a pretty rigid Z plate. Bored some holes and cutting out pockets.
    500w spindle
    Cuts #1 and #2 are with old z plate. 2 flute 2mm endmill.
    Cuts #3 and #4 are with new z plate. 3 flute 4mm HRC55 endmill
    I pocketed cut #4 at 22mm to fit a bearing I have that when I used digital calipers it measured out to multiple tries 21.95mm. And the bearing fit just snug it drops in as long as it level and flat it wont go in crooked with a slight movement laterally in the hole. Im thinking of taking the pocket smaller to almost having to heat up maybe or a vise to press the bearing in. My goal is to redo my 3d printed motor plates on both ends of the Y axis with the sealed bearings. I bought them for another project but ended not using them. This just testing the waters with sizing of holes to dial calipers. I have experience with my 3d printer if I needed a hole for 21.95mm bearing I had to draw the holes 22.2mm for the bearing to fit. SO I perceived that to be a pretty large margin of adjustment to make.
    "After calibrating my cnc router would you say .05mm is close to being calibrated or would you take even closer then that?" when I placed the dial calipers in the whole to get measurement dia of the hole it was consistently 22.00, 22.05 in about 5 tries. How close would the professional machinist want the machine dialed too? I am not a machinist by trade but have been excited about learning about this skill. I am thinking of getting anything closer smaller .05mm I would need to measure my routers movement with a digital dial indicator! I did the ruler measurement ran 100mm eyeballed it did the math adjusted in grbl.
    [​IMG]
    [​IMG]
    Also did some smaller holes and pocket for 5mm allen bolts. The bolt measures 8.40 dia head and 4.90 dia on the threads.
    I did a 8.5mm pocket and holes were as marked and they seem to get bigger and smaller as I put the bolt in and wiggled it from 4.90mm was the most snug and the 5.10mm being just a tad loose and holes in between were progressively getting bigger. What I was looking for the router is being consistent at making the holes bigger by .05mm.
    [​IMG]
    [​IMG]
    [​IMG]
    I also wanted to comment about the spindle. 500w and its working pretty good for the few cuts I made in aluminum. Pic above cuts were .25 depth with 200mm a sec. Running it at rpm to max which is probably around 11k ish I haven't implemented a RPM sensor yet. But point being it did cut it, question is how long will the spindle last. My next spindle going to be either 800w or 1.5kw with VFD. I know the routers are a lot cheaper but the noise is the problem for the cnc router is in my back bedroom.
    Oh and I have been using my Openbuilds XYZ probe just awesome! Glad its made out of metal first time I used it I forgot to put the magnet on. That was fun and scary at same time. But I think this is really worth the money. Thanks!
    [​IMG]
     
  7. Giarc

    Giarc OpenBuilds Team
    Staff Member Moderator Builder Resident Builder

    Joined:
    Jan 24, 2015
    Messages:
    2,892
    Likes Received:
    1,610
    It looks like you are getting it dialed in for aluminum. One thing I have found is that using the largest diameter endmill you can gives faster, cleaner, and more accurate cuts because there is less flex in the endmill. Another option that helps is using shorter endmills.

    For example, for your 22mm pocket, I would go with a 6.35 mm endmill. I am not a fan of the 3.175 mm (1/8") endmills for pocketing or cutting out a part unless there is a corner radius that requires it. I use them for hole drilling small holes all the time, but for 5 mm holes I was using a 3/16" inch endmill.
     
  8. Corey Corbin

    Corey Corbin Well-Known
    Builder

    Joined:
    Feb 27, 2016
    Messages:
    135
    Likes Received:
    62
    That
    That is good advise thanks. I would like to see how much bigger and fast i could push the 500w spindle.
     
  9. Corey Corbin

    Corey Corbin Well-Known
    Builder

    Joined:
    Feb 27, 2016
    Messages:
    135
    Likes Received:
    62
    Ok got scenerio question. This pertains to starting a .NC file and in the middle of running this job I had to stop machine. Now my part is half done so what I have been doing in this situation is I would start the machine over let the machine run over the cuts it already did dry fire so to say. But I am wondering if there is a better way to pick up were it left off.
    So I have been thinking before I try it I want ask. I restart the job that I previously stopped. Let the the bit start moving horizontally as if it was cutting but its dry cutting. Pause the job lower that bit until it barely touches the part path and then hit resume. I know I would have to watch the job close to the end cause if I lowered bit after I restarted job the depth would be off. So I guess the question would be can you adjust the depth of the bit during a paused job?
    Using OpenBuilds Control Software. The pic is a modified Sphinx plate to replace my 3D printed plates and different bearings. But the cut in question is the perimeter cut, cutting part out. Thanks.[​IMG]
     
  10. Corey Corbin

    Corey Corbin Well-Known
    Builder

    Joined:
    Feb 27, 2016
    Messages:
    135
    Likes Received:
    62
    Since I have been redoing my Z axis, Z plate with the MGN12H linear rail. To hold the plate to the Slider it requires M3 bolt. I was wondering what the torque would be on such a small bolt. Then I got to thinking whats the tensile and shear strength of the a M3 bolt. Found this guide just for reference.
    http://www.unbrako.com/images/downloads/engguide.pdf There might be other guides this was the first to popup from Google. Just thought it would be good to post. Personally I try to torque everything that has a torque rating most fasteners do have a ratings. Maybe there are more guides out there.
     
  11. Corey Corbin

    Corey Corbin Well-Known
    Builder

    Joined:
    Feb 27, 2016
    Messages:
    135
    Likes Received:
    62
    Ok just got these plates done. 3/8 thick uprights for the Y axis. Designed to swapped out and still use the 8mm lead screw and upto 1 or 2 anti back lash nut blocks with 1/2 in spacer. These are designed with the MGN12H lead rail in mind. Added extra 40x40 Aluminum Extrusion on top of C beam for spreading out support for the Z axis. Gonna follow up with a 1/4 in back plate or maybe steel to tie pieces together like Rob Taylor design been working on these for a couple of weeks. Trying to get them cut, pocketed and bored on current machine.Also both plates had to finish some of the holes by hand. Oh coarse there is always some thing that happens to mark or gouge somewhere on the piece I am working on.
    [​IMG]

    This was weird not sure how to explain event happened. I was in middle of cutting this plate out. I pause job in OB controls. After about hour I came back turned spindle on and hit resume. Machine started moving it did about a 4mm back pedal then started moving forward again. I didn't think much of it figured it needed a running start from the pause. Untill it got to the corner I wasn't paying attention for about 1 min and then I saw it undercut the corner. Anyways still structurally sound gonna use it. But man never 100% perfect. When the rails get here I get these installed will post files. Thanks!
    [​IMG]
     

Share This Page

  1. This site uses cookies to help personalise content, tailor your experience and to keep you logged in if you register.
    By continuing to use this site, you are consenting to our use of cookies.
    Dismiss Notice