Welcome to Our Community

Some features disabled for guests. Register Today.

Sphinx 1050

Discussion in 'CNC Mills/Routers' started by Kyo, Nov 8, 2018.
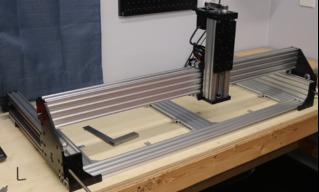
  1. Kyo

    Kyo Veteran
    Staff Member Builder Resident Builder

    Joined:
    Feb 27, 2014
    Messages:
    673
    Likes Received:
    699
    Kyo published a new build:

    Read more about this build...
     
    Anthony Bolgar likes this.
  2. Anthony Bolgar

    Anthony Bolgar Journeyman
    Builder

    Joined:
    Jan 14, 2016
    Messages:
    354
    Likes Received:
    198
    Perfect timing Kyo, I just got the last of my parts in for my 1050 Sphinx build as well. So I can build it along with you , that will be awesome to have someone to follow along with. I forgot to order one part, the reduction plate, but will order that tomorrow. For control I will be using Paul deGroots new Super Gerbil board that he is doing a kickstarter on right now. You should take a peak at it if you have not seen it yet. Nice board. I look forward to building along with you, I am sure I will make less mistakes this way :) And I have to say thanks to Mark Carew for trading me a set of Sphinx plates for a spindle and PSU that I was not using.
     
    Kyo likes this.
  3. Tracy Ranson

    Tracy Ranson Well-Known
    Builder

    Joined:
    Nov 4, 2014
    Messages:
    88
    Likes Received:
    32
    I would like more information about the controller box. Where did you get the Nema box? I have all of my drivers, din rail, etc the only thing I don't have is a case
     
    Anthony Bolgar likes this.
  4. Kyo

    Kyo Veteran
    Staff Member Builder Resident Builder

    Joined:
    Feb 27, 2014
    Messages:
    673
    Likes Received:
    699
    @Anthony Bolgar Thanks, I look forward to following your build as well. I do not recall hearing of the Super Gerbil board. Thanks for the heads up I will be looking at it in more detail tonight. I do enjoy playing around with different controllers. From a quick glance it looks like a nice option. I still need to order my Dewalt router ( so glad to see this at Open builds now ) some plastic cable trunking, Limit switches and misc cable / wire and connectors. I am planning to start on the frame this Sun or Mon depending on my schedule.

    @Tracy Ranson Definitely, I have built a number of controllers using steel nema enclosures. it really is the way to go :thumbsup: I tend to pick them up as I find good deals. Automationdirect, Amazon, Ebay, Galco, Auction warehouses ect. While I don't mind old enclosures I do stay away from boxes with prior life's and hole cut outs as they tend to be a pain to work around. Here is a good deal on a new nema enclosure (with free shipping to boot) the same size I am working with now 16x20x6. No matter where you find your enclosure always make sure to grab a back plate as well. It is often sold separately.
     
  5. Giarc

    Giarc OpenBuilds Team
    Staff Member Moderator Builder Resident Builder

    Joined:
    Jan 24, 2015
    Messages:
    2,892
    Likes Received:
    1,609
    Nice looking control box. I love those Harbor Freight parts boxes as well. If you have a HF near you, they are only $8.99 in the store.
     
  6. Kyo

    Kyo Veteran
    Staff Member Builder Resident Builder

    Joined:
    Feb 27, 2014
    Messages:
    673
    Likes Received:
    699
    Thanks, yeah the boxes have so many uses and are great for organizing. Definitely much cheaper to go to your local HF if you have one. They have coupons for $4-5.99 sometimes as well. Most of the time I just order it, or plan a day trip to hit up the store in a bigger town. #1Kpopulationtownssuck lol
     
    Giarc likes this.
  7. Anthony Bolgar

    Anthony Bolgar Journeyman
    Builder

    Joined:
    Jan 14, 2016
    Messages:
    354
    Likes Received:
    198
    If I use a 1000mm long leadscrew, will I have to shorten the X axis dimensions by 40mm, or is there room to play?
     
  8. Kyo

    Kyo Veteran
    Staff Member Builder Resident Builder

    Joined:
    Feb 27, 2014
    Messages:
    673
    Likes Received:
    699
    It depends on if you sourced your 1M leadscrew from openbuilds. If so you should be good to go as openbuilds provide a bit of extra length to the leadscrew. With a screw that is exactly 1M long you have a couple options depending on what you want to do. You can shorten your base and X-axis extrusions to the needed length or leave the X-axis at 1M long and mount the motor to the plate using 6mm stand offs. This will place the coupler on the inside and leave that end of the screw supported by the motor/coupler..

    01.jpg 02.jpg
     
  9. Peace11uehman

    Builder

    Joined:
    Oct 25, 2015
    Messages:
    30
    Likes Received:
    18
    +1 for interest in the controller box setup and parts that are used!

    What connectors do you have sticking out of the G540 in that image?

    Thanks :D
     
  10. Kyo

    Kyo Veteran
    Staff Member Builder Resident Builder

    Joined:
    Feb 27, 2014
    Messages:
    673
    Likes Received:
    699
    Awesome, I will make sure to take some good photos / videos of the controller progress. I just placed my order for the cable track and other misc. Items I was missing for the control cabinet. :thumbsup: Those are some 16mm Aviation Connectors I will be using for limit switches and probe input.
     
  11. Peace11uehman

    Builder

    Joined:
    Oct 25, 2015
    Messages:
    30
    Likes Received:
    18
    Thanks for the link! Did you make some sort of DB9 -> Aviation adapter there? Or are they simply placed behind the unit for the image.
     
  12. Anthony Bolgar

    Anthony Bolgar Journeyman
    Builder

    Joined:
    Jan 14, 2016
    Messages:
    354
    Likes Received:
    198
    I ended up using 2mm of precision shims on my X axis, did not need the three mm like yours.
     
  13. Jdog

    Jdog New
    Builder

    Joined:
    Mar 18, 2017
    Messages:
    10
    Likes Received:
    3
    Has anyone installed riser plates and a C-beam shield on the Sphinx Z-axis to help block debris from the lead screw? I see comments on some Sphinx build discussions about debris getting on Sphinx Y-axis and Z-axis, but I haven't noticed anyone using a C-beam shield. Is the shield not very effective?
     
  14. Kyo

    Kyo Veteran
    Staff Member Builder Resident Builder

    Joined:
    Feb 27, 2014
    Messages:
    673
    Likes Received:
    699
    I hope everyone had a great holiday and happy new year ! Not much progress on the build front. I have tried ( unsuccessfully ) for the last couple of weeks to remove a nasty bend in my X-axis lead screw I did not notice till after assembly. :banghead: So my machine has been torn apart and put back together a number of times as of late. In the end I ditched the 8mm leadscrew. I mostly got tired of trying to fix the bend lol.

    Here is what I came up with. I still need to tear the machine apart and reassemble everything, however I needed it to be at a certain point for prototyping the new parts. Original x-axis Nema 23 now with a 20 tooth 3GT pulley, two smooth idler wheels mounted to a new custom rear x-axis plate. I am using a 3d printed drop in place belt clamp that is mirrored for left / right placement. The one side gets mounted secure to the y-axis side plate using default mounting threads. The opposite side requires the belt to be clamped in place first and then the same mounting points are used to tension the belt. Belt in question is a 3GT 9mm wide belt. Everything mounts cleanly inside the center track of the c-beam linear actuator.

    00.jpg
    01.jpg
    02.jpg
    03.jpg
    04.jpg
    05.jpg
    06.jpg
     
  15. Anthony Bolgar

    Anthony Bolgar Journeyman
    Builder

    Joined:
    Jan 14, 2016
    Messages:
    354
    Likes Received:
    198
    Nice solution Kyo!
     
    Mark Carew and Kyo like this.
  16. Marcjwebb

    Marcjwebb New
    Builder

    Joined:
    Dec 19, 2017
    Messages:
    14
    Likes Received:
    1
    I noticed on your smaller build that you didn't use 1mm washers for the nut blocks, but on this build you did, how come? any reason important?
     
  17. Giarc

    Giarc OpenBuilds Team
    Staff Member Moderator Builder Resident Builder

    Joined:
    Jan 24, 2015
    Messages:
    2,892
    Likes Received:
    1,609
    He hasn't been on this forum for about a year- and we miss him - but I would assume that he designed his plates to where the screw mount is lined up in such a way they are unnecessary.
     
  18. Rick 2.0

    Rick 2.0 OpenBuilds Team
    Staff Member Moderator Builder Resident Builder

    Joined:
    Dec 20, 2013
    Messages:
    2,852
    Likes Received:
    1,524
    The washers under the nut blocks is often related to having the extra washer on the wheels.
     
  19. Neil Scott

    Builder

    Joined:
    Nov 12, 2019
    Messages:
    55
    Likes Received:
    14
    Hello. I am a bit confused about the plates for use in this build, are they available to download anywhere for a fee at all please and if so can someone tell me please,. thank you
     
  20. JustinTime

    JustinTime Veteran
    Builder

    Joined:
    Dec 18, 2013
    Messages:
    755
    Likes Received:
    252
    Neil, if you have SketchUp you can find them here.
     
  21. Neil Scott

    Builder

    Joined:
    Nov 12, 2019
    Messages:
    55
    Likes Received:
    14
    Yes I can get access to that although I use Shapr3D and Fusion my son has Sketchup, thanks so much Neil
     

Share This Page

  1. This site uses cookies to help personalise content, tailor your experience and to keep you logged in if you register.
    By continuing to use this site, you are consenting to our use of cookies.
    Dismiss Notice