Welcome to Our Community

Some features disabled for guests. Register Today.

Rob's C-Beam Machine XLarge

Discussion in 'CNC Mills/Routers' started by Rob Mahan, Feb 10, 2018.
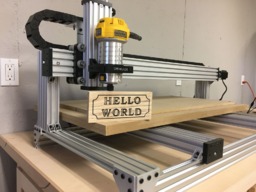
  1. Rob Mahan

    Rob Mahan New
    Builder

    Joined:
    Feb 5, 2017
    Messages:
    12
    Likes Received:
    18
    Rob Mahan published a new build:

    Read more about this build...
     
  2. TurfnSurf

    TurfnSurf New
    Builder

    Joined:
    Jan 6, 2018
    Messages:
    32
    Likes Received:
    17
    Looks sharp!
     
    Rob Mahan likes this.
  3. Scotty Orr

    Scotty Orr Journeyman
    Builder

    Joined:
    May 21, 2015
    Messages:
    315
    Likes Received:
    177
    Looks great! I use an old wood chisel to get rid of the nubs on those corner brackets (then touch up with a file if needed). That works pretty well too.
     
    Rob Mahan likes this.
  4. Rob Mahan

    Rob Mahan New
    Builder

    Joined:
    Feb 5, 2017
    Messages:
    12
    Likes Received:
    18
    Thanks! I should complete the rest of the details on my build submission in the next few days.
     
  5. Rob Mahan

    Rob Mahan New
    Builder

    Joined:
    Feb 5, 2017
    Messages:
    12
    Likes Received:
    18
    Hi Scotty, thanks for your kind words! Your tip for dealing with the nubs is great. That cast aluminum must be pretty soft.
     
  6. TurfnSurf

    TurfnSurf New
    Builder

    Joined:
    Jan 6, 2018
    Messages:
    32
    Likes Received:
    17
    I haven't tried Scotty's method, I will have to now that I know - but I have found it easy (though maybe a bit irritating) to file the corner nubs off and to cut the aluminum brackets with a hacksaw within short order - so yes, soft I agree.
     
    Rob Mahan likes this.
  7. Giarc

    Giarc OpenBuilds Team
    Staff Member Moderator Builder Resident Builder

    Joined:
    Jan 24, 2015
    Messages:
    2,892
    Likes Received:
    1,609
    I just use my disk sander on the nubs. They sand right off nice and smooth.
     
    Rob Mahan likes this.
  8. TurfnSurf

    TurfnSurf New
    Builder

    Joined:
    Jan 6, 2018
    Messages:
    32
    Likes Received:
    17
    how to do ensure squareness of the brackets?
     
  9. Scotty Orr

    Scotty Orr Journeyman
    Builder

    Joined:
    May 21, 2015
    Messages:
    315
    Likes Received:
    177
    Rob, from your notes it sounds like you've already got this thing running. Can't wait to see more details of the build! (Including cabinet and clamping system.)

    I Hope you will also include a short vid of that beauty cutting! Looks like the care with which you built it would ensure that calibration was a breeze.

    I also noticed you have a door for one of your tables (I think). I had forgotten that I have a couple of those when I was building (darn!). Ready-made torsion boxes!

    Anyway - keep it coming! Definitely a contender in the contest IMO. (I am very envious of your workshop, btw!)
     
    Rob Mahan likes this.
  10. Rob Mahan

    Rob Mahan New
    Builder

    Joined:
    Feb 5, 2017
    Messages:
    12
    Likes Received:
    18
    Hi Craig, thanks for another great tip on getting rid of the nubs!
     
  11. Rob Mahan

    Rob Mahan New
    Builder

    Joined:
    Feb 5, 2017
    Messages:
    12
    Likes Received:
    18
    Hi Scotty, yes, I've been up and running for about four months now. I did several gifts over the holidays, all 2.5D v-carving. I want to try some 3D carving soon, too. I will include a video or two of the machine in action. Thanks for your kind words about my workshop. I get a lot of enjoyment doing projects in it. And you have a sharp eye ... my two work benches have solid core doors for tops, and they've given me good service for about five years now. The top and bottom of the cabinet on which the CNC router sits are both doubled up 3/4 plywood with edge banding. I used birch plywood for the top layer of the top, and fir for the other layers. The rest of the cabinet is maple.
     
  12. Giarc

    Giarc OpenBuilds Team
    Staff Member Moderator Builder Resident Builder

    Joined:
    Jan 24, 2015
    Messages:
    2,892
    Likes Received:
    1,609
    My sander disk is 90 degrees to the table. I just make sure I hold them square to it as I sand them. It takes just a couple seconds for each. I actually did a short video of me doing it for my laser cutter build, but I haven't had a chance to write anything up yet. Here is a picture I took of a bunch I sanded all off and some where just 2 were sanded off.
    DSC_0207.JPG
     
    Rob Mahan likes this.
  13. Rob Mahan

    Rob Mahan New
    Builder

    Joined:
    Feb 5, 2017
    Messages:
    12
    Likes Received:
    18
    As of a few minutes ago, my build submission is complete! :)
     
    Scotty Orr likes this.
  14. GeoffH

    GeoffH Journeyman
    Builder

    Joined:
    Mar 11, 2017
    Messages:
    178
    Likes Received:
    106
    I built an XL last year, but I have to say I'm embarrassed when I see your great workshop, you've done a great job! You might see the state of mine :( here https://1drv.ms/f/s!AlBVQey2XMxNgSUOryS6sRDkx8UQ

    On the plus side, my modification to increase the Z by about 4" has proven to be well worthwhile and I haven't found any problems with loss of rigidity; I've also chosen Vcarve and found it to be really good, a bargain!
     
    Rob Mahan likes this.
  15. Rob Mahan

    Rob Mahan New
    Builder

    Joined:
    Feb 5, 2017
    Messages:
    12
    Likes Received:
    18
    Hi Geoff,

    Thanks, I really appreciate your kind words! I get a lot of enjoyment from time in my workshop. It's heated, and gets me through these cold Michigan winters. Thanks, too, for sharing your photos. The 3D carving projects you've done are beautiful and an inspiration for me to get going and try some!

    I saw your XL when I was researching my Z axis increase mod, and it's great to hear that you went twice as high as I plan to go with no problems. Not only do I want to be able to carve on thicker materials, but also, I want to be able to move my DeWalt router down in the mount a bit, like you have done.

    Love your cramping system, too. It looks solid as a rock!

    All the best,
    Rob
     
  16. GeoffH

    GeoffH Journeyman
    Builder

    Joined:
    Mar 11, 2017
    Messages:
    178
    Likes Received:
    106
    Hi Rob,
    Yes, the normal Z length is really too small to do much. I put the cramp bars onto locating pins secured in the spoiler board, then milled the top of the bars flat; I can remove them easily if needed to work off the spoiler board, but to be honest I've only used the clamps to date. Some of the images show my first attempt using the fixed cast clamp heads, I've improved this by routing a slot across the cramping bars and inserting an oak bar to clamp against.
    https://1drv.ms/i/s!AlBVQey2XMxNgXciEdv8MOiOXhEW
    So normally I clamp the workpiece directly but for small parts I make a jig out of MDF and clamp that.

    I'm about to install a chinese VFD spindle, hoping to program variable Spindle Speed from vcarve etc..

    Cheers, Geoff
     
    Rob Mahan likes this.
  17. GrayUK

    GrayUK Openbuilds Team Elder
    Staff Member Moderator Builder

    Joined:
    May 5, 2014
    Messages:
    1,668
    Likes Received:
    627
    Rob & Geoff
    I will be shortly starting a new build for myself, and it will be of a similar machine to your builds. But, I don't know if you've had any thoughts in the direction of keeping the chips etc away from the area between the two Y Linear Actuators, but I plan to use two short, sprung loaded roller blinds. One at the Front, and connected to the Table, and one at the Rear, and connected to the Table. I have spoken to a blind maker and they are quite happy to make me a couple of blinds in a wipe clean vinyl material, for just a few pounds each. They only need to be the width of the table, in my case 1000mm, and only about 400mm in length, to deal with the front and back travel of the table.
     
    Rob Mahan likes this.
  18. GeoffH

    GeoffH Journeyman
    Builder

    Joined:
    Mar 11, 2017
    Messages:
    178
    Likes Received:
    106
    Hi,
    Like Rob, I've had a go at keeping the chips under control. My system was 3 pieces of 5mm ply mounted vertically, like Rob's, but attached to the table with 1" sq batten, so that's 2 sides and back. It does help a lot, I could sweep out most of the chips off the table towards the open front but I did a job some time ago now where I needed to remove them for access of a large part, and they haven't gone back yet! The XL design keeps chips away from the lead screws and I'm just using a manual vacuum when I've finished a job. Good luck with you build.
    Cheers, Geoff
     
    Rob Mahan and GrayUK like this.
  19. Rob Mahan

    Rob Mahan New
    Builder

    Joined:
    Feb 5, 2017
    Messages:
    12
    Likes Received:
    18
    I like the addition of the oak bar to clamp against, Geoff. Fewer cast iron obstacles to avoid with your delicate carving bits! I hope your VFD spindle installation goes well and gives you the additional flexibility of programmable spindle speeds!
     
  20. Rob Mahan

    Rob Mahan New
    Builder

    Joined:
    Feb 5, 2017
    Messages:
    12
    Likes Received:
    18
    Hi Gray,

    Brilliant idea of the vinyl blinds to cover the two Y actuators, front and back! From your description, I can visualize your idea perfectly. I love that the C-Beams in the XL design are oriented with the opening and lead screw facing away from the cutting area. That helps to keep the Y actuator mechanisms clean, too. I look forward to seeing your new build!

    All the best,
    Rob
     
  21. Giarc

    Giarc OpenBuilds Team
    Staff Member Moderator Builder Resident Builder

    Joined:
    Jan 24, 2015
    Messages:
    2,892
    Likes Received:
    1,609
    Geoff, that is truly a brilliant clamping system. I may try something similar.
     
    Rob Mahan likes this.
  22. GeoffH

    GeoffH Journeyman
    Builder

    Joined:
    Mar 11, 2017
    Messages:
    178
    Likes Received:
    106
    Hi Craig, thanks for your comments. I should say that such a system can sometimes lift the workpiece slightly vertically as you tighten, so there can be a gap between workpiece and bars; this is caused by the centre of pressure differing in Z front to back. So if this matters, it takes a bit of care to make sure that the clamping forces pulls the part down and not up; so a thinner piece of oak sitting between the clamps and workpiece in my situation is normally the answer, in addition to a bit of manly downward pressure on the workpiece as you tighten up.
    Cheers, Geoff
     
  23. Mark Colasante

    Builder

    Joined:
    Dec 22, 2018
    Messages:
    1
    Likes Received:
    0
    Hi Rob:

    I really like your build. I ordered a standard size C-Beam bundle a few days ago and will be basing my build on yours, including a bit of extension to the Z axis. I'm also leaning towards the same UC100 and G540 setup from Vince. If you don't mind, I have a couple questions about your experience with that control system.

    1. From his videos, the fan is definitely loud. Is it bearable?

    2. I see you have put the controller case in your cabinet. I imagine that quiets things down, but how are you doing on temperature within the controller? Do you have the temperature auto cutoff switch on the G540 itself, and if so, has it ever cut out on you?

    3. Did you evaluate the UCCNC software for the UC100 or decide to go with Mach 3 from the beginning? I'm rather new at this and think that maybe UCCNC would be easier for me to start off.
     

Share This Page

  1. This site uses cookies to help personalise content, tailor your experience and to keep you logged in if you register.
    By continuing to use this site, you are consenting to our use of cookies.
    Dismiss Notice