Welcome to Our Community

Some features disabled for guests. Register Today.

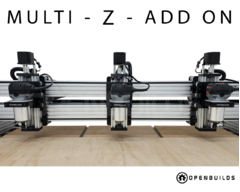
Multi Z LEAD Machine Addon

Discussion in 'CNC Mills/Routers' started by OpenBuilds, Dec 28, 2022.

  1. OpenBuilds

    OpenBuilds Well-Known
    Staff Member Moderator Builder Resident Builder

    Joined:
    Sep 23, 2019
    Messages:
    22
    Likes Received:
    108
    OpenBuilds published a new build:

    Read more about this build...
     
  2. residentdj

    Builder

    Joined:
    Dec 19, 2021
    Messages:
    24
    Likes Received:
    3
    “Man, you know what I would have if I had a million dollars? 2 Z’s at the same time, man”

    This is crazy!
     
    OpenBuilds likes this.
  3. Mark Carew

    Mark Carew OpenBuilds Team
    Staff Member Moderator Builder Resident Builder

    Joined:
    Jun 28, 2013
    Messages:
    2,746
    Likes Received:
    2,412
    @residentdj :D

    3 heads are better then 1.gif

    Throw some SharkBits on those routers, and you got yourself a 3 headed Shark. Its a Monster!!! hehehe
     
  4. OHScarve

    OHScarve New
    Builder

    Joined:
    Dec 28, 2022
    Messages:
    2
    Likes Received:
    0
    First of all, LOVE IT!

    Questions:
    1) If you add two additional spindles, do you always have to use all 3? Can you tell it to only use one or two spindles and the other one will remain above the work space and not run?

    2) How do you calibrate the z for three spindles?
     
  5. Mark Carew

    Mark Carew OpenBuilds Team
    Staff Member Moderator Builder Resident Builder

    Joined:
    Jun 28, 2013
    Messages:
    2,746
    Likes Received:
    2,412
    Since the "outriggers" ( the two outer Z axis gantry's) as we call them, are free moving and are not tied to the nut blocks on the center Z axis gantry in any way
    they could in theory just be disconnected from the back brace (20x40 V-Slot that holds them all together) and moved out to each side so you can use the machine with one router as you normally would. Note that you would lose a little cutting area on each side but should not be too bad.

    The easiest way we found to do this was to:
    1) With power off, jog all the Z axis plates up and make them even (best you can)
    2) Add the routers leaving the router mounts a little loose
    3) Take off all 3 collet nuts
    4) Jog the machine back on the Y axis (away from the front of the machine) about halfway and jog the the routers to center them in the spoilers
    5) Slowly lower the Z axis until all of router shafts are just resting on the spoiler boards
    6) Sung each of the routers in place
    7) Jog the Z axis up allowing room for a bit to be placed in
    8) Loosely add the collet nuts back on
    9) Loosely add the bits you plan on using (must be loose)
    10) Slowly jog the Z axis back down to where the bits are all resting on the spoiler boards (Just like before with the router shafts)
    11)Tighten collets
    12) Raise Z - Add material - Zero bit to the top of the material and run your job

    Hope this helps to answer your questions and thank you for the kind words we are excited to know that there are a lot of people out there who will benefit immensely by having the ability up their production with out the cost of a new machine.
     
    OHScarve and Peter Van Der Walt like this.
  6. OHScarve

    OHScarve New
    Builder

    Joined:
    Dec 28, 2022
    Messages:
    2
    Likes Received:
    0
    Sorry, another question...

    The motors for the x and y axis... will they handle the extra load with three spindles? Or would you need to beef them up?

    Thanks!
     
  7. Mark Carew

    Mark Carew OpenBuilds Team
    Staff Member Moderator Builder Resident Builder

    Joined:
    Jun 28, 2013
    Messages:
    2,746
    Likes Received:
    2,412
    No problems learning is what OpenBuilds is all about.

    No need to beef them up I am using the standard Nema 23 without any problems on the machine here at HQ
     
    OHScarve likes this.
  8. Rick 2.0

    Rick 2.0 OpenBuilds Team
    Staff Member Moderator Builder Resident Builder

    Joined:
    Dec 20, 2013
    Messages:
    2,862
    Likes Received:
    1,528
    You might take another look at the usable X width on the Z2 configuration. I'm getting 548mm not 584mm which would be just over 21.5"
     
  9. Mark Carew

    Mark Carew OpenBuilds Team
    Staff Member Moderator Builder Resident Builder

    Joined:
    Jun 28, 2013
    Messages:
    2,746
    Likes Received:
    2,412
    Hi Rick, I double checked and I am seeing 586 ~23" (couple mm buffer)
    upload_2022-12-31_8-11-23.png
     
  10. Rick 2.0

    Rick 2.0 OpenBuilds Team
    Staff Member Moderator Builder Resident Builder

    Joined:
    Dec 20, 2013
    Messages:
    2,862
    Likes Received:
    1,528
    Thanks for the clarification. I wasn't catching how efficiently you were overlapping the heads. Following that same logic though into Z3 mode, you should be able to get 15.3" using a head spacing of 390mm.
     
    Mark Carew likes this.
  11. Mark Carew

    Mark Carew OpenBuilds Team
    Staff Member Moderator Builder Resident Builder

    Joined:
    Jun 28, 2013
    Messages:
    2,746
    Likes Received:
    2,412
    Rick your the man! :thumbsup:
    I was so focused on getting 12" cut width that I over looked this on the Triple Z
    Mocked it up and it will work giving the users ~15" width of cutting per head.
    Thank you for taking a closer look at this and for sharing the feedback, I will be working on updating all the information needed.
    headspacing_390.jpg
     
    Rick 2.0 and Peter Van Der Walt like this.
  12. Mark Carew

    Mark Carew OpenBuilds Team
    Staff Member Moderator Builder Resident Builder

    Joined:
    Jun 28, 2013
    Messages:
    2,746
    Likes Received:
    2,412
    This opens the door to some cool ideas like repeating wall patterns!
    repeatingwall pattern.jpg
     
  13. Retsiel

    Retsiel New
    Builder

    Joined:
    Jan 5, 2023
    Messages:
    1
    Likes Received:
    0
    What controller are you using since you now have 2 more Z's
     
  14. Peter Van Der Walt

    Peter Van Der Walt OpenBuilds Team
    Staff Member Moderator Builder Resident Builder

    Joined:
    Mar 1, 2017
    Messages:
    14,047
    Likes Received:
    4,123
    They are run in parallel, they are not independant axes.
    That makes it a bolt-on upgrade without needing to change your electronics setup
     
  15. OpenBuilds

    OpenBuilds Well-Known
    Staff Member Moderator Builder Resident Builder

    Joined:
    Sep 23, 2019
    Messages:
    22
    Likes Received:
    108

Share This Page

  1. This site uses cookies to help personalise content, tailor your experience and to keep you logged in if you register.
    By continuing to use this site, you are consenting to our use of cookies.
    Dismiss Notice