Welcome to Our Community

Some features disabled for guests. Register Today.

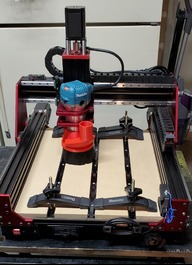
Modified Sphinx 55 with MGN12 linear rails

Discussion in 'CNC Mills/Routers' started by Wes Dwight, Aug 2, 2020.

  1. Wes Dwight

    Builder

    Joined:
    May 2, 2018
    Messages:
    7
    Likes Received:
    13
    Wes Dwight published a new build:

    Read more about this build...
     
  2. JustinTime

    JustinTime Veteran
    Builder

    Joined:
    Dec 18, 2013
    Messages:
    755
    Likes Received:
    252
    Very nice machine. I like the anodizing. Way above my paygrade. :(

    You better be careful and not cut all the way through your material or you'll hit the T-rails.
     
  3. Wes Dwight

    Builder

    Joined:
    May 2, 2018
    Messages:
    7
    Likes Received:
    13
    T-rails are 1/4" below the surface of the spoil board, so not much chance of cutting into them.
    The anodizing components werent that expensive; a 5 gallon bucket, a small 12x24" sheet of lead flashing, a gallon of battery acid, a couple of old used coffee pots and dye. The temp controllers, power supply I already had but arent too expensive.
     
  4. Rick 2.0

    Rick 2.0 OpenBuilds Team
    Staff Member Moderator Builder Resident Builder

    Joined:
    Dec 20, 2013
    Messages:
    2,852
    Likes Received:
    1,524
    Great build. A better explanation of your anodizing setup would be appreciated if you can offer one.
     
  5. Wes Dwight

    Builder

    Joined:
    May 2, 2018
    Messages:
    7
    Likes Received:
    13
    Yeah, I will update soon with more pictures and details...
     
  6. Wes Dwight

    Builder

    Joined:
    May 2, 2018
    Messages:
    7
    Likes Received:
    13
    The anodizing setup consists of the following (pictured below - from right to left);
    A 30V/10A constant current power supply, the anodizing tank, a bucket of water and baking soda (not pictured), two temperature controlled 30 cup coffee makers (thermostat disabled) and a distilled water squirt bottle (also not pictured).

    20200802_160238.jpg

    The Anodizing tank is 3 gallons distilled water and 1 gallon battery acid (picked mine up at O'Riley Auto Parts)
    20200802_160546.jpg

    There is a 12 inch x 24 inch x 1/32 inch lead sheet cut in half to the last one inch at the top, then along the top till 2 inches from the end.
    This provides nearly full tank coverage for the cathode (-) and enough of a strip of lead to hang outside the tank and clip the power supply to.

    20200802_160256.jpg

    I use an old aluminum bar as the hanger for my parts. Parts are suspended from a strip of aluminum wire that is folded at the ends and jammed into holes in the part being anodized. The anode wire (+) is then clipped to this.

    I place the aquarium pump in the bottom of the bucket with the nozzle pointed down for circulation and bubbles around the parts.

    Once everything is in place and properly connected, I turn on the power supply and slowly adjust the current to the calculated value for the determined amount of time.

    There are lots of YouTube videos that go over the basics of anodizing. Some even use a simple car battery charger set at 2A. But I was using "Caswell's 720 method", based on the square ft. surface area of the parts (simple Google search for details).

    After the determined amount of time in the anodizing bucket, I would rinse the part off with distilled water and then dip it into the baking soda and water bucket to neutralize the acid for a couple minutes. Then I would rinse with distilled water again before placing in the 140 degree F dye bath (coffee pot).

    The dye is usually made up in 2 gallon batches that I store in carboys (at room temp). I fill the coffee pot with the amount I need to cover the part and heat it to 140 degrees F (60 degrees C) for approx 15 min (or till color density achieved). So far I've done "Fiery Red" and "Jet Black" colors. The coffee pots were picked up on Amazon and at the local swap meet. The thermostat in the coffee maker needs to be disabled (bypassed), otherwise it wont continuously heat when the temperature control is running.

    20200802_160352.jpg

    After approx. 15 min in the Dye tank, I transfer the part to the sealing tank. This is another coffee pot (thermostat removed) with distilled water set to 95 degrees C (near boiling).
    I leave it in the tank for 10 minutes, then pull it out and let it cool.

    Using this setup I was able to anodize all my plates (from Chris), including the tall Sphinx side plates.

    Anodizing isnt terribly hard to do, its mainly organizing and planning for the steps, and making sure the baths are at the correct temp when you need them.

    One thing I should mention is that the parts need to be thoroughly cleaned before anodization. Using a good degreaser and distilled water (while wearing nitrile gloves to keep finger prints off the part) helps. Sometimes I needed to scrub two or three times to get a good water break.

    Also should mention that you should make sure you have adequate ventillation. The bubbling action in the sulfuric acid solution can cause the solution to mist in the air. I usually operate with the bucket covered and do it in the garage. Be careful, the misting action will cause the bottom of the lid to collect droplets and if you take it off to check on it, be careful not to get it too near your clothing (lesson learned, that pair of jeans is now my "garage clothes")...

    Feel free to PM me if you have any further questions or need help locating or operating (if you choose to try)

    Be safe
     
    #6 Wes Dwight, Aug 2, 2020
    Last edited: Aug 2, 2020
    JustinTime and Rick 2.0 like this.
  7. Wes Dwight

    Builder

    Joined:
    May 2, 2018
    Messages:
    7
    Likes Received:
    13
    This was the Z-Axis (4 hole mount) top plate from Chris. I love how red it got.
    This was my 6th run with the red dye and the color is almost as bright as the first run.

    20200717_205103.jpg
     
    #7 Wes Dwight, Aug 2, 2020
    Last edited: Aug 2, 2020
    Mark Carew likes this.
  8. Rick 2.0

    Rick 2.0 OpenBuilds Team
    Staff Member Moderator Builder Resident Builder

    Joined:
    Dec 20, 2013
    Messages:
    2,852
    Likes Received:
    1,524
    Excellent explanation. First time I've seen the process shown so simply. Thank you very much for posting it.
     
  9. Peter Van Der Walt

    Peter Van Der Walt OpenBuilds Team
    Staff Member Moderator Builder Resident Builder

    Joined:
    Mar 1, 2017
    Messages:
    13,675
    Likes Received:
    4,057
  10. Gilles Papet

    Builder

    Joined:
    Apr 7, 2021
    Messages:
    4
    Likes Received:
    0
    Hello Wes Dwight,

    First congratulation for your build.
    I have one question for you : Do you still use 8mm trapezoidal lead screw with plastic anti backlash nut or not ? If yes, can you tell me if this solution is robust enough according to you ?

    Thank you.
     
  11. Wes Dwight

    Builder

    Joined:
    May 2, 2018
    Messages:
    7
    Likes Received:
    13
    Hi Gilles,

    I apologize for the delayed response, I dont get notifications of replies to the board, so I didnt see your question.
    As to the 8mm lead screw and plastic anti-backlash nuts, yes, these were used on this build. I havent seen any problems with them as yet, but I havent dealt with many materials beyond softwoods as yet.
    Hardwoods are coming and Im hoping to try Aluminum once I get better at design and toolpaths.

    Sorry I couldnt offer much more insight than that, but hopefully someone else see this post and can provide their input...

    Wes

     
  12. Gilles Papet

    Builder

    Joined:
    Apr 7, 2021
    Messages:
    4
    Likes Received:
    0
    Hello Wes.
    Thank you for your reply.
     
  13. Corey Corbin

    Corey Corbin Well-Known
    Builder

    Joined:
    Feb 27, 2016
    Messages:
    135
    Likes Received:
    62
    I have a similar build and have done nothing but aluminum and a few pieces of wood. I have cut and pocketed and crashed and got the bit stuck in the aluminum piece. The OB anti backlash and lead screws are holding up. Here is a pic link to some scrap. I don't want to clog Wes Dwight thread with my pics.
    IMG-2032
    Box of scrap, not all but half of this scrap was cut with OB lead screws.
    IMG-2033
     
    #13 Corey Corbin, May 30, 2021
    Last edited: May 30, 2021

Share This Page

  1. This site uses cookies to help personalise content, tailor your experience and to keep you logged in if you register.
    By continuing to use this site, you are consenting to our use of cookies.
    Dismiss Notice