Welcome to Our Community

Some features disabled for guests. Register Today.

M4: 1510SS Heavy Mk.I

Discussion in 'CNC Mills/Routers' started by Rob Taylor, Aug 22, 2020.
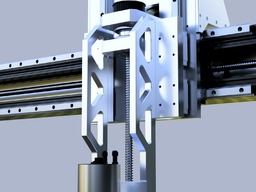
  1. Rob Taylor

    Rob Taylor Master
    Builder

    Joined:
    Dec 15, 2013
    Messages:
    1,470
    Likes Received:
    746
    Rob Taylor published a new build:

    Read more about this build...
     
  2. Rob Taylor

    Rob Taylor Master
    Builder

    Joined:
    Dec 15, 2013
    Messages:
    1,470
    Likes Received:
    746
    Well, I've alluded to it for long enough. Finally finished the model enough for my purposes last night, so it's time to pull the cloth off this thing!
     
    Mark Carew and Giarc like this.
  3. Giarc

    Giarc OpenBuilds Team
    Staff Member Moderator Builder Resident Builder

    Joined:
    Jan 24, 2015
    Messages:
    2,892
    Likes Received:
    1,610
    I love the built in lathe. I had considered something similar with my current modifications to mine, but chose do do a stand alone.
     
  4. Rob Taylor

    Rob Taylor Master
    Builder

    Joined:
    Dec 15, 2013
    Messages:
    1,470
    Likes Received:
    746
    Yeah, I'm partial to it. :D I'd love to be able to run it like a mill-turn, but at 80:1 reduction on the Harmonic Drive to hit reasonable torque/stiffness figures, even the ~1000rpm max speed on a stepper would be 12rpm. A 5000rpm servo would get me to 60rpm, which would put me in the ballpark of the low speed on most gearhead lathes for threading, but with a 36mm through-bore on the chuck for bar-feeding, single-point work (even assuming a servo-drive spindle or solid mounting block on the Z axis) would be extremely limited in terms of usable surface speed. Still, I do get to use it as a live-tool-only lathe, which isn't the worst thing in the world. And the way the spindle mounting is set up, it wouldn't be completely infeasible to add either a secondary horizontal spindle or a 90 degree angle head on the main spindle for face work. That could be pretty cool!

    It's definitely not a simple task- and as you can see, the base and table have to be entirely designed around its ability to run the B axis. I'll also be making an insert to allow it to have a full-area spoilboard (or perhaps, more likely, fixture table- this thing's begging for palletization) that seats and locks into the base frame for regular 3-axis work. No need to CAM or troubleshoot more complex operations if it's not completely necessary. But having the ability to turn a full 18x48" cylinder under the gantry allows for a ton of flexibility- including potentially even adding a 5th axis trunnion that could probably have an 8" platter without coming close to any space limitations! That's huge compared to the normal, what, 3" unit that's usually sold for gantry routers? Might have some torque/power limitations though.

    Sometimes additional machines are just the way to go though. Multitasking is better if you have the space and power available!
     
  5. Corey Corbin

    Corey Corbin Well-Known
    Builder

    Joined:
    Feb 27, 2016
    Messages:
    135
    Likes Received:
    62
    Awesome design! I like the double C-Beam setup for the X axis talk about being rigid!!
     
  6. Rob Taylor

    Rob Taylor Master
    Builder

    Joined:
    Dec 15, 2013
    Messages:
    1,470
    Likes Received:
    746
    Thanks! Yeah each axis rail is a pair of C-Beams in opposition, spaced on the ends by pieces of 2060 V-Slot, and held in place on the back side by an aluminum plate and on the front side by the linear rail and carriage plate system. Should be super rigid. Not sure it'll be steel-capable, even so, but I might try some small stuff with low cutting forces. Depends how well the spindle performs around the 6000-8000rpm range, which is basically the standard maximum for steel due to SFM constraints but the spindle minimum and probably isn't even close to peak power.

    It would be nice if I could find some HSM strategies that allow me to use the full spindle speed range so I can push the 8,000-10,000mm/min/300-400IPM that this thing can run with steppers. Assuming that either the spindle or the stepper motors can actually manage to maintain just enough torque to provide sufficient power at those speeds and feeds to the cutting edges. It may be that my MRR ends up being like, 0.5cuin/min so all the rigidity in the world is useless because it can't be brought to bear with sufficient power on harder materials.

    Such is life in machining. :rolleyes: HSMAdvisor is pretty cheap though, so I'll probably end up playing with that eventually. They have this intriguing little article, I'll have to check the related video out: HSM Machining
     
  7. phil from seattle

    phil from seattle Journeyman
    Builder

    Joined:
    Mar 17, 2017
    Messages:
    312
    Likes Received:
    137
    This looks like a well thought out design. A couple of questions/observations.
    - The Z axis looks pretty long (to get the 12" cut depth, I presume). Have you modeled the flex from that?
    - how rigid are the C-Beams? My little C-Beam machine is not the stiffest machine by far.
    - What controller are you going to use? (insert pitch here for grblHAL:) }
     
  8. Rob Taylor

    Rob Taylor Master
    Builder

    Joined:
    Dec 15, 2013
    Messages:
    1,470
    Likes Received:
    746
    Haven't modelled anything yet- literally just finished the model and ran the renders before posting, and I'd had enough of Fusion's single-threaded capabilities for a while. :D May do a separate file just for FEA on the Z axis, wouldn't be a bad idea.

    Currently what I know is that it's about 450mm from the collet face to the center of the Z carriages. That's a hefty leverage. And the height of the (500mm) Z rails from the gantry beam is probably in the same area, maybe 350mm. However, I resisted doing fixed carriages/moving rails, because not only would there be a slightly more inconsistent flex, but it would be at its lowest rigidity right at the bottom of the travel, where the hardest materials are likely to lay. So I kept the fixed rail with the mounting point at the bottom.

    Anything being machined that's ~6-10" thick is almost certainly going to be some kind of foam, maybe some solid urethane, but that's about it. In this design, that's where the two leverages combine for the lowest rigidity as a V-flexure. For most everyday use on aluminum and hardwoods, the Z and X carriages are side-by-side, the only leverage is the spindle mount, which is a pair of 15mm thick (faced from 5/8" bar) supports. I think it should be good. :nailbite:

    I had concerns over the length of the extrusion, but doubled up, plus the backing strap and the linear rails themselves, I'm doubtful it should have any issues. If there are, they'll show up when I do the FEA, I guess, but from what I've seen of other people's work on it, I see no reason currently to be overly concerned. There are plenty of commercial routers out there running longer gantries with 7-15kW spindles and doing just fine with extrusion.

    This is the machine I was talking about re: grblHAL a few months ago, and I did reconsider it again here recently, but because I already have a machine running LinuxCNC+Mesa, I kinda just wanna keep things uniform. Gives me backup hardware when needed, etc. I still think it looks like a great system and anyone who wants to try "real" capabilities for grbl prices should absolutely try it. If I ever make that mini desktop 5-axis that keeps floating around in my head from time to time, grblHAL would be perfect for it.
     
  9. Rob Taylor

    Rob Taylor Master
    Builder

    Joined:
    Dec 15, 2013
    Messages:
    1,470
    Likes Received:
    746
    Ok, did some super basic fully-rigid simulations just to test the overall geometric layout of the Z axis per my initial design:

    No sliding elements, no screws, just completely rigid full-face contact between components (which, for most of these components and the amount of screws or rolling elements involved, probably isn't too far off). Cutting force used is 100N (~24lbf) straight into the side of the collet. I wasn't too worried about the variations of tangentialism- as the cutters get smaller, the difference tends toward zero anyway.

    A 2.2kW, 24,000rpm spindle runs just under 1Nm peak torque (at what RPM, I don't know, probably about 15k?) which is going to be able to supply around 200N to the cutting edge of a 3/8" end mill. based on my cursory research, typical higher-feed, higher-DoC/WoC, lower spindle speed, "standard" machining operations in 6061 produce around 300-700N of cutting force at the tool. The high-speed operations that extrusion machines perform are unlikely to reach anywhere near these numbers. Looking more at 10-20% stepover instead of 75%, etc etc. So 100N seems reasonable as high-end-but-not-a-worst-case-scenario.

    So, with that context, the results!

    First, low-Z ("high rigidity"):

    M4FEA_lowZ-disp.JPG


    0.14mm! That's a lot. But wait... Most of the structure is blue- 0 to 15 micron. It's only at the narrowing of the arms that it starts rising up into the aqua. Well, guess I'll have to work on that bit then. No worries.

    M4FEA_lowZ-strain.JPG

    The strain view backs this up. Seems odd that 100.0162% elongation over a few cubic mm could lead to the drastic offset we saw in the first pic, but there it is.

    Now for the top of the axis! The scary bit.

    M4FEA_highZ-disp.JPG
    Only a six micron difference?! I'll take it! The extra motor mount plate and huge gusset plates doing the job I had thought they would, clearly. The V-Slot will be screwed in along its length on both sides, so the simulation isn't inaccurately adding additional connection there. I just didn't bother putting most screw holes in to the "does this thing physically work?" design. I'll add them when I derive all the parts into new files for CAM.

    M4FEA_highZ-strain.JPG

    Strain view supports it- those six microns appear to be at the top of the rail column, from the deformation visualisation, and while some of the rear plates are obviously taking the load as designed, most of the strain is still concentrated at the actual spindle mount, nowhere in the axis assembly itself. Which is great!

    Interestingly, the peak strain is noticable lower in this position, presumably because of the additional flexure being provided by the axis, but I'm not 100% sure how (the simulation should surely "press" until everything stabilizes? Which is 1.000162x longer for that particular stretch of aluminum in the spindle arms... Maybe because I had to move the force location between simulations, just an experimental design error).

    Anyway yeah. Bit of spindle arm design tweaking that honestly I assumed was gonna have to happen anyway, but otherwise rock and roll! Might have to sim the gantry columns too, make sure that big ol' 1-1/4x2" or whatever bar stock I put on there was sufficient to help out the single C-Beam (almost certainly yes).
     
    phil from seattle and Giarc like this.
  10. Rob Taylor

    Rob Taylor Master
    Builder

    Joined:
    Dec 15, 2013
    Messages:
    1,470
    Likes Received:
    746
    Moved on to the gantry/X-axis, because

    concerned me. (spoiler alert: he's correct)

    Welcome to my brain over the last 24 hours...

    As-designed, with fixed ends, under ~100N of radial force at the cutter (probably ~140N of tangential force, from the charts I've seen), the C-Beams look like this:

    M4FEA_lowZmedX_disp3.JPG

    M4FEA_lowZmedX_disp2.JPG

    That's pretty excessive- almost 0.3mm/0.012" of displacement at the tool. It's not gonna break anything, in all likelihood, but it's not gonna be happy either.

    Now, 100N is a little on the high side- for trochoidal milling, high speed machining, low-stepover strategies, whatever you wanna call it, aluminum seems to sit in a 20-70N range at ER-spindle speeds with normal-size tooling- think 3/8" end mill, 1/4" DOC, 0.003" chipload, 0.035" radial engagement, about 15,000rpm, 5000-6000mm/min (I make no apologies for my rampant inconsistency of unit systems... Blame the '90s UK education system and, well, America)- not necessarily those numbers precisely, but that general ballpark, which is crazy for a hobby router but perfectly normal for other machines (DATRON maybe?).

    This is according to my semi-cursory research, which turned up a few different journal articles looking into machine optimization and simulation. Terms like "machining force modeling", "milling cutting force calculation clamping", and "milling cutting force coefficients". Turns out, researchers like finding coefficients, and industry types want as little clamping as possible, so there's a lot of focus on the topic once you nail down the right search terms.

    Anyway, for hard woods (say red oak), it's more like 5-50N. Other stuff it's obviously significantly less. So my testing is somewhat extreme, which is the point, but not "I expect mill performance from a router" extreme, which is a recipe for failure. Running slowly in non-ferrous metals is not the end of the world, as long as the cuts are precise and with good surface finish.

    So, first test. Stick a big aluminum bar across the bottom that stops it buckling in the Y axis:

    M4FEA_lowZmedX_disp_BottomBarStrap.JPG

    Wildly unimpressive. Didn't stop nuthin'. 0.02mm of improvement. Wait. Am I actually modelling the V-Slot right? What's that stuff made from, anyway, and is Autodesk's "Medium Alloy Aluminum" model remotely accurate? Well, Google says it's 6063-T6, which would make lots of sense, but Fusion doesn't have it (wut). Is there something that's pretty close in terms of bendiness? After a few stabs in the dark, turns out, 5052-H32 is relatively close:

    M4FEA_lowZmedX_VSlot5052comp.JPG

    ...Good enough for the lazy modelling we're doing here. Onwards!

    M4FEA_lowZmedX_disp_BottomBarStrap_5052H32-VSlot.JPG

    ...Absolutely no difference. Guess "Medium Alloy Aluminum" was pretty close after all, my assumption was good.

    Next idea! Steel is 3 times the rigidity, albeit at the expense of 2.5 times the weight. So how about a big ol' steel box section on the bottom instead, and going all the way across instead of just trying to reinforce the center? eBay only seems to have 304 stainless in 1x3x1/8" or any other reasonable size in the neighborhoud, so we'll go with that:

    [Picture Not Found]

    Ok, I didn't screenshot that one, because I was somewhat underwhelmed and immediately decided "what if 3" x 1.5" x 1/4" angle iron were better?" I think it was 0.195mm of max displacement.


    M4FEA_lowZmedX_disp_Bottom1018Angle.JPG

    So yeah no absolutely not. Back to stainless rectangles. I probably need another one on top, but don't have much space. How about a 1.5" x 0.5" x 1/16" section?

    M4FEA_lowZmedX_disp_BottomBoxTopMiniBox.JPG

    Down to 0.18! Getting somewhere. Gonna need a full size box on top though, guess I'll suck it up and move half of the Z axis to give it room:

    M4FEA_lowZmedX_disp_TopBottomBox.JPG

    Only 0.05mm of improvement, but look how not-green the top of the Z axis plate is! Hmm. Well, at this point, I'd probably be better off fixing the Z arms:

    M4FEA_lowZmedX_disp_ThickerArms.JPG

    Ok it's a halfass fix, I admit, and the top of the Z got greenish again, but barely even 0.1mm of total deflection! And remember, this is cutting aluminum with ludicrous feeds and speeds by router standards with a 3/8" end mill in a 2.2kW spindle at the end of a 14" long lever! Once I make a proper design for those arms, we'll be in business.

    ... Now I gotta transfer all those changes back to the original model. And look for the most cost-effective way of sourcing ~90" of stainless rectangle tubing on eBay! Wait: Just found mild steel in the right size. That's good! Wonder if the simulation holds up...

    Upside: I bet at some point I can fill those tubes with mineral epoxy and it'll be awesome.
     
  11. phil from seattle

    phil from seattle Journeyman
    Builder

    Joined:
    Mar 17, 2017
    Messages:
    312
    Likes Received:
    137
    Hmmm... You are definitely going down the right path. And here I'd made my mind up to buy a Pro4848. Watching this with interest might not pull the trigger on Avid.

    FYI, on CNC Zone, there are a number of threads arguing the merit of epoxy. iirc, the biggest benefits are vibration reduction and inertial mass. Though I didn't get into chapter and verse.
     
  12. Rob Taylor

    Rob Taylor Master
    Builder

    Joined:
    Dec 15, 2013
    Messages:
    1,470
    Likes Received:
    746
    This almost certainly means going NEMA 34 on the Y axes so I can kinda do whatever I want with the gantry, which isn't really a huge deal, I think, and exactly why I designed those motor plates the way I did.

    In general, I think this entire machine build is gonna cost ~$1000 less than just the mechanical machine kit from Avid with no table, electronics, controller, spindle, or 4th axis? Which is kinda what I'm going for, as stated in the original summary. A $10-15k machine for ~$3k. I think it's doable, with some care. Obviously if you dump the 4th axis, use 15mm rails instead of 20mm, rack and pinion instead of ballscrew, etc, you can bring it way down from there.

    I read about ~70 pages of the main epoxy granite thread a couple years ago, but that's it so far. From what I recall, this page is actually a great summary without all the back and forth: CNCCookbook: Epoxy Granite Fill

    Vibration is the main thing I'd be looking at on a gantry like this. Obviously more mass isn't really better here, but trying to reduce it's ability to be one giant tuning fork would be good. Aluminum is the worst for that. A couple filled beams on the columns wouldn't be the worst idea either, but the columns are really temporary at this point. Once the machine's working, I can use it to cut out much better columns with multiple skins and internal ribs and all of it.
     
  13. Rob Taylor

    Rob Taylor Master
    Builder

    Joined:
    Dec 15, 2013
    Messages:
    1,470
    Likes Received:
    746
    Still not 100% happy with the results given that I haven't gotten to simulating the columns yet, so continued research re: torsional rigidity, and basically there are only two feasible ways to increase it.

    One, use round tube instead of square tube. Obviously we all know round tube is more rigid than square tube, that's engineering 101. The problem comes with trying to attach it to rectangular extrusion with no convenient way to machine flats into it:

    M4_RoundReinforcement.JPG

    Epoxy and machined brackets would be the way to go, I suppose, but then screwing the things in becomes an issue. It's a tricky spot.

    The "better" way of doing it is internal diagonal bracing, which I originally found in this paper from DuPont about GRP products: http://www.engpolymer.co.kr/design/design_data/ribs.pdf

    DuPontDiagonalBracingPaperFEA.JPG

    Which makes a lot of sense. Any twist will be attempting to both stretch and compress the internal bracing and not just twist it across its weakest dimension like it does to the tubing skin. This is also easier to connect to the C-Beam. The problem is mainly actual fabrication- can it be TIG stitch-welded without severe distortion, since it can't be heat-treated and machined down (though it would fit diagonally on the bed if an un-reinforced gantry could lightly surface it with reasonable accuracy using HSS tooling). I don't have a large precision fixture table for welding, so clamping would be out; to build this structure prior to having the machine operational would be a case of measuring as I go and heat-bending everything back into place followed by hand grinding and sanding with a framing level and Dykem. Not ideal, but not impossible.

    CR Onsrud do it for their gantries, as I discovered whilst watching shop tours while working on this model. That was rather timely and gratifying.

    CROnsrudZplateWeldments.JPG

    In general though, I think this plan of attack really has to wait until V1.5 with servos, and then maybe I can pull back the V2.0 steel gantry without doing the rest of V2.0's steel framing. A V1.6, I guess. I could probably even surface grind the steel mounting beams with M4, since the Y axis travel is the same length as the X axis rails, and surface grinding is mostly a pretty low-force operation.

    In the meantime, structural tubing apparently has some deficiency that Fusion doesn't like over stainless tubing- which makes no sense because it has both a superior profile (rounded corners) and a slightly higher shear modulus- which put the model back at 0.12mm of deflection even with the ends locked and an adjustment of the spindle arms:

    M4FEA_lowZmedX_disp_TopBottomBox2_FixedEnds.JPG

    But I noticed on this one that the spindle arms weren't just buckling at the mounting plate; their offset mounting point on the carriage plate was inducing a moment about the rail (or the corner of the carriage, or the rail mounting plate...) that was twisting the arms into their weaker orientation and allowing them to distort more than they should. Since 2" square arms aren't really feasible, this simple reinforcing plate did a substantial job for now, and I'll continue to ponder the arms themselves as I go.

    M4FEA_lowZmedX_disp_TopBottomBox4_FrontPlate.JPG

    Obviously the floating Z screw gets in the way of a lot of this whilst not being visible in this model, so it's hard to work around. It should provide just a tiny bit of added rigidity though, since it's relatively short and through a double ball nut.

    In the meantime, 0.1mm deflection of a 350mm lever is 0.0164°, or just under 1 arcmin. Which just happens to be the rated standard accuracy of the Harmonic Drives I have (they're both SHG-32s), interestingly enough. But I think the roughing end mills are gonna survive. :ROFL:

    Guess I'm buying steel tube and more NEMA 34s for now.
     
  14. Rob Taylor

    Rob Taylor Master
    Builder

    Joined:
    Dec 15, 2013
    Messages:
    1,470
    Likes Received:
    746
    Tried an alternate C-Beam layout a little while ago, but it doesn't work:

    M4FEA_rotTop_brackets.JPG

    I thought tying the top front to the bottom rear should help cancel each other out, but it just seems to encourage more twist. So, still sticking with the original plan.

    The table is built! 2x10 beams and 2x8 joists per the model, 6x6-36" legs cut from some beams I've had laying around for a couple of years for a project like this.

    Photo Sep 22, 08 46 23.jpg

    Had to build it upside down on some melamine dangling off the edge of a bench. It was the only way I could get anything even approaching flatness.

    Photo Sep 22, 09 36 16.jpg

    When you build a 200lb table, hoisting it off the bench and moving it around is MUCH easier when you can actually get inside the joists near the center of mass. A+ strongly recommend.

    Photo Sep 22, 10 01 24.jpg

    In place, taking up the last bit of room I could clear for anything in the shop. Everything else is either storage or walking space now.

    Photo Sep 22, 12 31 33.jpg

    Put some of the melamine down as a temporary work surface (the mill is immediately behind me here) and got the components I have so far up off the floor. Gonna add more 1/4x5" SPAX lags to the legs, I think I want three in each. Flatness seems to be comfortably within 1/16" (maybe 1/32"?) so almost falling off the bench while clambering around was clearly worth it.

    I'm sure I'll end up adding runners and additional shelving under there, but I want to be sure I have all the electronics squared away first, since there's no space to fit anything outside the envelope of the machine. Hopefully I can make some kind of screen/keyboard control panel on a swiveling arm, somehow, or setting up whilst moving around the entire perimeter might get inconvenient.
     
    phil from seattle likes this.
  15. phil from seattle

    phil from seattle Journeyman
    Builder

    Joined:
    Mar 17, 2017
    Messages:
    312
    Likes Received:
    137
    The deflection is a consequence of the long Z axis - hard to overcome leverage of a long arm. It's hard to tell but some of the flex looks to be in the Z assembly rather than the gantry.

    Probably not relevant here but this article intrigues me. I don't know how much more rigidity one could get but the premise of lighter and stronger seems like a winner.

    And, that table seems like deja vu to me. Building a table is something I find myself doing all too frequently. But wood has such nice dampening characteristics.
     
  16. Rob Taylor

    Rob Taylor Master
    Builder

    Joined:
    Dec 15, 2013
    Messages:
    1,470
    Likes Received:
    746
    Oh for sure. No getting away from that with a long-Z machine. I use the top of the Z rails as a metric for the gantry twist, since the bottom of the spindle doesn't really mean a whole lot in practice. Here it's 0.06mm and on the better version above it's only 0.03mm, so this arrangement is literally twice as bad, torsional-rigidity-wise.

    It does tie into my research above about truss-type structures and the "recti-diagonal" rigidity ideal, for sure. It's hard to do without a machine to do it with, though. If I had a surface grinder most of my work would be unnecessary!

    Isn't it? I pretty much have a standard pattern at this point. My machine tables are built one way, benches another slightly lighter-duty way, and that's basically it for everything. Rinse and repeat. Works well though. Only difference here was the size- normally they're only 2ft deep, the ~51" was a bit of a challenge.

    And yeah, given the option I'd probably do some kind of epoxy-granite based structure, but even at currently-doubled lumber prices, this is at least an order of magnitude cheaper and I'm not trying to overspend on this project, however it may seem externally. :ROFL: I haven't decided what I'm gonna do for the top yet- MDF for better damping, melamine for better coolant resistance, or hardwood plywood for better general strength.

    No enormous hurry right now though. Spindle's on its way- went with G-Penny, since they seem to get consistently positive discussion- but still haven't got the last two steppers, VFD, power supplies or Mesa cards. Main thing next is to buy all the aluminum plates, I've got as far as making a list of them all but that's it! That... Might be everything that's left, actually. This thing is seriously underway! It was slowed a little by the additional Harmonic Drive (but it was the right one in great condition at a nice price) and some more money I just threw at the laser, but it's solidly on track.

    After my experience with the mill the last week or so, I think I'm gonna buy a single 1200mm or thereabouts glass scale and use it to calibrate this thing. They're so cheap now, and I already have the DRO head. Reinstalling those on the mill just cut short months of occasional tweaking with insufficient tools like digital indicators and vernier calipers. You get 0.01mm accuracy- or as much as the screw/mounts will allow- in 2-3 iterations that takes all of ten minutes and an instant, exact readout of backlash that you can type straight in. Worth every penny of the $50-150 those scales cost. I think I'm gonna leave them permanently installed on the mill for convenience, but I don't think that's really necessary for M4.
     
  17. phil from seattle

    phil from seattle Journeyman
    Builder

    Joined:
    Mar 17, 2017
    Messages:
    312
    Likes Received:
    137
    Where did you order the Spindle from? Same for the VFD. Watching your build but kind of still set on an Avid Pro4848. But, I can't get serious until I clean up the target garage bay...

    Very interested in your glass scale calibration work. Please post when ready!
     
  18. Rob Taylor

    Rob Taylor Master
    Builder

    Joined:
    Dec 15, 2013
    Messages:
    1,470
    Likes Received:
    746
    Found them on AliExpress, Googled around and found a bunch of posts all over the place talking about them, nothing negative to say that I could see. Seem to be an OEM rather than a reseller, which is nice.

    The extra money might be justifiable on a ready-to-assemble kit. Hard to be sure from this side of the process. Ask me again after machining 37 blocks/plates! :ROFL:

    Hahaha, sounds familiar.

    I think I might actually do videos again on this machine, like the laser, since this is a somewhat unusual machine and might be of interest, unlike yet-another-mill-conversion. I want to cover some stuff that I didn't/haven't covered in depth there like proper frame tramming, and glass scale calibration is definitely a good one.

    Plus I've had a Tascam DR70D and a Sennheiser G4 lav set basically sitting around for a year waiting for me to be ready to continue and I really need to put them to use! :oops:
     
  19. phil from seattle

    phil from seattle Journeyman
    Builder

    Joined:
    Mar 17, 2017
    Messages:
    312
    Likes Received:
    137
    I prefer to do it myself in general but something like that would take me about 2 years to approximately never. It's never really about saving money, TBH, it's about the challenge.
     
  20. Rob Taylor

    Rob Taylor Master
    Builder

    Joined:
    Dec 15, 2013
    Messages:
    1,470
    Likes Received:
    746
    G-Penny spindle arrived! Interesting technique on the "balancing" of the ER 20 nut, but I suppose that's what they're working with at the price point. Other than that, it's beautiful! Looks exactly like the picture, super smooth rotation. Shipped in 5 days from Shanghai.

    Photo Sep 30, 16 20 33.jpg

    Came with two collets, a 6mm and an 8mm, which seems like one more than usual, so that's nice. I have a full imperial set for the mill too, I'm sure there'll be some shared tooling but I'm probably gonna need to get several more ER20 sets, maybe some 1/2" shank ER11/ER16 holders just so I don't constantly have to change out the collet. Once you're used to even manual toolchanging and presetting, it's so hard to go back!

    Weighs in right at 5,560g, or 12.2lb, which... Ain't nothin'. The machine should handle it, though. It's actually a similar size to my (non-powered) BT30 spindle, which it's currently sharing a toolbox drawer with:

    Photo Sep 30, 16 21 06.jpg

    ...Admittedly, 1/6th the price.

    I need the VFD, the water pump, hose and motor/power cables before I can actually test it. I wasn't expecting it until next week, haven't ordered them yet!
     
    Giarc and Corey Corbin like this.
  21. phil from seattle

    phil from seattle Journeyman
    Builder

    Joined:
    Mar 17, 2017
    Messages:
    312
    Likes Received:
    137
    spindle envy.
     
    Rob Taylor likes this.
  22. Rob Taylor

    Rob Taylor Master
    Builder

    Joined:
    Dec 15, 2013
    Messages:
    1,470
    Likes Received:
    746
    Some updates, which I'd typed out before apparently missing the text box with my drag and drop and the draft didn't save for some reason.

    One, returned my Lapond performance 4kW VFD and bought a Hitachi WJ200-022SF unit instead from PRB Electronics out of Georgia. Can't recommend their service quality enough! Phenomenal communication, stayed on top of it and kept me updated from Hitachi USA/Japan over the last ~6 weeks because they've been backordered everywhere. Nice price, too. Arrived today.

    Photo Dec 11, 14 40 32.jpg

    Thing's tiny, but heavy. Seriously chunky heat sink, legit Nippon 400V caps visible inside, seems great. USB connection which apparently seems to be usable for saving/reflashing autotune parameters, which is pretty cool. RJ45 ModBus connection, some general configurable logic IO, all kinds of stuff. Feels super solid, no flimsy plastic front panels here.

    A few weeks ago I a pump that got decent reviews and came with an NPT outlet and not smooth bore or BSP, and a Gems FS-380 0.08GPM flow switch that I'm currently planning on putting on the output of the spindle cooling loop. 0.08GPM is ~18LPH, which is right about where a 2.2kW spindle needs to be according to this guy's back-of-the-envelope thermo calculation: Spindle cooling requirement, basics of calculation. - numbers seem right, even if the result seems low. I guess it's assuming 100% conductivity and a constant energy flow despite changing temperature gradient? But it assumes constantly flat-out power draw too so it's probably close enough.

    Photo Dec 11, 14 39 07.jpg

    As you can see I finished the table, that's a 3/4" birch ply top. Not sure whether I'm gonna wrap it in aluminum flashing or what just yet. So far air-blast-only dry cutting has been working great on the mill, so I'm not even sure coolant will be needed here, it may be a moot point.

    Got the back rail cut (1244mm, I wanna say?) and the two inner 1500mm base rails attached. Next is to cut the "branches" that go to the Y rails. The right angle internal 1500mm base rails I'll add later on, because I'll probably have to machine some plates to connect them, not sure how much I feel like notching that table top just yet.

    Photo Dec 11, 14 43 47.jpg

    Received in piles of aluminum plate over the last few weeks, haven't yet really looked at them because I'm doing other work on the mill at the minute. But I do have an SMW 1/4" fixture plate and Mod Vise coming for the mill, which will help enormously in plate-making.

    Soon I've gotta figure out how I'm gonna get the VFD enclosed. The upside of how tiny the Hitachi is is that it'll play nice with a 12" enclosure, and a double stack of 12x12x4" boxes will actually hold it with a fair bit of air surrounding it:

    Photo Dec 11, 14 47 10.jpg

    I'd probably punch more knockouts and cover them in frequency-appropriate-gauge stainless mesh for more airflow, but I haven't decided what boxes I'm using yet.
     

    Attached Files:

  23. Rob Taylor

    Rob Taylor Master
    Builder

    Joined:
    Dec 15, 2013
    Messages:
    1,470
    Likes Received:
    746
    Ok, just spent three days aligning the Y axis rails and trimming the table and adding some leveling feet I had lying around (may have originally bought them for this project?) to get the top surface down from 1/8" cupped to less than 1/16" cupped and gravitationally level (to what standard, I'm not sure... Construction standard, I guess).

    Before alignment:

    Photo Jan 04, 14 35 45.jpg

    During alignment (which actually happened on the surface plate... REALLY wish I had a 24x36" and not a 12x18"!)

    Photo Jan 06, 11 10 30.jpg

    I had to add the additional plates in front because the C shape formed by the extrusion is extremely flexible- I could push it around by about a millimeter with no effort. I'm currently contemplating bringing the screws entirely outside of the rails in a more traditional configuration- the column plates are kinda up in the air anyway, easy enough to adjust accordingly- and using full 2060s on both sides with a ton of screws.

    Then I was working on the base framing again and realized the table top was... Less than optimal. I wasn't particularly concerned about the out-of-level issue, but the substantial dip in the middle and the fact that each side was out of level with each other- a twist about X, effectively- wasn't gonna work for the machine build; it couldn't get calibrated or compensated out later.

    Photo Jan 06, 14 22 34.jpg

    I considered a variety of options, including Bondo, but in the end I planed down the one joist that was high, using a 2040 V-Slot as a straight edge (I determined the other day that they appear to be within 0.002" of nominal in straightness, twist and thickness, as best I could measure) and added the leveling feet so I could easily take the twist out of the sides.That was the biggest issue, since the now-minor dip would get compensated out by workholding datum setting (eg. flattening a spoilboard). The lumber I could get at the time wasn't great.

    Photo Jan 07, 14 51 05.jpg

    Conveniently it also resulted in a level surface, might be handy for rough-aligning other parts of the machine later.

    Photo Jan 07, 14 29 05.jpg

    Gonna have to add some rubber somewhere here... The "shoes" are hard plastic, which won't go so well on a concrete floor. But at least it'll stop the legs from wicking up any more leaking rainwater!

    So, it's going reasonably well. The manual for the Hitachi VFD seems reasonably comprehensible and there's more information for setting it up online. I got a 16x14x8" box for it that had originally had a VFD in it, so it came with a bunch of primary wire, DIN rail, e-stop, etc. that should be mostly reusable.

    Photo Jan 01, 07 24 23.jpg

    $90 shipped, but when you need a steel box and have a minimum size of 12x14x8", there's not much you can do. Habitat (the source of the mill's electrical cabinet) was letting me down! But this allows me plenty of additional room to add the contactor, relay, EMI filter (pictured, up front), inlet flange plug, etc etc. I'll have more pics of that stuff when I get back to working on the electrical bits. For now I'm focusing on having a functional table, base frame and Y axis.
     
    Giarc likes this.
  24. Rob Taylor

    Rob Taylor Master
    Builder

    Joined:
    Dec 15, 2013
    Messages:
    1,470
    Likes Received:
    746
    Just made a final decision on the Mesa hardware that'll be running this build, too:
    • 6i25 PCIe FPGA Superport (HostMot/stepgen)
    • 7i76 25-pin Daughtercard (step/dir, general IO)
    • 7i74 25-pin RS422/485 Breakout (serial comms, VFD MODBUS)
    • 7i73 Serial Pendant/Control Interface (MPG interface, dedicated interface hardware (eg. override potentiometers) IO)
    For temporary linear encoder interfacing during calibration, I'll pull the 7i85 out of the mill if neither the 7i73 nor 7i74 can do 4x encoder counting. Not a huge deal there, certainly not worth repurchasing a $70 card. It won't be needed at the same time as the 7i74, so it can just go on the 6i25 P2 interface.

    $450 total, with cables, mounting hardware, shipping and some additional bits and pieces to finally finish off the install on the mill. Should be here sometime between a week and a month from now, depending on what Mesa have going on with large buyers at the minute.
     
    #24 Rob Taylor, Jan 8, 2021
    Last edited: Jan 9, 2021
  25. Rob Taylor

    Rob Taylor Master
    Builder

    Joined:
    Dec 15, 2013
    Messages:
    1,470
    Likes Received:
    746
    Short update from the last couple weeks: plate-making! Started with 1" x 3.5" cold-finished 1018 steel bar that I cut to 1mm oversize on the bandsaw.

    Photo Jan 23, 11 20 00.jpg

    Slow-going, but got there in the end. Used three 1/4" 4FL end mills thanks to the low speed; time in the cut is what counts, not material removed, and at only 2000rpm you're not removing much material. Definitely need to replace this spindle this year. Tried do use more DoC with low stepover but too much and the spindle grabs the material and pulls the head out of tram. Not a fan of these simple two-bolt tilting heads from Grizzly, and there isn't really a good spot to add more screws.

    Photo Jan 25, 14 02 53.jpg

    Coming along! The plates fit perfectly, just a little bit of jiggling and they pop exactly into place. These are the two tension end plates after op 1- op 2 is zeroed from the bottom rear corner using parallels.

    Photo Jan 29, 07 53 49.jpg

    All plates completed! Some beautiful finishes and some not-so-great finishes depending on how attentive I was being at the time. Had to lap the (mini) moving plates's center holes to size, they were about 0.05mm undersize, not sure why, but they wouldn't seat on the ballscrew shafts. Bit of time with rolled up sandpaper and spinning them on a Dremel sanding drum, no worries. They were made from some small scraps of 1/2" steel plate I had lying around and only faced on the side that would be engaging with the ballscrew nut.

    Had an accidental offset issue with the first plate, I think I thumbed a tool set button when I wasn't looking at the screen while waiting to press a feed override button, so I killed that op entirely in favor of manual drilling later.

    Photo Jan 29, 15 20 10.jpg

    Drilling template, used an extra brace plate I made cut in half to duplicate the ends with some offcuts.

    Photo Jan 29, 15 16 22.jpg

    Bottom row of holes were laid out since they're going into slots, not holes.

    Photo Jan 30, 11 26 10.jpg

    Demonstrating the final result with the Z axis screw. There's basically zero play in these fits and everything aligns perfectly, it's fantastic. Can't find the Belleville washers to go there between the moving plate and the nut though, no idea where I put them, so I may just leave them out for now until they show up. I don't think they're strictly necessary, just help even out the tension and absorb shock loads without transferring to the frame. There's enough thread on those M12x1.25 screws to just pull the moving plate all the way back for now.

    Is it wildly overcomplicated to hold a ballscrew in place? Maybe, but it's awesome. I think I'm gonna add some grubscrews to the sides to absolutely ensure the screw can't spin under load- no reason it should want to considering the relative coefficients of friction, but I like belt'n'braces where possible. I may add some other side-holes to the end plates to allow straps onto the extrusion, or attachments like a drag chain carrier, I haven't decided yet.

    I also think I'm gonna have to paint them, since they're bare carbon steel, which isn't gonna do too well in a frequently damp basement shop. I think I have leftover paint from the mill chip pan, so I may just go with that. I'll probably have to keep the interfacing surfaces oiled, since there literally isn't enough clearance in the fit to allow for a coat of paint.

    Once I figure out what I'm doing though, next up is Y axis carriage plates and possibly rotating nut assemblies, unless I do all three of those at the end.
     
    Giarc and sharmstr like this.
  26. Corey Corbin

    Corey Corbin Well-Known
    Builder

    Joined:
    Feb 27, 2016
    Messages:
    135
    Likes Received:
    62
    Nice!! I'm still intrigued with double C beams. I like you solution for the end plates and ball screws. Simple but looks strong.
     
  27. Rob Taylor

    Rob Taylor Master
    Builder

    Joined:
    Dec 15, 2013
    Messages:
    1,470
    Likes Received:
    746
    Yeah the double C-Beams are interesting. On these Y rails, the connected ends act as a flexture joint, so the middle can deflect enormously. But once it's screwed down to the base every ~500mm, it gets far more rigid. Combined with the 300x160mm quad-carriage footprint, I doubt it'll be able to move too much in the end; the carriage flanges would force the bottom C-Beam to actually fold in on itself to move the top beam, which should be almost impossible. 20mm linear rail can take thousands of pounds of force without budging (well, when it's mounted on steel, anyway). I'm happy to give up a foot of Y travel to get proper rigidity there, that was designed in from the very beginning.

    But on the X axis gantry, the lower C-Beam isn't gonna be screwed to anything along the length of it. I'll have the steel rectangle bars and the rear aluminum plate (that's now a C-channel server rack upright, found it for cheap) and the front linear rail... That should be enough on its own, but it might be difficult to stop the whole thing from twisting together. Gonna have to ponder the column connection carefully.

    These plates could almost certainly be made from aluminum and be just as strong. Maybe not the moving mini-plate which needs its rigidity, but the main end plates are probably wildly overkill as steel. I could accordion the entire axis and those plates wouldn't even notice. The dimensions are pretty self-explanatory, it'd be interesting to see someone else make them in alu and see.
     
  28. Corey Corbin

    Corey Corbin Well-Known
    Builder

    Joined:
    Feb 27, 2016
    Messages:
    135
    Likes Received:
    62
    I have been dreaming of a little larger cnc machine with a bigger spindle. I plan deploy your dbl c beam Idea. And using steel sheet of some thickness sounds like a great plan. My current machine has a 1/8in steel plate 4in wide back bone across the x axis to make it rigid. Plus 12mm linear rails across the front. I placed m5 bolts every 60mm in a zigzag bolt pattern. Recently bought 20mm rails for my new z axis. And like the stoutness of these rails and the blocks. My current machine is tad small and a bit light for milling aluminum. I would like to build a larger stout machine and be able to push it a little faster.
     
  29. phil from seattle

    phil from seattle Journeyman
    Builder

    Joined:
    Mar 17, 2017
    Messages:
    312
    Likes Received:
    137
    Would it be possible get a full picture of the dual CBeam? Or even better, a CAD rendering. I don't quite get how it goes together. [edit: scratch that. went back and looked at the postings. More questions but will take time to formulate them a better]

    Cool build, by the way. Too many projects so I am going vicarious with this one.
     
  30. Rob Taylor

    Rob Taylor Master
    Builder

    Joined:
    Dec 15, 2013
    Messages:
    1,470
    Likes Received:
    746
    Ok, time for another short update. I only seem to be getting one "thing" done a week at the minute, but forward progress is still continuing!

    I found the Belleville washers- that had been intended for the mill's R8->TTS ATC conversion- so I'll be throwing a couple of those on the ball screws for more precise tensioning.

    Finally opened up all the aluminum packages I got a while back that had been sitting on the racking in boxes:

    Photo Feb 02, 12 59 15.jpg

    Trying to correlate what was what with the original order and design key took a little while, but I got there in the end.

    Then it was time to paint those steel end caps:

    Photo Feb 04, 12 58 00.jpg

    Hopefully the interface of steel and aluminum isn't too inclined to corrode. I'll probably smear a layer of something on there before permanent installation just in case.

    Photo Feb 07, 14 27 54.jpg

    Looks great though. Super clean.

    The machining of the columns was next, which took some back-and-forth to make it all fit within the confines of the mill's travel. No higher revisions on the post than V2 though, so I'm happy!

    Photo Feb 12, 11 44 37.jpg

    The solution for the tall, wide columns was unfortunately pretty brute-force. Couldn't come up with a more elegant solution that I was confident would hold up to machining forces, though, and I definitely wasn't about to waste a huge piece of plate material on machining a custom pallet.

    Photo Feb 12, 13 51 15.jpg

    The result for the right side! Some of the holes don't align, which is very odd- since they don't-align symmetrically on both sides so clearly the drill didn't wander. Not a big deal though, tomorrow I'll make it work, enlarge what's supposed to be enlarged, tap what needs to be tapped, and we'll be good to go.

    Photo Feb 12, 15 42 51.jpg

    The machined sides. Very simple job other than the workholding- a large platemaker, the mill ain't. The machined faces interact with the machined faces of the carriages, which is the most important part. The joining plate has both lateral and axial steps cut into it- the carriages and the rails fit into those gaps, and the bulk of it sits pretty flush between the four carriages. The main upright will have holes drilled and tapped for the piece of C-Beam to be able to rotate very slightly and move up and down a little for tramming the gantry axis. I don't have much concern about that 3/4" plate flexing, especially with that ~480mm extrusion attached to it. Relatively stubby, really. The extra holes on the short side are for the rotating nut assembly to attach to. Maybe also the motor plate, if I'm feeling lazy?

    I could do the rotary nuts next, or I could start thinking about how the X axis is going to go together, after this weekend. Gonna be tricky to attach those steel tubes! Not sure yet, we'll see. Still coming along nicely though.
     

Share This Page

  1. This site uses cookies to help personalise content, tailor your experience and to keep you logged in if you register.
    By continuing to use this site, you are consenting to our use of cookies.
    Dismiss Notice