Welcome to Our Community

Some features disabled for guests. Register Today.

LEAD 710 with High Z mod

Discussion in 'CNC Mills/Routers' started by Torin3, Oct 27, 2021.
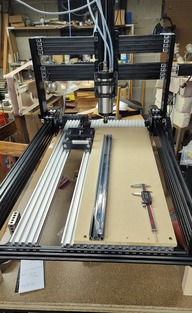
  1. Torin3

    Torin3 Well-Known
    Builder

    Joined:
    Apr 18, 2021
    Messages:
    85
    Likes Received:
    38
    Torin3 published a new build:

    Read more about this build...
     
  2. Torin3

    Torin3 Well-Known
    Builder

    Joined:
    Apr 18, 2021
    Messages:
    85
    Likes Received:
    38
    Currently I've got power wired to the VFD, and the shielded motor wires wired into the plug for the spindle. I've got to wait until Friday for the water pump to arrive for the spindle. Once I've got that set up, I can start working on getting it running jobs. I'm going to mount the VFD to a garage rafter so I can hang the wire down to the machine and not have it run along side the other motor and limit switch wires. The water lines for the spindle I'll probably zip tie to the drag chain and have a reservoir under the table (closed lid to avoid gunk in the water coolant). I'm going to have the VFD wired up so the Black Box can control the spindle speed.
     
  3. Allistar

    Allistar New
    Builder

    Joined:
    Aug 19, 2019
    Messages:
    57
    Likes Received:
    19
    Nice! I like the black aluminium. My 1515 is silver. I see you're driving the lower X gantry and not the upper one, that's a good move. I found on mine when I drove the upper gantry it limited the top speed quite a bit. With the dimensions of your build I don't expect speed on the X axis will be as important. Maybe for Y though. You should be able to push it to 4200mm/min, maybe more as there will be less racking with the narrower build. A tip for the spoilboard is if you don't want to attach it from the bottom you can put cleats (20x20mm pine or similar) on to the edge of the bed rails and then screw the spoilboard from the top down on to the cleats.

    Well done on the good looking build!
     
    Torin3 likes this.
  4. Torin3

    Torin3 Well-Known
    Builder

    Joined:
    Apr 18, 2021
    Messages:
    85
    Likes Received:
    38
    Thanks! I've been planning on putting down 20x80 v-slot sections for my table and mounting spoilboards to that when needed and use the table for mounting fixtures for the primary jobs I built this for. A pass-through vise for doing end work on ~24" to 30" dowels and sticks, and cam locks to hold work for grooving 1 1/4" square sticks.
     
  5. Torin3

    Torin3 Well-Known
    Builder

    Joined:
    Apr 18, 2021
    Messages:
    85
    Likes Received:
    38
    Added picture of my VFD wiring and 2 of the lid to my water cooling reservoir lid made from a Home Depot bucket. Currently running an hour leak test for the water cooling system before starting to program the VFD.
     
    Peter Van Der Walt and Allistar like this.
  6. Torin3

    Torin3 Well-Known
    Builder

    Joined:
    Apr 18, 2021
    Messages:
    85
    Likes Received:
    38
    Added 2 more pictures. One is of the Y drag chain at home position with 4 more links added in. The other is the machine after I've done the steps calculation and I'm figuring the best way to set up the table before tramming the spindle.

    Edit: I have wired the VFD and the water pump to be on the same circuit, so if I turn it on, both power up. That way I'll be able to avoid turning on the spindle without also having the water cooling running.
     
    #6 Torin3, Oct 31, 2021
    Last edited: Oct 31, 2021
    Peter Van Der Walt likes this.
  7. Torin3

    Torin3 Well-Known
    Builder

    Joined:
    Apr 18, 2021
    Messages:
    85
    Likes Received:
    38
    It's Alive! Cut holes that were round and exactly on size.

    Downside is I wrote the program when I had to comp for spindle runout, so I'll need to re-cut them on size.


    While the spindle won't drop down with the power off when it is just the spindle, if I leave the dust boot on, it will sink down. So I'll have to remember to take it off before turning everything off, or make a rest block for it.
     
  8. Torin3

    Torin3 Well-Known
    Builder

    Joined:
    Apr 18, 2021
    Messages:
    85
    Likes Received:
    38
    Added a couple of pictures, including updating the main picture to show the spoilboard. I also got a couple of extra C-Beam end plates and put them on the non-power X axis gantry beam. Not necessary, but makes it look more finished and I don't have un-anodized ends of the C-Beam showing.

    Almost done. Just need to tram the spindle and deck the spoiboard portion.
     

Share This Page

  1. This site uses cookies to help personalise content, tailor your experience and to keep you logged in if you register.
    By continuing to use this site, you are consenting to our use of cookies.
    Dismiss Notice