Welcome to Our Community

Some features disabled for guests. Register Today.

LEAD 1515, HGH15, SFU1604 Ball Screw

Discussion in 'CNC Mills/Routers' started by Netechsys, Sep 7, 2020.

  1. Netechsys

    Netechsys Journeyman
    Builder

    Joined:
    Mar 25, 2020
    Messages:
    149
    Likes Received:
    107
  2. Rob Taylor

    Rob Taylor Master
    Builder

    Joined:
    Dec 15, 2013
    Messages:
    1,470
    Likes Received:
    746
    Check your critical speed on your Y ballscrews! Especially if you haven't bought anything yet.

    Other than that, looks promising. :thumbsup:
     
  3. Netechsys

    Netechsys Journeyman
    Builder

    Joined:
    Mar 25, 2020
    Messages:
    149
    Likes Received:
    107
    Everything is on order. Playing with the cad designs for the plates that I will need to make.

    one change I made to the parts was the fixed mount for the ball screw. I replaced the BK12 with a HM12-57 c5 mount, so it has the NEMA 23 mount built into the end mount with upgraded 7001 bearings.

    I’ll post more when I get the parts and start the assembly.
     

    Attached Files:

  4. Netechsys

    Netechsys Journeyman
    Builder

    Joined:
    Mar 25, 2020
    Messages:
    149
    Likes Received:
    107
    Been doing the design of the plates needed for this configuration, and came up with a design for XYA configurations. This will create a very strong base. This design will require 2 different plate types to be made, one for the top/bottom plate that attaches to the HGH15CC blocks, and a 2nd that will attach to the 1st plate on the side and the DSG16H nut block in the middle. The uprights will attach to the front of the plates, and run on the inside of the XA beams, and the front of the Y Beam.

    After the parts are cut, and I get the base built, I will share the step files for the plates.
     

    Attached Files:

  5. Netechsys

    Netechsys Journeyman
    Builder

    Joined:
    Mar 25, 2020
    Messages:
    149
    Likes Received:
    107
    Ok. Need a bit of input and help. First a couple easy questions.

    is there a way to connect multiple extrusions together along the length of the extrusions? Say 2 1500mm c beams, connecting them together on the 40mm sides to make 1 double 40-160?

    second. Does anyone have a good supplier for 20100 aluminum extrusions? Heavy duty?

    last one, and I apologize for the long question, I need help poking holes in an idea. I am upgrading to 15mm linear rails with 2 carriages per rail, 2 sets per axis. What if, for the s axis, I use the c-beam with the rail on both sides, and the carriages mounting to the y gantry, so the carriages are stationary and the c-beam with the rails moves with the ball nut. That way, I think, the z-axis would be able to drop full height the travel, and stay rigid. My concern is the lateral and horizontal rigidity for this. Think it will keep the z axis rigid?

    thanks. Parts are on their way. Plates are being cut. Hopefully I will start the assembly soon.
     
  6. Rob Taylor

    Rob Taylor Master
    Builder

    Joined:
    Dec 15, 2013
    Messages:
    1,470
    Likes Received:
    746
    1) Not unless you start drilling through your extrusion. I bought very large 1/8" aluminum sheet as a joining plate for my double C-Beam axes.

    2) Either one is a standard way of doing it. Just google "moving rail vs moving bearing z axis"
     
  7. Giarc

    Giarc OpenBuilds Team
    Staff Member Moderator Builder Resident Builder

    Joined:
    Jan 24, 2015
    Messages:
    2,892
    Likes Received:
    1,609
    I did this when I built mine and made my own 80X40X838 gantry beam. V-slot-connector parts (V-Slot connector | OpenBuilds ) were printed to line up the two pieces of 20x80 v slot. I pounded 3 in on each end. Then I drilled and tapped 12 holes to screw the two beams together. Technically I only tapped 11 since my tap broke off in the 12th. :(
    [​IMG]
    [​IMG]
     
  8. Netechsys

    Netechsys Journeyman
    Builder

    Joined:
    Mar 25, 2020
    Messages:
    149
    Likes Received:
    107
    THANK YOU!! This is what I was looking for. Now, I need to go "borrow" my friends 3d printer for a while..
     
  9. Netechsys

    Netechsys Journeyman
    Builder

    Joined:
    Mar 25, 2020
    Messages:
    149
    Likes Received:
    107
    All parts are ordered. I have built the design in a few different CAD programs, and will share the files for the plates when it is built and verified that everything works as I hope, but here are a few images of the design. The only thing that is not right in the Overview is the Z Axis, as I am still playing with the plates and the design.

    Screen Shot 2020-09-30 at 12.45.04 AM.png Screen Shot 2020-09-30 at 12.48.41 AM.png Screen Shot 2020-09-30 at 12.46.16 AM.png
    The XA Axis plate is:
    Screen Shot 2020-09-30 at 12.53.17 AM.png

    This will allow for 8 T-Nuts to attach to the Y upright, and the use 16 Angle connectors. The Y axis is similar, but will have the 4 HGH15CA blocks attached to the plate, and the HGH15R rails will attach to the Z axis. For the end plates of the XAY gantrys, I think I will use 1/4" angle aluminum to tie the top and bottom C-Beams together, and give a good stable mount for the bearing block.

    The stepper mounts I have to say are nice! They incorporate the bearing block and the stepper mount in one unit.

    StepperMount.jpg

    I hope to start the final build when the last few parts come in later this week.. Maybe, by the end of the weekend, I will have it far enough to play..
     
  10. Netechsys

    Netechsys Journeyman
    Builder

    Joined:
    Mar 25, 2020
    Messages:
    149
    Likes Received:
    107
    First axis built. This will be the y/a axis. I’m leaving the 20/80 front and back long for mounting to the 20/40 frame.
    B518757D-060B-4A30-895B-4FB78ACE4369.jpeg
    I will add the stepper/linear rails/ and plates tomorrow after the m4 screws arrive for the linear rails.
     

    Attached Files:

    Giarc likes this.
  11. Netechsys

    Netechsys Journeyman
    Builder

    Joined:
    Mar 25, 2020
    Messages:
    149
    Likes Received:
    107
    Ok. Had an idea tonight that I need run by someone other then me. To poke holes in it.
    I will be running 2 linear rails per gantry with 2 blocks per rail. I will be using the hgh15 rails and blocks as I stated. But, what if I put the linear rails in the channel of the c-beam. Mount it in the middle of the channel. I would need 1 plate to tie everything together,

    I’m looking at this:
    09B51283-A777-4D41-944F-0251D6B49FD0.jpeg

    It would only take a 125x220mm plate, and I’d use 9 or 12mm thick plates. The 2080 uprights would attach directly to the front of the plate for the YA uprights.

    thoughts?
     
  12. Rob Taylor

    Rob Taylor Master
    Builder

    Joined:
    Dec 15, 2013
    Messages:
    1,470
    Likes Received:
    746
    It looks like a better mounting location, rigidity-wise. Might be harder to tram in the rails and add any necessary shims once they're down there though. Also you'd either have to drill and tap the extrusion, which is kinda weak right there, or add a sub-plate that T-nuts to the two inner channels and the rail screws into it.
     
  13. Corey Corbin

    Corey Corbin Well-Known
    Builder

    Joined:
    Feb 27, 2016
    Messages:
    135
    Likes Received:
    62
    Those will be sturdy. Wondering do you have a way to cut your own plates or do you have someone cutting them for you? Why don't you build your own end plate to hold the the right size bearing for the screw in stead of there bearing block they provide. I have been thinking and drawing a set for my next build. These are for the 1204 bell screw one bearing is 10mm ID and one is 8mm ID and then you 2020 aluminum EXT along edges to hold the linear rails. Same style as a c beam but for ball screw bearings. That way you will save on space and weight. These are not done. Just in a interim stage of drawing. Just a thought.
    .[​IMG]
    [​IMG]
     
  14. Netechsys

    Netechsys Journeyman
    Builder

    Joined:
    Mar 25, 2020
    Messages:
    149
    Likes Received:
    107
    I did look at using my own plates, but the nut block and ball nut is larger then the 40mm in the open channel. Without having the nut and block customized to fit, it wouldn’t work or would make the thickness a lot thicker. I was trying to keep the horizontal thickness close to the stock thickness, but add to the vertical thickness to add rigidity.

    as for mounting the rails to the center of the c-beam. I wonder if adding a round aluminum rod to the center of the opening, say a 3/8” rod, and screwing down into the rod would work enough to secure everything. I’m going to have to try this.
     
  15. Netechsys

    Netechsys Journeyman
    Builder

    Joined:
    Mar 25, 2020
    Messages:
    149
    Likes Received:
    107
    Ok.. How about this.. What if I used a 35MM screw to mount the rails to the C-Beam. Mount through the C beam and use a 8MM diamater washer and lock nut on the opposite side of the profile. There will be about 20MM on that side that is open to use the open slots of the base 2040, and these will be up 40MM from them. That will take care of the mounting, and make sure there is enough strength to lock it all together. The nut/washer will extend 6MM. I am liking this the more I think about it.. It will reduce the number of custom plates from 12 to 3, make the XYA axis's 56MM shorter, and about 2MM narrower.

    Soooo.. I guess these plates I just had cut are paper weights now.. the last item for me to figure out will be the mounting of the Z axis. Probably will need to make a custom nut block to get the 16MM ball screw to mount correctly, and keep the package slim and rigid.
     
  16. Rob Taylor

    Rob Taylor Master
    Builder

    Joined:
    Dec 15, 2013
    Messages:
    1,470
    Likes Received:
    746
    Sounds usable, but ugly. I'd bootstrap it before I did that- T-nut the rails to the extrusion for just long enough to get the machine working so it itself can cut more plates for itself.

    A lot more work, but a much prettier machine at the end of it. :ROFL:

    I actually may have to do that for some of the really long plates on my machine, and also the big 4th-axis mounting plate and proper gantry columns. I don't have another large enough machine to make them, so I have to get M4 functional enough to do so before adding them back in. Shouldn't be much tearing down though.
     
  17. Netechsys

    Netechsys Journeyman
    Builder

    Joined:
    Mar 25, 2020
    Messages:
    149
    Likes Received:
    107
    STEP files for the YA and XZ gantry plates have been uploaded. These are the final that are being cut now. The linear rails have been moved to the channel of the C-Beam for the Y, A, and X axis's. Hopefully, the machine build will be completed by next weekend, and cutting!

    Here is the high level look from the CAD system! Minus the Ball Screws. (They kill the processor when rendering, so I leave them off the sketches..)

    Screen Shot 2020-10-09 at 9.22.10 PM.png
     
    Giarc likes this.
  18. Netechsys

    Netechsys Journeyman
    Builder

    Joined:
    Mar 25, 2020
    Messages:
    149
    Likes Received:
    107
    Build commencing. Base and y axis done. A axis and x axis today. Plates cut and I’m going to get them now. Hopefully we will be moving tonight!
     
  19. Netechsys

    Netechsys Journeyman
    Builder

    Joined:
    Mar 25, 2020
    Messages:
    149
    Likes Received:
    107
    Plates in hand. Build moving forward.
    8AC3B783-D472-4859-A46B-B690667997DF.jpeg
     
    Corey Corbin likes this.
  20. Corey Corbin

    Corey Corbin Well-Known
    Builder

    Joined:
    Feb 27, 2016
    Messages:
    135
    Likes Received:
    62
    Awesome looking plates.
     
  21. Netechsys

    Netechsys Journeyman
    Builder

    Joined:
    Mar 25, 2020
    Messages:
    149
    Likes Received:
    107
    Well. It’s alive. Sorta. Y/a is installed and running. I can’t install the X/z axis because I miscalculated screw lengths to attach the plates to the linear rails, so shorter screw ordered and should be here later today.

    I did screw up the lead screw I ordered, and will run into problems if I try to run the steppers at fast speeds. I lose steps if I run them too fast. And I did increase the amps for the drivers. So it is a bit slower then I wanted. Next machine I’ll user a more optimal screw. But, i should get more precision because the travel is smaller per rotation. But, so far it’s working as I’d hoped.

    After I get the screws and finish the screws, I’ll finish up and take some pics.
     
    Corey Corbin likes this.
  22. Corey Corbin

    Corey Corbin Well-Known
    Builder

    Joined:
    Feb 27, 2016
    Messages:
    135
    Likes Received:
    62
    Different size screws was one of my problems too. I ended up just buying one big bag of same size screws and cut them with a hacksaw and used metal file to make the ends smooth. Not Ideal cause it added to my work load, but it worked out as I was constantly looking for the right size screw and waiting on shipping.
     
  23. Netechsys

    Netechsys Journeyman
    Builder

    Joined:
    Mar 25, 2020
    Messages:
    149
    Likes Received:
    107
    85% done. So far. No real issue. But I forgot
    To attach the x axis ball nut to the XZ plate so I have to disassemble the z axis.

    0DA9C7E4-9A4B-454A-8F7D-3E117F17F13C.jpeg B037EE7E-9381-4C5A-A19C-3902E6FB1AFA.jpeg
     
    Giarc likes this.
  24. Netechsys

    Netechsys Journeyman
    Builder

    Joined:
    Mar 25, 2020
    Messages:
    149
    Likes Received:
    107
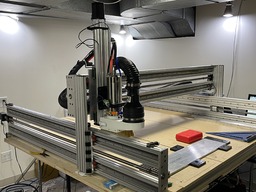
    It lives. Need to do some more work on the mounts for the ball screw because I don’t like it. But it lives. Now I need to cut some stuff after I finish the wiring, air, and water. But it moves.
     

    Attached Files:

  25. Giarc

    Giarc OpenBuilds Team
    Staff Member Moderator Builder Resident Builder

    Joined:
    Jan 24, 2015
    Messages:
    2,892
    Likes Received:
    1,609
    That looks great. Can't wait to see it cutting.
     
  26. Netechsys

    Netechsys Journeyman
    Builder

    Joined:
    Mar 25, 2020
    Messages:
    149
    Likes Received:
    107
    Well. ****. I released the magic smoke some how. I tested the spindle prior to putting it on the CNC. Everything was great. I installed the spindle today on the machine. Got the wires all run nice and neat in the cable chains. Power it all up. And poof. Vfd I think went bye bye. New vfd will be here Saturday. Now. I need to find out why it happened.
     
  27. Netechsys

    Netechsys Journeyman
    Builder

    Joined:
    Mar 25, 2020
    Messages:
    149
    Likes Received:
    107
    New vfd arrived. And is working fine. The problem was a faulty power cable. Seems that pulling the cable through the cable chains cause a wire to short out In the wire. I also replaced the cable from the vfd to the spindle. Glad I live near a McMaster Carr depot so I could go pick up the cable. Tonight I’ll finish everything up and run my 1st test. But I think I’m good now!
     
  28. Netechsys

    Netechsys Journeyman
    Builder

    Joined:
    Mar 25, 2020
    Messages:
    149
    Likes Received:
    107
    Project Completed! Ran 1 quick test. And all worked great. Tomorrow I’ll run a real job test and post the results. This will be a real test, as I’m going to make the new dual c-beam end plates/bearing mount and replace what I’m using. Making one single block will stiffen up the axis’ more.

    B1B09856-2F70-4C5A-BE84-8C6F4911F4E1.jpeg
     

    Attached Files:

    Mark Carew and Maxdd like this.
  29. Netechsys

    Netechsys Journeyman
    Builder

    Joined:
    Mar 25, 2020
    Messages:
    149
    Likes Received:
    107
    New Endplates being cut today. I want more rigidity, and this will help. But, now the machine will make its own parts. I will have to make 4 different type of plates. A different plate for the Front and back of the Y/A axis, and Left and Right X Axis. The X Axis needs to have pockets for the connectors where the C-Beam attaches to the uprights. Maybe I will make that connection integrated to the plates, but I need to check clarences. I think the cut-outs will be easier, and still give the expected outcome. Here are the 2 Y/A plates.

    Screen Shot 2020-10-29 at 11.01.57 AM.png Screen Shot 2020-10-29 at 11.01.03 AM.png

    Here are the X Axis plates:
    Screen Shot 2020-10-29 at 11.05.35 AM.png Screen Shot 2020-10-29 at 11.04.58 AM.png

    There is a back plate on the back side of the Y/A plate for the Motor Mount/Bearing block to mount to. These will be cut in 1/2 6061 Aluminum plate.
     
  30. Netechsys

    Netechsys Journeyman
    Builder

    Joined:
    Mar 25, 2020
    Messages:
    149
    Likes Received:
    107
    First plate cut tonight. Been tied up with work, so just getting to it. First time using machine. First time cutting aluminum. And I think my endmill is not that good. But. For first attempt. I’ll take it.

    18A09895-21BD-41CA-82BB-FCE02A0A9065.jpeg

    Need to play with the speeds and feeds and learn how to finish the cuts right. But it’s a learning curve.

    this will be the y/a end plate with integrated bearing.
     
    sharmstr likes this.

Share This Page

  1. This site uses cookies to help personalise content, tailor your experience and to keep you logged in if you register.
    By continuing to use this site, you are consenting to our use of cookies.
    Dismiss Notice