Welcome to Our Community

Some features disabled for guests. Register Today.

Double D-Bot 400mm x 400mm x 600mm

Discussion in '3D printers' started by Troy Proffitt, Nov 30, 2016.
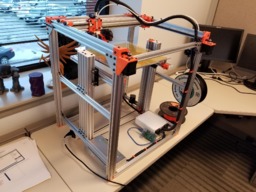
  1. Troy Proffitt

    Troy Proffitt Well-Known
    Builder

    Joined:
    Oct 11, 2016
    Messages:
    126
    Likes Received:
    101
    Troy Proffitt published a new build:

    Read more about this build...
     
  2. Troy Proffitt

    Troy Proffitt Well-Known
    Builder

    Joined:
    Oct 11, 2016
    Messages:
    126
    Likes Received:
    101
    I'm using a 750W PSU to power both the RAMPS board and the Pi3. Using the 5v continuous power line (purple) I'm able to keep the Pi on all the time, and using the PWR ON line coming out of the PSU, I've attached that to the RAMPS board and I can now use the M80/81 commands to turn on/off the motors using the software. Using AstroPrint right now as my slicer....very happy with it so far.
     
  3. Mark Carew

    Mark Carew OpenBuilds Team
    Staff Member Moderator Builder Resident Builder

    Joined:
    Jun 28, 2013
    Messages:
    2,741
    Likes Received:
    2,407
    Fantastic looking D-Bot build @Troy Proffitt thank you for sharing your first prints. With the size of this machine you could print the engine block! Well done :thumbsup:
     
  4. djKaldor

    djKaldor New
    Builder

    Joined:
    Dec 7, 2014
    Messages:
    6
    Likes Received:
    12
    what thickness is the bed? Did you machine it? I made a 400*400 and got a 6mm sheet of aluminum as bed but it wasn't perfect flat. I am thinking to make it from glass. I also notice you changed the Z axis Delrin wheel brackets with aluminum and add a second. Did you had issues with Z axis from weight and made these modifications? Should i add another?
     
  5. Troy Proffitt

    Troy Proffitt Well-Known
    Builder

    Joined:
    Oct 11, 2016
    Messages:
    126
    Likes Received:
    101
    I'm using a jig plate. It's 15 inches square and 1/4 inch thick from Cast Aluminum Tool & Jig Plate (ATP 5) | Midwest Steel & Aluminum
    I would definitely add the front bar. It greatly improved the stability of the build plate after I attached it to the front. Also, I added a pulley system that connects both z axis motors so they cannot get out of sync. I'll attach a pic of that so you can see how I did it
     
  6. djKaldor

    djKaldor New
    Builder

    Joined:
    Dec 7, 2014
    Messages:
    6
    Likes Received:
    12
    very nice. what about the z axis motors? are they nema 17?
     
  7. Troy Proffitt

    Troy Proffitt Well-Known
    Builder

    Joined:
    Oct 11, 2016
    Messages:
    126
    Likes Received:
    101
    yes, 84/oz nema 17's
     
  8. FherraZ

    FherraZ New
    Builder

    Joined:
    May 8, 2014
    Messages:
    6
    Likes Received:
    0
    Hi there, I want to build a D-bot also with an increased size of 30*30*50, could you help me out pointing me what do I have to change to achieve this?
     
  9. Troy Proffitt

    Troy Proffitt Well-Known
    Builder

    Joined:
    Oct 11, 2016
    Messages:
    126
    Likes Received:
    101
    Sure. I can help. What specifically do you want to know?
     
  10. FherraZ

    FherraZ New
    Builder

    Joined:
    May 8, 2014
    Messages:
    6
    Likes Received:
    0
    Mostly the aluminium extrusions I need to buy for 30*30*50 and the leadscrew? Besides that and belts, I am guessing everything else stays pretty much the same?
     
  11. Troy Proffitt

    Troy Proffitt Well-Known
    Builder

    Joined:
    Oct 11, 2016
    Messages:
    126
    Likes Received:
    101
    Have you downloaded the d-bot build instructions? That's a very good place to start. I bought 4 pieces of 20x40x100mm for the vertical pieces and everything was 500mm. The 2 leadscrews I purchased are 8mmx500mm
     
  12. a.i.

    a.i. New
    Builder

    Joined:
    Feb 17, 2017
    Messages:
    1
    Likes Received:
    0
    Hi,
    Your machine looks fantastic ! :thumbsup:
    so all extrusions are 500mm in length ? or do I add 200mm and 100mm to the v-slot rail sizes in the D-Bot build guide ?
     
  13. Alaa Younis

    Builder

    Joined:
    Nov 3, 2016
    Messages:
    4
    Likes Received:
    0
    Great design. Fantastic. Let us know the update. I just start print the parts to buld 300x300 .. without any background in electronics. I am an architect designer. I need help :)
    I based in dubai. Owning printing center.
    I need more printers .. i think the dbot will help that..
    Reagrds
     
  14. Troy Proffitt

    Troy Proffitt Well-Known
    Builder

    Joined:
    Oct 11, 2016
    Messages:
    126
    Likes Received:
    101
    I love the d-bot. Please respond here if you have any questions.
     
  15. Alaa Younis

    Builder

    Joined:
    Nov 3, 2016
    Messages:
    4
    Likes Received:
    0
    Thank you so much...
    I just near to finish the printing the parts using PETG by prusa. I dont know if there is any new update stl.. i juat download it from thingverse. Also i am waiting the v-slot. And the mechanical parts.
    If tgere is any update files please share it ..
    To be 300x300. Printer. And i tried to find a heat bed 300x300 i confused to find the best. Usually to use it for PLA in future .
    Any assembling video ?
    Regards
     
  16. Troy Proffitt

    Troy Proffitt Well-Known
    Builder

    Joined:
    Oct 11, 2016
    Messages:
    126
    Likes Received:
    101
    I bought my heated bed off AliExpress
    Here is an assembly video:
     
  17. Alaa Younis

    Builder

    Joined:
    Nov 3, 2016
    Messages:
    4
    Likes Received:
    0
    Thanks for the video. I will start to assemble it. Next week. I need to know about the auto leveling "parts to be print' and which method shall i use? And firmware update? "
    Regards
     
  18. Troy Proffitt

    Troy Proffitt Well-Known
    Builder

    Joined:
    Oct 11, 2016
    Messages:
    126
    Likes Received:
    101
    I do not use autolevel anymore. I just make sure the bed is level manually.
     
  19. mic0505

    mic0505 New
    Builder

    Joined:
    Oct 12, 2017
    Messages:
    2
    Likes Received:
    0
    Hey Troy, super nice build. I'm looking to build one myself just like yours, 400x400x600. Can you point me in the right direction? First, where did you source your aluminum extrusions? Here in openbuilds? Also, can you share more details and pics about the mods you did to your Z axis? I'm concerned that with such a large and heavy bed it will flex. Thank you and super nice work!

    Also, HD pics of your prints would be cool, to see what kind of surface finish you get. Thank you a lot!
     
  20. Troy Proffitt

    Troy Proffitt Well-Known
    Builder

    Joined:
    Oct 11, 2016
    Messages:
    126
    Likes Received:
    101
    Prints come out very nice, no z wobble at all. I did buy my aluminum extrusions from the OpenBuilds Website and also smw3d.com (I live in Houston). I ended up using 4 leadscrews for my z axis all powered by a single stepper motor and belts. Here is a pic:
    Imgur: The most awesome images on the Internet
     
  21. mic0505

    mic0505 New
    Builder

    Joined:
    Oct 12, 2017
    Messages:
    2
    Likes Received:
    0
    Thanks for answering! That looks complicated! do you think that I could do with two leadscrews, one on each side of the bed, in the middle? If the bed has wheels on all four corners it should be quiet stable right?
     
  22. Troy Proffitt

    Troy Proffitt Well-Known
    Builder

    Joined:
    Oct 11, 2016
    Messages:
    126
    Likes Received:
    101
    I started with just 2 leadscrews but was not satisfied with the stability. Now I can just about sit on it and it won't budge at all
     
  23. fillefrans

    Builder

    Joined:
    Nov 11, 2018
    Messages:
    4
    Likes Received:
    0
    Hi, I see that you have used metal brackets for the z wheel carriage, what brackets are these?
     
  24. Troy Proffitt

    Troy Proffitt Well-Known
    Builder

    Joined:
    Oct 11, 2016
    Messages:
    126
    Likes Received:
    101
    It's been a while since I've posted on this thread, but my poor D-bot is in constant upgrade. Here is a picture of my current Z structure. I actually separated the Z structure totally from the rest of my D-bot using 2 pieces of C-beam bolted to the cabinet that my D-bot is attached to. Here is 2 pics and a video of how my Z-axis works now. All parts were purchased from openbuildspartstore.com.
    Here is the video:
     

    Attached Files:

    Mark Carew likes this.
  25. fillefrans

    Builder

    Joined:
    Nov 11, 2018
    Messages:
    4
    Likes Received:
    0
    Cool, thanks for replying. :) That looks like a solid setup, haven't seen that before. Any thoughts on that setup vs your old one with 3 lead screws and wheels running on the frame? Do you feel it's a worthwhile upgrade?
     
  26. Troy Proffitt

    Troy Proffitt Well-Known
    Builder

    Joined:
    Oct 11, 2016
    Messages:
    126
    Likes Received:
    101
    I've had my D-bot for about 2 years now and I was never satisfied with the stability of the z axis. I tried belts, 3 leadscrews, 4 leadscrews...you name it. The current setup is super strong (like you can grab it with your hand and attempt to move it up and down and it's very stable). I use a single Nema 23 motor powered via an external Stepper driver, so I do not have to worry about getting out of synch or torque. By separating the z from the rest of the printer, it helps to mute any vibrations being transmitted to the bed, thus you get less ringing and other artifacts in your prints.
     
    fillefrans likes this.
  27. JustinTime

    JustinTime Veteran
    Builder

    Joined:
    Dec 18, 2013
    Messages:
    755
    Likes Received:
    252
    That's a very interesting way of doing it. I'll have to keep it in mind! :thumbsup:
     
  28. CFerguson

    CFerguson New
    Builder

    Joined:
    Dec 6, 2018
    Messages:
    12
    Likes Received:
    1
    Hey, I'm trying to put together a d-bot. Just started my research. Say I wanted to build a duplicate of yours. would you be willing to share the bom?
     
  29. Troy Proffitt

    Troy Proffitt Well-Known
    Builder

    Joined:
    Oct 11, 2016
    Messages:
    126
    Likes Received:
    101
    My D-bot started with the original BOM listed on thingiverse and was added to over 2 years time. I honestly don't have a BOM for my current build, but I'd be happy to answer questions.
     
  30. CFerguson

    CFerguson New
    Builder

    Joined:
    Dec 6, 2018
    Messages:
    12
    Likes Received:
    1
    alright, what makes up your z-bed?

    I can see the c-beam, etc. But I mean, what lead screws and pulley's do you have going on down there, and what size belt? Also what size and pitch lead screws? you said its a nema 23 i think, what stepper driver are you using on it? how tall are your c-beam's? Is that a KFL8 bearing mounted under the c-beam?

    Any measurements you can share would be greatly appreciated.

    Also can you share your stl files for the z-base thing? and the mn12 rail gantry?

    Are you using 20 tooth sized pulley's for the x-y axis?

    Thanks a lot for the info.
     
    #30 CFerguson, Dec 7, 2018
    Last edited: Dec 8, 2018

Share This Page

  1. This site uses cookies to help personalise content, tailor your experience and to keep you logged in if you register.
    By continuing to use this site, you are consenting to our use of cookies.
    Dismiss Notice