Welcome to Our Community

Some features disabled for guests. Register Today.

Dogmeat's Custom C-Beam XL

Discussion in 'CNC Mills/Routers' started by dogmeatk, Apr 21, 2017.
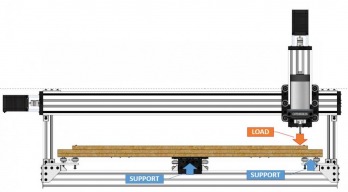
  1. dogmeatk

    dogmeatk New
    Builder

    Joined:
    Apr 20, 2017
    Messages:
    12
    Likes Received:
    19
    dogmeatk published a new build:

    Read more about this build...
     
  2. dogmeatk

    dogmeatk New
    Builder

    Joined:
    Apr 20, 2017
    Messages:
    12
    Likes Received:
    19
    Good to hear from you, Jerry.

    I plan on carefully squaring the bed mounting holes for the side 20x20's with the gantry plate holes in the bed. Then jogging the Y axis through the entire travel before snugging the side support brackets to maximize parallelism. As for the co-planar adjustment, coarse adjustment will be done with washers on the v-wheel bolts and fine adjustment can be done with shims under the extremity brackets.

    Something like these would be perfect McMaster-Carr but they are a bit too pricey for my liking. I could easily make these out of some 20x20 v-slot. Altogether, it's hard to beat the $5 bracket from Home Depot when you want to tie together 3 rails.
     
  3. dogmeatk

    dogmeatk New
    Builder

    Joined:
    Apr 20, 2017
    Messages:
    12
    Likes Received:
    19
  4. mcbuilder22

    Builder

    Joined:
    Jan 12, 2015
    Messages:
    45
    Likes Received:
    24
    I ran into the issue you're trying to solve on my build: http://openbuilds.com/builds/c-beam-2-xlarge-cnc-router.4914/

    I greatly improved it by removing the MDF platform and replacing it with a 3/8" thick aluminum plate. It's not what I would consider 100% firm and rigid but it seems to be enough better to make a very noticeable difference.
     
  5. M90Ranger

    M90Ranger New
    Builder

    Joined:
    Mar 30, 2017
    Messages:
    27
    Likes Received:
    8
    CNC.jpg I have something similar in the works. I got the idea from Fred:
     
    Shotpeen likes this.
  6. dogmeatk

    dogmeatk New
    Builder

    Joined:
    Apr 20, 2017
    Messages:
    12
    Likes Received:
    19
    McBuilder, great build, I have already read through your entire discussion. Haven't seen any pictures of the aluminum plate though. I would prefer a metal bed but the costs are too high for this project. When it comes to a band-aid, I will opt for the cheaper one.

    M90Ranger, interesting take on the idea but that wheel arrangement only offers deflection resistance in the "down" direction. Since you have no wheels on the underside, the top wheels will not be tensioned to the V-slot. Imagine large side loads during milling pushing those V-wheels sideways against the slot, which will push them up and out of the slot. If you consider bowing the bed between the side rail and the gantry plate, the entire row of side wheels will tilt inward because there are no opposing wheels to resist that torsion on the end of the bed.
     
    M90Ranger likes this.
  7. mcbuilder22

    Builder

    Joined:
    Jan 12, 2015
    Messages:
    45
    Likes Received:
    24
    The last picture I uploaded shows then aluminum bed, it's under a mdf spoiler but the ends stick out.

    Surprisingly the 30 x 30 inch .375 piece of aluminum was only $65 but I bought it with some other stuff.
     
  8. dogmeatk

    dogmeatk New
    Builder

    Joined:
    Apr 20, 2017
    Messages:
    12
    Likes Received:
    19
    Dang mcbuilder, that was a bargain! I would take that deal if i ever found it! Definitely worth $65.

    I just put in my openbuildsparts order today, so I am committed to the build. I need to finish some other spring projects before I start the cbxl build though, so it might be a little while.
     
  9. Kevin Henning

    Builder

    Joined:
    Mar 18, 2016
    Messages:
    25
    Likes Received:
    2
    dogmeatk, I am setting up an arrangement similar to what M90Ranger is doing. My gut feeling (and I have nothing more than that to go on right now) is that the side forces would be mostly absorbed by the Y axis wheels.
     
  10. dogmeatk

    dogmeatk New
    Builder

    Joined:
    Apr 20, 2017
    Messages:
    12
    Likes Received:
    19
    That's a good point Kevin. Would you be willing to do a comparison cut when it is all finished? I think the spindle differences will be the biggest factor in judging the cut quality between our designs, what spindles are you and Ranger planning on using? I am using a 400w chinese router spindle. I also have a DW660 on hand, but the speed is bonkers for aluminum.
     
  11. Kevin Henning

    Builder

    Joined:
    Mar 18, 2016
    Messages:
    25
    Likes Received:
    2
    I can give it a shot, sure. I am using a Dewalt 611 router in my machine; I decided to go that way as I expect that the bulk of the work that I do will be in plastic or wood.
     
  12. Kevin Henning

    Builder

    Joined:
    Mar 18, 2016
    Messages:
    25
    Likes Received:
    2
    Dogmeat, as an update I've not yet got my setup cut; been busy with things for my wife. However I had another thought based on the graphic that is at the top of the page. Rather than attaching a piece of 2020 v-slot to the frame, have a look at the picture in the parts store of how the mini-v gantry is intended to be used. Now envision attaching the 2040 V-Slot to the bottom of the spoil board and mounting the mini-v gantry in line with the router. You'd need to tweak the spacers used since the C-Beam gantry is 6 mm thick and the mini-v gantry plate 0.25", but so long as you can get the bottom of the mini-v gantry plate level with the bottom of the Y-axis C-Beam the geometry should work out, at least in my head it does :)
     
  13. dogmeatk

    dogmeatk New
    Builder

    Joined:
    Apr 20, 2017
    Messages:
    12
    Likes Received:
    19
    Kevin, I can't quite visualize your suggestion. Are you suggesting that the side saddle plates be mounted to the table instead of the frame? What benefit would that provide over my current design?

    Regarding gantry plates thicknesses, I made all of mine out of .25" and .5" plate, so I am already not using any stock gantry plate thicknesses. Everything is lined up and very snug, the marker test ran smoothly and accurately. I plan on cutting metal within a few days.
     
  14. Kevin Henning

    Builder

    Joined:
    Mar 18, 2016
    Messages:
    25
    Likes Received:
    2
    I was looking at the graphic right at the top. In it you appear to have a piece of 2020 V-Slot attached to the underside of the support for the spoil board, and then a plate holding a couple of wheels mounted on top of the 2060 piece. What I am wondering about with that setup is what it would take to make sure the wheels are aligned with the V-Slot.

    What I am suggesting is mounting a 2040 to the spoil board support in place of the 2020 (it would likely be a bit further in towards the C-Beam). Since that is the same height as the C-Beam, if you could mount a plate with its bottom flush with the bottom of the C-Beam then it should be fairly simple to make sure the wheels align with the slot in the V-Slot. I am looking at this from a CBM XL design. I'll try to do up a quick cross section of it tonight and post it.
     
  15. Kevin Henning

    Builder

    Joined:
    Mar 18, 2016
    Messages:
    25
    Likes Received:
    2
    under_outrigger.png Here is a graphic of what I had envisioned. It isn't the easiest to view (I wish I had done it with the spacers under the wheels being a bit higher).The horizontal 2060 represents the side piece of the CBM. The gantry plate attaches to a piece that supports it; I put a piece of 2020 to support it on the other side, although if the underside piece is thick enough the 2020 may not be necessary. The 2040 attaches to the underside of the spoil board. The 2040 "should" be pretty close to how far you can get the router along the X axis; if it isn't directly under the difference should be able to be ignored.
     
  16. dogmeatk

    dogmeatk New
    Builder

    Joined:
    Apr 20, 2017
    Messages:
    12
    Likes Received:
    19
    Kevin,
    I still do not quite understand the problem you are trying to solve. My design lines up perfectly. Just remember that the distances will line up perfectly if the side saddle thickness and the shim between the table and table-mounted-v-slot sum up to the thickness of the gantry plate. For example, my current recipe that is working well and still allows you to easily slide the table out from the front is:

    Table side: Spoil board > .125" plate > 20x20 V-Slot
    Frame side: 20x20 V-slot on one side, 20x60 on the other > .125" saddle plate > standard 6mm spacer or eccentric > V-slot wheel assembly

    All of this works perfectly because my custom gantry plate is .25". If you are using the stock 6mm gantry plate, you might use a 3mm saddle plate and 3mm spacer between the v-slot and waste board instead.
     
  17. Kevin Henning

    Builder

    Joined:
    Mar 18, 2016
    Messages:
    25
    Likes Received:
    2
    I didn't see the 0.125" plate between the spoil board and the V-Slot in the diagram, and was thinking about making sure that the wheels line up with the V-Slot. My approach was a bit different; rather than split the thickness of the gantry plate I was going to put it all on one side.
     
  18. GeoffH

    GeoffH Journeyman
    Builder

    Joined:
    Mar 11, 2017
    Messages:
    178
    Likes Received:
    106
    Nice one, looks great! I built an XL middle of last year, didn't imagine that I would ever cut aluminium with it, and so far I haven't but I'm going to take a careful look at your work later this year when I have time. Cutting wood, I haven't had any issues with accuracy, much better than I had dreamed Images in fact I increased the Z by 4" and still no issues.
     
    Mark Carew likes this.
  19. dogmeatk

    dogmeatk New
    Builder

    Joined:
    Apr 20, 2017
    Messages:
    12
    Likes Received:
    19
    Wow Geoff, excellent work! Really great results, especially on the Z height extension. I just found out that my 12k rpm spindle only runs at 5,600 rpm @ 24 V and I had too much RFI on my limit switch wiring, so just fiddling with some fixes at the moment. I plan on skimming my spoil board this weekend.
     
  20. GeoffH

    GeoffH Journeyman
    Builder

    Joined:
    Mar 11, 2017
    Messages:
    178
    Likes Received:
    106
    I've bought a Chinese VFD Spindle that I hope to get 24k rpm from and be able to program speed from vcarve, grbl, xpro etc... I've some fun ahead.
     
  21. GrayUK

    GrayUK Openbuilds Team Elder
    Staff Member Moderator Builder

    Joined:
    May 5, 2014
    Messages:
    1,668
    Likes Received:
    627
    GeoffH.
    I hope you will keep us posted, in your usual thorough way, on how it goes with the VFD controller and Spindle. :D
    We may all learn something from your experience. :thumbsup:
    Gray
     
  22. GeoffH

    GeoffH Journeyman
    Builder

    Joined:
    Mar 11, 2017
    Messages:
    178
    Likes Received:
    106
    Hi Gray,
    Nice to hear from you. Yes the VFD Spindle is sitting around my workshop waiting for some bits to arrive before I can get on with that. There seems to be plenty around regarding running the spindle from the Huanyang Inverter, but not so much about the digital connection from xpro to inverter to convert iso Scodes to actual spindle speeds. That said the inverter manual is a large Chinese translation so I'll have to put my best reading glasses on! I'll let you know how I get on.
    Cheers, Geoff
     
    GrayUK likes this.

Share This Page

  1. This site uses cookies to help personalise content, tailor your experience and to keep you logged in if you register.
    By continuing to use this site, you are consenting to our use of cookies.
    Dismiss Notice