Welcome to Our Community

Some features disabled for guests. Register Today.

Custom build 80w Co2 Laser Cutter

Discussion in 'Laser Cutters' started by CChico, Dec 7, 2018.
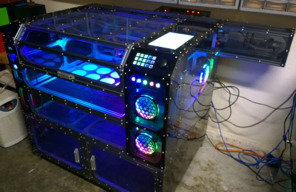
  1. CChico

    CChico New
    Builder

    Joined:
    Nov 21, 2018
    Messages:
    29
    Likes Received:
    96
    CChico published a new build:

    Read more about this build...
     
    G4rF likes this.
  2. pedrofernandez

    pedrofernandez Journeyman
    Builder Resident Builder

    Joined:
    May 14, 2017
    Messages:
    148
    Likes Received:
    218
    hello that machine frame is looking pretty good, Ill follow your work and most interested on the Hiwin rails for my build upgrade, one small advice from a been there done that fellow Co2 builder,, try to build the X Y stage as a separate unit from the frame, like a floating unit, it will make your life a breeze when time says it is time to align everything out, mostly and more critical on the size you are working on, best wishes on your endeavor!!!
     
    #2 pedrofernandez, Dec 7, 2018
    Last edited: Dec 8, 2018
  3. CChico

    CChico New
    Builder

    Joined:
    Nov 21, 2018
    Messages:
    29
    Likes Received:
    96
    Hey, yeah after I started building it I realized that it would have been a lot easier making the xy axis outside and just mounting it inside the frame. I tried being careful and be as leveled as I could but I’m guessing I’m going to have to tweak that thing a lot as soon as I drop the laser in. I should get the tube in by late next week. I already have an even more complicated build in mind where that will come in handy. If you have any other tips I’d be glad to hear them. Thanks.
     
  4. pedrofernandez

    pedrofernandez Journeyman
    Builder Resident Builder

    Joined:
    May 14, 2017
    Messages:
    148
    Likes Received:
    218
    What linear rails and blocks models are you using for this build?
     
  5. CChico

    CChico New
    Builder

    Joined:
    Nov 21, 2018
    Messages:
    29
    Likes Received:
    96
    I'm using MGN12 Linear Rails with MGN12C Carriage blocks. My Chinese 80w laser already uses them so I figured I'd use them on this build. What are you thinking about using?
     
  6. pedrofernandez

    pedrofernandez Journeyman
    Builder Resident Builder

    Joined:
    May 14, 2017
    Messages:
    148
    Likes Received:
    218
    still on the look on what to use, have you test your x y motion already? how you like it?
     
  7. CChico

    CChico New
    Builder

    Joined:
    Nov 21, 2018
    Messages:
    29
    Likes Received:
    96
    Everything feels good so far. I'm waiting on a 2:1 gear reducer for the y-axis. I have a 3:1 pulley on there now but it's too big and the laser tube won't fit because of it. Then I'll be able to properly test it but my 80w laser already uses the MGN12 Rails and Carriers and I've abused the crap out of my machine and they are still operating smoothly. Love your build btw. Something like that is what I originally intended to do with my old k40 but I wanted to upgrade the tube to an 80w, so I was going to need a make a much bigger frame and upgrade motors and get a new controller so I figured why just not build it from scratch.
     
  8. pedrofernandez

    pedrofernandez Journeyman
    Builder Resident Builder

    Joined:
    May 14, 2017
    Messages:
    148
    Likes Received:
    218
    Thanks, are you using normal 2GT or something else, Belt width, im about to jump into rails soon bur afraid to buy the wrong stuff!!!
     
  9. CChico

    CChico New
    Builder

    Joined:
    Nov 21, 2018
    Messages:
    29
    Likes Received:
    96
    I can definitely understand. The rails get expensive rather quickly. I ended up using 3M instead of 2GT. Performance wise from what I’ve read, they are identical and both are designed for linear motion. I went with 3M because it seems to be easier to source at longer and wider lengths than 2GT which are mostly used for smaller builds.

    I found this website when I first was planning the build and it made me feel better about buying belts. Which ever way you go just make sure that you get the corresponding pulleys

    Choosing Belts and Pulleys - RepRap
     
  10. Satish Veda

    Builder

    Joined:
    Dec 21, 2018
    Messages:
    13
    Likes Received:
    1
    Hi CChico,
    Great work ! Have you thought of a belt less system? Or is the cost of a ball-screw based system way too high?
    Also:- How are you planning on metrics?
    *Accuracy *Precision & Throughput
    ThanX!!
     
  11. CChico

    CChico New
    Builder

    Joined:
    Nov 21, 2018
    Messages:
    29
    Likes Received:
    96
    Hey Satish,

    To be honest I hadn't even thought about using a ball-screw based system but I can only imagine that the cost would be astronomical plus I don't believe that it is needed. The precision with belts is already down to .01 I think but the score mark that the laser makes is much bigger than that so in the end, you wouldn't be gaining much as far as precision. I'm sure it would make for a much nicer heftier maybe longer lasting machine but it is also easy and cost effective to replace a belt. I am rather curious though. I'm going to look into how much it would have been if I used them in my system.
     
  12. Satish Veda

    Builder

    Joined:
    Dec 21, 2018
    Messages:
    13
    Likes Received:
    1
    >>I think but the score mark that the laser makes is much bigger than that so in the end, you wouldn't be gaining much as far as precision.
    Hey CChico: Thanks for the reply. The Std. Dev (Sigma) would need to be added to the Laser score mark dia. So in the case of a belt system the (Sigma)^2 would
    get larger as you progress through the workload (due to heat generated via friction).
    Probably a non-issue, for cutting, however, maybe an issue for fine engraving.
    BTW:- Do you have belts on all axes?
    Also I presume you're planning to run Stepper's w/o encoders?
    TIA
    -SVeda
     
  13. MikeBardsley

    Builder

    Joined:
    Mar 20, 2016
    Messages:
    2
    Likes Received:
    5
    I purchased the open builds 1000mm 20/40 setup to start with, are you concerned about the sag/flex you will get on your axis as your head travels?
     
  14. Satish Veda

    Builder

    Joined:
    Dec 21, 2018
    Messages:
    13
    Likes Received:
    1
    >>are you concerned about the sag/flex you will get on your axis as your head travels?
    Hi Mike: Yes. However, there are at least '2' components to the above.
    1. Static Component (at the very beginning of a workflow, for ex):- where the sag/flex will add (or subtract) to the variance in positioning.
    2. Dynamic Component: (Where the Sag/Flex will include a Temporal variable to the process).

    Again ...these are non-issues, if cutting to a tolerance of say +/-1mm (in this case)
    However, if you changed the Laser (and hence the spot dia) and have a spot size to be 1/10th of +/-1mm, then we have an issue.
    You would probably change the laser and the optics (and hence it's spot size) for fine engraving.

    So Basically:- I was asking if ball screws could be designed in (to greatly reduce environmental variances, like temp & humidity).
    Maybe an "Over-design" for coarse cutting, but would make the machine more deterministic and multipurpose.
    Regards,
     
  15. Satish Veda

    Builder

    Joined:
    Dec 21, 2018
    Messages:
    13
    Likes Received:
    1
    CChico:- How RU? I would recommend leveling feet. You could still use the rollers. The leveling feet will give you the ability to level out the garage floor, for ex.
    Best,
     
  16. CChico

    CChico New
    Builder

    Joined:
    Nov 21, 2018
    Messages:
    29
    Likes Received:
    96
    That's actually a really good idea. I had not thought about using levelling feet but I think I will. Would make my life easier. I don't trust those rollers at all. Thanks.
     
  17. Satish Veda

    Builder

    Joined:
    Dec 21, 2018
    Messages:
    13
    Likes Received:
    1
    "My 80w Chinese laser came with an extremely loud exhaust, air assist, and water pump, all 110v. My goal for this build is to replace all those peripherals with DC components so that I can eliminate all those loud components with much quieter ones and so that I can eliminate all those plugs and control everything directly from the laser (that's the purpose of all the buttons in the front of the machine.)"

    Hi CChico,
    Howdy? Regarding your recent post (in quotes above). If you moved the Laser Cooling function to the DC side, you're introducing a Single Point of Failure.
    So basically, when the DC power supply fails (or has anomalies), you're Laser has ZERO cooling! You'll be shortening the Laser tube lifetime.
    Also:- On the performance side, your cooling anomalies will influence the Laser beam variances. These anomalies maybe subtle and not noticeable w/o cooling metrics (via data logging) and measurement of Laser parameters (in real time, over a specific time period).
    Regards,

    P.S. Have you planned for a Cooling Malfunction Interlock (which would shut power off to the Laser)?,
     
  18. CChico

    CChico New
    Builder

    Joined:
    Nov 21, 2018
    Messages:
    29
    Likes Received:
    96
    Hey, so far this is what I’ve come up with. When I push a button to turn the water pump on, it also turns on my water temperature display, and it also turns a light on behind a visual water flow indicator. I’m also looking into getting a water flow sensor which are relatively cheap, I’ll just have to find out how to make it work with my control board, cohesion 3d laserboard, or rig something with the raspberry pi I already have inside of the machine.
     

    Attached Files:

  19. Satish Veda

    Builder

    Joined:
    Dec 21, 2018
    Messages:
    13
    Likes Received:
    1
    Hey CChico:- 'Morning! My intention is to be a Skeptical Design Reviewer, as I do in my professional life. I hope I don't piss you off :>)
    I learn't Precision Machining from a "Guru" at LLNL, hat's off to Jim Bryan!
    So basically we would start the design '2 ways:- a) Top Down approach (most folks do this) & b) Bottom up Approach
    When we have a Technical Risk and or a Business Risk, we need a "Bottom up approach" to retire the risk(s) in question. Let's cast aside the Business side, here.
    So:-
    The known Technical Risks (not a complete list by any means), for example:-
    1. Tool Positioning Precision (Accuracy maybe derived thereafter by calibration). To keep it simple let's say: This is @ room temp (25 Deg C)
    2. Laser Beam Parameters, over time & more importantly over the work area.
    3. Reliability: Let's look at this Top-Down, as we would need a HALT test in a chamber for a meaningful reliability test.
    a) Keep the Laser tube H.V. Controller & Cooling accessories independent of the motion system. Reduces dependencies & eliminates unwanted performance
    related variables.

    To test for '1' we would need encoder info from the steppers and plot it over commanded position info. Don't know if you're running open loop on the steppers.
    To test for '2' you'd need a beam profiler (with a suitable attenuator, since the laser is 80W optical pwr). And profile the beam to extract the beam parameters over time and the extremities of the work area. There are plenty of USB/Ethernet based beam profilers.

    Depending on the results of test(s) '1' & '2' we would need to tweak the machine.
    For example:- Maybe at certain extremities of the work area the beam loses 10% or more of it's power. We need to find out if the motion system/the laser beam coupling optics are contributing to this variance.
    Regards,
     
  20. Satish Veda

    Builder

    Joined:
    Dec 21, 2018
    Messages:
    13
    Likes Received:
    1
    "When I push a button to turn the water pump on, it also turns on my water temperature display, and it also turns a light on behind a visual water flow indicator. I’m also looking into getting a water flow sensor which are relatively cheap"

    CChico:- Are you implying that the water pump needs to be turned on manually? The Laser operates at it's best spec (as specified in the data sheet), with a 21 Deg to 25 Deg C, so probably best to turn on the Laser cooling accessories independently of Laser power. If the Laser Cooling is powered on with DC, loss of DC pwr is detrimental to Laser performance and lifetime. Even with an interlock to trigger the event.
    Best to use a Chiller to control the temp to the Laser. And interlock the Laser AC i/p pwr to the Chiller alarm O/P. An added advantage is that when you switch the Laser pwr off. The chiller stays on.

    Also:- The more the number of sensors, the lower the reliability (measured as MTBF & Uptime, for example). The flow sensor is great for secondary confirmation of flow, not for a Primary Interlock, because when this sensor malfunctions (SW can't figure this out easily).
    Regards,
     
  21. Satish Veda

    Builder

    Joined:
    Dec 21, 2018
    Messages:
    13
    Likes Received:
    1
    Quote:- "I can jog the motors using lightburn right now and get the laser head to move, but when I try to start a job depending on where in the bed it is located, it grinds and loses a lot of steps but that’s another issue for another day."

    Hey CChico,
    How's it going? Cool pics! I happened to notice the above ( in quotes). This usually occurs because of excitation of natural frequencies (Mech & Electrical). The best way to avoid this is to use a PROFILE to drive the Stepper. Pay around with the controller SW and reduce the slope of the Trapezoidal profile(s), if provided use a SW notch filter, as well. Since it's very position dependent, you could also try Mechanical Damping. Of course, all this assumes that the belts have the identical tension all over the work area. Hope this helps.......
    Regards,
     
  22. CChico

    CChico New
    Builder

    Joined:
    Nov 21, 2018
    Messages:
    29
    Likes Received:
    96
    Thanks. I’ll keep all that in mind when I actually start squaring everything up. I stopped working on that for a few days and I’ve mostly been concentrating in cleaning up all the wires, separating power from signal cables, etc etc.

    I also did find out that the original grinding noises was just me being dumb and not checking all my settings. I told the software how big the print area was but under the controller settings I had 200x300 so when I the head would try to move past the given parameters it would just go heywire.

    If everything goes well I should have the belts tracking tomorrow and I’ll be ready to test fire the laser by the end of week.
     
  23. Satish Veda

    Builder

    Joined:
    Dec 21, 2018
    Messages:
    13
    Likes Received:
    1
    Quote:- "I also did find out that the original grinding noises was just me being dumb and not checking all my settings. I told the software how big the print area was but under the controller settings I had 200x300 so when I the head would try to move past the given parameters it would just go heywire."

    That's funny! A good problem to have, as long as it's trivial to solve!
    Keep us posted. TIA.
    Regards,
     
  24. Satish Veda

    Builder

    Joined:
    Dec 21, 2018
    Messages:
    13
    Likes Received:
    1
    Hey CChico,
    How RU? How's the build coming along?
    Regards,
     
  25. CChico

    CChico New
    Builder

    Joined:
    Nov 21, 2018
    Messages:
    29
    Likes Received:
    96
    Hey! Thanks for asking. I’ll do an actual post a bit later today, but so far so good. I’m a bit behind from where I thought I’d be but it was mostly because of an issue with my board. I know that structurally everything is fine with the machine.

    The board I have uses smoothie or grbl as firmware and I tried both but kept having communication errors. I would start a project and it would get interrupted in the middle, sometimes I’d send a command to grbl and I would get an error and the settings would reset, it was just a mess. It wasn’t all the time but it would happen enough to drive you mad.

    Also axis X was having issues, it would Cut perfectly but if I set it to scan, the image would warp and dance all over the place. I finally figured out the X issue and it wasn’t anything mechanical so I feel better. It was just another board issue.

    So now that I feel confident that everything is working as it should, I’m continuing the build. I’ll add pictures later today. I also “made” myself a rotary. I bought a chuck rotary and mounted it to some extruded aluminum and made a frame so I could use it with the build.
     
  26. CChico

    CChico New
    Builder

    Joined:
    Nov 21, 2018
    Messages:
    29
    Likes Received:
    96
    Ok, I lied. I'll post something tomorrow. Working on putting on the back panels so that I can test the extractor. Still haven't begun working on the lid.
     
  27. Mark Carew

    Mark Carew OpenBuilds Team
    Staff Member Moderator Builder Resident Builder

    Joined:
    Jun 28, 2013
    Messages:
    2,741
    Likes Received:
    2,407
    Amazing Build @CChico its an outstanding job! Thank you for taking the time to share all the coolness that is this laser. :thumbsup:
     
  28. CChico

    CChico New
    Builder

    Joined:
    Nov 21, 2018
    Messages:
    29
    Likes Received:
    96
    Thanks. I've been having a lot of fun with the build. I've learned a lot during the build that's for sure but I also learned a lot by reading and looking at pictures of other builds, so sometimes I might be a bit wordy but it might give someone an idea, just like I've gotten ideas from other people. I'm definitely glad that this place exists. Props to you guys, I would not have even remotely considered ever building something if I hadn't found this place. Kudos
     
    GrayUK and Rick 2.0 like this.
  29. Satish Veda

    Builder

    Joined:
    Dec 21, 2018
    Messages:
    13
    Likes Received:
    1
    Hey CChico,
    It's looking good! Feels like it wants you to dance along, while it's cutting!
    BTW:- Are going to add the rotary attachment as well?
    Regards,
     
  30. CChico

    CChico New
    Builder

    Joined:
    Nov 21, 2018
    Messages:
    29
    Likes Received:
    96
    Hey, yeah I got the rotary attachment going as well. Maybe I'll post pictures of it tonight. The laser machine is still at the same state as before. I haven't had a chance to finish panelling it but it will happen soon. Since the laser is fully operational I started using it for production. I'll take some time off next week and hopefully finish it. However today I punished the machine and ran it for about 8 hours and it worked beautifully. The temperate of the water reached 27C which is not bad at all. So far so good.
     
    Satish Veda likes this.

Share This Page

  1. This site uses cookies to help personalise content, tailor your experience and to keep you logged in if you register.
    By continuing to use this site, you are consenting to our use of cookies.
    Dismiss Notice