Welcome to Our Community

Some features disabled for guests. Register Today.

C3DO

Discussion in '3D printers' started by crypt-tek, Nov 25, 2017.
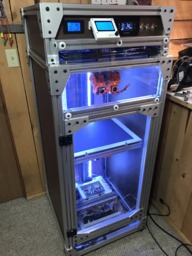
  1. crypt-tek

    crypt-tek New
    Builder

    Joined:
    Nov 25, 2017
    Messages:
    14
    Likes Received:
    92
    crypt-tek published a new build:

    Read more about this build...
     
    cheaplicenseshop likes this.
  2. Michael.M

    Michael.M Veteran
    Staff Member Builder Resident Builder

    Joined:
    Jan 21, 2017
    Messages:
    432
    Likes Received:
    263
    This is your first 3D printer build? That's awesome! Nice work.
     
    cheaplicenseshop likes this.
  3. crypt-tek

    crypt-tek New
    Builder

    Joined:
    Nov 25, 2017
    Messages:
    14
    Likes Received:
    92
    Yes first ground up build from scratch. Thank you.
     
  4. Holy1

    Holy1 New
    Builder

    Joined:
    Nov 7, 2014
    Messages:
    15
    Likes Received:
    2
    Nice build! Do you have a link to the RM2005-1250mm-C7 BallScrew? I've built 3 printers and I can tell you have put a LOT of time into this.
     
  5. crypt-tek

    crypt-tek New
    Builder

    Joined:
    Nov 25, 2017
    Messages:
    14
    Likes Received:
    92
    It was purchased on eBay the original seller does not have it anymore but there are several other sellers. It was from China
     
  6. Trunkmonky

    Builder

    Joined:
    Aug 12, 2017
    Messages:
    18
    Likes Received:
    17
    This thing is a work of art! May i ask where your inspiration came from?
     
  7. crypt-tek

    crypt-tek New
    Builder

    Joined:
    Nov 25, 2017
    Messages:
    14
    Likes Received:
    92
    Honestly I did some early drawings in Sketchup with a basic shape and just continued adding and redesigning different aspects as I went along. No one machine inspired me, I just wanted to create a machine that worked and worked well. I was tired of prints failing because I bumped my smaller printer taking it out of alignment.

    So far I have wheeled this around a couple times, fired it up and printed a perfect print each time.

    I have been staring at it a few days now trying to decide how to mount the filament spools. Drawing a blank...
     
  8. Scotty Orr

    Scotty Orr Journeyman
    Builder

    Joined:
    May 21, 2015
    Messages:
    315
    Likes Received:
    177
    I can't tell from your photos if the PTFE fittings on the top of the machine are fixed or moving. If they are fixed, I think mounting the spools on top, directly above and as close as possible would be clean and easily accessible. If they are moving, maybe on the back of the machine (if room) with plenty of travel length for the tubes? just thoughts. Great looking machine, BTW!!

    Here's a quick render of an idea if those are fixed (mount lower rail centered between fittings and front to back):

    Screen Shot 2017-11-28 at 5.43.27 AM.png
     
    #8 Scotty Orr, Nov 28, 2017
    Last edited: Nov 28, 2017
  9. crypt-tek

    crypt-tek New
    Builder

    Joined:
    Nov 25, 2017
    Messages:
    14
    Likes Received:
    92
    Thank you for the idea, they are fixed at the top of the machine. The top of the machine is where I am most likely going to place them. I am just trying to get them to blend with the rest of the machine and not look like I just threw rolls on top of the machine.
     
    Scotty Orr likes this.
  10. Holy1

    Holy1 New
    Builder

    Joined:
    Nov 7, 2014
    Messages:
    15
    Likes Received:
    2
    Josh B and Scotty Orr like this.
  11. crypt-tek

    crypt-tek New
    Builder

    Joined:
    Nov 25, 2017
    Messages:
    14
    Likes Received:
    92
    Oh I like that, it is a possibility. Although I am thinking as the printer is on casters and may move from time to time I'd like to support the spool from tipping side to side.
     
  12. Scotty Orr

    Scotty Orr Journeyman
    Builder

    Joined:
    May 21, 2015
    Messages:
    315
    Likes Received:
    177
    I really like those too! My spools have a 50mm id hole, so one set of those might fit in the inside hole of the spool.
     
  13. JohnSmithhart

    Builder

    Joined:
    Nov 4, 2016
    Messages:
    1
    Likes Received:
    0
    Dude this is awesome. Great work.
     
  14. Trunkmonky

    Builder

    Joined:
    Aug 12, 2017
    Messages:
    18
    Likes Received:
    17
  15. Jay Dickson

    Builder

    Joined:
    Nov 21, 2017
    Messages:
    2
    Likes Received:
    0
    Absolutely beautiful. Do you have any examples of something you've used it to make?
     
  16. crypt-tek

    crypt-tek New
    Builder

    Joined:
    Nov 25, 2017
    Messages:
    14
    Likes Received:
    92
    So far just a couple small things I've built for my kids testing the printer. I will upload shortly, I've been meaning to upload photos.
     
  17. Bloodember

    Builder

    Joined:
    Nov 1, 2016
    Messages:
    4
    Likes Received:
    2
    How do you have your electronics wired? The Rumba comes with stepper motors, but you show you also got some digital stepper motors also. I'm assuming your using the digital steppers over the ones that came with it. Maybe I'm just over thinking it.
     
  18. crypt-tek

    crypt-tek New
    Builder

    Joined:
    Nov 25, 2017
    Messages:
    14
    Likes Received:
    92
    You are correct, the Rumba does come with slots for stepper drivers. However it is possible to take the enable signal and the step/direction signal directly from the rumba or any 3D printer board and run them directly into an external Stepper Driver. This allowed me to use higher torque stepper motors which required high AMP's. It also allowed me to use more stable drivers apposed to the DRV8825 or Step Stick A4988 eliminating over heating.
     
  19. Bloodember

    Builder

    Joined:
    Nov 1, 2016
    Messages:
    4
    Likes Received:
    2
    Ah, How do you wire that and what drivers did you use? I'm working on building a large scale printer and I'm researching electronics.
     
  20. crypt-tek

    crypt-tek New
    Builder

    Joined:
    Nov 25, 2017
    Messages:
    14
    Likes Received:
    92
    This is a drawing I just whipped up, but basically you wire each slot for a driver to your external driver. Below would actually wire extruder #2 to an external driver but you do not need to do every driver only the ones which you would like to use larger motors. I am using these Digital Stepper Driver 1.0-4.2A 20-50VDC for Nema 17, 23, 24 Stepper Motor

    upload_2018-2-10_23-40-59.png
     
  21. Bloodember

    Builder

    Joined:
    Nov 1, 2016
    Messages:
    4
    Likes Received:
    2
  22. Ryan155

    Ryan155 New
    Builder

    Joined:
    Jun 2, 2016
    Messages:
    4
    Likes Received:
    15
    I love the layout. So much so that I am designing one myself. How is your z axis when it comes to wobble? The supported Cantilever isn't something I have seen before, have you tried running this through a large print at its full build volume? Does the Z axis configuration give you issues?
     
  23. crypt-tek

    crypt-tek New
    Builder

    Joined:
    Nov 25, 2017
    Messages:
    14
    Likes Received:
    92
    I haven't ran a tall print yet, but so far no wobble. I will post some more pictures for you of the z-axis build later this evening.
     
  24. Ryan155

    Ryan155 New
    Builder

    Joined:
    Jun 2, 2016
    Messages:
    4
    Likes Received:
    15
    Yes please! thanks so much!
     
  25. crypt-tek

    crypt-tek New
    Builder

    Joined:
    Nov 25, 2017
    Messages:
    14
    Likes Received:
    92
    Well unfortunately I did not get to this, sorry. I however will not forget! As soon as I can I'll post some more images.

    Thank you,
     
  26. Marlowe

    Marlowe New
    Builder

    Joined:
    Jan 26, 2018
    Messages:
    1
    Likes Received:
    0
    I am also anticipating more pics, or video!
     
  27. Weldon Smith

    Builder

    Joined:
    Jan 10, 2018
    Messages:
    1
    Likes Received:
    1
    Would lover to see full build info
     
    poddy71 likes this.
  28. poddy71

    poddy71 New
    Builder

    Joined:
    Apr 30, 2018
    Messages:
    1
    Likes Received:
    0
    Excellent build. Looks awesome. Would love to see a full build info also
     
  29. IT-Pro

    IT-Pro New
    Builder

    Joined:
    Jun 26, 2018
    Messages:
    1
    Likes Received:
    0
    This build is amazing. I've lurked here for a while, but had to register to see the higher res pics on this one and leave a comment. Outstanding workmanship here. Thanks for sharing.
     
  30. Nikys

    Nikys New
    Builder

    Joined:
    Jul 5, 2018
    Messages:
    1
    Likes Received:
    0
    Ахуенчик _! ))) Чётенько_!
     

Share This Page

  1. This site uses cookies to help personalise content, tailor your experience and to keep you logged in if you register.
    By continuing to use this site, you are consenting to our use of cookies.
    Dismiss Notice