Welcome to Our Community

Some features disabled for guests. Register Today.

45W CO2 Laser Build

Discussion in 'Laser Cutters' started by wackocrash5150, Dec 2, 2019.
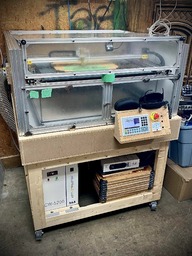
  1. wackocrash5150

    wackocrash5150 Well-Known
    Builder

    Joined:
    Jun 9, 2015
    Messages:
    102
    Likes Received:
    48
    wackocrash5150 published a new build:

    Read more about this build...
     
    sutharvj66 likes this.
  2. WR_Rider

    WR_Rider New
    Builder

    Joined:
    Apr 3, 2019
    Messages:
    63
    Likes Received:
    3
    Excellent job so far. The cutting of the plexi looks great and seems to me like it should work well.
    That x gantry of yours moves pretty fast in that video... nicely done.
    Keep posting
     
    #2 WR_Rider, Dec 4, 2019
    Last edited: Dec 4, 2019
  3. Giarc

    Giarc OpenBuilds Team
    Staff Member Moderator Builder Resident Builder

    Joined:
    Jan 24, 2015
    Messages:
    2,898
    Likes Received:
    1,613
    That looks cool. I like the dual shaft center mounted stepper motor.
     
  4. wackocrash5150

    wackocrash5150 Well-Known
    Builder

    Joined:
    Jun 9, 2015
    Messages:
    102
    Likes Received:
    48
    Thanks guys. I appreciate the feedback. The center mounted stepper was just done due to parts available. My supplier was out of 1000mm straight rod, so I went with 2x 500mm and just relocated the mount. I'm still wracking my brain about how to install the tube and 1st mirror. The way Pedro mounted his rear vertical extrusions gave him more options.

    Btw; the M5 8mm screws were on back-order so, it's just been sitting there all week teasing me.
     
  5. Giarc

    Giarc OpenBuilds Team
    Staff Member Moderator Builder Resident Builder

    Joined:
    Jan 24, 2015
    Messages:
    2,898
    Likes Received:
    1,613
    Crap. I ordered a few packs of those. I hope it's not my fault because I won't get to mine until after the holidays.
     
  6. wackocrash5150

    wackocrash5150 Well-Known
    Builder

    Joined:
    Jun 9, 2015
    Messages:
    102
    Likes Received:
    48
    lol ... Naw. I ordered them from my local Fastenal. Matter of fact, they just called me about 30 min ago to let me know they have them.
     
  7. wackocrash5150

    wackocrash5150 Well-Known
    Builder

    Joined:
    Jun 9, 2015
    Messages:
    102
    Likes Received:
    48
    Hi all. Sorry for the lack of progress updates. A few health issues have taken this project out of priority but I'm still trying to plug away, or at least think about it when time and energy allows.

    Not too much has changed in the past month. It's still sitting in roughly the same spot on my CNC bed like in the photo... lol.

    I'll add some pics later but I've roughly figured out how I'm going to apply motion to the Z axis. Basically a closed loop belt over a couple pulleys to a Nema 23 I have sitting around. Should to the trick nicely. I've also been farting around with the design for the intermediate back panel to which I will mount the electronics to. It's just going to be a piece of 1/8th" hardboard for now until I get the design finalized. It will probably be acrylic when done.

    So I've been thinking about cooling lately for the laser tube. As much as I would like to have a standalone laser cutter, I think it might be wise to mount the pump, reservoir, radiators and fans externally. I would just pipe out of the main chassis using some barbed fittings. This would leave minimal tubing inside but would also have the flow sensor switch inside as well.

    This got me thinking that I should probably also have some sort of thermometer/temperature-sensor on the output of the tube so I can monitor it. What do you guys suggest? Something with a barbed inline fitting would be good as I'm fighting a but with thread standards mainly on the flow switch. (uses a G standard rather than the commonly depot available NPT standard. And I also mistakenly ordered the 8mm ends for mine as opposed to the 10mm ends from CloudRay)

    I'll upload some pics when I can.
     
  8. wackocrash5150

    wackocrash5150 Well-Known
    Builder

    Joined:
    Jun 9, 2015
    Messages:
    102
    Likes Received:
    48
    Kind of completely pointless but, I took a video of my cnc cutting some acrylic parts for the laser cutter.

     
    Rachel Holley likes this.
  9. wackocrash5150

    wackocrash5150 Well-Known
    Builder

    Joined:
    Jun 9, 2015
    Messages:
    102
    Likes Received:
    48
    Well with a few moments of time and energy here and there, I managed to make some progress on the build. I recut the intermediate panel and decided to make a couple sub-panels as well. I mounted components to the sub panels and then mounted the 2 sub panels to the intermediate panel. Made things easier for installation to the left and right of the exhaust pipe. Laser PSU and 120AC filter still need to be installed on the 2nd sub-panel but I managed to get the 1st one in with the RuiDa controller and 24V PSU, The stepper drivers are just mounted on a small piece of extrusion and fastened to the frame for good heat dissipation. So with this and wiring up the XY endstops, I got motion! Also got a bit of a test frame in there for the Z axis which seems to work well. Going to figure out some end stops for it as well.

    Here's a little video demonstrating motion.

     
    Mark Carew likes this.
  10. wackocrash5150

    wackocrash5150 Well-Known
    Builder

    Joined:
    Jun 9, 2015
    Messages:
    102
    Likes Received:
    48
    Still lots of work left to do but made some good progress. Got the x-axis drag chain and retainer installed and working well. Ran the air-assist hose through and am going to run a Had to fiddle with the chain a bit as it was not giving clearance for the laser path at first. Good thing I noticed it before firing the tube for whatever reason, otherwise it would've tried burning the chain/hose. Next thing is to shorten the z-axis rails a bit to allow more z height. This also means re positioning the z-axis limit switches. Not a huge deal with a bit of thought. After that we should be on to skinning the frame. I'm going to try and use some 1/8" hardboard from Depot for now that's white on one side. The board is a bit flimsy but the frame is fairly rigid. I can cut this to size with screw holes on my 4x4 cnc. Then finally a lid, which I have to order more extrusion for as I miscalculated in the beginning with my design. At this point the cooling to the tube is working and the mirrors are aligned, so she will make smoke! For the air-assist, I just decided to use my shop compressor (as it's 6 feet away) with a pressure regulator on the line. I should probably put a moisture filter on it for good measure to protect the focus lens.
    The bed surface has been an interesting dilemma. Obviously there's the go-to honeycomb bed but, that stuff is unusually expensive. I'd need a piece about 800*500 and even something close to that is $150-$200 from what I can see. I just can't bring myself to pony up for one at this point. So then there's the knife bed. Seems like a decent idea but somewhat of a fabrication process. So lastly as I can tell, there's the pin-bed option. I thought about this one and then thought, what if I just ran a couple extra extrusion runs on the bed, then install a bunch of t-nuts with some 25mm' ish M3 screws in them? not exactly a "pin" bed but, it would raise the material up for cutting. Cheap and think I might try it.

    Here's a little video of the motion test with the x-axis drag chain installed.

     
    #10 wackocrash5150, Feb 27, 2020
    Last edited: Feb 27, 2020
  11. Giarc

    Giarc OpenBuilds Team
    Staff Member Moderator Builder Resident Builder

    Joined:
    Jan 24, 2015
    Messages:
    2,898
    Likes Received:
    1,613
    For a bed, I bought these spikes for costume clothing. I plan to screw them into a sheet of polycarbonate plastic. Someone gave it to me thinking it was acrylic and I quickly learned a CO2 laser barely makes a mark in it when I tried cutting and engraving it. It melts a little bit but flows back and solidifies so I figure it would make an easily machines bed with the CNC router that I can make a grid with those metal spikes.
     
    wackocrash5150 likes this.
  12. arcrunner

    arcrunner Well-Known
    Builder

    Joined:
    Jul 19, 2018
    Messages:
    48
    Likes Received:
    37
    Nice! What size motor are you using on the X axis?
     
  13. Mark Carew

    Mark Carew OpenBuilds Team
    Staff Member Moderator Builder Resident Builder

    Joined:
    Jun 28, 2013
    Messages:
    2,742
    Likes Received:
    2,407
    Nice Build!
    Cool idea on these spikes but being as reflective as they are I would make sure to paint them so you don't get the reflected laser light coming back out at you.
     
    Giarc likes this.
  14. wackocrash5150

    wackocrash5150 Well-Known
    Builder

    Joined:
    Jun 9, 2015
    Messages:
    102
    Likes Received:
    48
    Using a Nema17 Stepper Motor 4-lead 48mm 59Ncm. Same power as the dual shaft for the Y-axis. Seems to work fairly well so far in preliminary runs.

    As for a smoke extraction solution, I finally broke down and ordered one of those 550W chinese over-sized turbo looking things. I know they're loud but I don't really want to compromise with toxic fumes. I've noticed that plexi smells REALLY bad when cutting.

    The frame is also enclosed now, including the bottom, which I just used some 1/8" hardboard which is white on one side. Seems this may be an issue as when I was cutting through a piece of acrylic, the beam discolored the bottom. I think I may hunt down a few ceramic tiles and just lay them on the bottom to prevent this.

    In it's current state it's usable for short periods of time. I'm using a shop-vac for smoke extraction temporarily and have hooked up the cooling system. Upped the pump to a 920 GPH for good measure running into a 5 gallon plastic pail. I have a 2 fan radiator that I have not worked into the system yet.

    Started collecting pieces to build Pedro's "low budget rotary" as well so, that should be fun. I already have the stepper driver in place for it.

    I'll post some pics when I can.

    Cheers
     
    asfand likes this.
  15. asfand

    asfand New
    Builder

    Joined:
    Jun 14, 2020
    Messages:
    4
    Likes Received:
    0
    please share cad model once completed thanks :)
     
  16. wackocrash5150

    wackocrash5150 Well-Known
    Builder

    Joined:
    Jun 9, 2015
    Messages:
    102
    Likes Received:
    48
    No CAD model so to speak. Just the May-CAD drawing that helped me forgive out how to arrange the extrusion.
     
  17. wackocrash5150

    wackocrash5150 Well-Known
    Builder

    Joined:
    Jun 9, 2015
    Messages:
    102
    Likes Received:
    48
    Hey everyone. Completely forgot about this build log and dropped the ball. Was sidetracked with some fairly serious health issues but things seem to be on track now. This build has been up and running well since the fall. It's have a few upgrades over the months. Added a beam splitter for a red-dot. A custom sized honeycomb table. Adjustable tube mounts from Cloudray Laser. Also an S&A CW5200 cooler from them as well so the laser can be run indefinitely. I no longer have to have cooling periods and rely on ice packs. Not the cheapest thing in the world but definitely a much better solution. Lately I've been considering a more powerful laser. Possibly a 70-90 watt. Overall it's been a great little'ish unit. Of the CNC, 3d Printer and this, it's probably the most used unit. From hinge spacers for kitchen cabinet hinges to kids craft stencils, it's great.
     
  18. wackocrash5150

    wackocrash5150 Well-Known
    Builder

    Joined:
    Jun 9, 2015
    Messages:
    102
    Likes Received:
    48
    Well I probably should list this build as "complete" now. However like most projects on here, it's never really complete and constantly evolving. I forgot to mention above that I've built a proper torsion box stand for it and also recently added the "ultimate air assist" kit from Cloudray.. This is fed from my 20 gallon compressor into a double air/water filter, then to a pressure regulator set to about 25 psi and then into a 24v solenoid controlled by the Ruida/air-assist setup. I put a shelf on the bottom on the stand to hold the chiller and some supplies. A proper housing was cut for the Ruida control panel. I have the main unit, chiller and fume extractor fan controlled on a remote 3 channel AC controller from Amazon. Seems to all work pretty well and I have a decent workflow. An old Lenovo PC runs Lightburn. I've mounted a camera on the inside of the lid to use Lightburn's camera features. Things on the to-do list would be to upgrade the tube and power supply, make an extension to house the longer tube, modify the cooling plumbing to have some fittings on the side of the machine and finally make the USB/RJ45 connectors all panel mount. I love using this machine and have leanred a tremendous amount by building instead of buying. Shoot me a message if you have any questions.

    196243748_401812684341049_1654472930563084041_n.jpg
     
    REdington, Giarc and JustinTime like this.
  19. sutharvj66

    Builder

    Joined:
    Jun 6, 2019
    Messages:
    12
    Likes Received:
    0
    HI, I M REALLY EXITED TO BUILD ONE, CAN YOU SHARE THE PARTS LIST AND TOTAL COST? REALLY APPRECIATE.
    THANKS IN ADVANCE
     
  20. DavidR8

    DavidR8 New
    Builder

    Joined:
    Feb 3, 2021
    Messages:
    1
    Likes Received:
    0
    Love this build. What is the overall footprint?
     
  21. syl

    syl New
    Builder

    Joined:
    Jan 7, 2019
    Messages:
    49
    Likes Received:
    12
    Are you open to sharing the STL / SVG files for this build?
     
  22. Giarc

    Giarc OpenBuilds Team
    Staff Member Moderator Builder Resident Builder

    Joined:
    Jan 24, 2015
    Messages:
    2,898
    Likes Received:
    1,613
    According to his post (45W CO2 Laser Build) he did not make any models.

    He references in the build he used "pedro's" files which I believe came from this build. Openbuilds Table Top 50w Co2 Laser Cutter/Engraver


Share This Page

  1. This site uses cookies to help personalise content, tailor your experience and to keep you logged in if you register.
    By continuing to use this site, you are consenting to our use of cookies.
    Dismiss Notice