Welcome to Our Community

Some features disabled for guests. Register Today.

Yet Another LEAD CNC Build

Discussion in 'CNC Mills/Routers' started by Aaron Newsome, Apr 21, 2019.
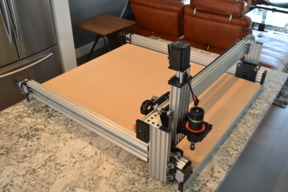
  1. Aaron Newsome

    Builder

    Joined:
    Apr 15, 2019
    Messages:
    12
    Likes Received:
    51
    Aaron Newsome published a new build:

    Read more about this build...
     
  2. Mark Carew

    Mark Carew OpenBuilds Team
    Staff Member Moderator Builder Resident Builder

    Joined:
    Jun 28, 2013
    Messages:
    2,742
    Likes Received:
    2,407
    Nice job on the Build @Aaron Newsome, really love the printed touches add to your machine :thumbsup:
     
    Aaron Newsome likes this.
  3. SugarJ

    SugarJ Well-Known
    Builder

    Joined:
    Nov 16, 2015
    Messages:
    126
    Likes Received:
    47
    Nice build! You'd probably make a few people happy if you shared your mount designs on Thingiverse.
     
    Aaron Newsome likes this.
  4. Roger Beseke

    Builder

    Joined:
    Sep 11, 2018
    Messages:
    16
    Likes Received:
    2
    Nice build Aaron. I was wondering if you could share info on the spindle that you purchased and how it is working for you. Again great job.
     
  5. Aaron Newsome

    Builder

    Joined:
    Apr 15, 2019
    Messages:
    12
    Likes Received:
    51
    Thanks Roger. I didn't really have a strategy when I purchased the spindle. I just followed the advice of some CNCers from another forum and went looking for spindles on eBay. I just looked for a vendor that was close and could ship quickly, someone who had a high rating and a spindle with specs that sounded about right. The vendor I purchased from had sold hundreds of this spindle. Although the spindle is made in China, I purchased from a vendor close to my house. My only complaint was that the controller I received was slightly different than the one pictured in the eBay listing. The eBay listed controller clearly has a separate hookup for TTL OR speed control by potentiometer (choose one or the other). The controller I received only had one connection so initially I was a bit confused how to use TTL to control spindle speed via G-code.

    I paid $77 for the spindle, including shipping. The vendor I purchased from is here: CNC 400W Brushed Spindle Motor 4pcs Set Tool Kit 12000RPM Mount NEW GENERATION | eBay

    The spindle works great. Very strong and extremely quiet compared to a DeWalt router. I really like being able to control speed via G-Code. My cheap desktop CNC can only move at 300mm/m at it's fastest speed so it's crucial that I can slow down the spindle when cutting ABS or other soft plastics, otherwise the plastics just melt on the bit.
     
  6. sharmstr

    sharmstr OpenBuilds Team
    Staff Member Moderator Builder Resident Builder

    Joined:
    Mar 23, 2018
    Messages:
    2,030
    Likes Received:
    1,428
    What software are you using with this build?
     
  7. Aaron Newsome

    Builder

    Joined:
    Apr 15, 2019
    Messages:
    12
    Likes Received:
    51
    I've been using bCNC running on my Raspberry Pi to run the machine but I also plan to use the OpenBuilds software. I just really like using the Raspberry Pi since I can easily remote desktop to it from my PC at my desk instead of having a dedicated PC at the CNC machine. I also love running the bCNC pendant in a web browser on my iPad for controlling the CNC. I mostly use SolidWorks to create models, both 2D and 3D. I usually use CamBam for generating my G-code since it runs on Windows and Linux.
     
  8. sharmstr

    sharmstr OpenBuilds Team
    Staff Member Moderator Builder Resident Builder

    Joined:
    Mar 23, 2018
    Messages:
    2,030
    Likes Received:
    1,428
  9. Aaron Newsome

    Builder

    Joined:
    Apr 15, 2019
    Messages:
    12
    Likes Received:
    51
    First cut today on the LEAD CNC machine. I swapped out my controller and purchased a Black Box from OpenBuilds and now I can say I've done my first cut. Well technically, this is the second cut on the new machine. The first cut was a vertical and horizontal line in the spoilerboard at 0,0. This is my DJ logo engraved in brushed silver/black ABS on the back of my laptop with carpet tape.
     

    Attached Files:

    sharmstr likes this.
  10. Roger Beseke

    Builder

    Joined:
    Sep 11, 2018
    Messages:
    16
    Likes Received:
    2
    You are the man. Great first project. Thanks for the info. I think I need to get one of those spindle things.
     
  11. Forestbird Originals

    Builder

    Joined:
    May 6, 2019
    Messages:
    19
    Likes Received:
    4
    After owning it are you as bothered by the 2 standoff Nema 23 mounting method as I am? I feel OCD about it and my machine boxes arrived yesterday and have yet to be opened LOL.
     
  12. Aaron Newsome

    Builder

    Joined:
    Apr 15, 2019
    Messages:
    12
    Likes Received:
    51
    I absolutely hate the Nema 23 only being held by 2 screws. Eventually I’ll do something about it. I’m actually considering hybrid closed loop steppers and even better steeper controllers. If I do that i’ll probably make the mounts a little more proper and secure.
     
  13. Forestbird Originals

    Builder

    Joined:
    May 6, 2019
    Messages:
    19
    Likes Received:
    4
    I actually ordered mine with some raw aluminum plate so I can make a few custom plates. Also, the intention to make the plate on the Z axis move instead moving the whole extrusion, it’ll be 500mm instead of the stock 250mm
     
  14. Aaron Newsome

    Builder

    Joined:
    Apr 15, 2019
    Messages:
    12
    Likes Received:
    51
    Would love to see some pictures of your Z axis setup once you get it up and running. I'll keep an eye out for it.
     
  15. Forestbird Originals

    Builder

    Joined:
    May 6, 2019
    Messages:
    19
    Likes Received:
    4
    Yea I’ll definitely post it. I had a death in the family a couple weeks ago and I believe it’ll be a minute before I can start working on it
     
  16. Peter Van Der Walt

    Peter Van Der Walt OpenBuilds Team
    Staff Member Moderator Builder Resident Builder

    Joined:
    Mar 1, 2017
    Messages:
    13,749
    Likes Received:
    4,070
    An alternative to the 2-screw mount (not that its an issue, works fine. If you are twisting it so hard that those are not sufficient you are doing something wrong hehe) checkout MiniMill Z Axis Upgrade with Offset Motor (ignore MiniMill, plate works on almost all C-beam setups
     
  17. Forestbird Originals

    Builder

    Joined:
    May 6, 2019
    Messages:
    19
    Likes Received:
    4
    I actually purchased this for the z axis already. But the X and Y’s still need some help now lol
     
  18. Rick 2.0

    Rick 2.0 OpenBuilds Team
    Staff Member Moderator Builder Resident Builder

    Joined:
    Dec 20, 2013
    Messages:
    2,852
    Likes Received:
    1,524
    While it's not a terribly attractive solution, additional mounting holes can easily be added by adding some 12mm deep bar stock to the front using the existing cover plate mounting holes and then drilling the required stepper mount holes.

    Mount Revision.jpg

    To make it a bit more stable I'd also probably be inclined to drill in another screw hole into the face near each end.
     
  19. Forestbird Originals

    Builder

    Joined:
    May 6, 2019
    Messages:
    19
    Likes Received:
    4
    I am just going to do this is solid aluminum plate I think to remake the bracket eventually.
    I need to 3D print the drill guide for the hole pattern
     
  20. Christopher Harris

    Builder

    Joined:
    Oct 18, 2017
    Messages:
    13
    Likes Received:
    5
    ChrisClub on EBay sells 4 hole C-Beam end plates...
     
  21. Forestbird Originals

    Builder

    Joined:
    May 6, 2019
    Messages:
    19
    Likes Received:
    4
    I’ll take a look
    Are they compatible with the existing 2 hole plates for the non-motor side?
     
  22. Christopher Harris

    Builder

    Joined:
    Oct 18, 2017
    Messages:
    13
    Likes Received:
    5
  23. Forestbird Originals

    Builder

    Joined:
    May 6, 2019
    Messages:
    19
    Likes Received:
    4
  24. Christopher Harris

    Builder

    Joined:
    Oct 18, 2017
    Messages:
    13
    Likes Received:
    5
    He’s a member on here... Chris Laidlaw...
    But they appear to just be an extended mounting plate to accept all 4 screws/spacers.
     
  25. RodS

    RodS New
    Builder

    Joined:
    Aug 1, 2019
    Messages:
    2
    Likes Received:
    0
    Hi Aaron I’m new to the cnc mafia and am ordering the same machine you have. A few questions if you don’t mind, if I was building an in closure for it. What is the out side measurements on the finished built machine? What spindle did you end up using? I was gonna use the Dewalt.
    Thanks Rod
     
  26. Allistar

    Allistar New
    Builder

    Joined:
    Aug 19, 2019
    Messages:
    57
    Likes Received:
    19
    Hi Aaron,
    Nice build! What speeds in both X and Y do you get from this?

    Thanks,
    Allistar.
     
  27. Forestbird Originals

    Builder

    Joined:
    May 6, 2019
    Messages:
    19
    Likes Received:
    4
    I wound up going for a 3D printed version to accommodate 4 screws. I made 1 adjustment to the design after the fact to recess the nuts that will be used for the additional 2 holes. I figure this should get me by for awhile and should be better than 2 holes.

    Like Peter suggested for the Mini Mill, I am inverting the Z axis motor to save some height.

    I just added a "Build in progress" for my LEAD 1010 yesterday afternoon. I am having a lot of fun with it.
     

    Attached Files:

  28. Forestbird Originals

    Builder

    Joined:
    May 6, 2019
    Messages:
    19
    Likes Received:
    4

    You have had this spindle for awhile, how do you like it? I have been debating on whether or not to stick with my Makita trim router plan (I have some Elaire 1\8" and 1\4" collets for it, or switching to a ER11 based 400-600 watt spindle. I have a problem with the Makita just because these trim routers are SO LOUD. I will be running my CNC in the garage after work. Possible while my 3yr old is in bed 50 ft away in the house.
     
  29. Aaron Newsome

    Builder

    Joined:
    Apr 15, 2019
    Messages:
    12
    Likes Received:
    51
    This spindle is whisper quiet. I can’t imagine it being any more quiet than it already is. No complaints about the noise at all. It runs fairly cool too, even after long sessions.

    The only thing I miss is a proper metal or aluminum mount for it. I currently use the OpenBuilds mount with a 3D printed shim. It works ok but once I did not secure it properly and the spindle slipped down, ruined my work and the spoilboard. Other than that? I’ve been 100% satisfied.

    If I burn up this spindle, I’ll buy another without hesitation.

     
  30. Forestbird Originals

    Builder

    Joined:
    May 6, 2019
    Messages:
    19
    Likes Received:
    4
    Have you had run-out issues with it at all? Have you cut more than wood with it?
     

Share This Page

  1. This site uses cookies to help personalise content, tailor your experience and to keep you logged in if you register.
    By continuing to use this site, you are consenting to our use of cookies.
    Dismiss Notice