
For anyone looking to build a LEAD CNC, I wanted to post my build and hopefully answer any questions. I'll say right here in the beginning, if you're on the fence you should really go ahead and pull the trigger. This is a very nicely built machine. I took plenty of pictures and I'll point out some of the build features and little things I added.
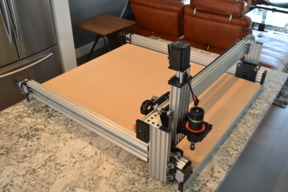
This first pic shows an overall view of the machine. I love how clean it looks and it really points to a great design and the Openbuilds system in general just being awesome.
Yes I did build this in my kitchen. My countertop was very well protected during the build. Obviously I do not plan to run a CNC machine in my kitchen.

One of the things you'll notice is that I purchased only the mechanical kit and stepper motors from Openbuilds. Since I didn't get any of the electronics or spindle, I had to make that all work on my own. Here you can see a few things such as limit switch mounts I designed and printed on my 3D printer, as well as the spindle mount, also 3D printed. Closeups of both further down.

Since I don't have a table saw at home (or even a circular saw), I had to go to Home Depot and cut the 3/4 MDF there. Home Depot usually allows 2 cuts on a 4x8 for free but they ripped the entire 4x8 for me at no charge, which was nice.

With the machine sitting at "home" you can see the 3D printed limit switch mount and the spindle mount.

Here's a closeup of the spindle I got off E-Bay. It seems pretty solid and **** it's quiet compared to a router. I think I like this setup better than a DeWalt router. Sound level isn't the only reason either. I really like being able to control the spindle speed in my G-Code.

Still not sold on the 2 screw mount of these stepper motors but it is what it is.

I think this spindle setup looks really clean. To get the mount tightened up square, I rested a couple of the 20mm screws in the C-beam channel as a stop. Worked nicely too. It's square.

Here you can see a closeup of the limit switch on the left front Y axis.

On the right side of the machine you can see the drag chain mounted to the C-beam and the 3D printed mount I made. Also, the front right limit switch.

The X axis drag chain rests on the 20x20 extrusion. You can also see my limit switch mount in RED 3D printed PLA ( I ran out of the silver lol).

At the rear right of the machine, you see another 3D printed drag chain mount and limit switch. Yes I have limit switches at both ends of all three axes.

Around the back of the machine, you can see I ran Y axis stepper wires and limit switch wires from the left side of the machine through the 20x40. I made some 3D printed plates that use T-nuts to keep the wires tucked in nicely.

A close up of the little plate.

Left rear Y axis stepper and limit switch.

Around the back of the Z axis you can see the dual limit switches on the Z axis and the left side X axis limit switch. You can also see the 3D printed drag chain mount, mounted right on the gantry plate.

Lower Z axis limit switch

Closeup of the 3D printed drag chain mount

Notice these X axis limit switch mounts have to reach in quite a bit. They're also shaped to allow the 20x20 drag chain rest to sit in the correct position.

Close up of the drag chain mount on the right side and the limit switch at the front of the machine.

Another view of the 53mm spindle

Front view of the spindle. I've actually reworked this a bit since the photo, to better mount the dust collection shoe (not pictured).

Looking at the rear right of the machine where all the wires come together and a 3D printed drag chain mount. I've actually cleaned this up a bit and reworked it since the photo was taken.

This is the first cut on the LEAD CNC. My laptop logo on my laptop in silver brushed/black ABS

I found this silver brushed ABS on Amazon. I've already created two of these logo panels. 1 for my MacBook pro and 1 for this Dell laptop. The brushed silver really looks like real metal.

A bit blurry on the edges but you can see a close up of the detail of the engraving. The LEAD CNC seems to be working nicely. Now I can CUT some stuff!
Yet Another LEAD CNC Build
Build in 'CNC ROUTER BUILDS' published by Aaron Newsome, Apr 30, 2019.
My take on the LEAD CNC build. Followed the instructions and I think it came together very nicely. Added a few of my own touches to finish up the build.
-
-
Build Author Aaron Newsome, Find all builds by Aaron Newsome
-
- Loading...
-
Build Details
- Build License:
-
- CC - Attribution - CC BY
Reason for this Build
Year ago I purchased a crappy little desktop CNC and it never worked worth a ****. I spent about the same amount on that CNC as I did on this LEAD CNC. The difference in build quality is not even close. I mounted a laser on the old desktop CNC and it seems to be an OK frame to run the small laser.


