
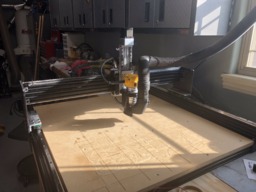
First and foremost, this is a GREAT machine out of the box. Granted, it could be a little easier to put together but I believe that is a benefit since you know EXACTLY where to go and what to do should something go wrong. The base design is very good for 99% of the people using these machines but I tend to land in the 1% when it comes to my tools so here we are.
Goals for this build:
1: Raise X axis to allow thicker parts to be machined
2: Eliminate slop and flex
3: Increase serviceability should I need to tighten, replace or modify anything in the future
4: Get rid of all of the SOFT bolts that I could supplied in the original kit
After looking at probably 100 different modified "Hobby" CnC machine mods, I found quite a bit of really good information here on the OpenBuilds forums. This build borrows heavily from Jacob Lotter's 1510 modified build (1510 Workbee Modified)
Since I don't have a machine shop at my disposal, I had to get creative making the brackets. I DO have some metal cutting saws and drill presses so that helped immensely. Bottom line, if you're 1/2 way equipped and somewhat handy with tools, you CAN preform these mods.
Parts List:
4 - 15-1500mm 2x Linear Guideway Rail 4x Square Type Bearing Block HGH 15CA (HiWin Clones on ebay)
2 - Blue Ox Deluxe WorkBee Taller Y Side Plates by chrisclub1 on ebay (2" taller, 1 pair)
100 - M4 T-Slot Hammer Head Nut, 2020 Series Silver Carbon Steel Fastener Aluminum Profile Extrusion Slot
100 - M5 T-Slot Hammer Head Nut, 2020 Series Silver Carbon Steel Fastener Aluminum Profile Extrusion Slot
200 - M4-0.7 x 15 MM Metric Allen Socket Head Cap Screws Grade/Class 12.9 Alloy Bolts Black Oxide
100 - M5-0.8 x 15 MM Metric Allen Socket Head Cap Screws Grade/Class 12.9 Alloy Bolts Black Oxide
4' - 2"x2"x1/4" aluminum 90 degree angle "iron" from OnLineMetals.com
3' - 1 1/2"x1 1/2"x 1/8" aluminum 90 degree angle "iron" from Home Depot
1 - Openbuilds Z axis with linear bearings from CnC4NewBie with drop plate
Picture Explanation:
IMG_3858 - Y Axis rail mounting bracket with stock sideplates.
IMG_3859 - Y Axis rail mounting bracket with stock sideplates view 2. Note, you cannot put screws under the X axis as they hit the extrusion
IMG_3863 - Y Axis rail mounting bracket with BlueOx sideplates. All screws in place
IMG_3864 - End picture of BlueOx sideplates. Most all of the bolts have been replaced. Also painted the side plate because that was a LOT of aluminum staring at you.
IMG_3865 - X Axis gantry. I had to retain this piece for the lead screw. It also gives me someplace to fasten all of the wiring
IMG_3866 - X Axis gantry brackets. There isn't a lot of load on the rear plate so I could get away with thinner metal back there.
IMG_3867 - CnC4Newbie Z axis. This thing is a TANK!
IMG_3868 - The biggest problem I had with the factory Z Axis was it worked loose and was almost impossible to tighten. I redesigned the factory mounting bracket and it now attaches from the front. I can remove the Z Axis in literally less than a minute now.
IMG_3869 - Close up of gantry brackets. You need to cut a 1/2" off one side to clear the factory rail.
Takeaways/Lessons Learned
Get more metal than you think you'll need, especially if you haven't discovered Jacob's engineering drawings on his files page yet.
Once you place the Y and X axis rails, tighten ONE bolt at one end on each side (or top and bottom) and leave the rest of the rails loose. Cycle the axis back and forth a few times to let everything move around a little and seat itself. I then cycled by 10mm and snugged the bolts down as I went. I'm sure I affected my accuracy by an extremely slim margin but I'm not machining for NASA so I believe I'm good.
The cable chains do pop open and WILL slide out through the holes in the X/Y end plates
If you install taller end plates AND a new Z axis, you WILL need the drop plate for the Z axis. I now have right at 5" of clearance between my waste board and the bottom of the Z axis.
Mathieu at CnC4Newbie is great to work with. Very responsive to e-mail and their product is built like a tank. Highly recommend these guys!
I'm sure this isn't the only build like this but I submitted so I could hopefully give someone another resource to use in their quest for a stiffer, faster, more accurate machine.
WorkBee 1010 "Get Rid of the Slop" Build
Build in 'CNC ROUTER BUILDS' published by txcomp, Mar 5, 2020.
My goals for this build were to eliminate slop and flex while also allowing easy serviceability.
-
-
Build Author txcomp, Find all builds by txcomp
-
- Loading...
-
Build Details
- Build License:
-
- CC - Creative Commons Public Domain (CCO 1+)
Inspired by
Jacob Lotter 1510 Workbee Modified


