After I sent Keith Davis some pictures of my machine, he asked me to post the build here. First some background.
About 4 years ago I built a CNC Mill following Hytech2K’s build called F-117. It has worked well and I’ve done some interesting things with it, especially some 3D carvings. Last summer I wanted to add a laser to it, but soon discovered the machine was just too big and not quite precise enough for what I wanted. Since I have also been intrigued with 3D printers, I began looking on here for ideas.
I decided upon Keith’s TrueUp Glide Kit. I ordered one and knowing absolutely nothing about 3D printers started putting it together. Keith was very helpful and answered whatever questions I threw at him. After getting it completed I decided on a couple of thing. One was that rather than the glides (I was never able to get the correct balance between tightness and Z belt skipping) I wanted to use wheels. I had some left over from my CNC build. Second was that I wanted a larger build area and a stronger frame, mainly for laser etchings.
So using the TrueUp I started printing parts for the Transformer. All the individual parts were redesigned/strengthed but the overall design is the same as the TrueUp.
My goal was to have a machine that would work equally well for Printing and Laser Etching. This machine does both.
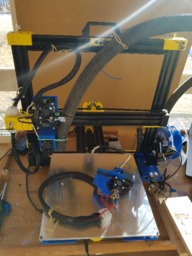
The Printer:
Framed from 2040 linear rail
Build Plate is 300x300mm
Plate is 1//4” MIC-6 Aluminum
Bed heater is still 12V, but is powered by a MOSFET
Hot End, controller, all motors and end stops were those supplied with the TrueUp
Because of the increased mass of the build plate I did slow down the acceleration of the Y axis.
I added a Raspberry PI3 running OcroPrint when printing.
![[IMG]](https://openbuilds.com/data/attachments/29/29359-b1f8ecd291bd6d7bb7f4595af32e676f.jpg)
The Laser:
The laser is a kit (includes 2.8 diode laser, driver, and glasses) from J Tech Photonics
As far as connecting the laser, all that is needed is the driver that comes with the laser, the post proccessor provided by J Tech for your particular controller, and 12v for the cooling fan. On the MKS controller board the laser is connected to the parts fan, and the cooling fan is connected to the same as the Hot End cooling fan.
When etching I connect to my laptop. I found that when using the PI3 it would sometimes pause while catching up with the code and if that happened when the laser was on it produced a larger spot than was ideal.
Since I have the machine in my solarium, I included a fan to exhaust fumes to the outside through a window when etching. That is the hose you see connected to the laser mount.
It takes less than two minutes to switch between Laser and Printer. Just two bolts on the carriage and a plug. At first I had the Hot End wires going through the plug also, but I got periodic errors. I don’t think the connection were firm enough. So instead I use a screw block for that connection. Also since when the Hot End is not present the program would error out because of the missing thermistor. Therefore you can see a 100k thermistor attached to the plug.
So, since I didn't think I would be posting this build I did not take any production photos. But if anyone has any questions or wants more detailed information, I'll be glad to oblige.
Transformer
Build in 'Cartesian Style Bots' published by George Motichka, Jan 17, 2018.
I wanted a machine that could easily switch between 3D Printing and Laser Engraving
-
-
Build Author George Motichka, Find all builds by George Motichka
-
- Loading...
-
Build Details
- Build License:
-
- CC - Attribution - CC BY
Inspired by
TrueUp Glide
![[IMG]](https://openbuilds.com/data/attachments/29/29360-7faeb439dea55bdf8fad8d4561747cdc.jpg)
![[IMG]](https://openbuilds.com/data/attachments/29/29361-f8f1419175f950d48ec7a520cb04522b.jpg)
![[IMG]](https://openbuilds.com/data/attachments/29/29365-fb00a82fdf53270363fec723adcbb2fc.jpg)
![[IMG]](https://openbuilds.com/data/attachments/29/29366-7dc50973e8fb2aa8c452cb6e6bb06c9a.jpg)
![[IMG]](https://openbuilds.com/data/attachments/29/29362-71d5137ce5ac4d1a5ef45ffe7a01f361.jpg)
![[IMG]](https://openbuilds.com/data/attachments/29/29363-fc751bd8c5f44c6b3a1bfb9eebaf044c.jpg)
![[IMG]](https://openbuilds.com/data/attachments/29/29364-5551f0e799f5ff409859fa64b115fcaa.jpg)


