
Update 01/18/17
I get a lot of questions of what bits to use for different applications so i'm putting together a list, you'll be able to find the ones I purchase from Amazon here:
CNC Bits
I'll also create a post on HomesteadingDIY where I get the rest.
My advice for those new to CNC machines and the software, get the cheap bits !! Seriously.... When I started out I asked for advice on a few forums and quite a few long time member suggested brands like Amana, Onsrud, and Beckwith to name just a few.
While those are great tools, I've used them all. But just starting out you're going to break tools. You're going to hit clamps, run them into the bed, have the DOC set too deep or run to fast, just the way it is... I would cringe everything a 20 something dollar bit hit a clamp or something it wasn't supposed to. Even worse when it was a $60 tapered ballnose bit or $50 compression bit... It's discouraging and disheartening to say the least, not to mention the hole it puts in your wallet.
My advice is this, start out with cheap Ebay chinese bits. Doesn't matter how long they will last or the general quality of them, just build up your knowledge of your machine, the software, and good feeds, speeds, and depth of cut for the materials you intend to cut/carve. And when you inevitably break one, it doesn't hurt near as bad. After you feel comfortable in your skills and have the gremlins worked out of the machine/software then start purchasing the more expensive bits and giving them a shot. This is just my opinion after a pretty solid 5 years of cutting/carving over 2500 signs.
I'll make a post explaining the bit's I use everyday, where I get them, and what I use them for. Keep in mind, I run my machines pretty much 6 days a week, all day. I think some of my bit choices will surprise a lot of people. I'll make a update here when the article is ready or just subscribe to my newsletter to stay in the loop.
Have a great day and keep on building !!
Gerald
Update 01/16/17
Again I apologize for another long overdue update.
Just to catch everyone up of this build and the durability of this machine. It's been almost 2 years since we started the F-117, I have run it hard just about 6 days a week. We've had our share of issues with wheels splitting, z slide having bushing problems, and we're on our 3rd spindle (chinese). Other that that, everything has been working great.
I'll be doing a complete tear-down on this machine in February, I would do it sooner but I have to wait for new spur gears from Boston Gear. We'll be replacing all the v-wheels, changing out the Y steppers to 570 oz 3/8 shaft Nema 23's from Automationtechnologiesinc . ditching the 1/4" 14.5 degree racks and installing new 1/2" 20/20 racks from Finelineautomation. We'll also disassemble the z-slide and see what we can do to fix the bushing issues. All the parts are ordered, just a matter of waiting for them to arrive.
I'll be writing a full article on the rebuild with video for those who may wish to build this machine, as well as how we created our sign business around two DIY CNC machines, DIY homesteading projects, and articles about us looking for a new piece of land to build our homestead on.
Our new website is:
HomesteadingDIY
Thanks everyone and have a great week !!
Gerald
UPDATE 05/22/2016
Long over due update. First off I would like to apologize for my absence here on Openbuilds, my sign shop experience a large growth in sales over the past 8 months and I haven't had much time for anything else.
As for the F-117 it's still working perfectly, I use it everyday as much as my other machine. I have had to do some minor maintenance on the z slide and replace the spindle but other than that it's turns out the work just as fast as my large machine. I might do a couple upgrades like change out the Y steppers to larger ones and swap out the 14.5 racks for larger 20 pitch racks. I'm also looking for a better z slide, this one has some quality issues with bearings/bushings. But other than that it's still working and cutting great. I can't say enough good things about Openbuilds and their products.
I will also be selling my Triple Shot laser within the next week or so. We now need a larger faster more powerful machine so I am awaiting delivery of a new 60 watt CO2 laser this week. As soon as I get it set up and running I will be listing the Triple Shot for sale, I would keep it but I just don't have the room for it right now, i'd rather see someone else put it to use than just sit here in a corner..
As far as the BOM being correct and up to date, I'm not sure. I believe the materials list is pretty accurate as I haven't changed anything since the build, but the suppliers may need to be updated.
UPDATE 8/15/2015
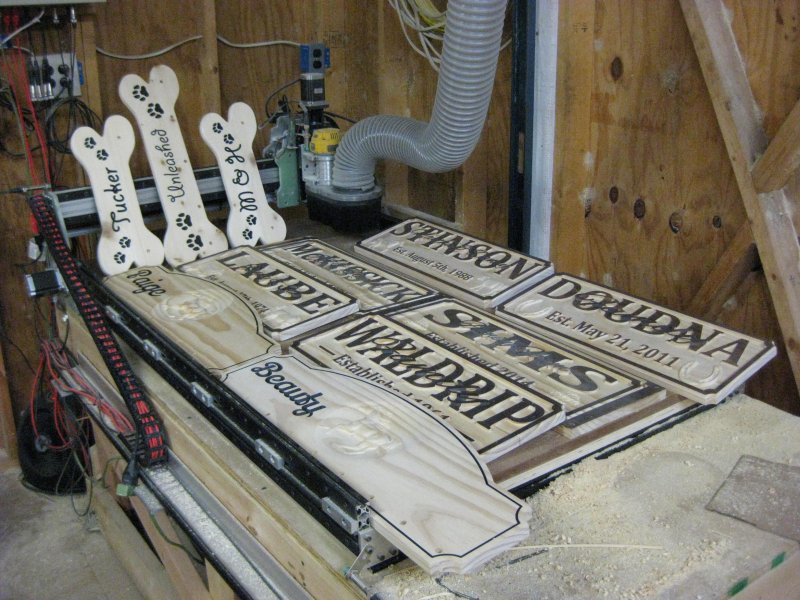
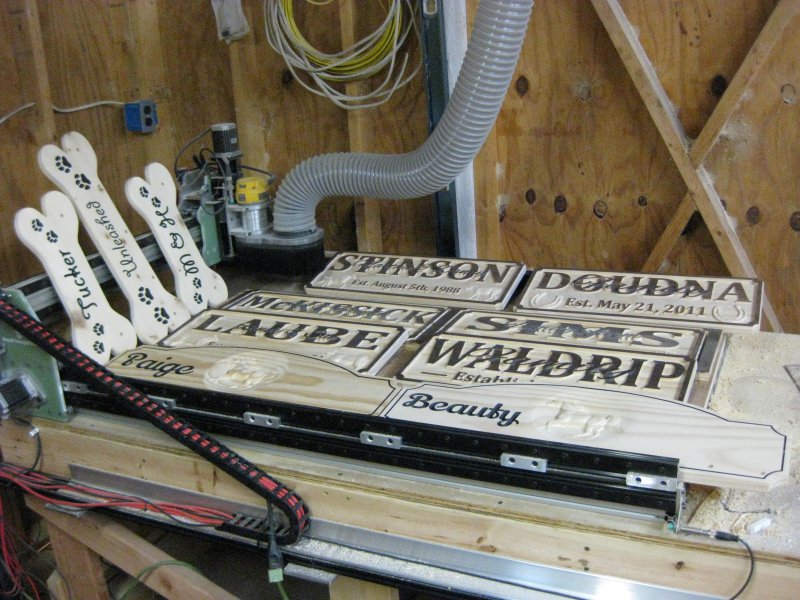
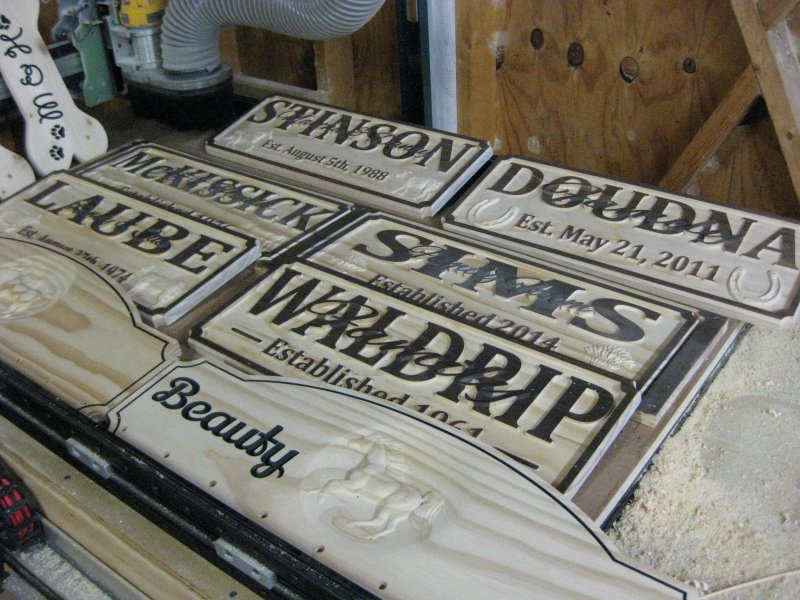
It's been over a month since we installed the delrin wheels and so far so good. We have run this machine pretty hard and cut alot of signs so i'm pretty happy with their performance so far.. I will keep everyone updated if anything changes. Also check out my new build the "Triple Shot R-P-M" it's going to be a 6 watt laser cutter/engraver, a bowden 3D printer with a large heatbed, and a 400-600w CNC router as well. Triple Shot R-P-M Area 51 CNC Parts
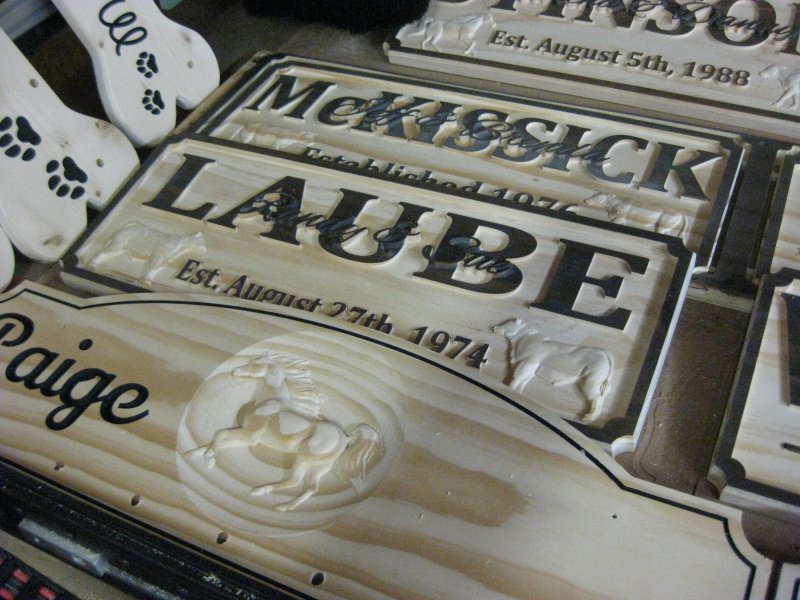
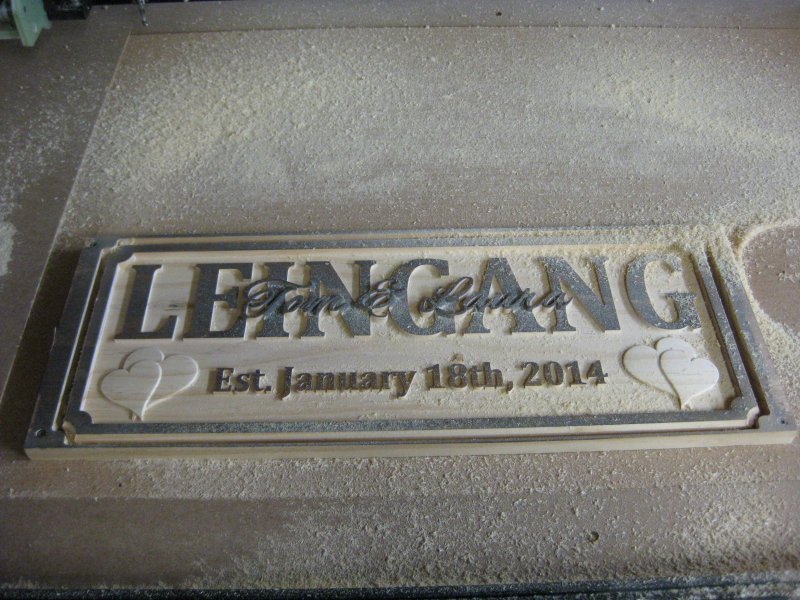
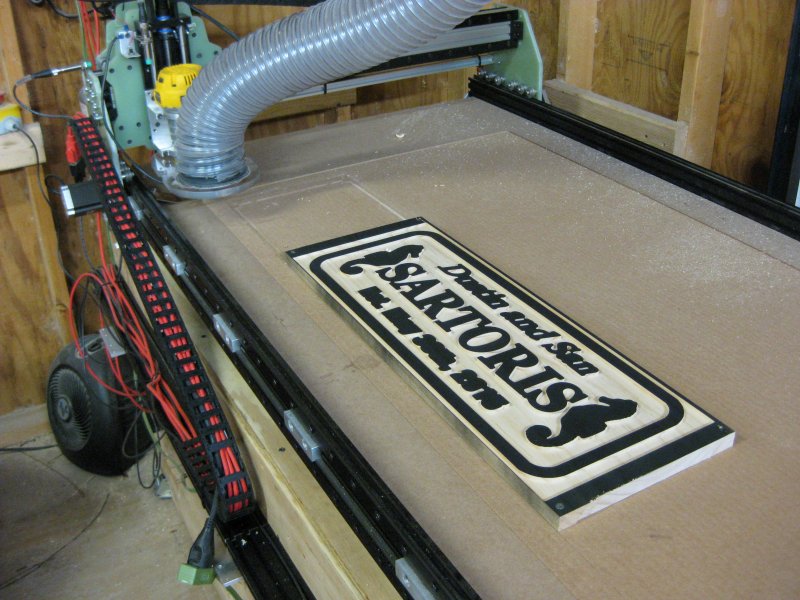
Here are a few more photos of some signs the F-117 recently cut.
![IMG_0320[1].JPG](https://openbuilds.com/attachments/img_0320-1-jpg.10346/)
![IMG_0321[1].JPG](https://openbuilds.com/attachments/img_0321-1-jpg.10347/)
![IMG_0322[1].JPG](https://openbuilds.com/attachments/img_0322-1-jpg.10348/)
UPDATE 7/2/2015
Well we installed the new delrin V wheels, readjusted everything, replaced the spoilboard with a new piece of MDF, surfaced it, and adjusted everything we could think of. So far so good... I replaced all 12 V wheels on the top of the Y plates with delrin and left 2 xtreme wheels on the bottom. Did a couple family signs and a few 3D stall sign and looking good...
UPDATE 6/19/2015
It's been quite some time since i've posted an update and i apologize for that, my sign business has never let up. The F-117 CNC has been running and cutting 6-7 days a week averaging 8 hours a day since the last update. Everything has been working great, the new spindle is awesome, love it !! I really haven't had to do much of anything to the machine since March until now... I have been noticing the quality of the cut being a little off over the past few days, then I had a issue with the stepper on the left side skipped a tooth on the rack while jogging, that's when I noticed things where not quite right. All of the wheels on the top of the Y plates were split in half as well as 2 on the bottom. 14 wheels total split in 2. I'm surprised I never noticed before but they split and just ride on the bearings, really not too noticeable till you look close. My stepper drive tensioners took up the slack and kept everything riding as smooth as possible.. I am not sure what caused the catastrophic failure of all those wheels, I am very care when adjusting the tension on the stepper drives to just enough to make sure they don't skip, and I only tighten the eccentrics on the lower wheels till the wheel makes contact and is resistant to spinning freely... I was using all Xtreme wheels and with 12 wheels on each Y plate I don't believe the weight of the gantry being a problem. The only thing I can think of is maybe the Polycarb wheels are pretty brittle, other then that i'm just not sure.
I'm exploring what other options I have, I hate to go to the steel V wheels due to the rapid wear on the aluminum V rails. Here are a few photos of the carnage....
![IMG_0221[1].JPG](https://openbuilds.com/attachments/img_0221-1-jpg.9504/)
![IMG_0222[1].JPG](https://openbuilds.com/attachments/img_0222-1-jpg.9505/)
![IMG_0216[1].JPG](https://openbuilds.com/attachments/img_0216-1-jpg.9506/)
![IMG_0214[1].JPG](https://openbuilds.com/attachments/img_0214-1-jpg.9507/)
![IMG_0219[1].JPG](https://openbuilds.com/attachments/img_0219-1-jpg.9508/)
![IMG_0223[1].JPG](https://openbuilds.com/attachments/img_0223-1-jpg.9509/)
![IMG_0224[1].JPG](https://openbuilds.com/attachments/img_0224-1-jpg.9510/)
You can see the stress fractures in these last 2 pretty well, looks like they were getting ready to fail... I will admit I push my machines a lot harder then most hobbyist, and probably not the best wheels for a small commercial operation, and as far as I know i'm the only one with a cartesian style gantry cnc running on Openrail.
UPDATE 3/14/2015
So we've been using the machine hard for about a week now with the new motor on the X installed and it works perfectly. I would like to change out the racks on the Y rails to 20 pressure 20 pitch but I would have to disassemble the entire machine to add them. There isn't enough clearance between the Y axis plate and the extrusion to squeeze the 1/2 think rack in there, I would have to add a 1/8 spacer to all the wheels on the Y plates and either replace the gantry beam with one 1/4" longer or redo the base to squeeze the Y rails in .25 ". So i'm going to wait a bit, the 14.5 pressure 24 pitch rack is doing a fine job anyways plus we are in the process of adding belt reduction drives so both the Y plates and the X drive plate will be redesigned if folks wish to go this route.
Also IMService CNC stopped selling their Z slides on Ebay, my front gantry plate was pre drilled to accept their slide. The are quite a few others on there that have decent looking Z slides for a reasonable price. So if anyone purchases a plate kit from me, I would advise to figure out your Z slide first and send me something with the mounting hole locations and i'll custom cut that front plate for you. Otherwise if you would just like a blank plate with no mounting holes and drill them yourself that's ok too, just let me know either way when ordering.
I believe the next project i'm putting in the works is a CNC Plasma cutter, easy to build and I would be able to cut up to 1/2" Aluminum with it or make machine plates out of mild steel.
Also scored a very nice .8kW GMT air cooled spindle with a Laidlaw mount and Lenze SMVector VFD wired up in a nice Nema enclosure.
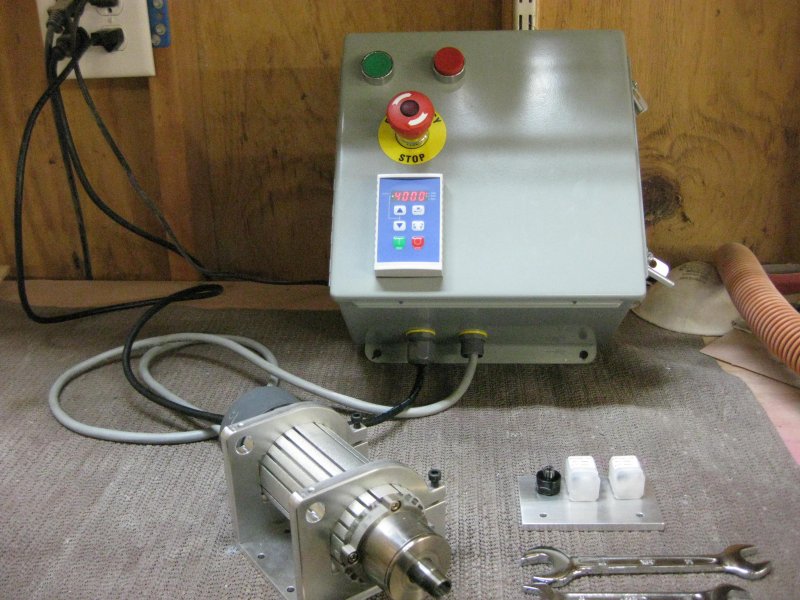
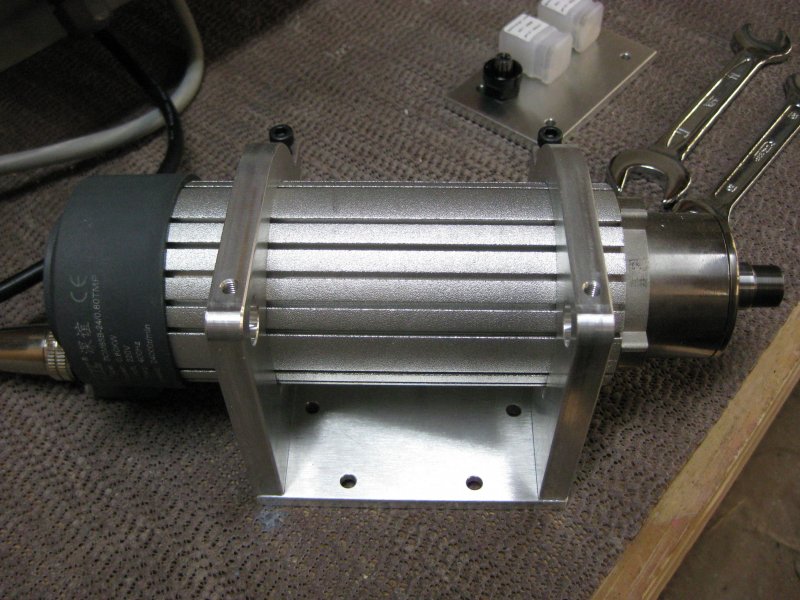
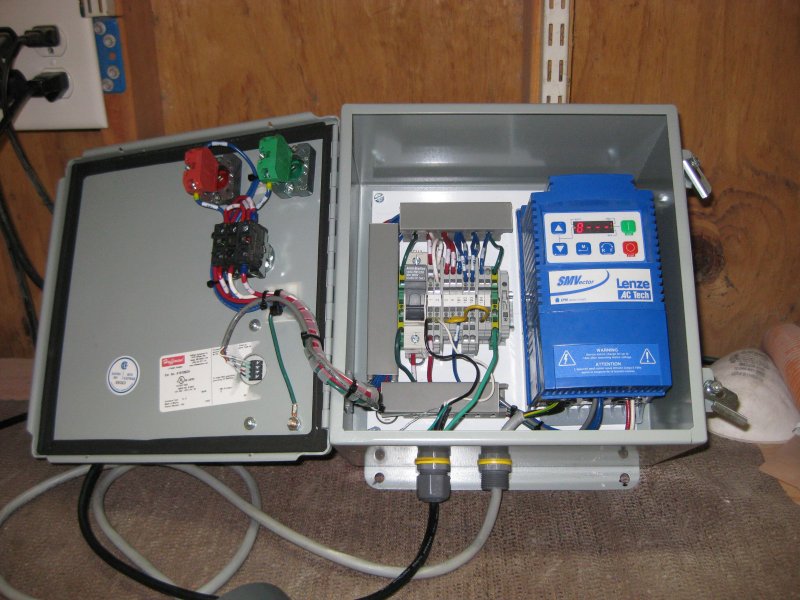
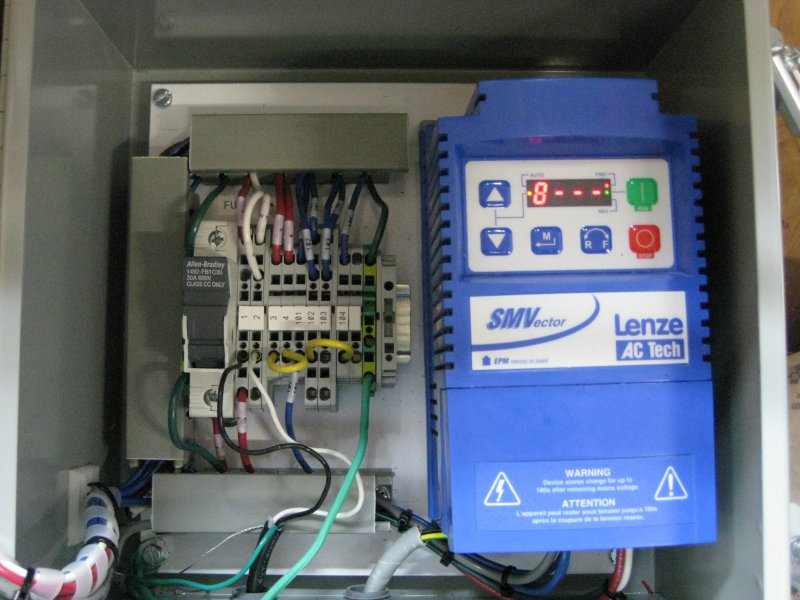
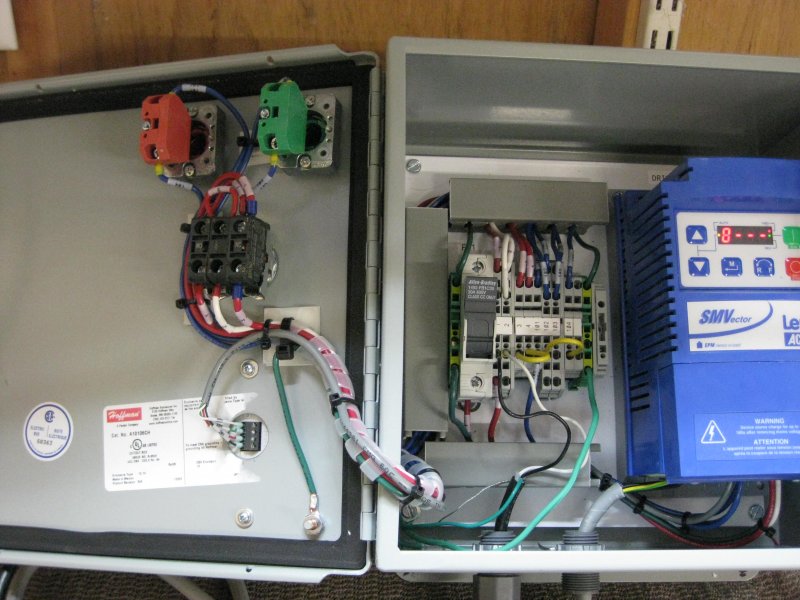
Sweet !! Now to see if I am able to wire this into my existing Plug and Play electronics is the question.... I would really like to be able to control the RPMs from Mach3 but might only be capable of turning it off and on without upgrading the BOB... None the less, love it and will be installing and testing it tomorrow.
Here's a video of our latest product, nice 3D hat rack... We cut the 3D at full depth running 140ipm with a 1/8 tapered ball nose bit....
UPDATE 3/08/2015
Well we've installed and tested the X with the new 570oz motor, even though our electronics can only push 4.2 amps max, it works great. Extremely quiet and smooth with the 20 pitch 20 pressure 1/2 x 3/4 rack. The Dewalt DWP611 on the other hand is turning out to be a piece of junk. Replaced a badly worn lower bearing a couple days ago. When we first bought our 3 1/4 hp Porter Cable we learned after the lower bearing went south after a month of use, Dewalt purchased PC and the quality seemed to go by the wayside since then. We replaced the bearing with a good NSK bearing and get 4-6 months sometimes more out of it between bearing changes.
Update on Area51 CNC PartsWe are currently way behind schedule on the web store and plate production, due to demands from our sign shop and the fact we are moving into a larger location coupled with the time required to cut aluminum, we will not be cutting plates from 6061 aluminum at this time. We will be offering 3/8 plates in XX phenolic for the original Ox and the F-117. We will also be cutting plates from G10 for the F-117. We are looking to purchase a dedicated CNC mill in the near future to be able to cut these 6061 plates efficiently.
UPDATE 2/26/2015
After speaking with a few experts about using stepper motors in direct drive situations we have concluded in this application the motors for the Y axis need to be 425 oz Nema 23's or better and the X needs a 57o oz Nema 23 motor, the Z can use a 385 oz Nema 23.
I have updated the BOM to REV3 and included links where to find these motors. The 570 motors require 5A drivers so if your following this build please allow for this when choosing drivers and a power supply.
I recommend Automation Technology, great selection of motors and drivers plus affordable pricing. DO NOT buy the low inductance 320 oz motor from CNCRouterparts. After speaking with Ahren the 320 oz is designed to have a flatter torque curve at higher RPM's, it will not work properly in a direct drive situation. High inductance motors have higher torque at low RPMs. I am working on a belt reduction drive for the F-117 but it will be awhile before I can complete a prototype and test it.
Also I am testing a different gear rack on the Y axis to make installation easier, the only difference between the old rack and new will be in order to use the proper spur gear you will have to use a Nema 23 with a 3/8 shaft. In the mean time the machine can still be built with the 14.5 degree pressure 24 pitch rack using the Nema 23 1/4 shaft motors and work just fine. I won't be cutting rack clamps due to the long length of time required to cut them, so if you go this route please line up a welder to TIG weld the rack to a 1/8 x 3/4 x ? long steel backer and drill out holes for mounting to the extrusion. If the 20 degree pressure 20 pitch racks work out well I will stock them in the store.
Thanks !!
Gerald
UPDATE 2/25/2015
Posted the BOM today for the F-117. Everything should be spot on but if you happen to find a discrepancy please let me know so I can look into it and update the BOM if necessary.
Thanks !!
Gerald
UPDATE 2/23/2015
Well the electronics gremlins are at it again, had a NEMA 23 motor give up a couple days ago, motor was about 2 years old and worked hard most of those 2 years so I can't complain. My hat's off to CNCrouterparts for their awesome customer service, I spoke with Ahren late in the afternoon his time and he went out of his way to get a motor in the mail that day !!
Even with the motor limping along we're still cutting, although it's at about 1/2 speed we're still getting it done.

UPDATE 02/18/2015
The machine has been cutting 6 days a week for the past few weeks with no issues other than having to replace the brushes in the router. We have probably cut 40+ signs over this period.
We finally had a moment to tear it down to redo the gantry with a 5010 (50 x 100mm) extrusion, while we were at it we took it down to the base and checked everything out, looking for any possible problem areas. While we had it tore apart we took that opportunity to create a complete BOM for the machine. I'll be posting that as soon as I get it entered into Excel.
CHANGESWe cut all new plates from .375 6061
Changed out the rack on the gantry to 20 degree pressure 20 pitch 1/2 x 3/4 rack
Changed out the X axis motor to a low inductance 320oz Nema 23 with a .375 shaft with a 15 tooth spur gear
Back gantry plate now has 8 wheels rather then 12
We are cutting plates this weekend and offering plate kits for sale for both the 4080 and 5010 versions. Stay tuned for the Grand Opening of our store this coming week. We will be adding new items on a weekly basis for not only the F-117 but also the stock Ox machines along with upgrade parts !!
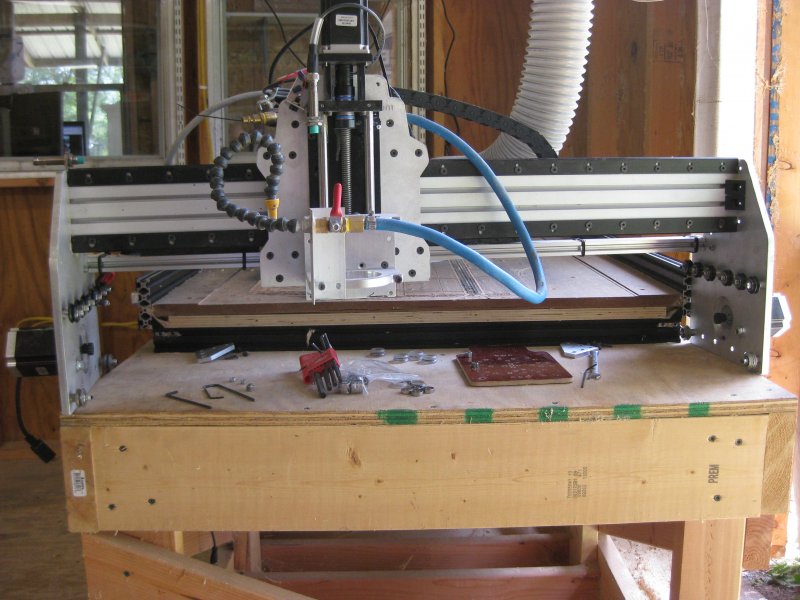
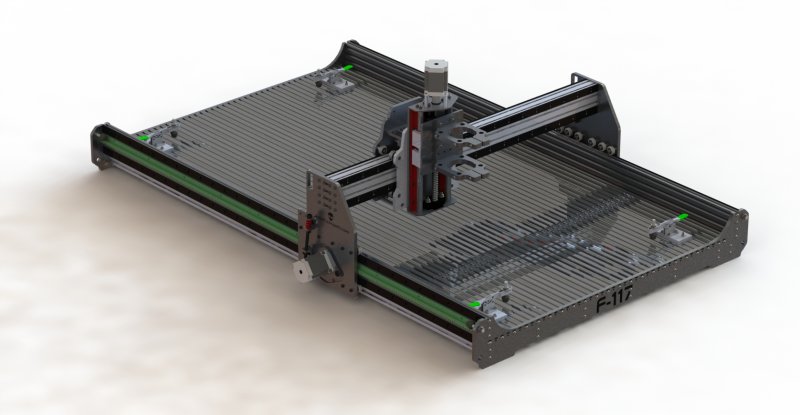
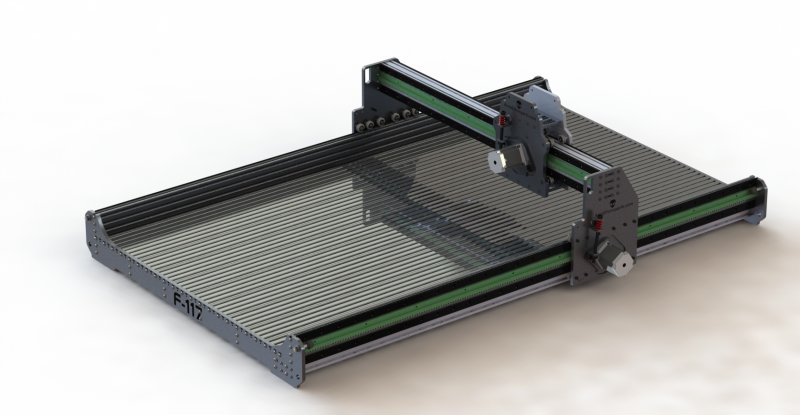
Here are a few photos of the completed Area 51 CNC Parts F-117:


UPDATE 02/03/2015
The machine is working great !! No issues to really speak of, we are getting ready to change the gantry over to the 5010 extrusion, i'm pretty excited to see if that removes the little bit of chatter that's present when we use a generous DOC. I have to cut 2 more plates then we'll swap everything over, we are also going to try reducing the number of wheels on the gantry plates to 4 on top and 4 on the bottom of each plate, to make it easier on the wallet when purchasing the wheels. Also the DeWalt 611 router i'm really happy with it's performance, I run at about the same speeds, feeds and DOC as my other machine with the 3 1/4 hp router and I don't have any issues with it bogging or failing to keep a pretty steady speed.
The only negative thing I have to say at this point about it is the brushes wear out pretty quickly, go to ereplacementparts and have some spare brushes and bearings on hand. This is a good example of why you need to be with your machine when it's cutting. I had a 1/8 downcut endmill working on a pocket when I heard the router stutter a few times like the power was going out. I used feed hold in Mach 3, raised the router, DISCONNECTED the power cord and removed the top. Both brushes were about gone, I modded them to get a bit more life out of them while I have to wait for the new ones to arrive.
Here's the lesson, if that would have been a 1/4 endmill or one of my expensive tapered ball nose mills, they probably wouldn't break, the machine and software doesn't know the router quit and would just keep on trucking, who knows what damage would have been done to the machine if I wasn't present to step in and stop it before it quit...
Cutting a nice 3D Hat Rack for my brothers birthday....
UPDATE 01/25/2015
As far as i'm concerned this build has proven itself, i've cut probably 20 different signs ranging from straight easy v-carve stuff, signs with a good mix of pocketing and 3D, to full on 3 hour per sign 3D cuts !! No issues what so ever.. We even cut some .25 6061 aluminum just for kicks !!!I am in the process of assembling a BOM for this machine now, the plates will be available from me the first week of February. I will be offering them in 6061 aluminum for right now, i'm setting up to anodize now so plate sets in different colors will be available. Here are a few photos of a portion of the signs this machine has cut over the past few days.
I am extremely pleased with this machines performance and it has met and exceeded my expectations. I believe it will fit in great as a first or second machine in a small business production capacity. Over the next few weeks I will be ordering the parts to assemble a vacuum hold down system using 3/4 Phenolic to make "vacuum pucks/jigs" to secure the material. I think this will be much more cost effective given the type of work i'm currently doing. I really would like to use the bleeder board method, and maybe I will on my large machine if I go to start cutting a lot of sheet goods, but I don't think it's best when some of my signs take up to 5-6 hours nested. That would certainly be hard on vacuum motors and my electric bill. Thanks and stay tuned for revisions on this build !!
********************************************************************************************************************************************************************************************************
Start of Ox Upgrade Build
Here i'm going to document upgrading my machine to a stronger more rigid OX. The purpose of this isn't just to make a bunch of mods and see how far one can "pimp" out their machine, it's more about making the machine a better tool in my small business. The level I want to take this is to where I can cut up to 1/4" aluminum, but mostly softwoods, ply, and hardwoods with no real issues. My current OX "Florida OX" is prone to chatter pretty easily, the belts have a bit of deflection and the gantry needs some stiffening but all in all a good machine for hobby stuff. I will be cutting new plates for this project on my other machine. I will probably start with some G10 Phenolic for prototyping to be sure everything lines up where I need it to and all bolt and eccentric holes are sized and spaced properly, then cut the final plates out of 3/8 aluminum plate.
Here are a few of the upgrades i'm starting with,
I will upload a few photos and maybe a video to use as a baseline for these upgrades.
- change gantry beam to a 4060 Misumi extrusion with Openrail mounted top and bottom. Depending on how stiff this turns out, an upgrade to double 4060 or 4080 is a possibility, but for now it will be 4060 (because I have it on hand)No need to go double, 4080 Misumi is plenty strong enough. Machine will use 5010 (even stronger) in the future due to supply issue from Misumi though.
- possibly add 1/4 steel plate to the top and bottom to further stiffen up the gantry beam
- gantry carriage redesigned for use with Openrail, made taller to reroute the belt above the gantry wheels (N/A), made wider to accommodate more wheels to better spread out the load and be more resistant to deflection.
- change the belts to 3/8 037XL urethane belt with kevlar cords to better resist stretching and backlash issues also changing to 16T pulleys for better resolution from the Nema 23 steppers. Changed to true gear rack and pinion drive.
- gantry carriage and side plates will reroute the belt to better wrap around the drive pulley for more tooth engagement. No longer necessary.
- new side plates are designed for Openrail and use 5 (6) widely space double v wheels on top to better distribute weight and 4 on the bottom plus 2 idler pulleys. Went with 6 wheels on top and bottom, deleted the idler pulleys.
- side plates are redesigned to accommodate a wider variety of extrusions for the x beam, 2040, 2060, 2080, 4040, 4060, 4080
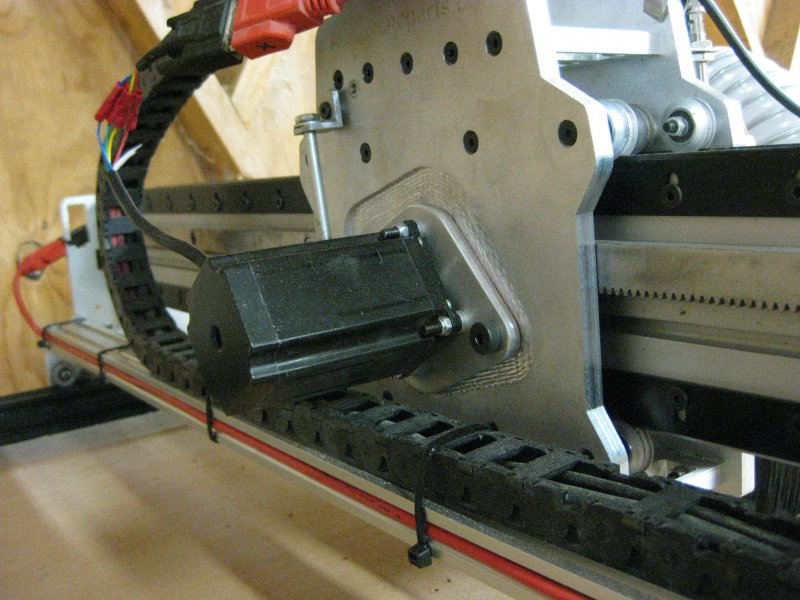
- side plates move the motor to the bottom of the rail placing the belt under the rail, while also rerouting the belt slightly to gain more tooth engagement. Motor is mounted in the center of the plate to accommodate the rack.
- side plates are redesigned to relocate the x drive belt above the gantry wheels. No longer necessary.
- side plates have a pocket for the stepper to eliminate the need for spacers and to be able to use the side plate as a heat sink to dissipate heat from the stepper motor.
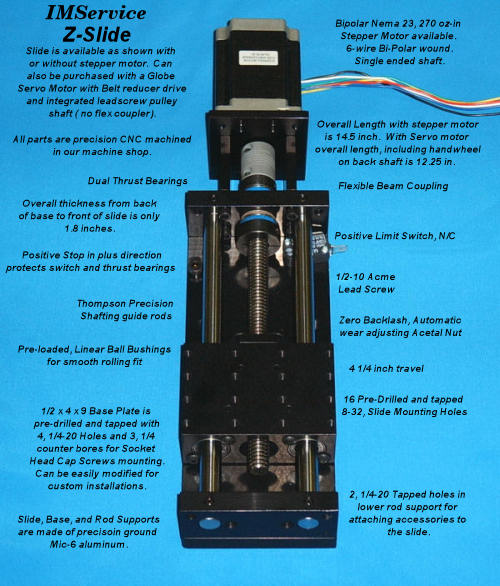
- possibly change out the z slide to a much stiffer design, not sure yet, this will be decided near the end. Looking at prebuilt z slides on Ebay, seems to be a good design at a reasonable price.. Went with a pre-made Z slide, good quality.
- change out temporary spoilboard with 4 zone vacuum bleed bed. Going to use DIY vacuum pucks instead, easier on the electric bill.
Much more to come, stay tuned !!
********************************************************************************************************************************************************************************************************
01/13/2015
This build is almost wrapped up, just need to tackle the vacuum jigs/pucks and put together a good vacuum pump system and we're done. As for the machine it's exceeded my expectations !!! I can run feeds and speeds cutting signs as fast as my big machine. Everything went together perfectly, we only had one tiny problem, the spur gear on the gantry carriage drive was poorly machined, while running 120ipm doing some 3D cuts it skipped a couple teeth. We tore down that drive unit and replaced the spur gear with one we got in from Misumi and installed a slightly stiffer spring on the tensioner. Works perfectly now, we've been cutting signs all day..
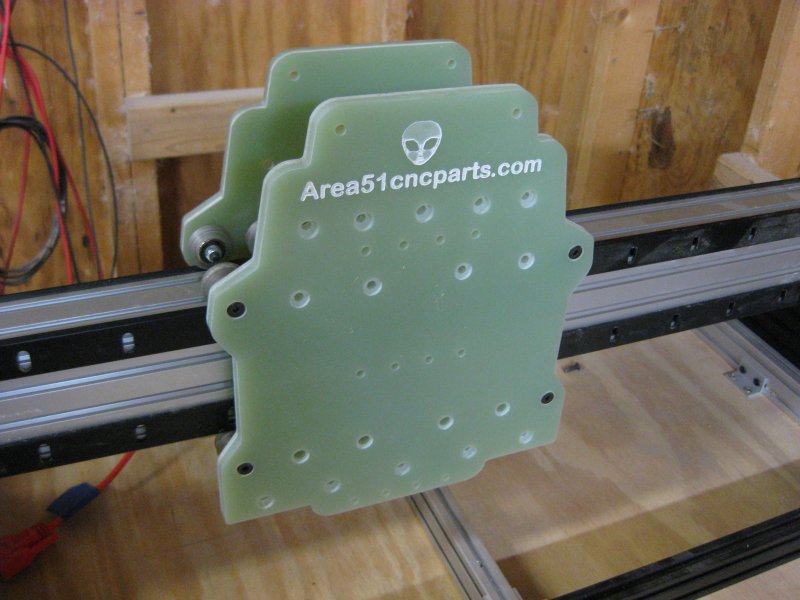
Our online store is about ready to go live, Area51cncparts.com , you will be able to order complete with electronics kits for both the Ox and the F-117 CNC, frame and hardware kits, upgrade gantry kits for the Ox, plates kits for the Ox and F-117, plus a whole bunch of other bits and pieces you may need !!
The plates kits will include all three stepper drive plates for Nema 23/17 motors, 2 Y plates, 2 X plates and the cross braces that go in the X carriage to "box" it. These will be initially offered in your choice of green G10, black xx Phenolic, and of course 6061 aluminum. The stepper drive plates for all kits will be machined from 6061 and come with the bushing pressed and a matching shoulder bolt.
We are are now a Openbuilds Distributor and will be offering up all the great products you see here shipping from the deep south!! (Florida
I would like to personally thank Mark Carew and the folks behind Openbuilds for creating the Ox and providing such great products !!
Here are some of the latest videos and photo we shot yesterday while the F-177 was doing it's thing... Enjoy !!
btw... might want to turn your sound down a bit, I have both machines running, dust collector and a air compressor kicking on from time to time...

_+_+_+_+_+_+_+_+_+_+_+_+_+_+_+_+_+_+_+_+_+_+_+_+_+_+_+_+_+_+_+_+_+_+_+_+_+_+_+_+_+_+_+_+_+_+_+_+_+_+_+_+_+_+_+_+_+_+_+_+_+_+
01/17/2015
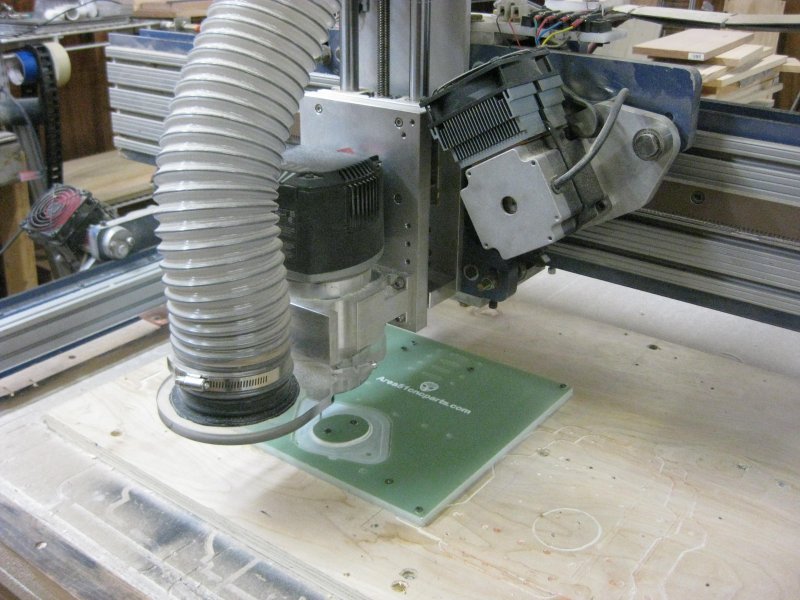
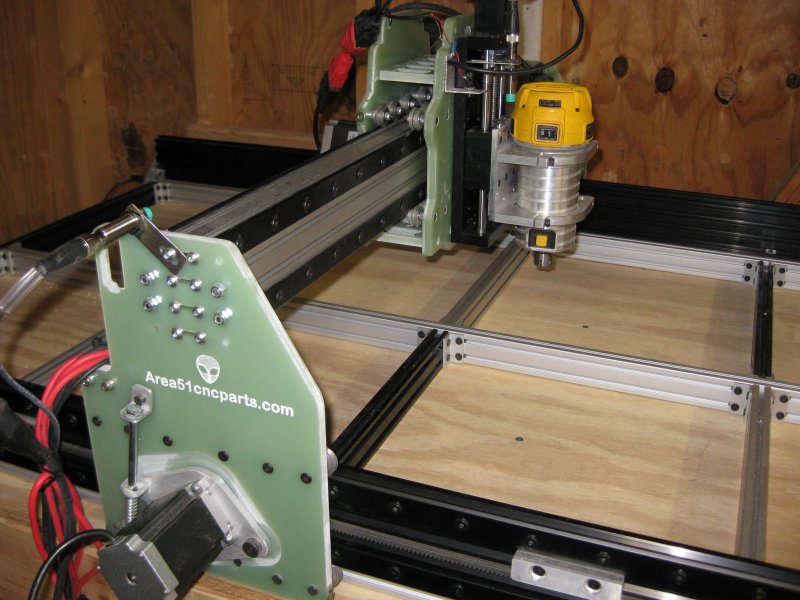
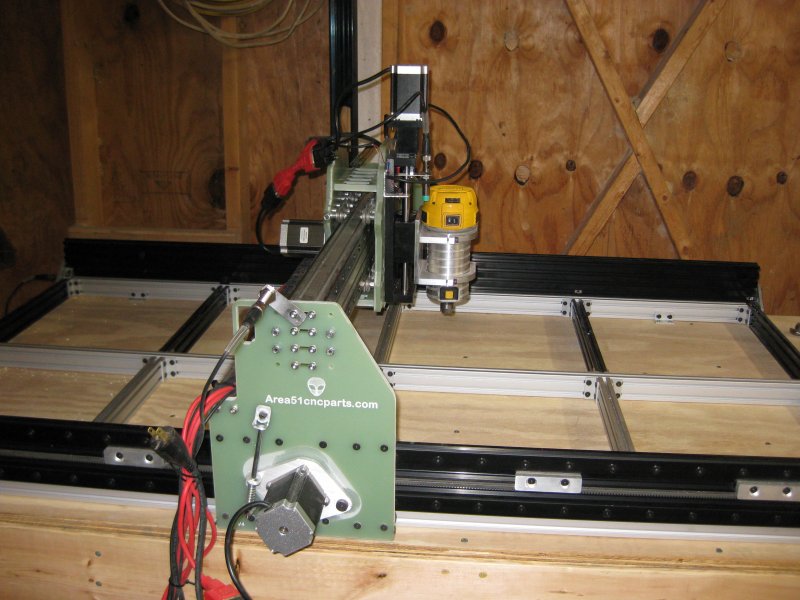
Here we are finally complete and working great !!! Removed the clamps holding the rack on the gantry and had a local welder TIG weld the rack to a 1/8 mild steel backer in which I drilled holes to mount to the 4080 Misumi extrusion. Also got a chance to cut a new back gantry plate and braces out of 3/8" 6061, really stiffened up the gantry carriage, can't wait to cut and install the front and two Y axis ones. Works like a champ now, cut out about 6 signs, 2 of which were complete 3D and took 4 hours a piece to cut. Took it for a spin cutting 1/4" 6061 Aluminum plate tonight, worked perfectly. Cut out a few more stepper drive plates, no issues... I'm posting 1 video tonight and a couple photos, i'll update tommarow with a few more showing more of it cutting 6061 and a couple 3D signs...
01/18/2015
Here are a few more videos and photo of the F-117 cutting 6061... We are ordering more materials to cut out a few sets of these along with some regular stock Ox plates. My goal is to have the web store open the first week of February, supplies for the moment will be limited to plates and some other items needed to build the F-117 CNC or upgrade your Ox. We are in the process of remodeling our stock room to accommodate carrying Openbuilds products in stock so bear with us please.
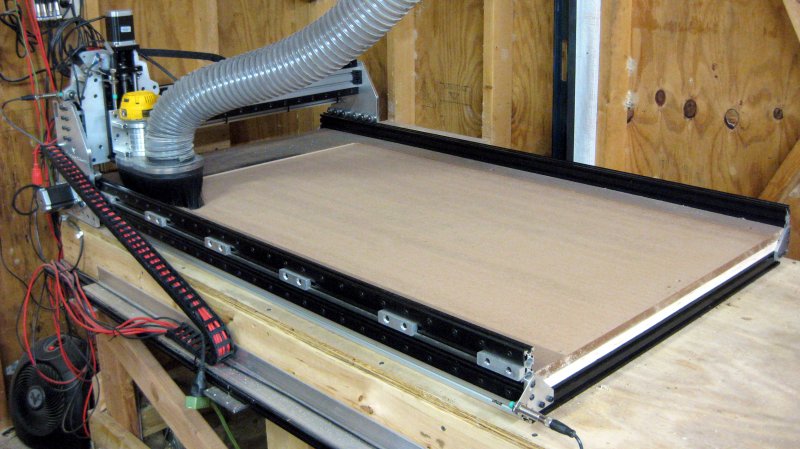
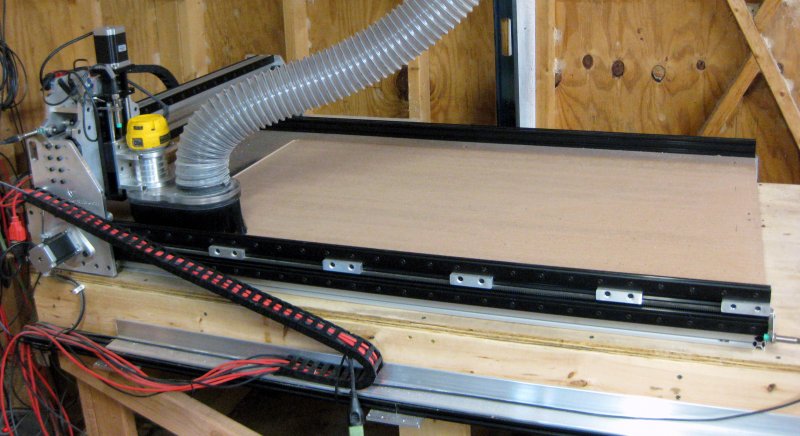
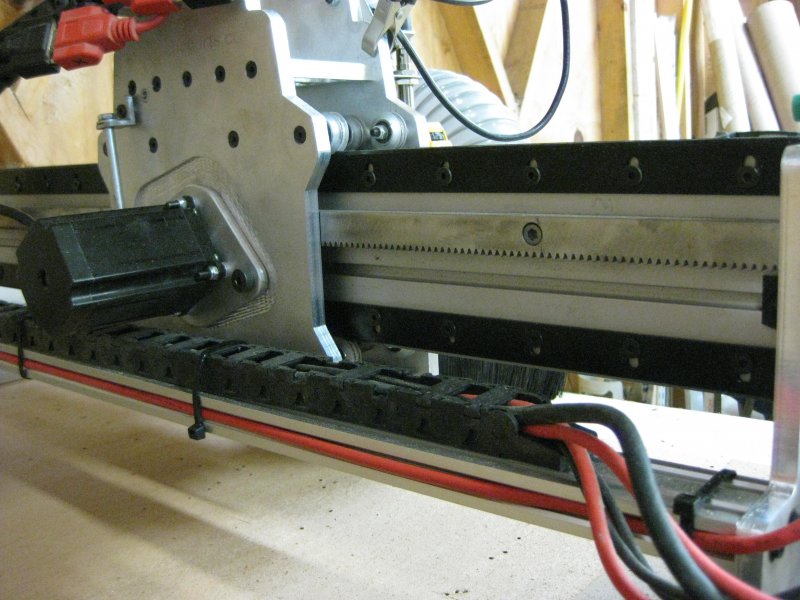
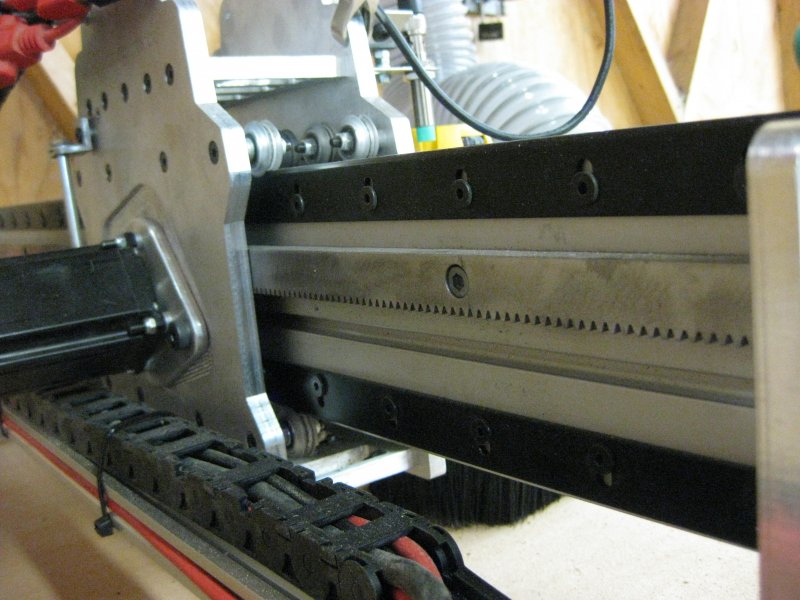
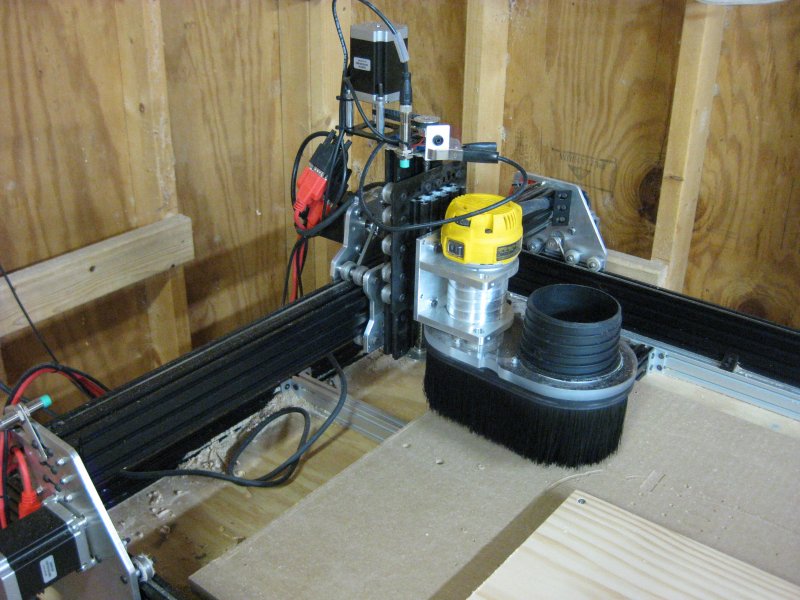
11/30/14
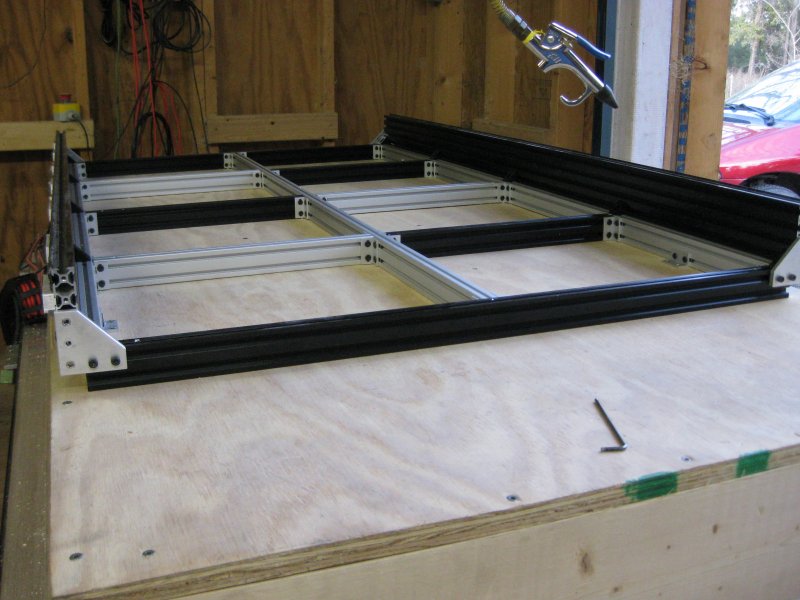
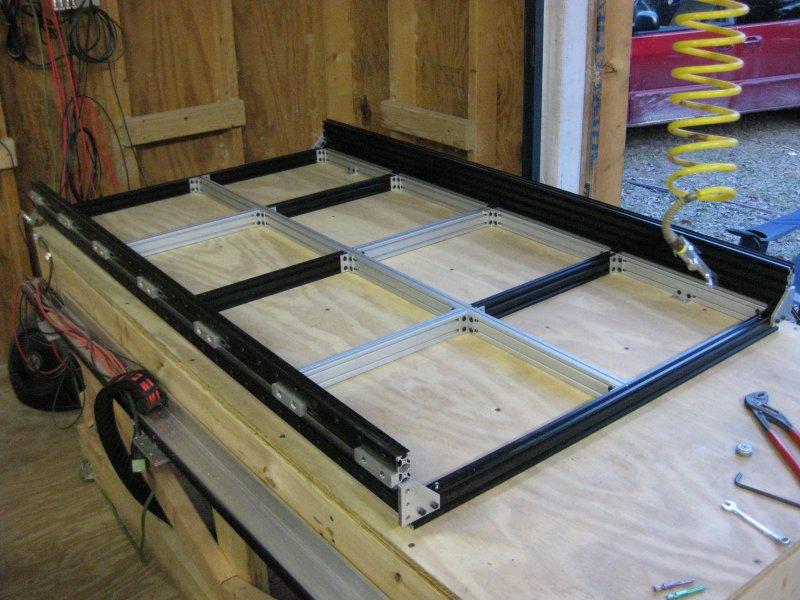
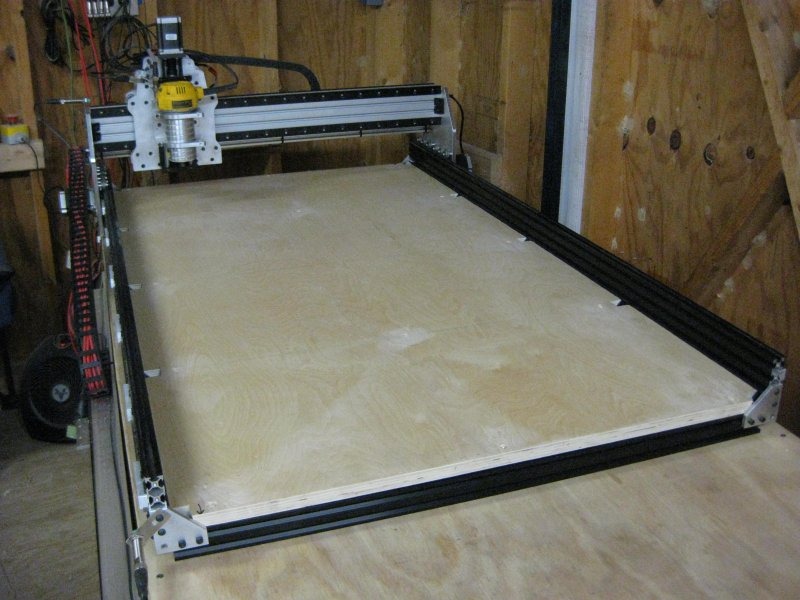
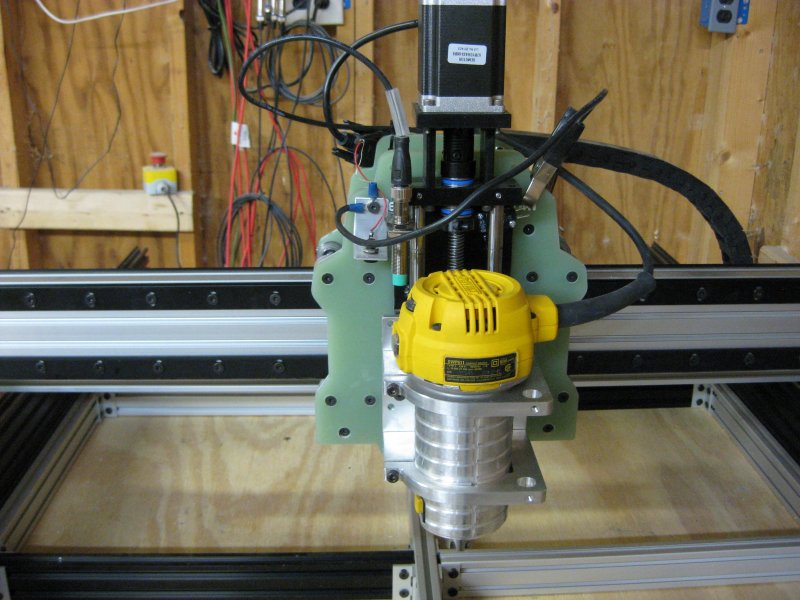
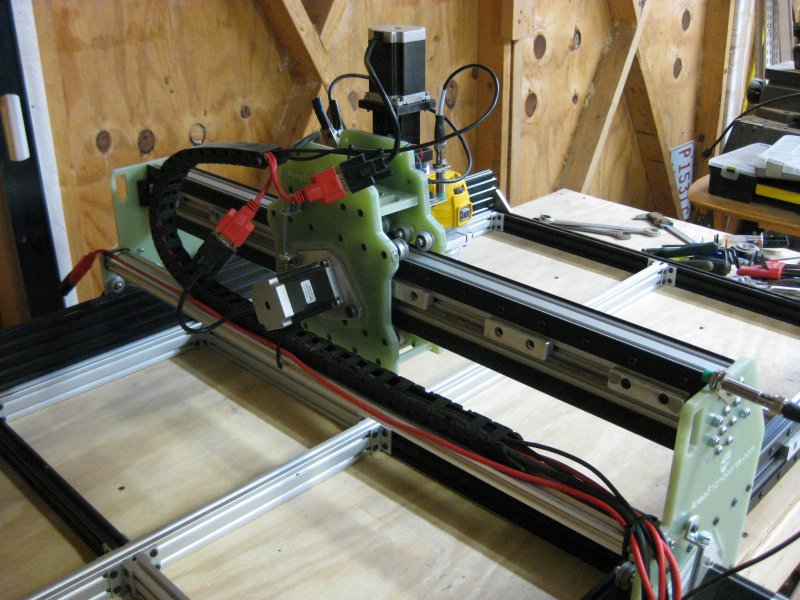
Here are a few photos of the "semi-completed" machine for a baseline, just missing a few odds and ends.
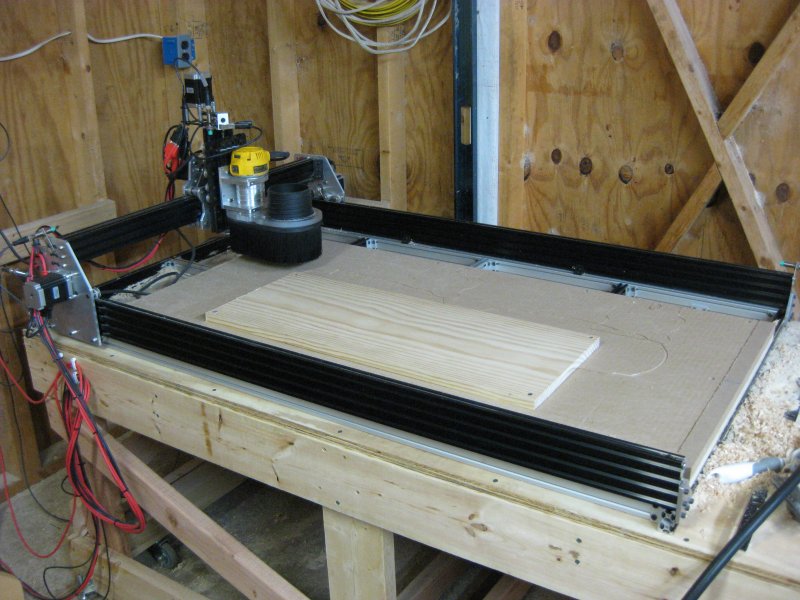
Video doing a 6" x 6" 3D carve, no roughing pass just finish.
Here is a video showing the flex in the gantry doing a 3D rough cut on select pine. Settings were very mild 40IPM feed at 20K RPM .1 DOC with a 4 flute carbide ball nose bit. After watching the gantry carraige go back and forth for about 10 minutes it looks like the flexing is primarily from the 2-2060 extrusions used for the X beam... I was going to bolt them together but at this point there's no need. I have a solid 4060 Misumi extrusion waiting in the wings to be bolted on..
12/07/14
Ok it's been awhile but I decided to go another route. After thinking about the whole belt arrangement for awhile I just wasn't happy with the possibility of still having deflection issues and dealing with belt stretch. Soooooo. Redesign time...
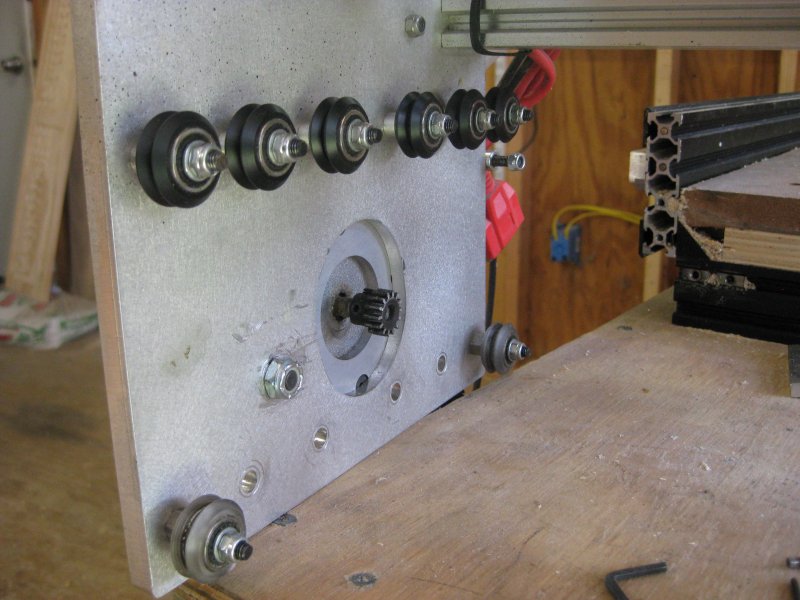
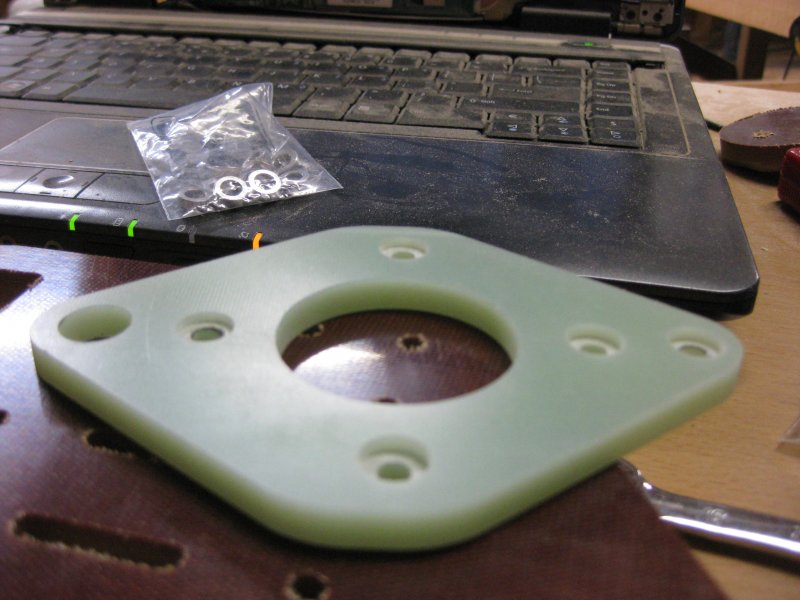
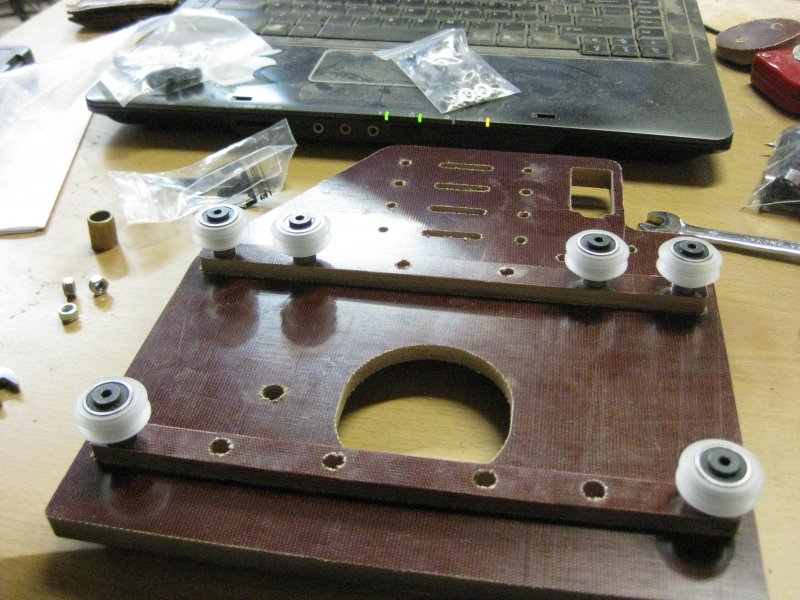
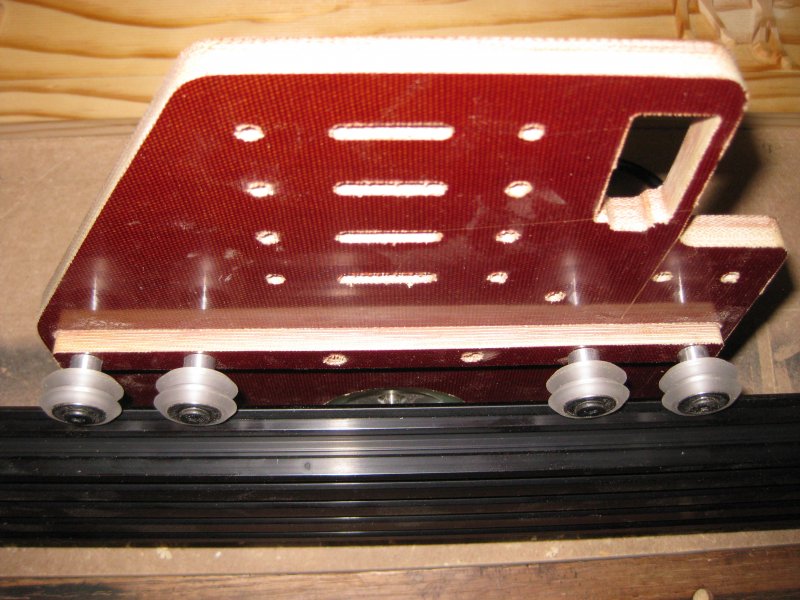
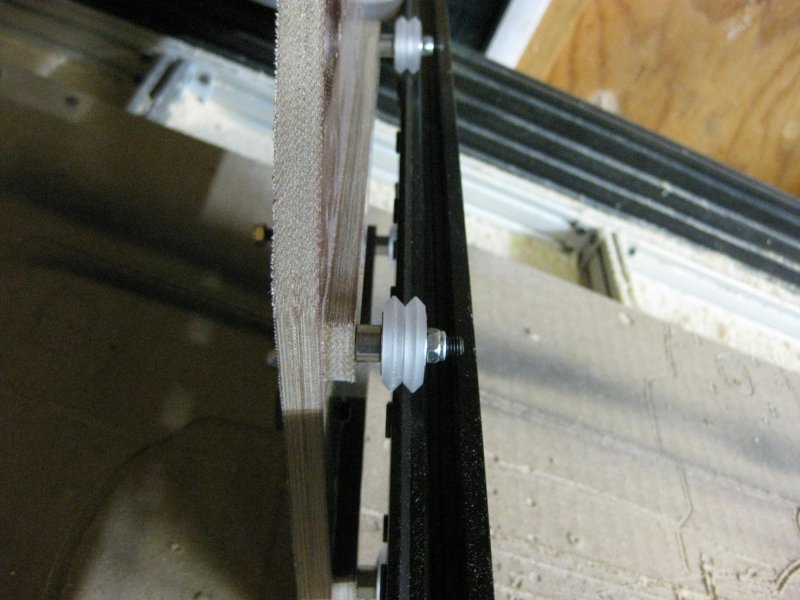
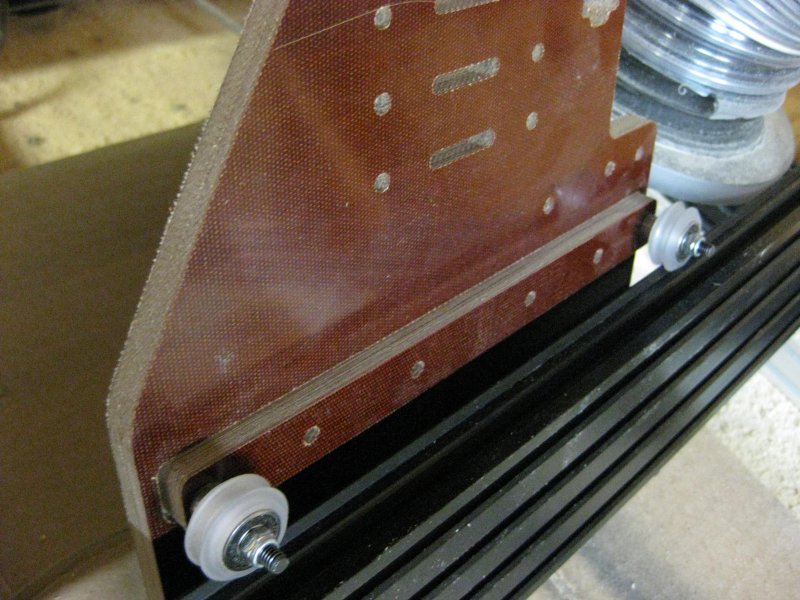
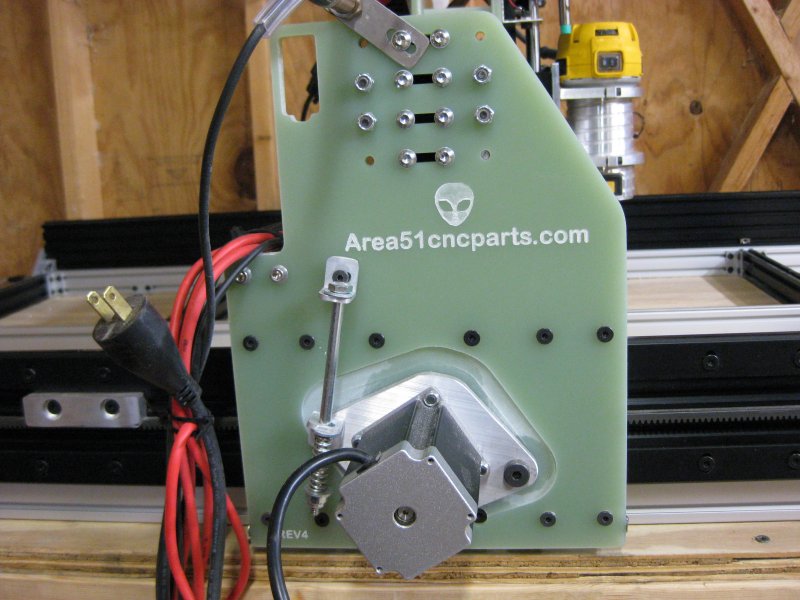
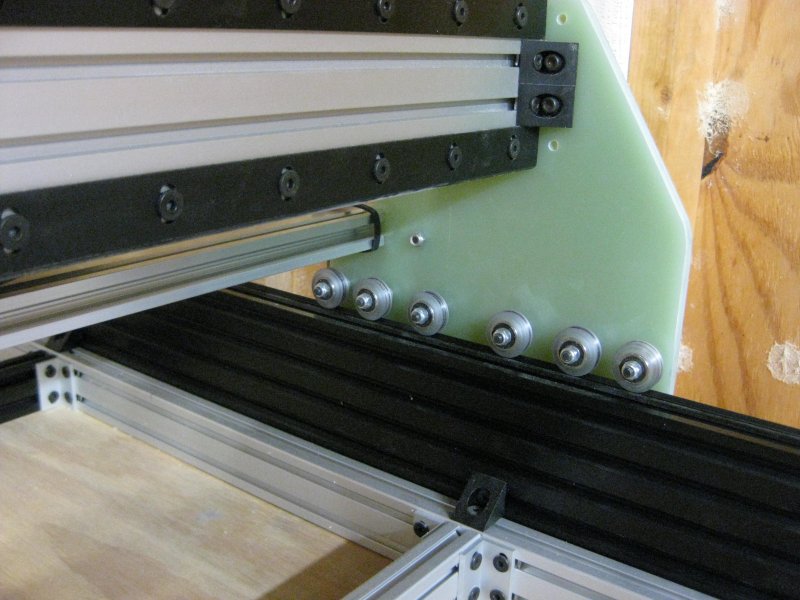
I sourced some pre drilled rack and gears I believe will work. I am basing my idea off of what Shopbot has done with even their large 4x8 machines and how my current 5x9 machine works. You have the stepper mounted on a drive plate with a pivot, the stepper engages a gear rack mounted to the sides of the machines extrusions and tension is handled with a bolt and spring arrangement. My 5x9 Joe's Evo uses this drive system and it works perfectly, no noticeable backlash or deflection. I had the opportunity to cut a prototype plate out for G10 and CE Phenolic yesterday, I assembled it with some leftover parts and mocked it up on a piece of scrap 2080 with Openrail... Very pleased !! Just need to tweak a few things, primarily the wheel spacer, this one was cut out of .375 phenolic and .5 wide, i'll recut out of the .28 G10 to reduce to space between the extrusion and plate and goto .75 wide. I will be using a .25 x .25 rack with a aluminum .125 x .75 wide spacer to mount the rack to the extrusion.
I am no longer going to pursue developing the plates mounting the stepper below the extrusion, if someone else would like to continue where I left off and needs the DXF files let me know.
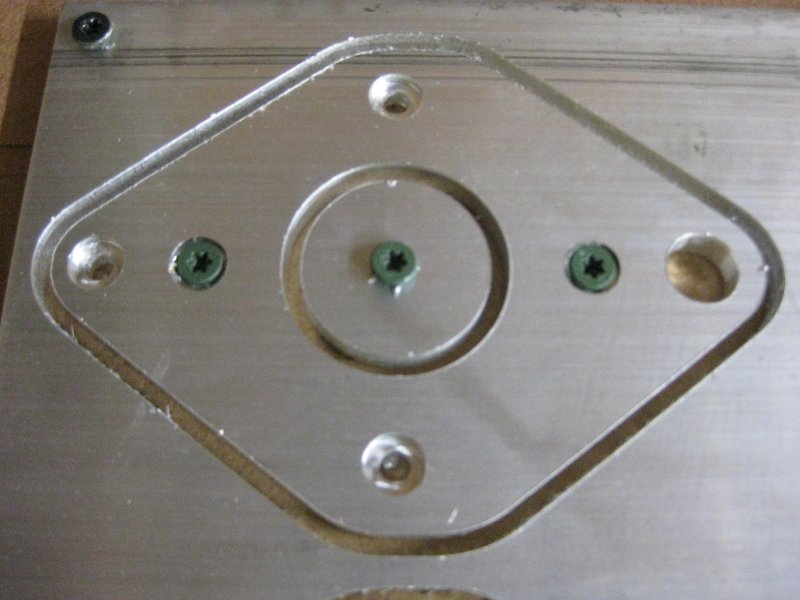
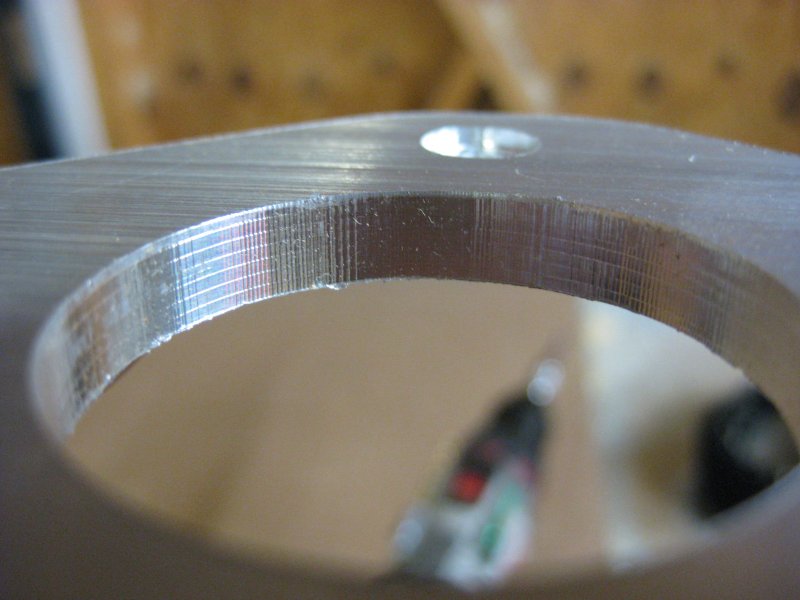
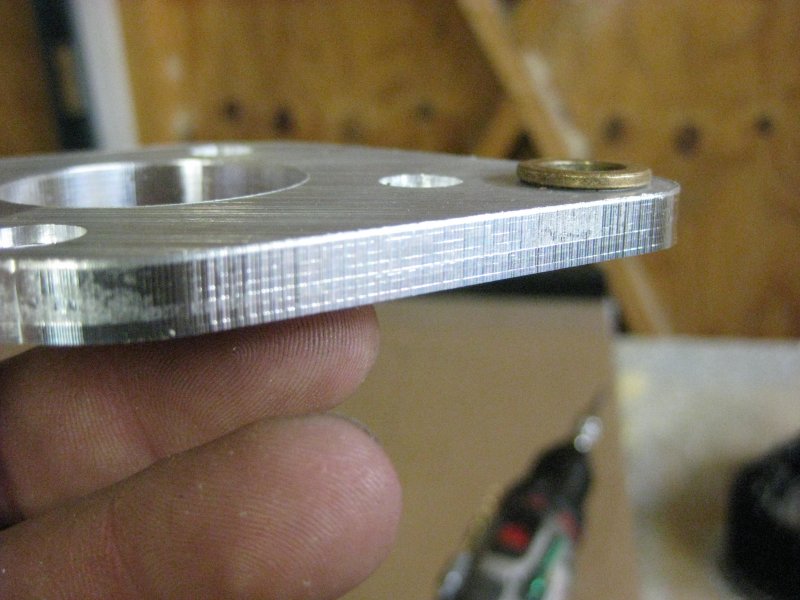
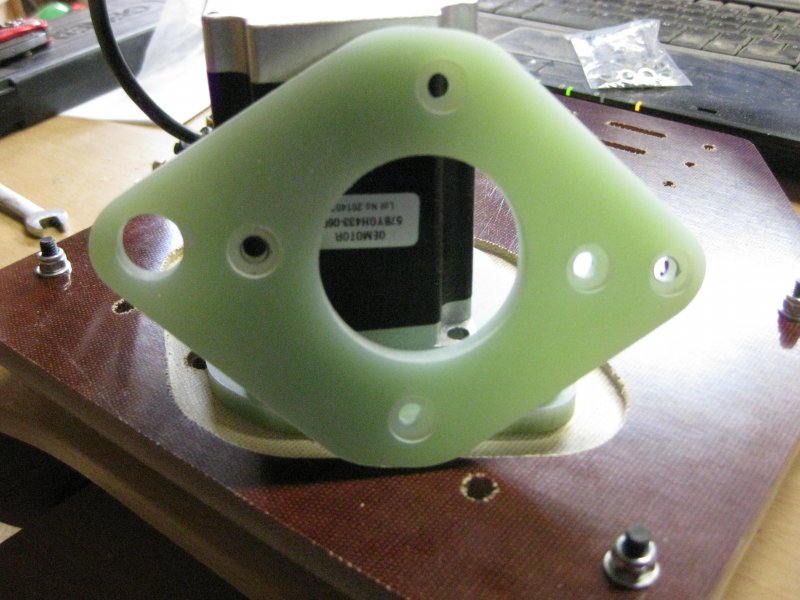
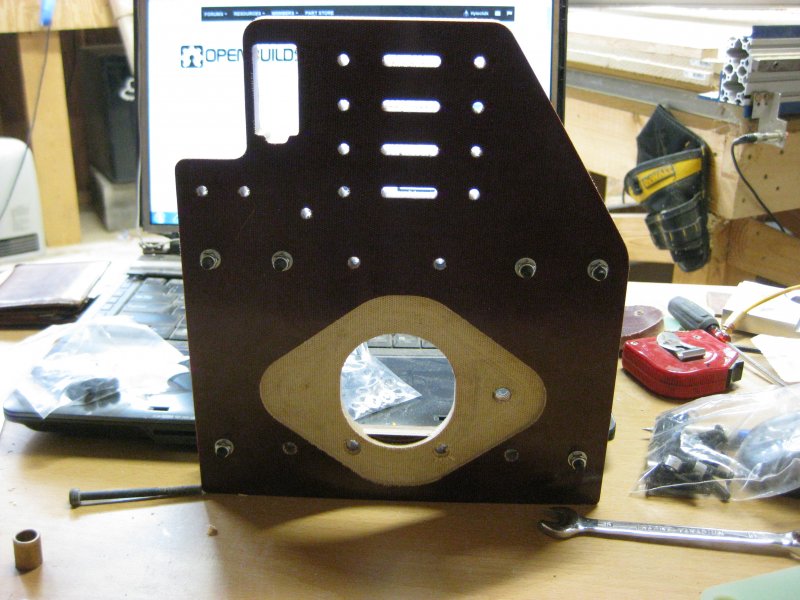
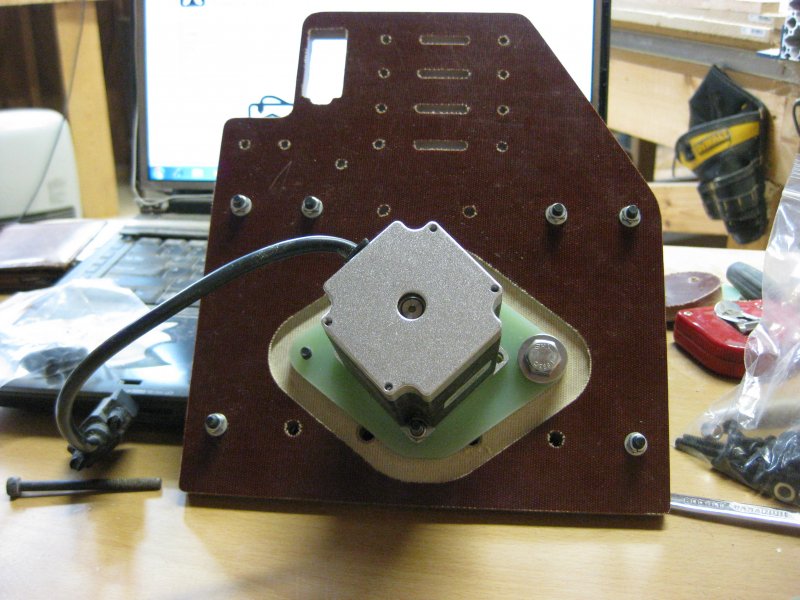
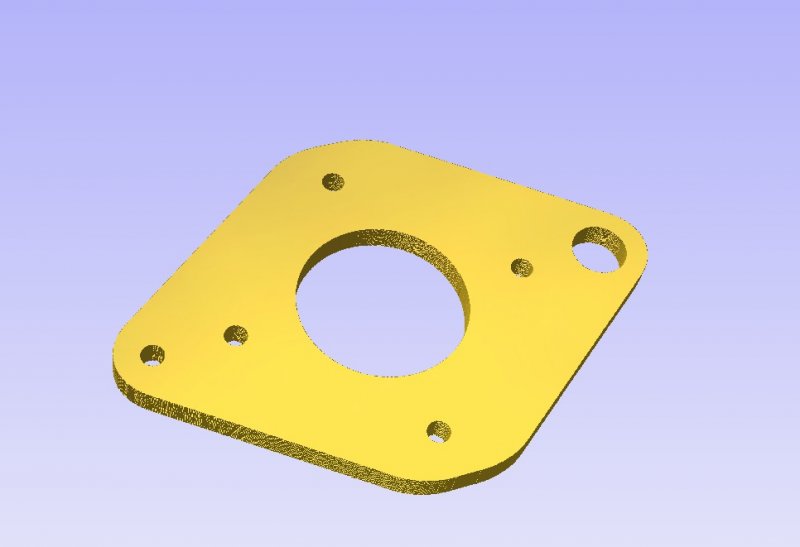
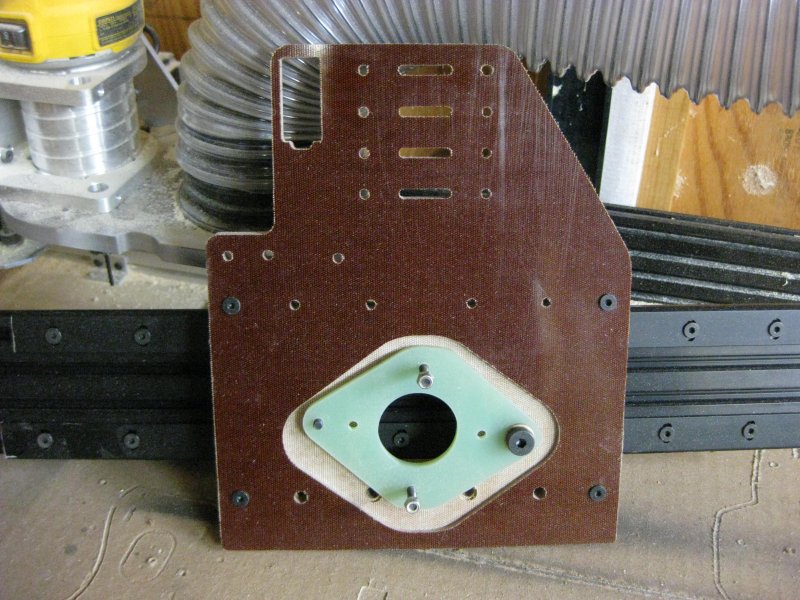
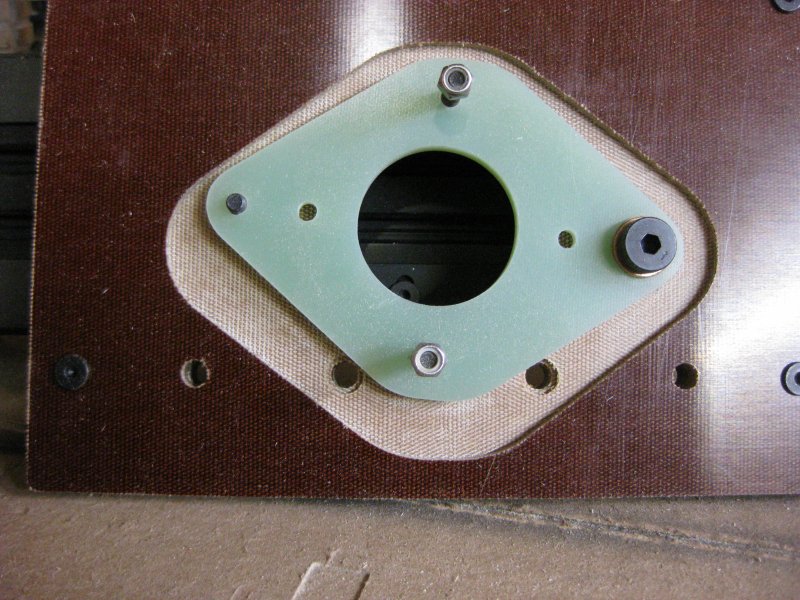
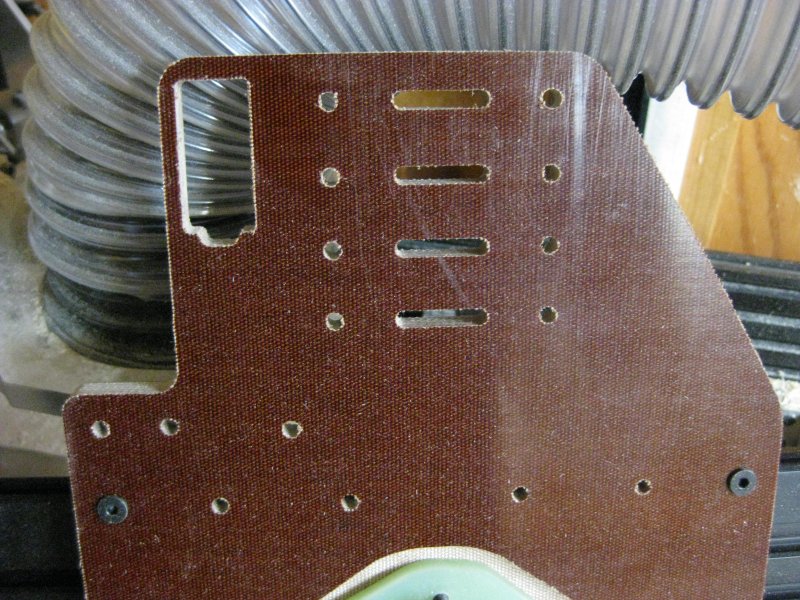
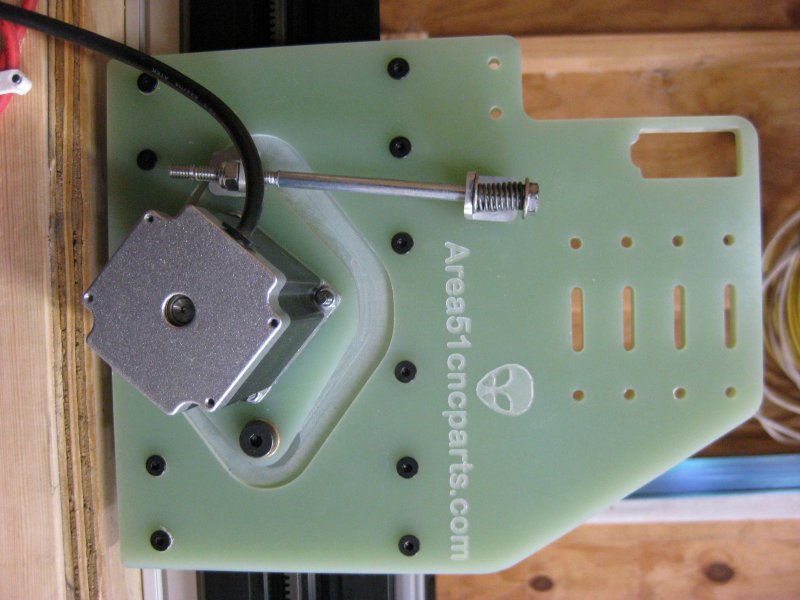
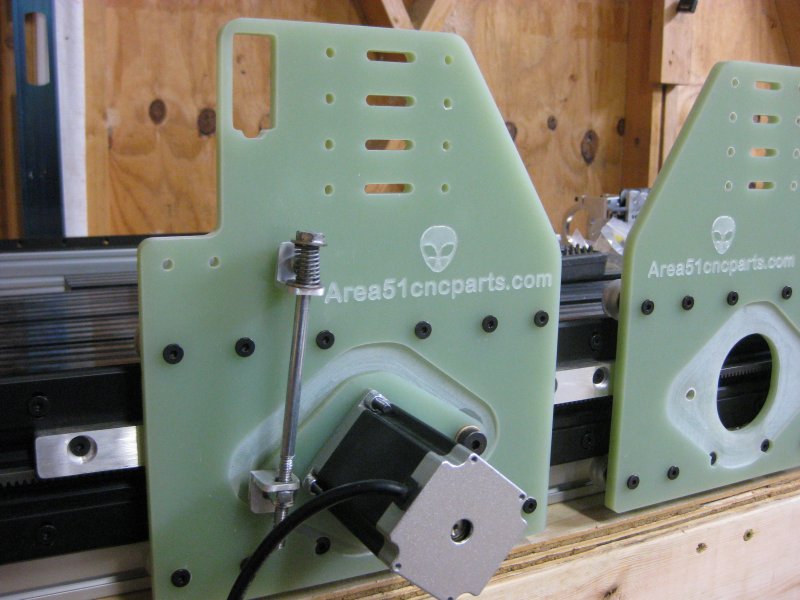
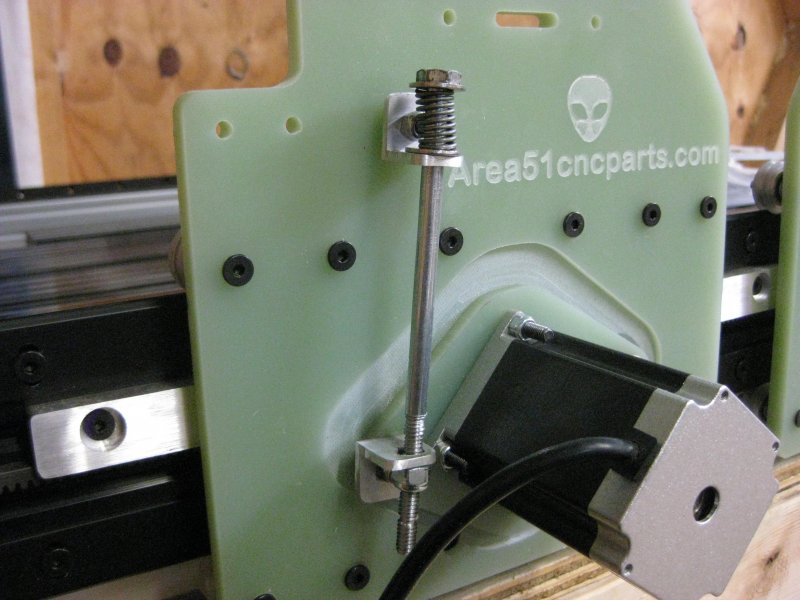
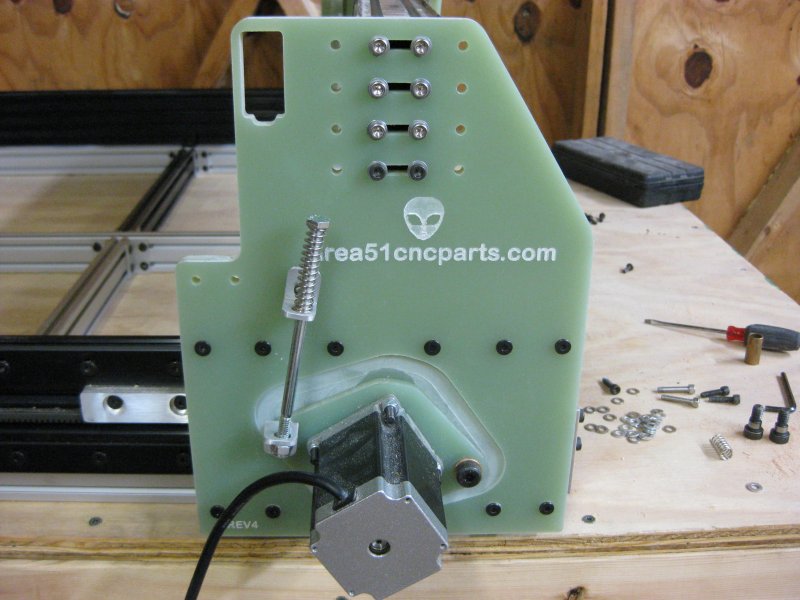
Here are some photos of the prototype Right plate REV1 and stepper drive REV1..
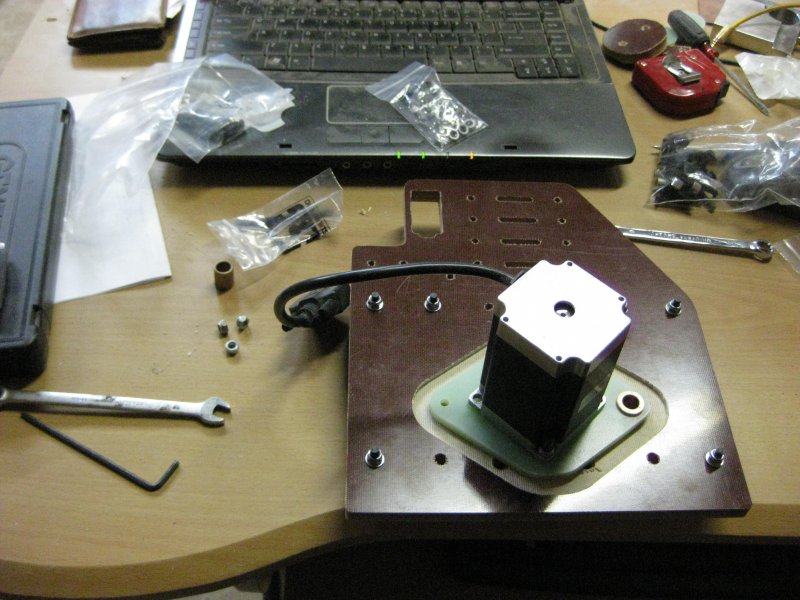

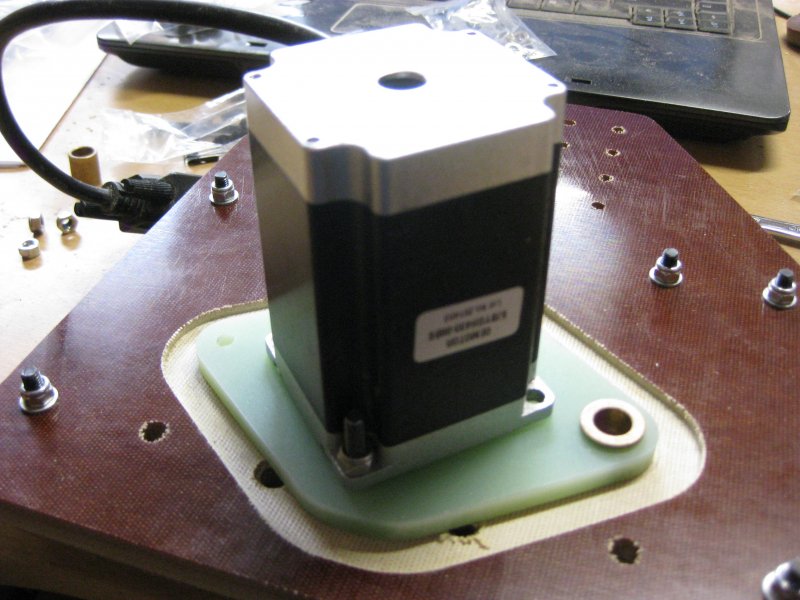
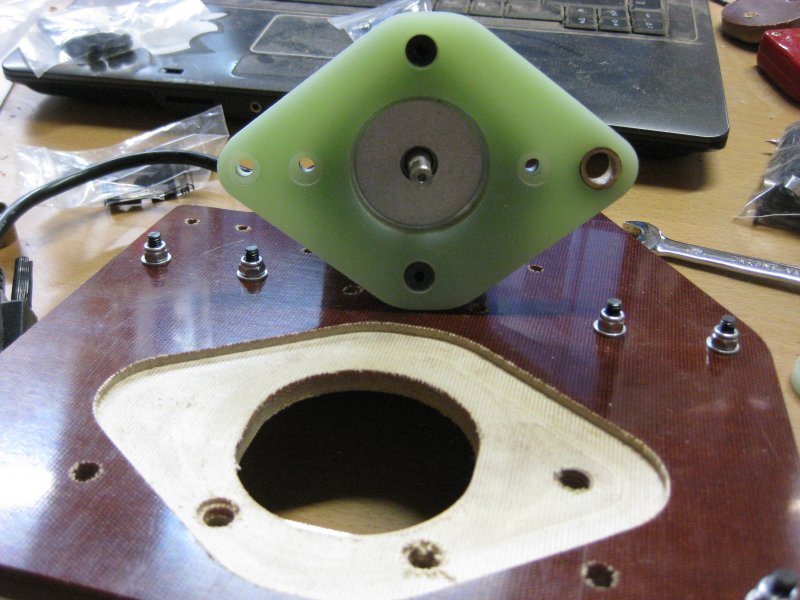

12/09/2014
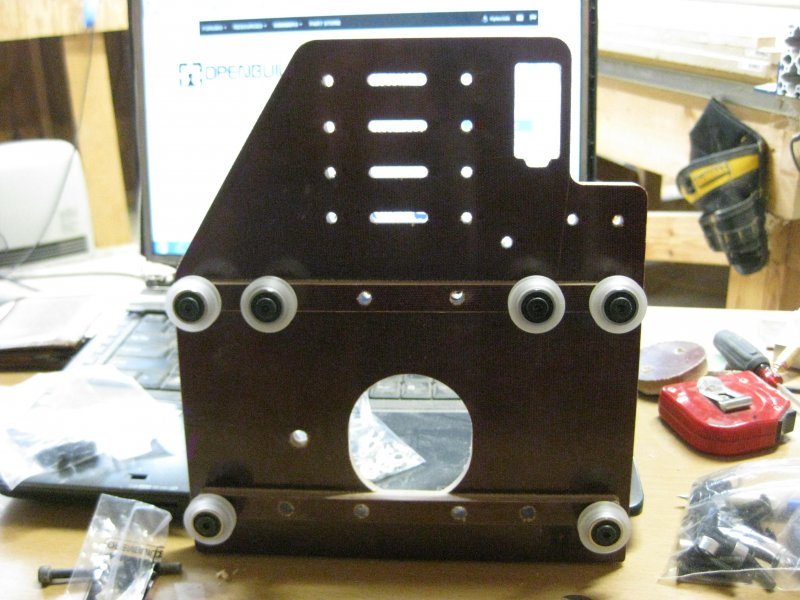
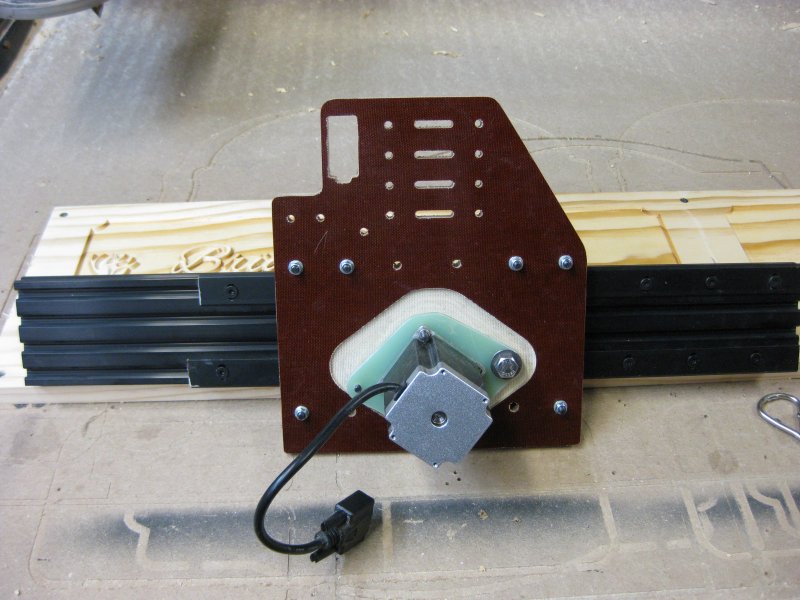
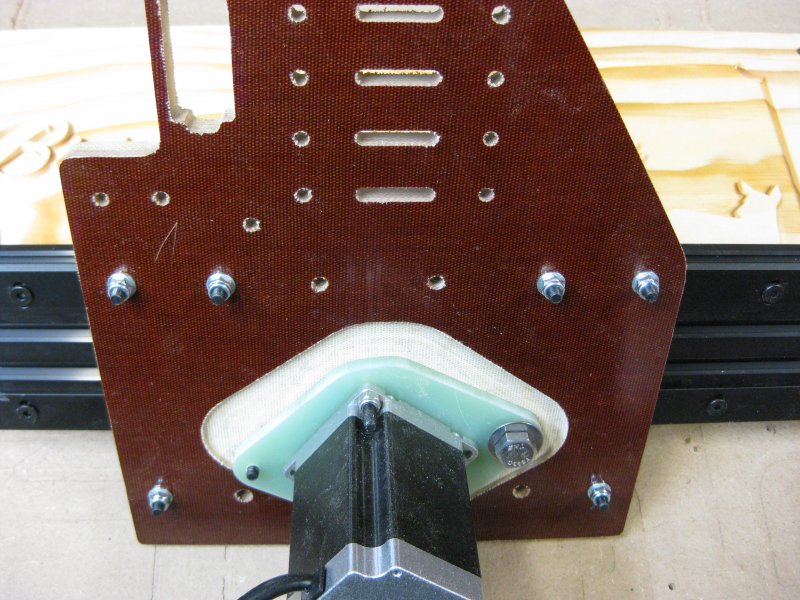
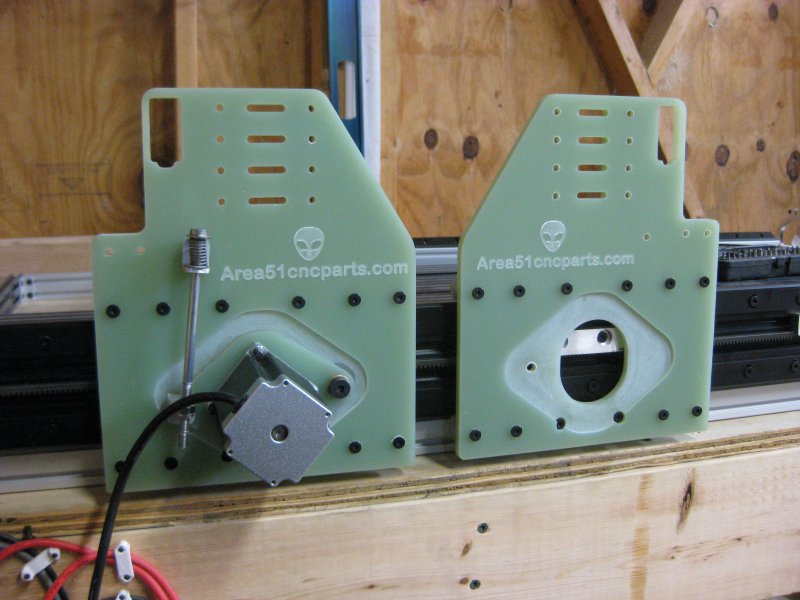
After test fitting the new plates I made a few changes, here are some previews before I cut them...
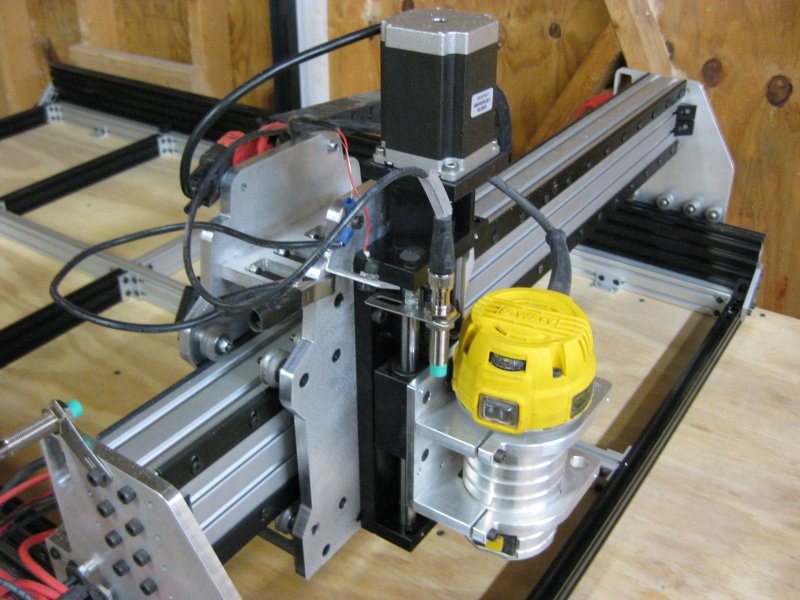
Right side plate with wheel spacers...
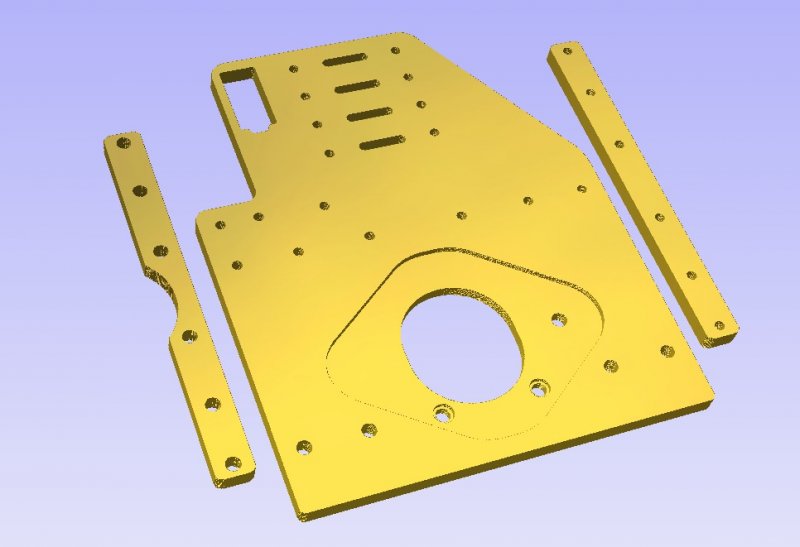
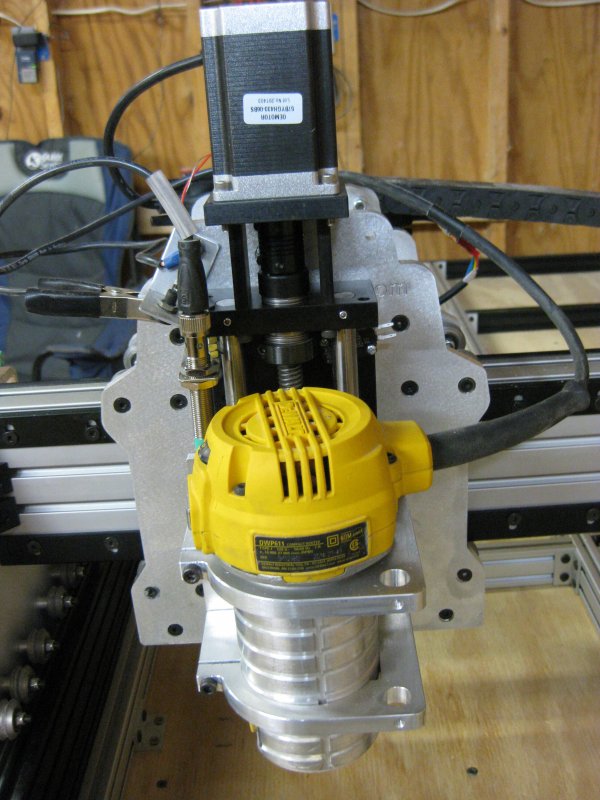
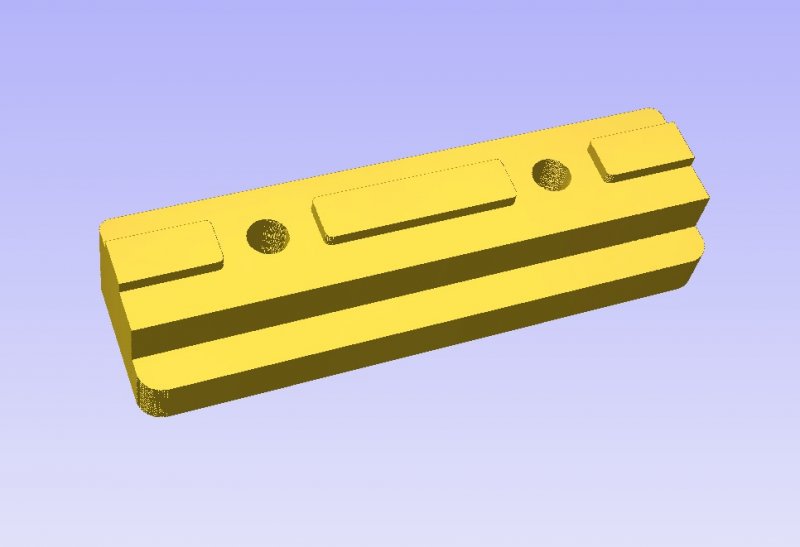
Stepper Drive Plate...
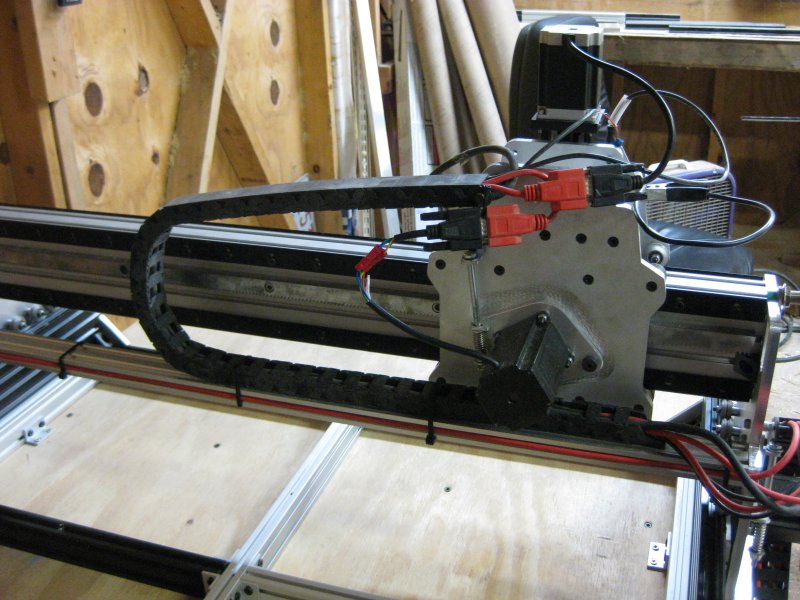
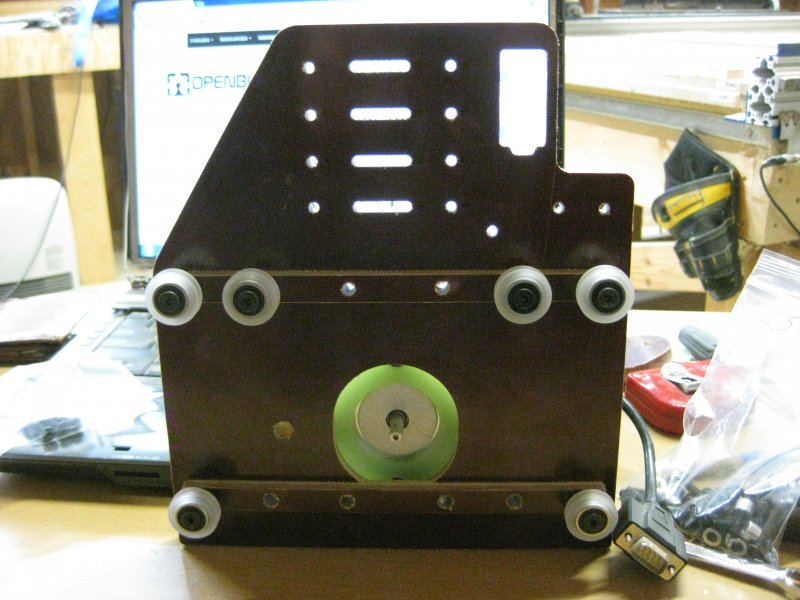
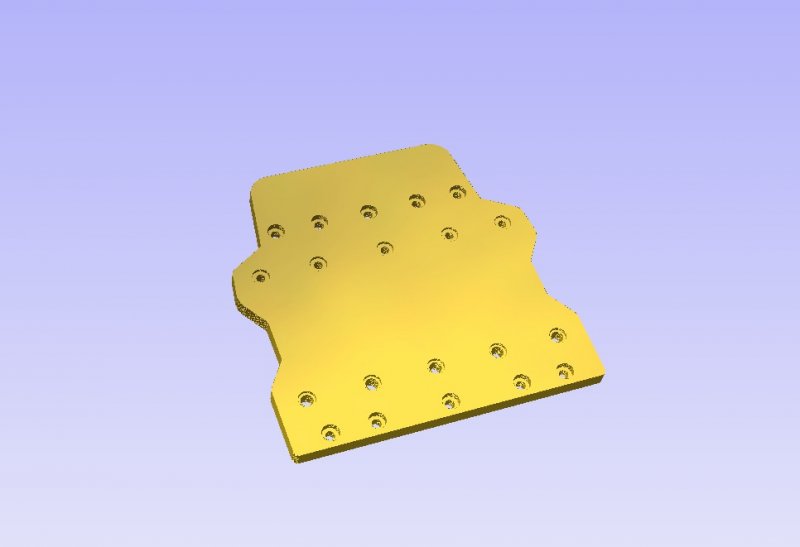
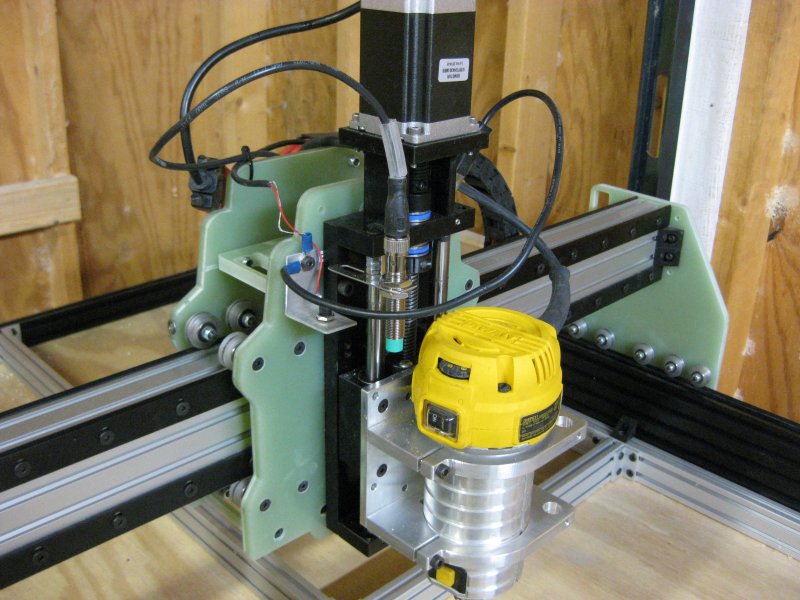
Gantry Back plate with wheel spacers....
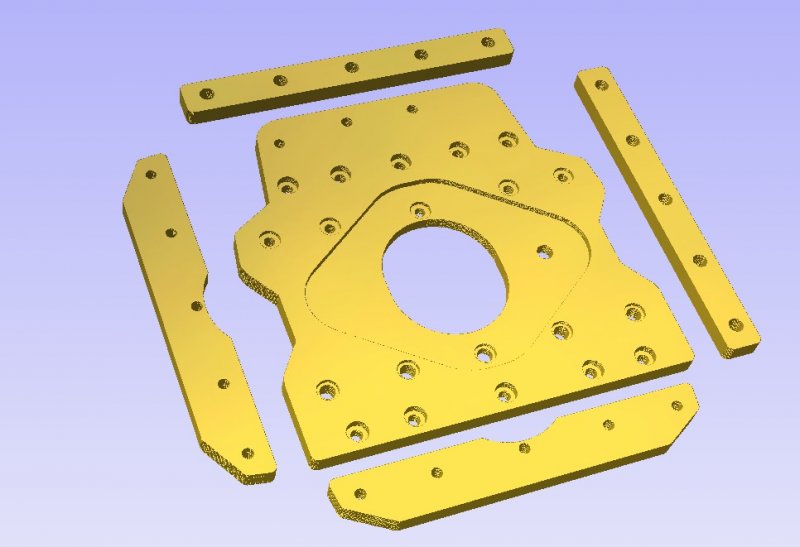
Gantry front plate minus holes to mount Z slide...
12/10/2014
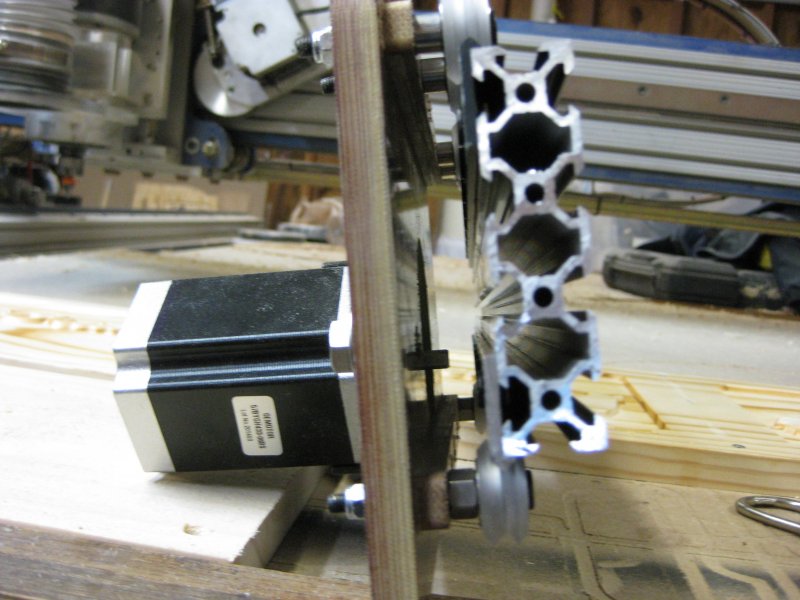
Ok on Rev2 of the side plates, lowered where the 2040 crossmember is located to better clear a Nema 23 on the X carriage. Also added 1 inch to the height and moved the gantry beam mounts up. The wheel spacere are widened to a full .75 for better stability and the lower was trimmed to fit the stepper drive hole. Installed the new Oilite bushing and shoulder bolt on the stepper drive plate. The new rack came in today, going with a 1/2 x 1/2 20 pitch 20 degree pressure rack, just waiting on the new spur gear to arrive. X carriage is designed, i'll be cutting that out tonight to test fit. I'll be doing another version as this one is for 4060 (2060 x 2) Openrail, probably do one for 4080 for more options. Need to order up some more Openrail and other bits needed...
Decided against going to 1/2 aluminum for the plates, spacing is working out great with the 3/8 and i'm sure that with be plenty stiff enough...
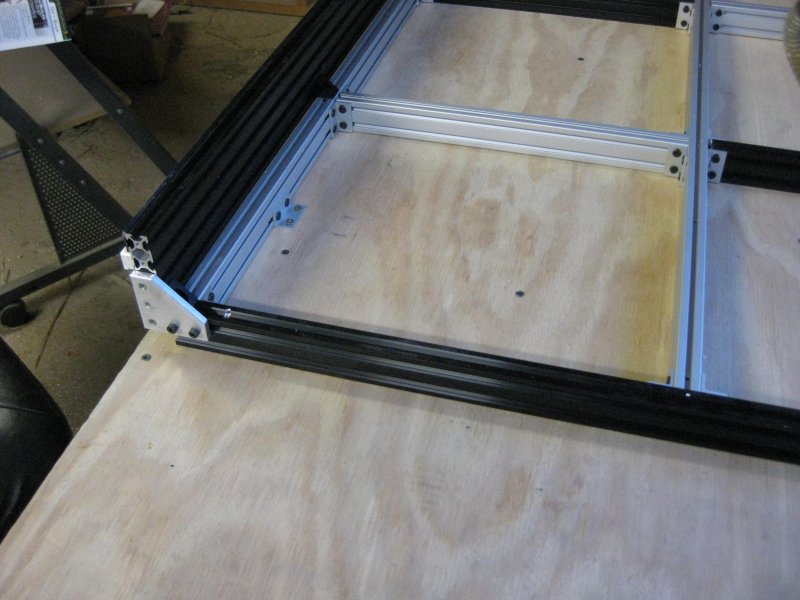
Here are a few photos of the new side plates,
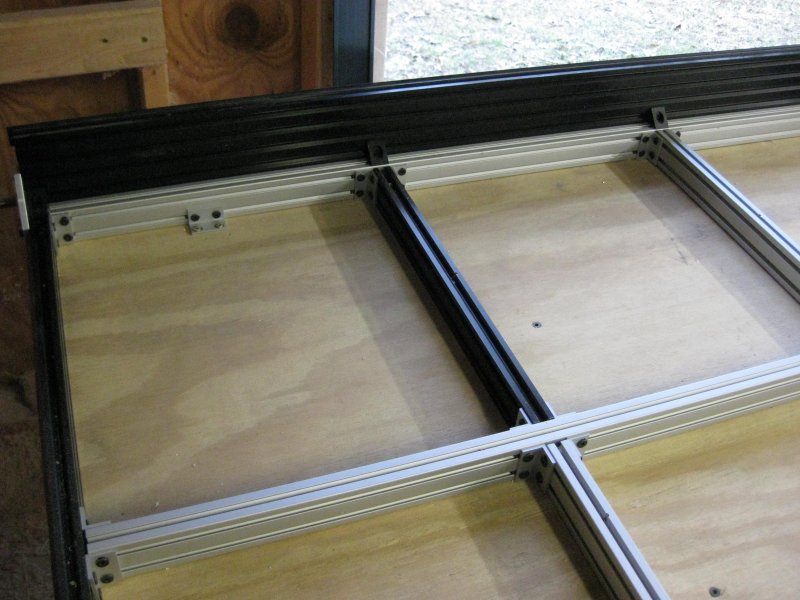
12/13/2014
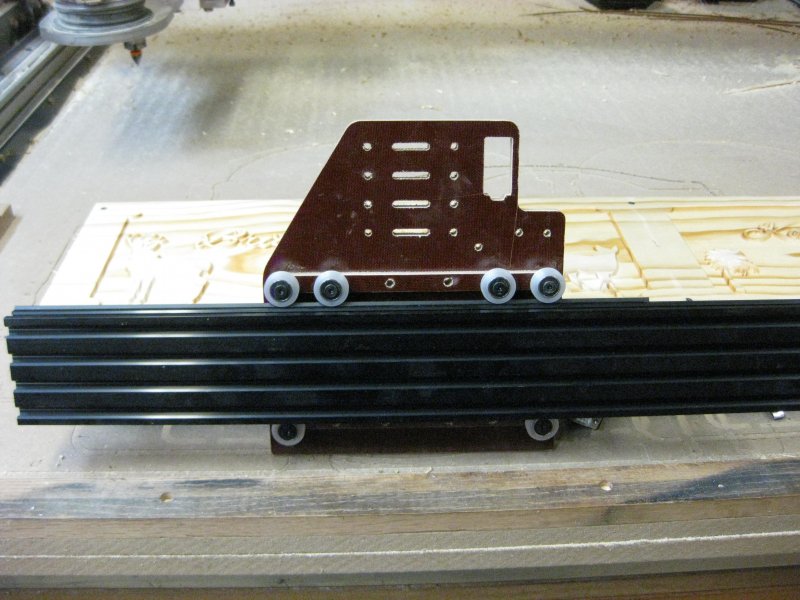
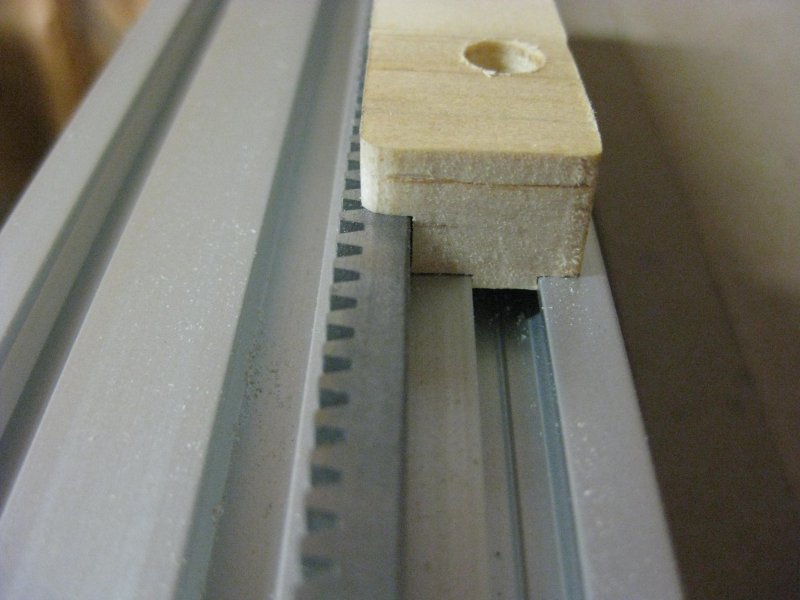
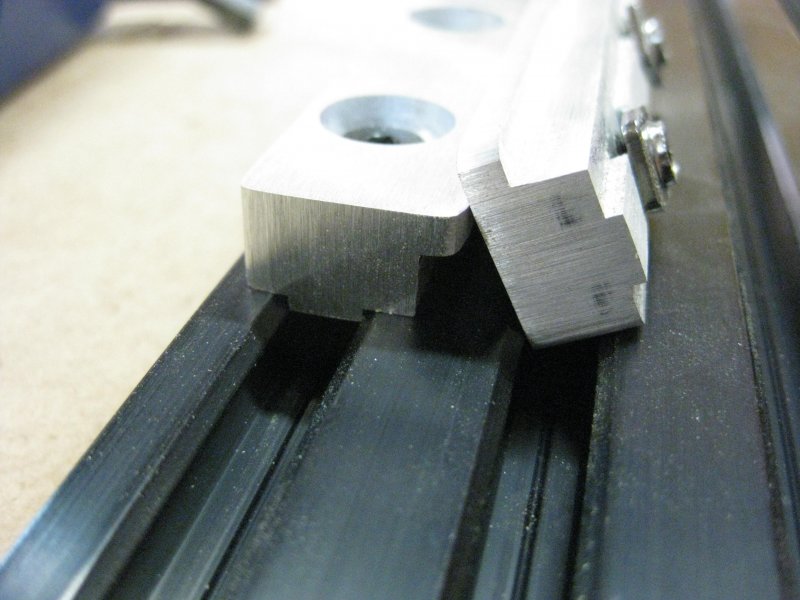
Whipped these prototypes up real quick, they fit the Misumi extrusion just fine but the locating tabs are to tight for the 8020 metric extrusions and I still have to add a chamfer and fool with the depths to adjust it to fit the V slot extrusions... But coming right along, probably have it worked out by the end of the day... Oh and this one is designed for 1/4 x 1/4 rack... I'm using them on my gantry to hold the 24 pitch rack I have on hand.. I'll be doing another for 1/2 x 1/2.
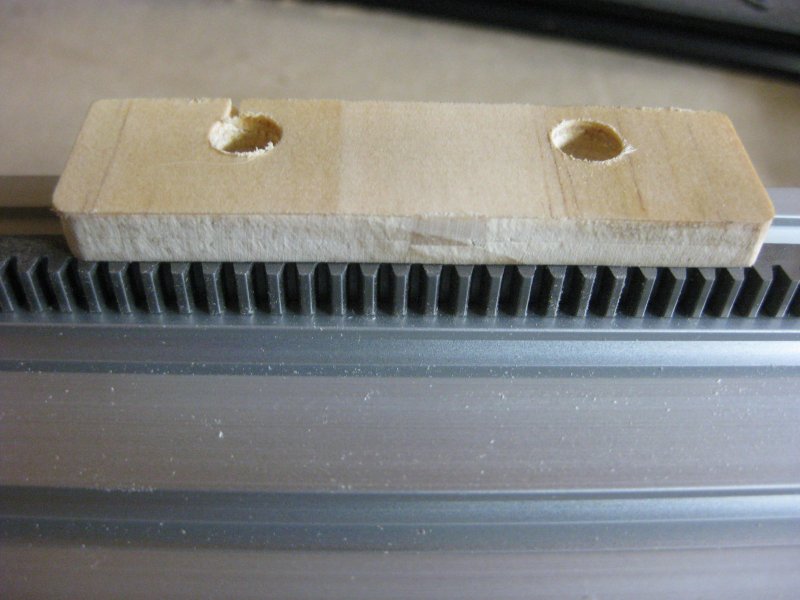
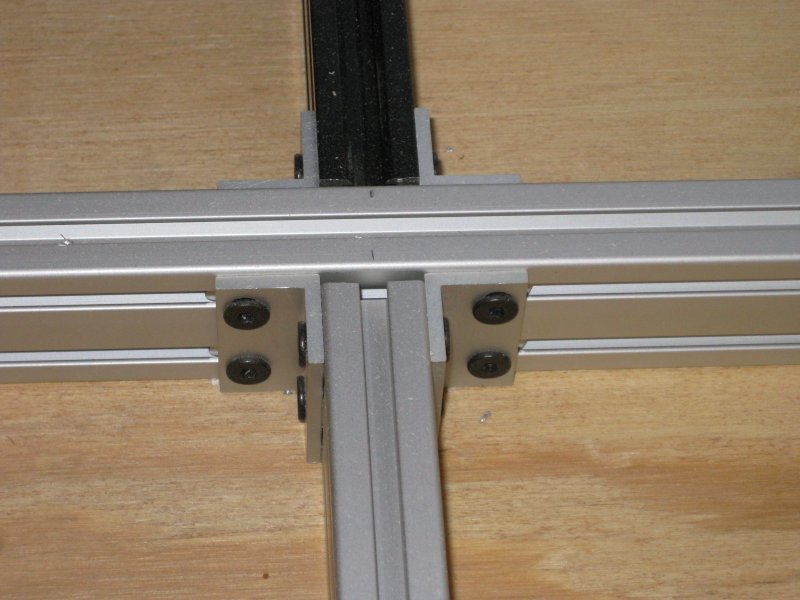
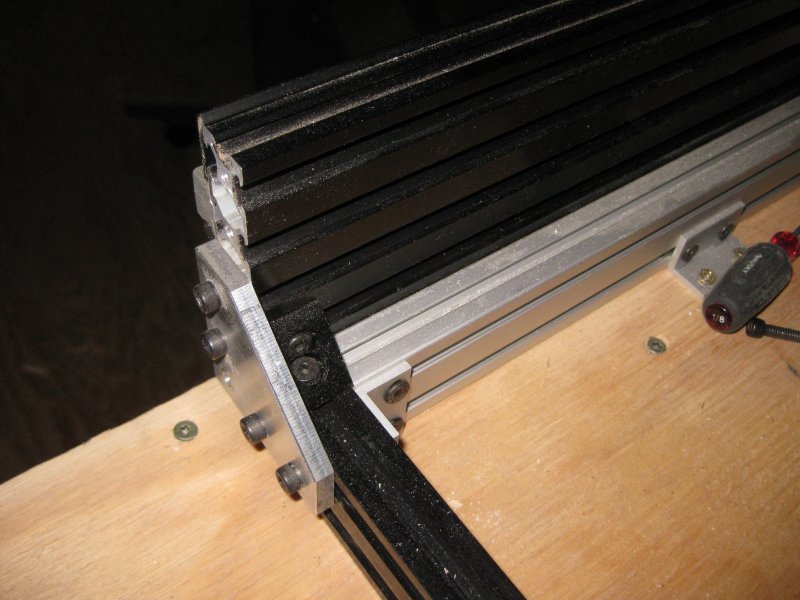
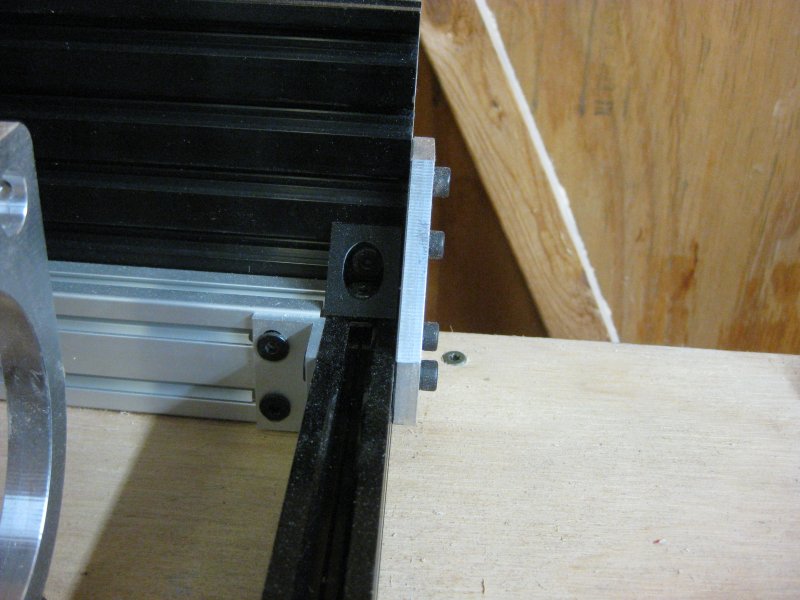
12/17/2014
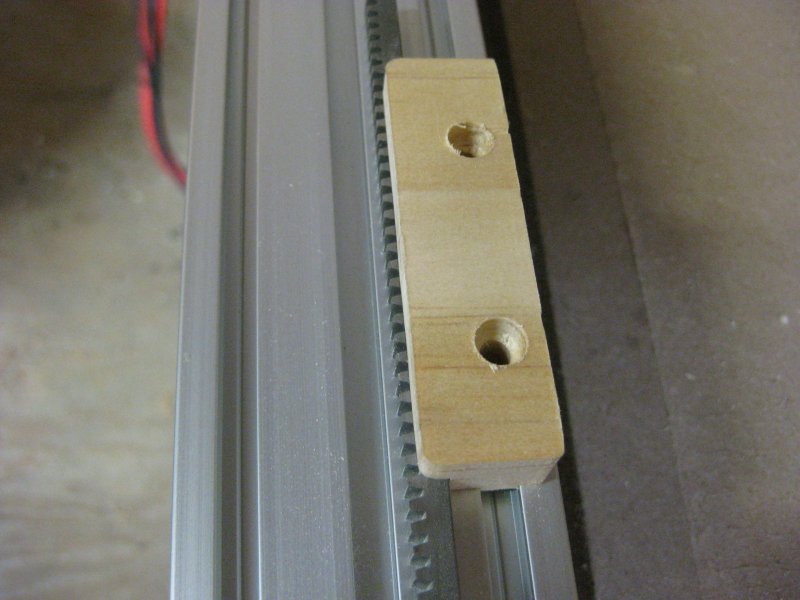
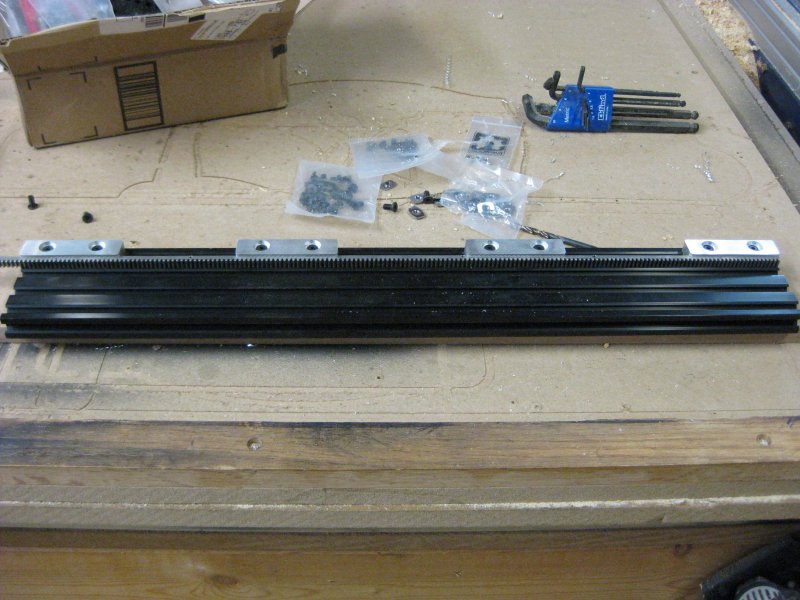
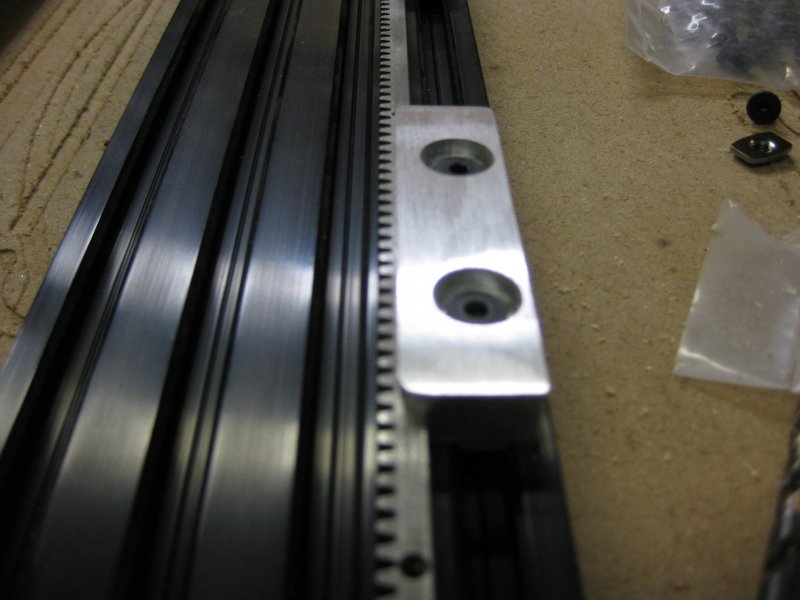
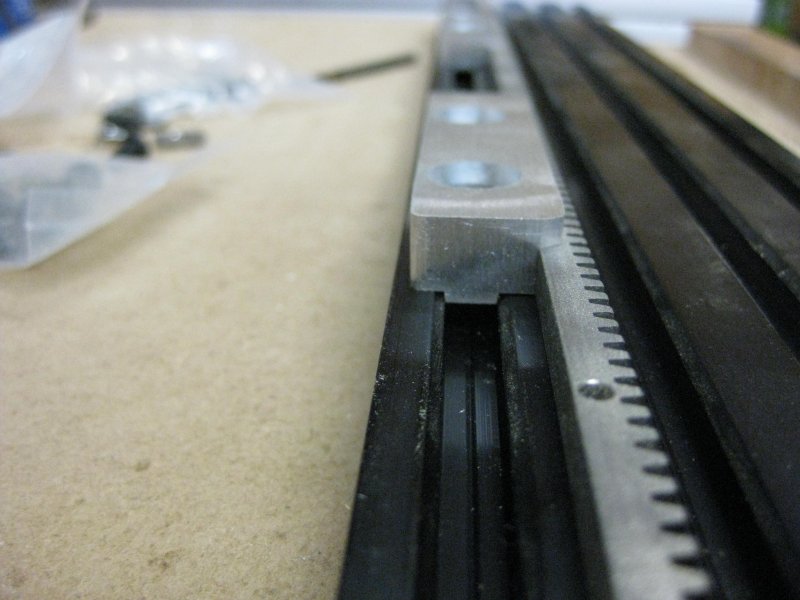
Decided to go with 1/4 x 1/4 24 pitch rack all the way around. Finally got some time to cut some rack clamps out of 6061 Alum, look great and hold the rack solidly. Clamped 4 of them to a piece of 2080 with 1/4 x 1/4 rack, rack didn't deflect between the clamps when pressure was applied, and couldn't move the rack in clamps. All in all I think these are going to work out great !! Just waiting on some more Openrail, spur gears, 3/8 G10, 3/8 Alum plate, wheels, and some new "o" flute Amana bits from Toolstoday in order to get this upgrade moving along. I'm going to cut the first set of plates out of 3/8 G10 to test everything out, once i'm sure everything is where it needs to be then i'll make the final plates from aluminum. Here are a few photos of the new clamps.
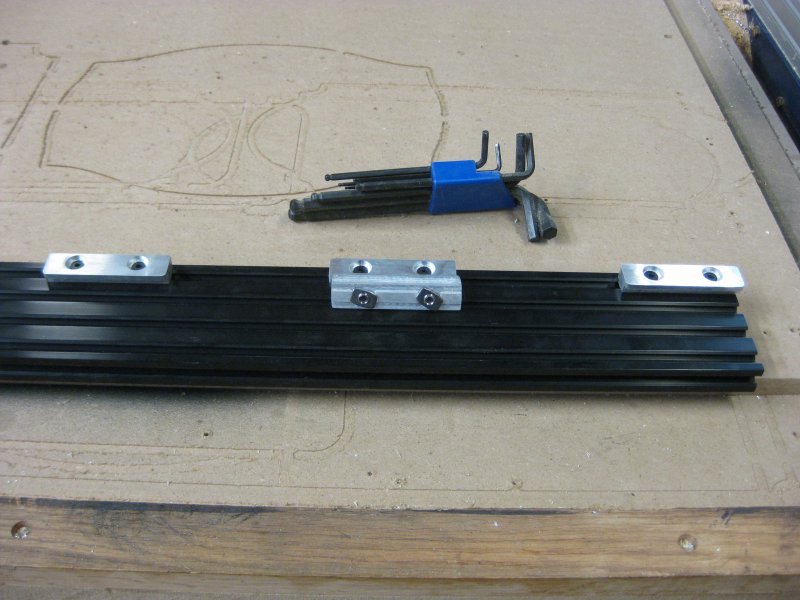
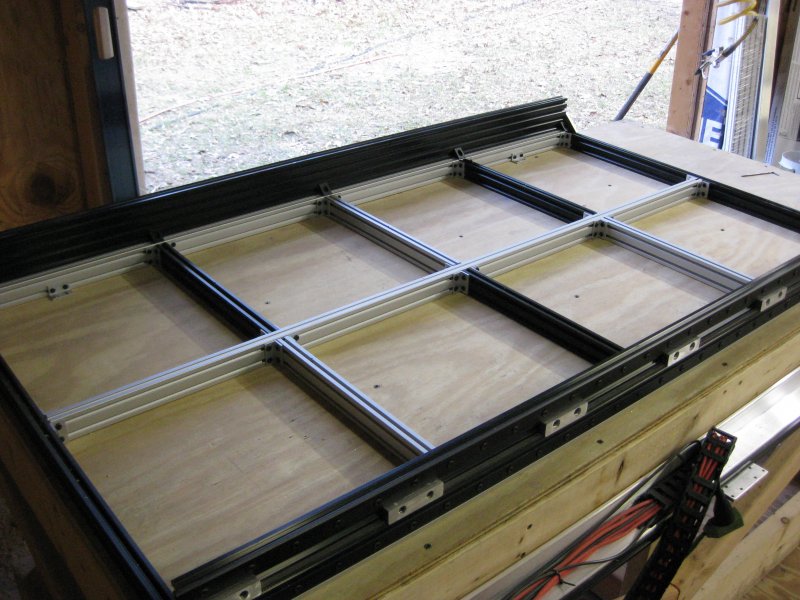
12/21/2014
Ok I completely disassembled the Ox and started rebuilding, got the Openrail mounted to one of the 2080 Y extrusions, and installed the rack with the clamps I already cut out, btw I still need to add about 4 more clamps to hpld that rack securely. REV3 plates are cut, mounted and tested. Ran the plate back and forth up to 1000IPM, backed it down to 600 in the video.
The gear mesh noise in the video is coming from between the clamps, the rack is flexing and causing that noise, 4 more clamps on the way. Ran smooth and fast, cutting out the other side tonight.
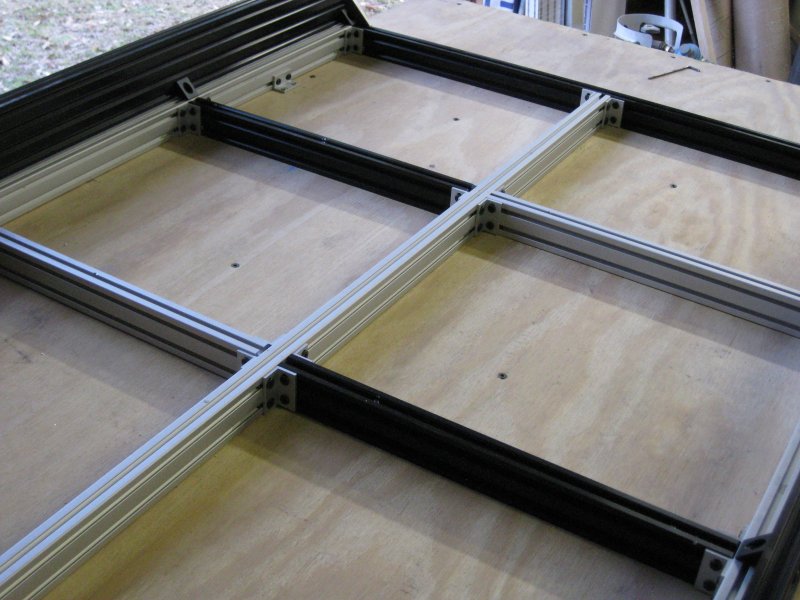
12/26/2014
Ok, time to kick this in high gear and get it done... Both Y plates are assembled, and all the clamps are installed on the right side, waiting on a couple bits to finish the clamps for the gantry and the left side. Prototype tensioner is tested and works great. Seven rack clamps took care of the flex in the rack. Twelve wheels per side should do the trick .

12/29/2014
Well..... Ran into a little snag, turns out the 4080 extrusion I ordered from Misumi is held up in customs per Misumi "Please be advised that at this time this order that is scheduled to ship today is currently being held by a customs delay. At this time, we have no further information on when the items will be released; however, we will ship according to the purchase order when we receive the parts." so that sux. Apparently even though they have a office in the US they don't stock this stuff here, I should have known when they reboxed the last extrusion I got from them, still had a japan air freight bill attached to it. So another change of plans, i'm going with extrusions that are readily available here in the US from 8020. I ordered a 25-5010 50mm x 100mm extrusion to use for the gantry beam. I have already redesigned the files for the axis plates to accommodate the 5010, just need to cut them out. I also turned the stepper drive pocket slightly in order to be able to add a t nut to lock the shoulder bolt. I'll be cutting the new plates in the next couple days, the 5010 is scheduled to arrive tomorrow so hopefully we will have a operational gantry by this weekend.
Thanks for following along !!
01/02/2015
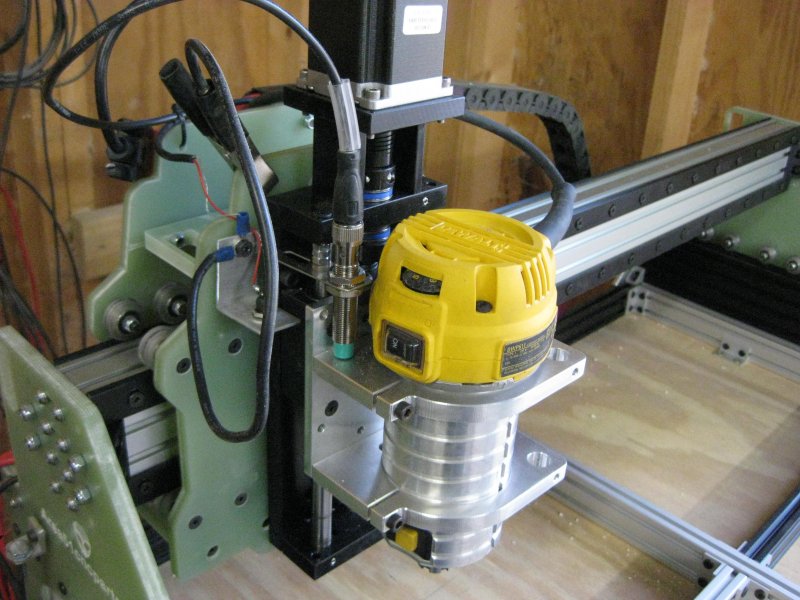
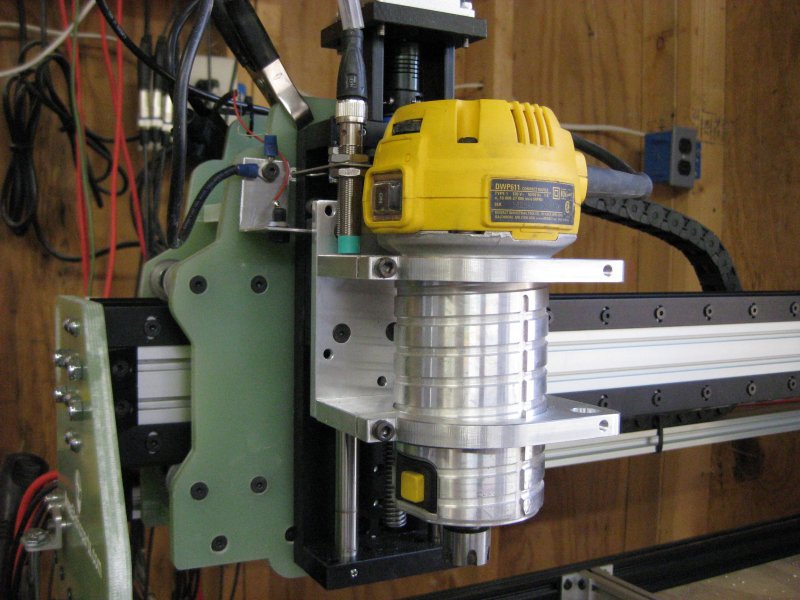
Ok, well the the Misumi 4080 arrived so we're going with it for this build. All future builds with be built with locally (US) sourced materials whenever possible. Gotta say though, 4080 beam is nice and heavy for it's size. Made a couple more changes to the design, first off, the only real wildcard in the equation now is the z slide so we're going with a more commercial version with linear ball bearings, solid aluminum construction, and a 2 start 1/2 leadscrew.
Going to get Chris Laidlaw to cut me a new router mount back plate, already redesigned the front X axis plate to accommodate this slide. Should give me the performance and rigidity i'm looking for.
Finally got the right springs to tension the stepper drives. I'm going to work on the 2 plates to box the gantry carriage tonight. Just waiting on some more T nuts and 8 more v wheels and this project will be closing in on the finish line. Hopefully i'll have this wrapped up by next weekend.
As for the vacuum table, slight change there. A lot of the cuts I do are 3D and go for close to 4 hours at a time. Running vacuum motors for that length of time will be hard of them and my electric bill. We're going to make some vacuum pods with 3/4" phenolic board and use a vacuum pump setup. I'm going to incorporate mounts in the base to be able to bolt and unbolt the pods/jigs at will. That should be alot easier on my electric bill and initial setup cost.
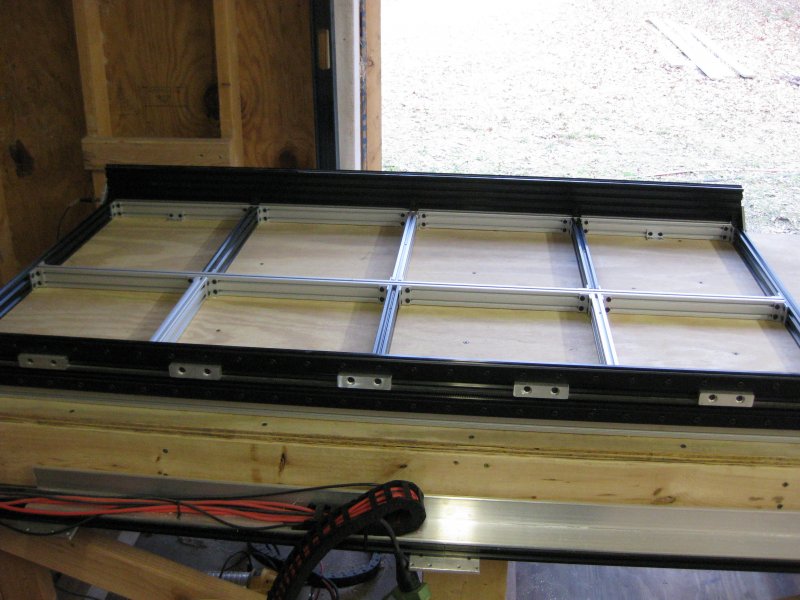
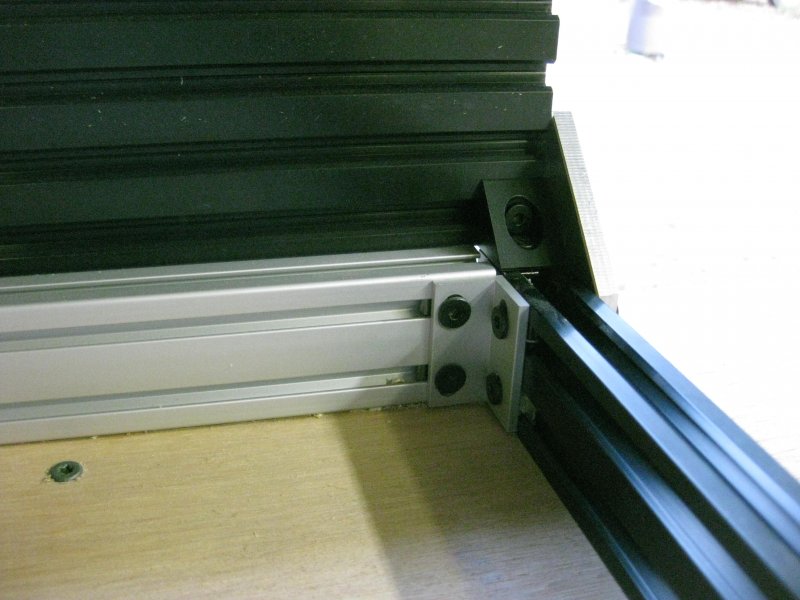
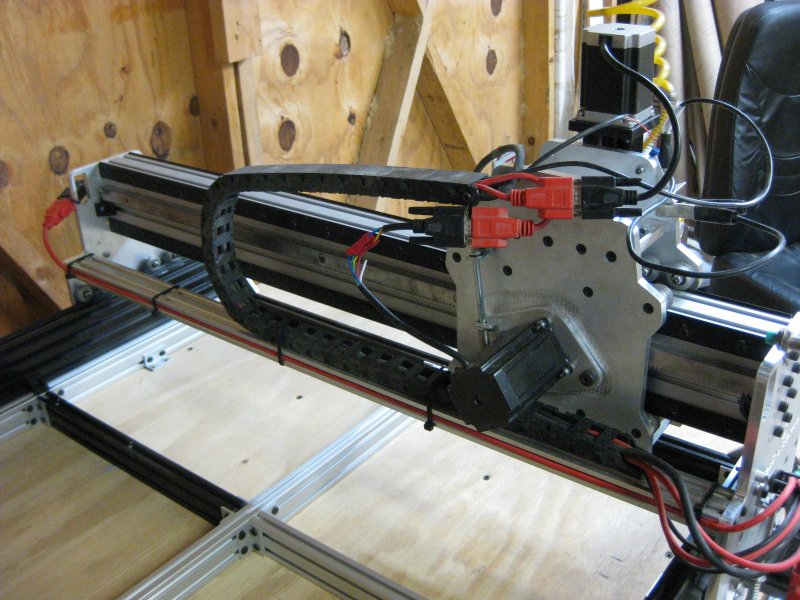
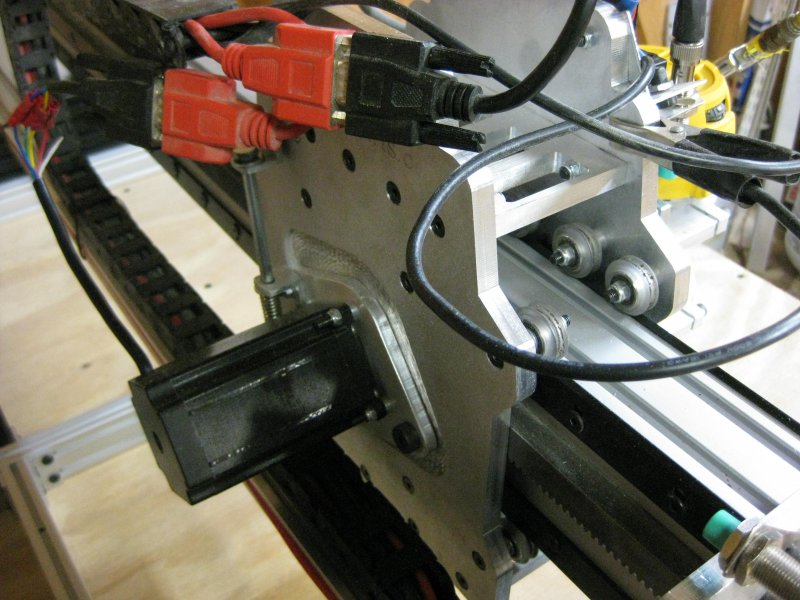
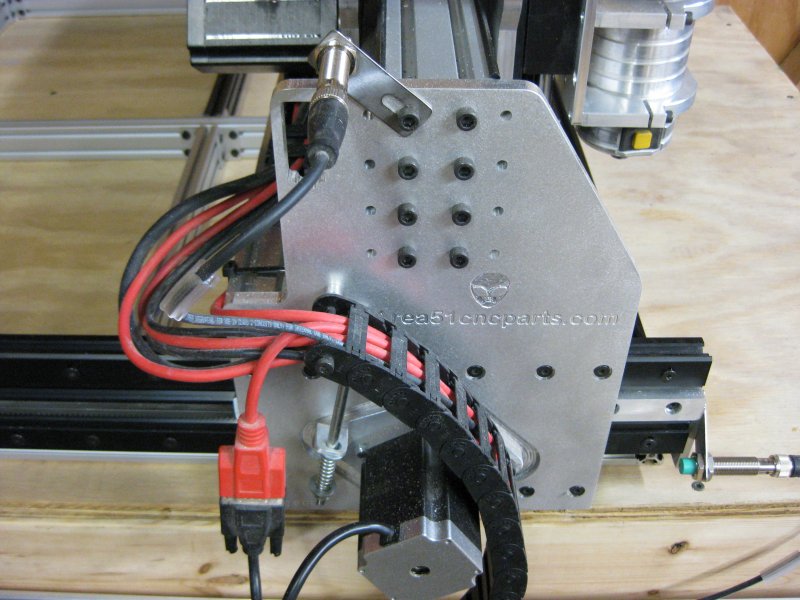
Here are a few photos of where i'm at now:
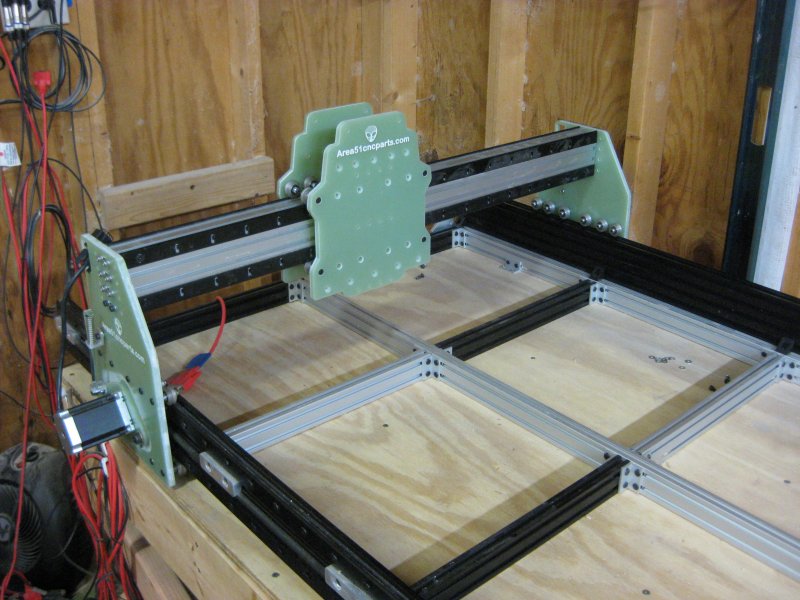

01/10/2015
OK in the home stretch now. Finished cutting and assembling the racks, made new drive plates out of 6061, calibrated all axis. New z slide fits the bill perfectly !!
Thanks to Chris Laidlaw again for coming through on a new router mount backplate to fit the new slide !!
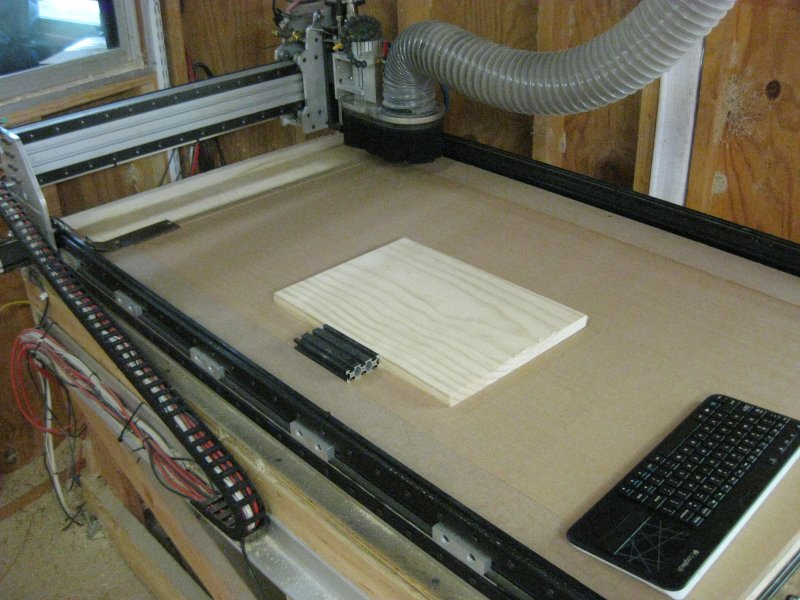
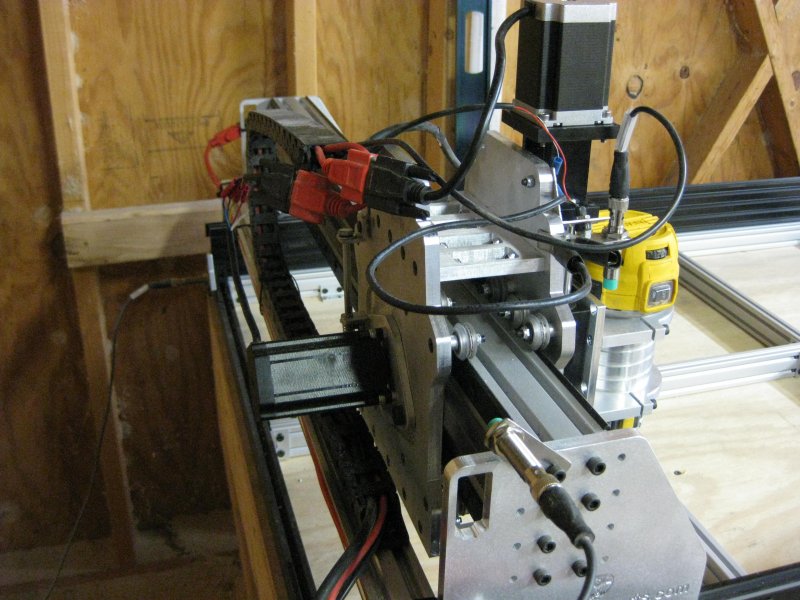
Ran it through a break - in / shake down of 200 reps tonight, everything working great !! I'll be installing the plywood base and a MDF spoilboard tomorrow and trying out a few test cuts. I've ran this rack system as high as 1000ipm and besides being slightly noisy ran fine. I have the rapids dialed back to 300ipm now. I'll run a few 3D files tomorrow at varying feeds and speeds to see what it can handle. Here are a few photos of the nearly completed machine and a video of it running through a 50 cycle breakin..
BTW, I changed the name of the machine, I have horses and Clydesdale just doesn't fit this machine any more, it's much sleeker and fast then a draft horse, this machine was in need of a much cooler name!
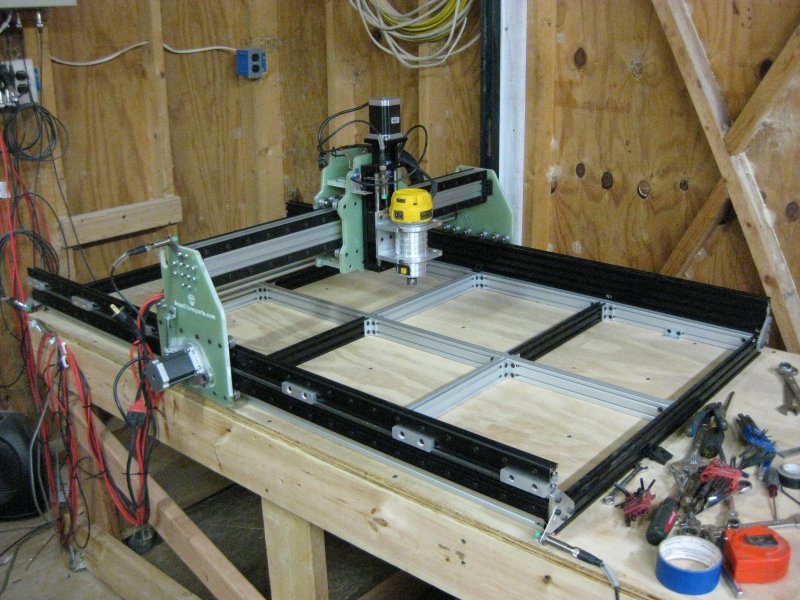


Area 51 CNC Parts F-117 CNC Gear Rack Drive System
Build in 'Cartesian Style CNC' published by Hytech2k, Jan 18, 2017.
This is my journey on building a rack and pinion Ox variant called the F-117 CNC.
-
-
Build Author Hytech2k, Find all builds by Hytech2k
-
- Loading...
-
Build Details
- Build License:
-
- CC - Attribution NonCommercial - No Derivs - CC BY NC ND
Reason for this Build
To enhance the strengths of the original OX CNC for more of being a light affordable commercial machine geared towards people with small businesses.Inspired by
Mark Carew and The Ox CNC -
Attached Files:


