
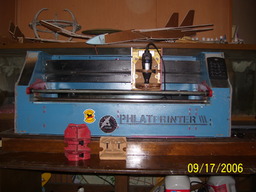
My name is Gary .This is the Phlat Printer 3 is a 3 Axis Milling machine
All are belt driven. I will go over the machine in more details later.
By now you are thinking , what does this machine have to do with Open Builds.
Well ! this . Yep .The Black Box
PHLAT PRINTER 3 meets OPEN BUILDS.
Before I get to the attachments ,you need to know about this.
The PP3 came with the Rotary Tool from Harbor Freight . The tool has a flex shaft and (Pencil) end.
The part you see with holes in it ,on the left side is where the tool goes into. The pencil end goes through
the large hole first . Then the main tool itself sets in the large hole. The Pencil end goes from under the tool
and back up the through the small hole. ( I think ) . It goes over the machine and to the attachments Time for the attachments. Picture 5518 and 5520 This what the first attachment looks like.
The hole you see at the left side (centered) is the hole where you put your Roto Tool pencil end into the top hole and down through the bottom hole at a certain depth .The top and bottom knobs is used to tighten the end in place. The hole at the right side is for the shop vac adapter. I took the attachment off to show you this. Do you see cut outs on the z axis part . They are for the tabs on back of all the attachments for the PP3. There are 4 look like holes on it . There are 4 T nuts
on the back of them. You see 2 of the black knobs (right and left ) it has a threaded ends on all 4 of them. I only shone 2 of them ,tighten all of them down. This is the Dremel attachment, with tabs on the back. This is the sharpie marker attachment and it has tabs on the back as well. The only attachment that I do not have is the ROTO - ZIP attachment. If any of you have one let me know.
.This key pad allows you to jog your axis with the arrow keys . I will go over the belts soon. Time for the belts. The small gear on the left side is connected to the ACMA threaded rod ,held in place by a cap head screw. The right gear (larger one) is connected to the stepper motor under it. Now for the Y axis belt . On the back of the z axis is a part that connects the ends of the belt together . ( it is a little difficult to take the z axis off and show you that part that connects the belts together ).Only if some of you asked me to. I will start from the left side of the machine first. I had to take off the left end ( panel, part ) from the machine to show you wher the belt goes. Pic 5533 . There is a cut out on the left side for the belt to go through . Pic 5531. The end goes around that gear ,pic 5535 . There is an opening (pocket) that goes through the Y gantry ,for the belt to travel to the right side of the machine . The right side will be next. The end of the Y axis belt finally goes through the right side of the machine. Where it goes around the other gear ( cant remember what you actually call it ) . That gear is on the stepper motor for the y axis. and then to the back of the z axis. Will post the X axis soon. Looks like have to stand the Phlat Printerc3 on one end to see the X axis .
Well I took the machine and tilted it on it's back. My old kodak camera does not focus very well .
The x axis belt and stepper motor can be seen in the picture's . It is routed around the rollers to feed the materials .
Pic. 5555 and 5556.Showes the rollers for the X axis. They are made of pipe and covered with
with skid guard tape. Pics. 5568 and 5569 ,shows the top view of the X axis rollers.
Pics. 5571 and 5572 .Shows the 2 rods that is used for weight. Hold the material down .
Pics. 5573,5575,5576. This rod on the front is used as a handle . It lifts the weighted rods
up above the material to be cut . The red parts are used as a hinge and holds the 3 rod up and down.
Pics.5577,5578,5579. This is how hinge looks like on the inside of the machine.
I think I have covered all of the axis on this machine. Time for a little about how the PP3 goes
together. 90% of this machine is held together with tabs, square nut and screws. Not much
is glued .5536 is the nut and screw.5537 shows the T slot cut out .The small cut out is for the
square nut goes . 5537 also shows the 2 tabs . 5574 shows you the 2 cut outs for the tabs and the
screw.
Ok time for the electronics.
HOUSTON WE HAVE A PROBLEM .
As you can see on Pic.5583 my stepper motors wires will not hook up with the black box wires.
My PP3 has VEXTA PK266-02A 2-Phase 1.8 Step not nema17 or nema 23 stepper motors.
Question? will the black box work with my stepper motors. Got my 3 nema stepper motors today.
And as usually something is wrong with putting them on. Well I put the new nema 23 stepper motors on the Y axis and Z axis. I had to scrounge around for screws, washers and nuts to put them on.
Now I have to go to a hardware store and get the screws ,nuts and washers for he X axis. Finally got all 3 stepper motors on. Now where to mount the Black box and power supply.
Pic. 5605 - 5606. Black Box mounted and wired. Pics.5607 - 5608. The end panel is screwed back on. I have no clue how to use the software for the black box. There are many things that I can't answer on the set up . I learned that the black box is used for the Open Builds machines ,you can buy.
Phlat Printer 3 meets Open Builds
Build in 'OTHER BUILDS/PROJECTS' published by Gary Johnson, Apr 27, 2021.
I will go over the attachments for the PP3 Z axis. soon. Before any thing else .You need to know the first PP3 ,used SKP 7 and Mach 3. Later on they used CNC USB.
-
-
Build Author Gary Johnson, Find all builds by Gary Johnson
-
- Loading...
-
Build Details
- Build License:
-
- CC - Attribution - CC BY
Reason for this Build
Try to use Black Box on the PP3Inspired by
Mark and Trish Carew -


