
So here is a bit of a new machine I'm building. There is multiple machine builds I like so I am plugging the ideas all together for one machine. With one twist to be able to drill and cut and bolt it together with just a drill press and table saw for cutting and normal hand tools and 3d Printer. i have drawn the plates with x in the middle of all the holes so you can transfer punch them for drilling. Utilizing Rob Taylor's Dbl C Beam idea with Ptiwee idea making a machine all thru hole design. Print a DXF file thru Inkscape, tape it to the aluminum piece and drill and cut it out and have parts ready to go without using another cnc. I know its not going to be pretty. Some holes are going to be a bit off. But it gets you started at least with no pockets no slots. Just linear rails with ball screws.
Current planed design will have-
Y Axis 1605 ball screws 1000mm
X Axis 1605 ball screw 1000mm
Z Axis 1204 Ball screw 200mm<==== Because I all ready bought it. Previous part build. Ball Screw Carrier.
Y and X axis will have DBL CBeams for strength carrying 2.2kw spindle (I want the ER20 Collet)
Going with Nema23 425in oz Steppers
Controller TBD<===== Probably Arduino with GRBL. Cause I have alot of UNO's.
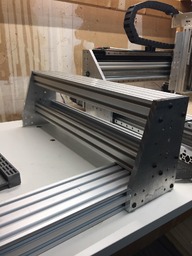
Concept Idea with scrap cbeam setup. The end plates are going to be 3/8in thick aluminum. Ball screw bearing will thread from inside and stepper motor on 3d printed motor stand and threaded on outside. 35mm hole made from a whole saw made for non ferrous metal I bought off Amazon.
Because I only had 6mm bolts and the side holes on the ball screw bearings are 5.5mm? Well
so I drilled out the side holes of the bearing and have made them 6mm thru holes.
2/22/21
Got the 12x13 1/2in piece of aluminum for the gantry uprights. I taped them together with packing tape. I ended up using the exsiting cnc to spot drill the holes with a 90degree 2flute chamfer bit to able to be able to drill holes on drill press. My printer only does the 8x11in sheets. The goal was to print and transfer the holes with a punch.I figured I would use other cnc to mark the holes. Since the only thing that matters is the placement of the holes. I scribe the the outer edges of the plates and cut them out on the saw. I used 35mm whole saw which turned out to work great but can mar and deform your work if you are not careful. One corner got bounced around with the hole saw and the other corner got snagged by table saw. I think the blade bound up a little and the part climbed off the table and stalled the blade. I got a little to rushed on one piece it suffered. Still functional. But just ugly.
I always seem to gouge out marks on my work. I decided I wanted to use 2.2kw spindle for the use of er20 collet. Here some pics.
35mm hole saw has a center drill to guide it. I drill a 6mm hole for this bit and used it to start the cut but had to remove the center drill bit after a certain depth cause with it it would stop and not go any deeper that's where I got into trouble with the bit bouncing around on the other piece. No center bit means you have to try line the hole saw up while it's spinning. Also I probably should of change the RPM of the drill press might of been to fast for this size of saw.
The Good.
The Bad.
I know the shape of the plates are awful. But this is straight lined shape that can be easily cut out
on the table saw. This is the idea for the x axis. Drill both plates the same cause they were taped together for most of the production. But also wanted to be able to flip the stepper around to the other side if needed. Or if I needed a second stepper. I would have to figure something out for this end. Maybe. I guess that would be another project.
![[IMG]](proxy.php?image=https%3A%2F%2Fi.ibb.co%2FkB7D6Qy%2FIMG-1903.jpg&hash=903e28251cc63429ac4c9a459f2b1578)
Gigantesque CNC
Build in 'Cartesian Style CNC' published by Corey Corbin, Feb 22, 2021.
This is a upgrade to make a little deeper and a little bigger foot print for cutting. This is a copy of design off Rob Taylor idea for Dbl C Beam setup. The goal though is to design it around a new build with minimal tools for some one with no cnc access. Drillpress and drill bits and tap set. A 10in Non ferrous metal cutting blade for my table saw. Paper printer for printing DXF files.
-
-
Build Author Corey Corbin, Find all builds by Corey Corbin
-
- Loading...
-
Build Details
- Build License:
-
- CC - Attribution - CC BY
Reason for this Build
Needed a bigger CNC.Inspired by
Rob Taylor, Netechsys, Ptiwee, OpenBuilds General -
Attached Files:
![[IMG]](proxy.php?image=https%3A%2F%2Fi.ibb.co%2FPZRx0PX%2FIMG-1871.jpg&hash=58c7862b7753c9c54797f3ec553bb6ea)
![[IMG]](proxy.php?image=https%3A%2F%2Fi.ibb.co%2Fd4Bxc7v%2FIMG-1888.jpg&hash=e56f44d1666cf7cf833b24421acfc404)
![[IMG]](proxy.php?image=https%3A%2F%2Fi.ibb.co%2F61ZH4F1%2FIMG-1890.jpg&hash=4f870c37428f35d63f306cc505e3724c)
![[IMG]](proxy.php?image=https%3A%2F%2Fi.ibb.co%2FSvspC4S%2FIMG-1898.jpg&hash=48cca68b534373be4f6a08aa48b6145f)
![[IMG]](proxy.php?image=https%3A%2F%2Fi.ibb.co%2FDVmgzX5%2FIMG-1897.jpg&hash=841f49e95fdce1d4df102ee121198ac6)
![[IMG]](proxy.php?image=https%3A%2F%2Fi.ibb.co%2Ff8hcxsL%2FIMG-1899.jpg&hash=d094a8e48863755498a4ee936fff81d5)
![[IMG]](proxy.php?image=https%3A%2F%2Fi.ibb.co%2FBKBLW4Q%2FIMG-1900.jpg&hash=4d2d5795c6b1c510eab15f9e25d76883)
![[IMG]](proxy.php?image=https%3A%2F%2Fi.ibb.co%2FLn9RkSF%2FIMG-1901.jpg&hash=1685b59cedfdc801c57bf9132540a8ec)