Welcome to Our Community

Some features disabled for guests. Register Today.

Heavy Metal

Discussion in 'CNC Mills/Routers' started by Brian Slee, Aug 30, 2023.
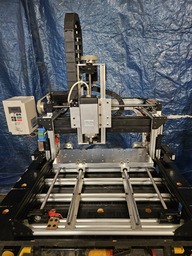
  1. Brian Slee

    Brian Slee Well-Known
    Builder

    Joined:
    Apr 26, 2014
    Messages:
    191
    Likes Received:
    59
  2. Mark Carew

    Mark Carew OpenBuilds Team
    Staff Member Moderator Builder Resident Builder

    Joined:
    Jun 28, 2013
    Messages:
    2,746
    Likes Received:
    2,413
  3. Brian Slee

    Brian Slee Well-Known
    Builder

    Joined:
    Apr 26, 2014
    Messages:
    191
    Likes Received:
    59
    Thanks Mark. This is just phase one to get a feel for the layout and operation. I'm really going hardcore for phase 2 where I will be using the 20 x 80 I just ordered from you guys with an epoxy granite fill in between the carriage rails to make it super stiff. Here are a few more pics of phase one
    20230830_052754.jpg

    20230830_053355.jpg
     
  4. Brian Slee

    Brian Slee Well-Known
    Builder

    Joined:
    Apr 26, 2014
    Messages:
    191
    Likes Received:
    59
    Started cutting stuff today. Results look promising

    Dialed in.jpg
     
    David the swarfer and Giarc like this.
  5. Rob Taylor

    Rob Taylor Master
    Builder

    Joined:
    Dec 15, 2013
    Messages:
    1,470
    Likes Received:
    746
    This thing's pretty tasty! :thumbsup:
     
  6. Brian Slee

    Brian Slee Well-Known
    Builder

    Joined:
    Apr 26, 2014
    Messages:
    191
    Likes Received:
    59
    Thanks Rob. I took some video but the files are too large to upload. What's really great is that the frame is so stiff and the spindle is so quiet that my stepper motors drown out the sound of the tool while it's cutting through the hardboard. I might upload the videos to youtube in a bit and paste a link.
     
  7. Brian Slee

    Brian Slee Well-Known
    Builder

    Joined:
    Apr 26, 2014
    Messages:
    191
    Likes Received:
    59
    David the swarfer likes this.
  8. JustinTime

    JustinTime Veteran
    Builder

    Joined:
    Dec 18, 2013
    Messages:
    759
    Likes Received:
    253
    Brian, I think you could run the machine at a little higher in/min. Looks quite slow to me.
     
  9. Brian Slee

    Brian Slee Well-Known
    Builder

    Joined:
    Apr 26, 2014
    Messages:
    191
    Likes Received:
    59
    Hi Justin,

    Thanks for stopping by. I am being conservative starting out. Right now, I have a max cutting speed set to 500mm per min and fast moves to 1000mm per minute because this thing has the power to eat itself. I already had to replace a ball screw that got bent playing with auto squaring. And here is what happens when the controller card loses the bubble during homing. Glad that wasn't my finger :jawdrop:

    SUNP0032.JPG


    I will probably increase the feed rate as I go, and gain confidence in the setup, but with a steps per mm of app 800+ it's never going to be a speed demon. At that step count the electronics package can easily handle 15000mm per minute but given the amount of mass I am pushing around I doubt the motors would oblige. I will probably keep it at 1000 or less until I get the epoxy granite reinforcements done, after that, I think I will be lucky to get to 5000 without going up to nema 34s. I expect to be cutting mostly metal components, starting with aluminum and hopefully working my way up to steel and titanium. This build is all about frame stiffness and precision cutting of metal components, feed rate is a secondary consideration.

    Cheers
     
    #9 Brian Slee, Sep 6, 2023
    Last edited: Sep 6, 2023
  10. David the swarfer

    David the swarfer OpenBuilds Team
    Staff Member Moderator Builder Resident Builder

    Joined:
    Aug 6, 2013
    Messages:
    3,288
    Likes Received:
    1,837
    with reference to your image of a broken limit switch....
    change the way the switches are mounted so that it is triggered as the carriage goes past it. Thus the switch is not a physical stop.

     
    Peter Van Der Walt likes this.
  11. JustinTime

    JustinTime Veteran
    Builder

    Joined:
    Dec 18, 2013
    Messages:
    759
    Likes Received:
    253
    LOL, now that I saw this I realized I have 7 limit switches on my CNC router and 3 on each of my 3d printers that act as the stop for the axies! Thank goodness none of my machine, so far, decided to make a fool out of me!

    I'll think about upgrading the switches to the way it shown in the video.
     
    David the swarfer likes this.
  12. Brian Slee

    Brian Slee Well-Known
    Builder

    Joined:
    Apr 26, 2014
    Messages:
    191
    Likes Received:
    59
    Thanks David for the awesome share. I will definitely be relooking at the Z axis mounting method for phase 2. Originally the switch was supposed to tuck up in between the fixed block for the ball screw and the vslot, but it didn't quite fit, so I dropped it down a little.

    Z axis limit switch.jpg

    Woudn't ya know it. Murphy is always looking for an opportunity
     
    David the swarfer likes this.
  13. Brian Slee

    Brian Slee Well-Known
    Builder

    Joined:
    Apr 26, 2014
    Messages:
    191
    Likes Received:
    59
    Speaking of Phase II....

    I finished cutting the first two pieces of the casting mold for the epoxy granite pour.

    Phase II begins.jpg
     
    David the swarfer likes this.
  14. Brian Slee

    Brian Slee Well-Known
    Builder

    Joined:
    Apr 26, 2014
    Messages:
    191
    Likes Received:
    59
    Been doing some testing and tuning this week. I moved to faster cutting speeds and a larger bit - 1/4" bit @ 1000mm per minute. For testing and tuning, I drew up a fan mount cover for my mini-PC, that tends to slow way down due to heat when I am watching video. Nothing fancy it's not attached it just sits a little bit above the PC, high enough to let airflow over the heatsinks. It works great. My little mini doesn't even get warm now and the N95 processor runs full bore all the time. I also created a new YouTube channel coincidentally named "Heavy Metal CNC" where I have uploaded 2 new short videos of HM-CNC (Heavy Metal - CNC) with the new cutting parameters. Stop by and check them out (1) Heavy Metal CNC - YouTube

    20230913_064446.jpg

    20230913_064541.jpg
     
  15. Brian Slee

    Brian Slee Well-Known
    Builder

    Joined:
    Apr 26, 2014
    Messages:
    191
    Likes Received:
    59
    This week heavy Metal gets its first real challenge. Cutting a new set of x axis mounting plates out of some 1/4" 6061 aluminum plate. I tinkered with two different bits, a 2mm and 2.2mm both TiN coated. My spindle tops out at 12000 RPM so I was a little below the recommended spindle speed for the bit sizes and worked on the feed rate to get the best cutting parameters I could. I started out at 100mm per min with a DOC of .2mm and that didn't turn out well the bit gave up the ghost about half way through due to galling because the feed was too slow. I reduced the DOC to .1mm and started the next cut at 250mm per min and worked my way up to 600mm per min which was a little too fast and then dialed it back to 500mm per min. I still ended with some galling on the bit but it made it through the program. Outside dimensions and hole placement were perfect but hole size was a good bit under spec due to bit deflection so I ended up post processing the holes on the drill press. The final DOC did not get all the way through because my material was app 6.55 mm vs 6.35 and I will finish cutting the pieces out with the band saw.

    20230920_134041.jpg 20230920_134100.jpg


    All in all I think it worked out well and I am left with two new plates that are going into the phase II project.

    Video of the project is available on my YouTube channel Heavy Metal CNC - YouTube
     
  16. David the swarfer

    David the swarfer OpenBuilds Team
    Staff Member Moderator Builder Resident Builder

    Joined:
    Aug 6, 2013
    Messages:
    3,288
    Likes Received:
    1,837
    to prevent the galling you can
    - spray with kerosene or WD40
    - rub wax candle into the groove after each pass, ready for the next pass
    - spray with pure alcohol (a very fine spray) , it evaporates completely leaving no cleanup
     
  17. Alex Chambers

    Alex Chambers Master
    Moderator Builder

    Joined:
    Nov 1, 2018
    Messages:
    2,700
    Likes Received:
    1,327
    @Brian Slee, it's probably too late to say this, but when I make a mistake measuring material thickness I reset my WCS Z a bit lower and run the g-code again - less work in the long run than finishing with a bandsaw and file.

    Alex.
     
  18. David the swarfer

    David the swarfer OpenBuilds Team
    Staff Member Moderator Builder Resident Builder

    Joined:
    Aug 6, 2013
    Messages:
    3,288
    Likes Received:
    1,837
    only works if your clearance height is larger than the mistake in the material thickness.
    I would regenerate the gcode with the correct thickness but only 1 pass.
     
  19. Brian Slee

    Brian Slee Well-Known
    Builder

    Joined:
    Apr 26, 2014
    Messages:
    191
    Likes Received:
    59
    I tried a little dab of TapMagic when I first started but that seemed to just help make it gummy, so I stood over the next cuts with the shop vac. I might give a 1/8" bit and some WD40 a shot for the outside cuts and a countersink bit, using a drilling cycle then finish it with the drill press for the through holes for the next testing cycle. As always thanks for all your suggestions and help.
     
    #19 Brian Slee, Sep 21, 2023
    Last edited: Sep 21, 2023
  20. Brian Slee

    Brian Slee Well-Known
    Builder

    Joined:
    Apr 26, 2014
    Messages:
    191
    Likes Received:
    59

    I considered doing a second pass then I got a good look at my bit and thought it might be best not to push my luck. :nailbite:
     
  21. Brian Slee

    Brian Slee Well-Known
    Builder

    Joined:
    Apr 26, 2014
    Messages:
    191
    Likes Received:
    59
    Almost ready to create the epoxy granite composite carriage rail. Casting mold is done, and I did a dry pack to get a good measure for the aggregate. Might try and do a mix and pack this weekend.


    20230922_150834.jpg
     

Share This Page

  1. This site uses cookies to help personalise content, tailor your experience and to keep you logged in if you register.
    By continuing to use this site, you are consenting to our use of cookies.
    Dismiss Notice