Welcome to Our Community

Some features disabled for guests. Register Today.

WorkBee CNC Machine

Discussion in 'CNC Mills/Routers' started by Ryan Lock, Sep 21, 2017.
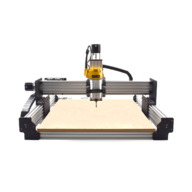
  1. Metalguru

    Metalguru Veteran
    Builder

    Joined:
    Dec 29, 2015
    Messages:
    752
    Likes Received:
    547
    I have had good luck cutting ABS and Acrylic with the "flat" type of single flute bit.
    [​IMG]
    Someone also pointed out a new type of bit called the "O-Flute" bit, which is supposedly specially made for plastics. It has a concave cutting surface which slices rather than scrapes. Google it.

    I also found you need air to blow the chips out of the way, helps immensely if the chips are gone they can't get friction welded back on.

    MG
     
    Ryan Lock and GrayUK like this.
  2. T4Concepts

    T4Concepts Journeyman
    Builder

    Joined:
    Dec 7, 2017
    Messages:
    108
    Likes Received:
    114
    It didn't happen yesterday guys :( ................ not to worry though, as I still have plenty more research to do. I would of been extremely impressed if FedEx would of managed to deliver to a very remote little village in central France from the UK in just 24 hours ! Just got my FedEx tracking email this morning and it states that my WorkBee is in transit ! :D 48 hours for delivery, can't complain about that !

    Excellent information MetalGuru thanks for that :thumbsup: a while back I managed to purchase a plastics trimming bit, that's designed for cutting flanges so has two bearing guides on it >

    Flange-cutter.jpg

    On closer inspection I did notice that the cutting surfaces were 'flat', so basically the same sort of thing you have in your image but without the bearings, so, looks like I'll be buying some of those as well. I also bought a couple of bits for testing purposes, one basic end mill and one of those 'O-Flutes' you're talking about. I got the Solid Carbide type from CMT Orange ......... top quality I'm told. You could say that I now have all the kit, but have no idea what I'm going to do with it ! :ROFL:

    I shouldn't have any issues assembling the machine, but I may struggle on the software side of things ...................... luckily for me ( and there rest of us newbies ) there's a wealth of experience on this forum :D

    I'll let you all know how I get on, I may even begin a build thread if anyone' interested.


    TURK
     
  3. T4Concepts

    T4Concepts Journeyman
    Builder

    Joined:
    Dec 7, 2017
    Messages:
    108
    Likes Received:
    114
    WooHoo !!! ........................ look at what I just got :D :p

    IMG_4198.jpg

    I got worried right away when I saw the state of the boxes, boxes were a little damaged, looks like they had a hard ride ! :cool: But when I unpacked and checked everything I was pleasantly surprised to see the care and attention ( almost lovingly ) was spent packaging everything up .................... big thumbs up Ryan :thumbsup: I just love a man that takes pride in his work. I was also surprised to see just how many boxes all the parts come in ( the big box has even more little boxes inside it ! ), it's going to take me weeks to assemble this lot ! You'll also notice two lovely produced assembly manuals ......... what can I say, apart from I would highly recommend 'OoZnest' to anybody, I'm sure we'll be doing business again Ryan :thumbsup:

    You could say that I'm over the moon !

    Dancing Cat.gif


    TURK
     
    GrayUK likes this.
  4. Ryan Lock

    Ryan Lock Veteran
    Builder

    Joined:
    Oct 12, 2014
    Messages:
    530
    Likes Received:
    292
    @CNCKitCompany Hey Tim, welcome to the forum, so glad to have you on board! Looking forward to seeing your build :thumbsup:

    @T4Concepts Glad it arrived safely! Thanks for the kind words :)

    Ryan
     
  5. T4Concepts

    T4Concepts Journeyman
    Builder

    Joined:
    Dec 7, 2017
    Messages:
    108
    Likes Received:
    114
    Good idea Tim, I intend to design and make mine out of Carbon Fibre 'T4 Concepts' and stick it to the X gantry. Also, it's worth mentioning that if you order the Router Spindle Mount the 'OpenBuilds' logo is already on there.

    Personally I think that we really need other options for mounting routers, as a lot of people are using routers as opposed to spindles ................... currently the only option is for mounting the Bosch Colt router that has a diameter of 71.0mm. The other popular router used is the Makita RT0700c, in my mind a far better router as it's operational speeds are 10,000rpm to 30,000rpm as opposed to 16,000rpm to 35,000rpm, if I'm not mistaken slower speeds would be better for softer materials.

    I know the intention is to 'shim' the Router Mount from 71.0mm down to 65.0mm ( Makita ), but how to do that effectively ? As it stands, I will be unable to use my WorkBee until I source a decent mount, I certainly can't make one as I can't mount my router ! So it would be nice to see that option in the kit so you could use the WorkBee straight out of the box.


    TURK
     
  6. CNCKitCompany

    Builder

    Joined:
    Jan 22, 2018
    Messages:
    35
    Likes Received:
    11
    Good point about router mounts @T4Concepts. I had saw that there are several places online, stores based in Europe, that had 71mm to small adapters. I suspect it would work with the OpenBuilds mount but I haven't tested them yet. For instance I am looking at Kress spindles. There were adapters for that. I also saw mount on Thingaverse where one could 3d print a mount or adapter.
     
  7. Metalguru

    Metalguru Veteran
    Builder

    Joined:
    Dec 29, 2015
    Messages:
    752
    Likes Received:
    547
    Hey guys, you have a couple of choices here:

    The Dewalt DWP611 fits perfectly in the OB mount, I believe it's 69mm instead of 71, but I use it without a shim. You can easily cut a shim from the thin plastic that report covers are made of if you really want. The DWP611 is 1.25 hp (25% more than the Makita or Bosch), very quiet, has a nice speed control, soft start, and LED lights built in. 3 year warranty, 1 year free service, 90 day moneyback gurantee. 16000-27000 RPM.

    If you want a custom mount, I highly recommend Chris Laidlaw who makes custom mounts for any size router that fit right on the OB v-slot. You can search for Chrisclub1 on eBay for his products. A bit more money but a very good quality double mount with dust collection attachment points. I don't think a 3D printed mount would work. 3D printed parts are very low strength and mostly air.

    I have used 2 of the OB mounts to make a bulletproof mount for long barrel routers like the Dewalt.

    https://openbuilds.com/threads/extra-strong-double-router-mount.8224/

    There are also tons of router mounts on AliExpress for very reasonable prices.

    MG
     
    #217 Metalguru, Jan 27, 2018
    Last edited: Jan 28, 2018
  8. Giarc

    Giarc OpenBuilds Team
    Staff Member Moderator Builder Resident Builder

    Joined:
    Jan 24, 2015
    Messages:
    2,992
    Likes Received:
    1,670
    If you, or someone you know have a 3d printer, here is a shim. https://openbuilds.com/projectresources/spindle-mount-adapter-for-makita-rt0701c.268/
     
  9. T4Concepts

    T4Concepts Journeyman
    Builder

    Joined:
    Dec 7, 2017
    Messages:
    108
    Likes Received:
    114
    I think some people are missing the point about "The WorkBee missing something" ........ I brought up the 'Router Mount' because not having the correct size to fit my router basically renders my cnc unusable until I buy the shim. You can't use what is in effect a very expensive piece of kit, just because of a cheap plastic shim, that's kind of frustrating ! I know what can be done to fix this, I looked into that before buying the kit, that's why I bought the router mount, I'm hoping to use a cut-down PVC pipe as a shim, as a 3D printed part isn't an option for me. Nor is buying a single shim from the US, the postage would be 3 to 4 times the cost of the shim !

    Buying a Bosch or DeWalt router isn't an alternative either, as many people probably already own a Makita, as I do, I've had it for a couple of years so I'm not about to go out and buy another router. What I'm trying to say is, the 'missing thing' is an option to chose the correct spindle mount when ordering a complete kit, whether it be 65mm, 69mm or 71mm. What about a 'universal' router mount ? Far more important than a logo I think.


    TURK
     
  10. Giarc

    Giarc OpenBuilds Team
    Staff Member Moderator Builder Resident Builder

    Joined:
    Jan 24, 2015
    Messages:
    2,992
    Likes Received:
    1,670
    I apologize. You asked the question:
    As a Makita user, I attempted to answer the question and provide you with information on an effective temporary solution because you seemed unhappy that you had an expensive piece of kit you couldn't use right away. Personally, I just ordered one of the many available 65mm spindle mounts. I didn't trust a shim.
     
  11. T4Concepts

    T4Concepts Journeyman
    Builder

    Joined:
    Dec 7, 2017
    Messages:
    108
    Likes Received:
    114
    No need to apologise Giarc, and no I'm not unhappy, on the contrary ................. I'm stoked, as I have a superb cnc machine :D
    And I really do appreciate your answer, I'm not making a point of what I have, the conversation was 'what else could be available for the WorkBee' ? my answer was to have different options of mounts that's all. So in the future potential customers would have the option to buy a complete working kit that just needs assembling.

    " Personally, I just ordered one of the many available 65mm spindle mounts. I didn't trust a shim."

    Where did you get your router mount from may I ask ? as I may of missed that one ................... I looked but didn't find one :(


    TURK
     
  12. Scotty Orr

    Scotty Orr Journeyman
    Builder

    Joined:
    May 21, 2015
    Messages:
    315
    Likes Received:
    177
    If this works out, could you post details about pipe size and how you did it? That would be helpful to other folks, I'm sure.
     
  13. T4Concepts

    T4Concepts Journeyman
    Builder

    Joined:
    Dec 7, 2017
    Messages:
    108
    Likes Received:
    114

    I most certainly will Scotty :thumbsup: ............... I was in a hardware store a couple of weeks ago and saw some PVC piping ( the type that plumbers use ) and did notice how thick it was ( about 4mm ). As I didn't particularly like the idea of 3D printed shims, as they do look a little flimsy to me, I thought I would try this. I'll let you know how I get on.


    TURK
     
  14. Ryan Lock

    Ryan Lock Veteran
    Builder

    Joined:
    Oct 12, 2014
    Messages:
    530
    Likes Received:
    292
    @T4Concepts We do have 3D Printed shims for the makita, because we now offer the router along with the Dewalt. I can ship you one out if you want. If you have the dust shoe, i can send you a shim for that also. If anyone is reading this in future and already has a Makita, just buy it with the router mount, and leave a comment on the order to include the Makita adaptor and we will put it in.

    @CNCKitCompany We did want to offer a faceplate, but we thought to keep costs down as much as possible it isn't really needed. But would be good if to come up with something people can make.
     
  15. Giarc

    Giarc OpenBuilds Team
    Staff Member Moderator Builder Resident Builder

    Joined:
    Jan 24, 2015
    Messages:
    2,992
    Likes Received:
    1,670
    I ordered this one: 65mm clamps Spindle Clamp Electric Motor Mount Bracket Cast Aluminium For CNC Engraving Machine LG078-in Machine Tool Spindle from Tools on Aliexpress.com | Alibaba Group $30 and free shipping to the U.S. I went with this one because my X gantry plate was 125 mm wide. I had to drill my own mounting holes. I saw his as a benefit since my plates were custom plates.

    [​IMG]

    The only downside to these is that very little of your spindle is exposed below so, a dust shoe becomes more of a custom job. However, because so little is exposed, your spindle is held rock solid.
    [​IMG]
     
    #225 Giarc, Jan 28, 2018
    Last edited: Jan 28, 2018
    Ryan Lock likes this.
  16. Giarc

    Giarc OpenBuilds Team
    Staff Member Moderator Builder Resident Builder

    Joined:
    Jan 24, 2015
    Messages:
    2,992
    Likes Received:
    1,670
  17. Metalguru

    Metalguru Veteran
    Builder

    Joined:
    Dec 29, 2015
    Messages:
    752
    Likes Received:
    547
    Come on, Turk, you are a "maker". Instead of grousing about how you can't use your machine, invent something that will work until you can find or afford a better solution! ;)

    4mm thick PVC is too thick to do a spacer, the mount is 71mm and the router is 65, meaning the diameter difference is 6mm. That works out to 3mm all the way round. Pvc is pretty hard to sand down, especially evenly. How about just a flat strip of 1/8" aluminum, bent into a circle? Home Depot has 1/8" x 3/4" aluminum strapping for a few dollars.

    Stick a pencil to the side of your router mount and draw some pictures to get familiar with the machine operations. Get Creative!

    MG
     
    Ryan Lock and Chillimonster like this.
  18. Metalguru

    Metalguru Veteran
    Builder

    Joined:
    Dec 29, 2015
    Messages:
    752
    Likes Received:
    547
    Giarc likes this.
  19. Graeme Dingwaall

    Builder

    Joined:
    Apr 12, 2017
    Messages:
    10
    Likes Received:
    8
    Right guys this is going to be something simple but for the life of me I cant get my head round it!!

    I have my x & y limit set in universal g code sender 550mm x 770mm (machine is 750mm x 1000mm) the Y seems ok and stops jogging within the 1000mm but the x just seems to want to keep going and not coming up with a warning even when it's right against the opposite side of the machine.

    Anybody got any ideas how to get the limit working?

    Cheers
    Graeme
     
  20. Metalguru

    Metalguru Veteran
    Builder

    Joined:
    Dec 29, 2015
    Messages:
    752
    Likes Received:
    547
    Not that familiar with UGS, but I assume you are talking about soft limits.

    In order for soft limits to work, you have to home the machine to 0,0,0 and make sure your current machine location is there. The soft limits work as offsets from Home via the Current Machine Location, and if you reset the machine zero to somewhere else on the table, they will not work properly anymore. If you Home to the front left corner of your table, soft limits will be positive. If you home to the right rear of the table, soft limits will be negative numbers. So, you have to make sure your axis polarity (positive and negative directions) are correct. For the Y axis, positive is toward the back, for the X axis, + is right, and for Z, + is up.

    Hard limits (ie switches) do not have this limitation, and no matter where your machine is zeroed, the limit switch will stop it when it hits the switch. In my opinion, for the way I use the machine (I don't use G54-G59 offsets), the soft limits are pertty much useless.

    MG
     
    GrayUK likes this.
  21. Graeme Dingwaall

    Builder

    Joined:
    Apr 12, 2017
    Messages:
    10
    Likes Received:
    8
    Thanks metalguru,

    I found the problem. I knew it was something simple haha. Turns out the homing limit switch was to far over the x gantry. So by the time it got to the machine limit it was hitting the other side. An adjustment to the position of the limit switch and it's all sorted.

    but I have another little niggling thing happening every so often the y axis will stick and the motors are not able to turn the acme.

    It seems like the 2 Y axis lead screws are moving at different speeds and it causing the y Axis to twist and stick.

    @ryanlock is that possible?

    Thanks
    Graeme
     
  22. Ryan Lock

    Ryan Lock Veteran
    Builder

    Joined:
    Oct 12, 2014
    Messages:
    530
    Likes Received:
    292
    @Graeme Dingwaall Glad you got the first issue sorted. They should be moving together. A couple of causes to look into:

    - The couplers could be slipping on the motor shaft or the screw
    - Is the current sent correctly? 1/8th turn from full on both the Y & A Driver?
    - The nut blocks on the Y-Axis may be positioned such it is binding the screw. Try loosening one on each Y-Plate and see if that improves it

    Ryan
     
  23. artfuturo

    artfuturo New
    Builder

    Joined:
    Jan 24, 2018
    Messages:
    10
    Likes Received:
    8
    Hi guys

    I am new to this forum but plan to make best use of it and share my own experiences. I have ordered a Workbee 1000mmx1500mm (belt/screw version) with the DeWalt router from Ooznest last week and will get it around mid-February. Can't wait to get started. The main purpose initially for the router will be milling wooden and acrylic panels that we use for our design & art work.

    One initial question I have: What do you guys use as an undercarriage or table for a router of that size? How solid/flat does it need to be? Is the router frame solid enough to cope with a level of unevenness or would it eventually warp the router frame itself?

    I was thinking of using heavy work stands (e.g. metal), add straight 2x2's or bigger across, put a smooth 18mm or 24mm plywood on top and then screw all three together so it builds quite a heavy and solid base. However, due to my uneven workshop floor, wood that is always a little warped, this base will never be totally even. Still, would it be good enough for this purpose?

    Any views?

    Cheers
    Phil
     
  24. T4Concepts

    T4Concepts Journeyman
    Builder

    Joined:
    Dec 7, 2017
    Messages:
    108
    Likes Received:
    114
    Welcome to the forum Artfuturo :thumbsup:

    Wow, a 1000mmx1500mm WorkBee ....... that's going to be a BIG machine. I just received mine from 'OozNest' a few days ago. I ordered the 750mm x 750mm version, spent all last night assembling it, haven't finished yet but look at the size of the thing ! So much so, the table top I had planned on using turned out to be too small ! :rolleyes: So now I have to build one. I can get away with using wood for mine as it's only about 40 Kilo's, but yours I think would require a metal frame work I think, at least that's what I would do. But I'm sure the experts will be along soon :D

    Here's a pic of mine so far >>

    2085_IMG_4296.jpg


    The assembly is a breeze, Ryan supplies two excellent manuals for the full build. Even a dumb *** like me managed it ! :rolleyes:


    TURK
     
    #234 T4Concepts, Feb 1, 2018
    Last edited: Feb 1, 2018
  25. CNCKitCompany

    Builder

    Joined:
    Jan 22, 2018
    Messages:
    35
    Likes Received:
    11
    Nice looking machine Turk!

    Hi Phil, welcome to the forum. The longer the frame, the more it needs to be supported. That said, the C Beam profile is less likely to saw, it would take a lot of force. Think your proposed method of building a table would work. Maybe put leveling feet on the table to help level it.
     
  26. T4Concepts

    T4Concepts Journeyman
    Builder

    Joined:
    Dec 7, 2017
    Messages:
    108
    Likes Received:
    114

    Thanks Tim :thumbsup:

    Yeah, it's superb, really pleased with it. Fantastic design and beautifully engineered. It's just a top quality piece of kit.
    The two supplied user manuals really does make the kit complete though, for a first timer like me, I would of been completely lost otherwise. I've still got all the electrickery to do yet, so guys, be prepared for an awful lot of questions in the coming weeks :rolleyes:


    TURK
     
  27. T4Concepts

    T4Concepts Journeyman
    Builder

    Joined:
    Dec 7, 2017
    Messages:
    108
    Likes Received:
    114
    Good idea Tim, go for it mate :thumbsup:

    Ryan's already got the PDF version of the manual, downloaded and printed mine out before I purchased the machine. A HTML web version would be a good idea with accompanying pictures as a step by step assembly guide.


    TURK
     
  28. michielproce

    Builder

    Joined:
    Mar 23, 2017
    Messages:
    15
    Likes Received:
    5
    I bought some scaffolding tubes and connectors for my 1000x1500. This ended up being quite rigid, and as a bonus I could create a "crane" of aluminium tubes for my dust extraction. I've attached my Sketchup model of the table and a picture. I've changed some dimensions during the build so be sure to double check the model dimension.
     

    Attached Files:

    GrayUK likes this.
  29. Metalguru

    Metalguru Veteran
    Builder

    Joined:
    Dec 29, 2015
    Messages:
    752
    Likes Received:
    547
    Phil:

    You really need a good solid base for a machine that size (or any size, for that matter). The flatter it is, the flatter your router will be. With that size of machine, I would suggest starting with 2 sheets of MDF glued and screwed together. A torsion box would be even better. Then at least 3 trestles under the base with heavy lumber (4x4" beams with 2x4" structure) well cross braced should hold it up. Levelling feet will take care of any uneven floor. Even better would be a welded steel frame. Or, you could do something with aluminum extrusion but that would be pretty spendy. A couple of sawhorses just isn't going to cut it.

    If your table is out of level, your machine will be as well, the c-beam may be fairly stiff but the attachment methods using corner brackets will always be able to shift no matter how tight the screws. If the machine is out of level, it could cause binding in the axes, excessive wear on the wheels, and uneven cuts.

    MG
     
  30. Ryan Lock

    Ryan Lock Veteran
    Builder

    Joined:
    Oct 12, 2014
    Messages:
    530
    Likes Received:
    292
    Hi @artfuturo welcome to the forum! A solid and flat table is a must. Ideally that size workbee should be secured to the table. So if the table is warped, securing it down will also in turn make the workbee warped, which is less than ideal. So adjustable feet for your uneven floor is a must!

    @T4Concepts Looking good, my apologies again for the missing parts, but i think we have got it sorted now. For anyone else who received their machine recently, we have found in some cases a 6mm aluminium spacer to be missing. If it is, email us, and we will ship it out on our quickest service.

    Ryan
     

Share This Page

  1. This site uses cookies to help personalise content, tailor your experience and to keep you logged in if you register.
    By continuing to use this site, you are consenting to our use of cookies.
    Dismiss Notice