Welcome to Our Community

Some features disabled for guests. Register Today.

Voxel OX 3D Printer

Discussion in '3D printers' started by Marshall Peck, Sep 27, 2015.
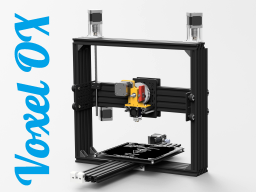
  1. Marshall Peck

    Builder

    Joined:
    Oct 18, 2014
    Messages:
    29
    Likes Received:
    80
    Marshall Peck published a new build:

    Read more about this build...
     
    pixelnate and crispin like this.
  2. Giarc

    Giarc OpenBuilds Team
    Staff Member Moderator Builder Resident Builder

    Joined:
    Jan 24, 2015
    Messages:
    2,892
    Likes Received:
    1,609
    Great build! I love the versatility.
     
    pixelnate and Marshall Peck like this.
  3. Mark Carew

    Mark Carew OpenBuilds Team
    Staff Member Moderator Builder Resident Builder

    Joined:
    Jun 28, 2013
    Messages:
    2,741
    Likes Received:
    2,407
    Excellent build @Marshall Peck !
    Really like the size of the 3D printer
    Thank you for sharing :thumbsup:
     
    Marshall Peck likes this.
  4. Marshall Peck

    Builder

    Joined:
    Oct 18, 2014
    Messages:
    29
    Likes Received:
    80
    Oh, thanks!
     
    Mark Carew likes this.
  5. LukeDuke

    LukeDuke New
    Builder

    Joined:
    Sep 29, 2015
    Messages:
    1
    Likes Received:
    1
    This build is awesome. The simplicity and thoughtfulness of it is super appealing. And as you probably reflect the logical and thoughtful design of the printer, I'm wondering why decided to go with a cartesian design? From my undersanding, H-bot/CoreXY is objectively better than Cartesian designs, with the only downside being that it's a bit more complicated and more expensive. What are your thoughts on this? Thanks again for posting the design, from an industrial design standpoint, it's dead sexy.
     
    Marshall Peck likes this.
  6. Marshall Peck

    Builder

    Joined:
    Oct 18, 2014
    Messages:
    29
    Likes Received:
    80
    Simplicity was high on my list when I put it together. 2nd was rigidity, since my first 3D printers had laser cut wooden frames. 3rd was easy put-together, since I knew I'd be make a few of these for myself when ever the time called for it.

    I started to make a CoreXY bot for my 12in bed a while back, actually. I abandoned those plans after I discovered that the XY belt run was almost 9.5 feet! That seemed like too much stretching and backlash to worry about at the time. Unfortunately, I never got to test it. I recently ordered some polyurethane belt that's steel wire re-enforced, so maybe it's worth me revisiting.

    Thank you so much for the comments and kind words!
     
  7. stargeezer

    stargeezer Journeyman
    Builder

    Joined:
    Feb 20, 2015
    Messages:
    328
    Likes Received:
    117
    Hi Marshall, I'd sure like to add my appreciation of your design. Like you, I'm constantly looking to lessen part count and find the most basic machines to be the most beautiful.

    One thing I wondered about was your decision to use the Open Builds plates in your build? Obviously you have the skills, equipment and pattern to make your own plates. I understand that using the OB plates allows for a faster build that is more easily replicated by others, but it does add to the cost and to me, the OB plates with all the unused holes are far less attractive than a solid plate with no more holes than you actually need.

    I should add that I use the plates too, when I'm prototyping a build and if I'm happy with the results of a design I'll often cut finish plates. But this comes from a personal design esthetic. It has nothing at all to do with any perceived fault in the fine OB plates, there is none.

    Larry
     
    Marshall Peck likes this.
  8. Marshall Peck

    Builder

    Joined:
    Oct 18, 2014
    Messages:
    29
    Likes Received:
    80
    Hi there,

    Thanks for the kind words!

    We could have milled some plates on our HarborFreight CNC mill, but at the time opted for OB plates out of convenience. I also wanted to show the OB plates on our first few builds, and well.. haven't come across a need to mill that particular plate just yet. The Voxel OX actually hasn't done any heavy duty milling yet besides some drilling tests. When the new spindle arrives, I'll be doing some milling and hopefully make a couple jump-start write-ups about making tool paths with Fusion360.

    OB plates are 3mm aluminum and full of holes is pretty much their down side. They can flex depending on how they're used. What I'm using them for, they seem adequate and provides some tiny amount of flex when setting up the frame. However, when the machine is assembled they aren't positioned where there's a lot of leverage. Certainly something that could benefit from thicker plates sans-unnecessary holes. You just got me thinking about custom anodization.

    basic is beautiful
     
  9. Kstuck

    Kstuck New
    Builder

    Joined:
    Nov 18, 2014
    Messages:
    2
    Likes Received:
    1
    Excellent design! Low parts count and assembly looks to be fairly easy.

    I've been trying to download the Inventor files from you link and have not been able to get them. It asks for an email which I put in but I don't get the link to download the files. I've checked all my spam folders etc and just don't seem to be getting the link. I'm probably doing something wrong so please don't be afraid to tell me if I am doing something incorrect.

    Thanks for all your efforts and thanks for keeping this open source. It is appreciated!
     
    Marshall Peck likes this.
  10. Marshall Peck

    Builder

    Joined:
    Oct 18, 2014
    Messages:
    29
    Likes Received:
    80
    Hi There,

    If you use the A360 link http://a360.co/1JJ0FfR , sometimes it takes a few minutes for the link to be emailed. If your Autodesk account is new, you might need to confirm/register further or some such.

    I actually, ought to export and attach to dropbox. Let me know if it's still brokey and I'll do that.

    No probs. I made this mostly so I could share it :)
     
  11. Kstuck

    Kstuck New
    Builder

    Joined:
    Nov 18, 2014
    Messages:
    2
    Likes Received:
    1
    Thanks again for all your work on this.

    I never did the the link to download the file but that's ok.

    I'm curious how wide in the x axis you think can be done without compromising the rigidity?

    Thanks again for all your help and work!
     
  12. Marshall Peck

    Builder

    Joined:
    Oct 18, 2014
    Messages:
    29
    Likes Received:
    80
    The x-axis is probably the most expandable axis. I don't see any reason why a full 1500mm wouldnt be dooable. Keep in mind, you'll be moving a super wide bed back and forth. Which one is best/easier to expand is kind of a toss up, tbh.

    The y-axis is actually the least amount of work to expand.
     
  13. dean knipping

    Builder

    Joined:
    Mar 24, 2015
    Messages:
    84
    Likes Received:
    16
    I am looking for an easy, inexpensive CNC router that I am mostly going to use for wood but will also do some aluminum milling and I am wondering if this is what I am looking for. I am going to be using the Bosh Colt router (since I already have one) and just want to make sure this will be stiff enough for what I want to do.

    I don't think I am going to need a huge Z but do want at least 2" so with that in mind, what do you think?
     
  14. Marshall Peck

    Builder

    Joined:
    Oct 18, 2014
    Messages:
    29
    Likes Received:
    80
    Z-axis availability on this frame as about 4 in when mounting the spindle pictured. Of course, you can expand your z-rails or raise your spindle a bit too. Having tinkered with a Shapeoko, I'd say you're good to put a machine like that to shame with almost any sort of robust small to medium 3-axis setup. Certainly this one when it comes to frame rigidity. I'll be giving it a full abuse test in about a week as-is.

    This would certainly be appropriate for a light duty mill. The axis are very strong (even at higher speeds) and I personally, find it acceptably difficult to push on the effector to make the motors skip.

    Although, giving it a go as-is should be just fine, I would recommend a few things to make this machine stronger if budget and interest permit. Order of easy / cheap to difficult / more expensive:

    1) Use steel reinforced Polyurethane belts. I just got some of these on ebay. They're super stiff and durable compared to the black rubber / kevlar / fiberglass type. (you'll need different pulleys.)
    http://www.ebay.com/itm/22189494289...49&var=520788355988&ssPageName=STRK:MEBIDX:IT

    2) Use Nema 23 motors. It should be pretty easy to expand your axis an inch or 2 in lenght on the X and Y and just swap the Nema17 mounts and motors for nema23's. That would be 123 oz-in of torque compared to just 50 to 76 oz-in. My build uses the slightly beefier Nema17's with 76 oz-in.

    3) Get a little creative and use lead screw for the X and Y axis. I did this on a less robust printer frame and it worked out just fine.

    4) All of the above + c-beam. And really only 3 pieces would benefit from the change over. The Y axis that the bed rolls on, The x-gantry for the effector/hot end/router. And the z-frame. The top and bottom Just need to be fixed securely.

    Oh and an easy upgrade to the existing would be some 90 degree plates (4 on the front, 2 on the lower back) of the primary frame.

    And if you're eventually REALLY happy with it's milling duty, it might not hurt to weld the frame in place. Might seem overkill, but vibration can certainly loosen t-nuts and screws over time. Most people would probably consider welding overkill + aluminum welding these tiny things might be tricky.

    Oh, oh, oh, one more easy thing. Poly carbonate wheels. If you haven't tired them, they have extremely noticeable hardness over the black delrin/acetal wheels. Compression goes from noticeable to nearly gone. PS. Wouldn't recommend steel on aluminum. You want your wheels to be slightly softer than your rails or equal hardness so, they don't wear down in the middle.
     
    crispin likes this.
  15. dean knipping

    Builder

    Joined:
    Mar 24, 2015
    Messages:
    84
    Likes Received:
    16
    I have been thinking about the wheels and am wondering...'Self....how hard would that be to make on the lathe?' 'Not hard...just don't tell the wife!'

    I guess my only other concern would be the leveling and while I read the leveling inventible not sure how easy that is to accomplish in reality. While I have tinkered with stuff all my life and have a programing background...CNC is new to me
     
  16. stargeezer

    stargeezer Journeyman
    Builder

    Joined:
    Feb 20, 2015
    Messages:
    328
    Likes Received:
    117
    Hang in here Dean and you'll be learning all kinds of new things your wife won't like, but you'll love! :) And as a programmer type of guy, you'll have a big leg up on some of the rest of us. I can build anything, but can't program a vcr!

    Larry
     
  17. bill

    bill New
    Builder

    Joined:
    Jan 3, 2014
    Messages:
    17
    Likes Received:
    4
    In one of your photos you have a geared stepper in use. By chance what extruder and setup did you run? The motor looks to be a kysan10422X series yes?
     
  18. winand

    winand Well-Known
    Builder

    Joined:
    Mar 14, 2014
    Messages:
    65
    Likes Received:
    36
    Looks nice, a bit like my 3d printer ;)
    At first thought, i liked the concept of switching heads from 3d printer to CNC mill etc..
    But after a few thoughts; You want to use a 3d printer in a relative clean environment,
    and a CNC Mill in a place where chips and dust are no issue.
    I see that you've built yourself more machines, do you ever transfer from 3d printer to CNC
    and vice versa?
    I'm very curious because this is the reason i built two separate machines, a 3d printer and a cnc mill.

    Also, to get the most out of both (in a ideal world) , two separate machines also have different needs;
    - A3d printer requires very smooth, light and fast movements
    - A CNC works better when built heavy to minimize flex when milling hard materials, and benefit from
    heavier motors (nema23..) with bigger teethed pulleys and belts (gt3..)

    Nothing to bring your design down though, i like it a lot, :)
    but just curious why you did not built entire separate machines for two jobs..
     
  19. Beppe

    Beppe New
    Builder

    Joined:
    Feb 12, 2015
    Messages:
    3
    Likes Received:
    0
    Hi, i want to make this printer but with a working area near 16"x16"x16", it's possible?
     
  20. brettmc1121

    Builder

    Joined:
    Dec 7, 2014
    Messages:
    4
    Likes Received:
    1
    Wondering if you can post cut dimensions to build this with a 12x12 build area? or is there enough room in x and y with the current dimensions in your BOM?
     
  21. jjcolletta

    Builder

    Joined:
    Sep 13, 2014
    Messages:
    30
    Likes Received:
    10
    I took advantage of the OpenBuilds sale and purchased parts for this build. I am using 500mm z-axis screws for a bit bigger build.

    Thanks for sharing the design.
     
  22. jjcolletta

    Builder

    Joined:
    Sep 13, 2014
    Messages:
    30
    Likes Received:
    10
    670mm across the top and 530mm Z axis will get you about 15" build area. I am also using a 500mm screw (openbuilds site states they are actually 540 to get 500).

    Front View.JPG
     
    #22 jjcolletta, Dec 5, 2015
    Last edited: Dec 5, 2015
    crispin likes this.
  23. Selvakumaran

    Builder

    Joined:
    Mar 22, 2015
    Messages:
    15
    Likes Received:
    0
    Hi, super sturdy build. Interested to build one. Some questions : You are claiming the speed as 'Up to 75mm/s print speed and up to 200mm/s travel speed' - with the super rigid build, why the print speed in only 75mm/s. Is it the optimum speed to get quality printing or the maximum speed?

    And for Y-axis, the belt is connected to one side of 20x80 V-slot, which looks somewhat odd. Does the bed plate is balancing?

    Also, for Z-axis having two steppers doesn't create any issues? (Because I use Prusa i3, some times I find lot of issues with Z-axis movement.)

    Any pictures of the output of the printer?

    Just to clear the things..
     
  24. Slobberknocker

    Builder

    Joined:
    Jul 5, 2015
    Messages:
    33
    Likes Received:
    16
    Any updates on your print quality? I have a cart full of parts to buy so I can build this out of my Makerfarm i3V 12". I would love to see what kind of print quality its producing first.
     
  25. bill

    bill New
    Builder

    Joined:
    Jan 3, 2014
    Messages:
    17
    Likes Received:
    4
    I imagine the 75mm/sec print speed quoted there has more to do with extruder and hotend than mechanical of the frame.
     
  26. wpickensjr

    Builder

    Joined:
    Dec 21, 2015
    Messages:
    2
    Likes Received:
    0
    I am quite a fan of the design. Simple and Stable sums it best. I have decided to make this my first build. Can you share the motor type for the router and mount shown in your mill configuration?
     
  27. Mark A. Hogan Jr.

    Builder

    Joined:
    Dec 5, 2015
    Messages:
    1
    Likes Received:
    0
    As I am also interested in a 12x12x12 model, by using the values in this image, do you need to adjust the y-axis length as well?
     
  28. jjcolletta

    Builder

    Joined:
    Sep 13, 2014
    Messages:
    30
    Likes Received:
    10
    Yes, I am printing currently but in eye balling it I have a 27" Y axis.
     
  29. Ryan James

    Builder

    Joined:
    Sep 8, 2014
    Messages:
    41
    Likes Received:
    15
    I am also curious about the geared stepper motor in one of the photos. Which would be better to use, a direct drive extruder with the geared motor or a wade extruder?
     
  30. dd453567

    dd453567 New
    Builder

    Joined:
    Dec 29, 2015
    Messages:
    1
    Likes Received:
    0
    Hi mister, I am curious to see a printed part if you have one to share. I am nt shure today if I go to print my own printer or if I should build mine. I need something that will be able to print at arround 50 micron and able to print any kind of material including carbon filament, nylon, etc... Nice design ! And thanks a lot to share your good work! Dan.
     

Share This Page

  1. This site uses cookies to help personalise content, tailor your experience and to keep you logged in if you register.
    By continuing to use this site, you are consenting to our use of cookies.
    Dismiss Notice