Welcome to Our Community

Some features disabled for guests. Register Today.

Ultra MegaMax Dominator CoreXY Printer

Discussion in '3D printers' started by Mark Rehorst, Aug 18, 2018.
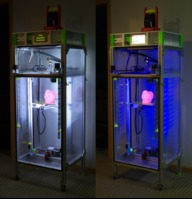
  1. Mark Rehorst

    Builder

    Joined:
    Aug 18, 2018
    Messages:
    9
    Likes Received:
    22
    Mark Rehorst published a new build:

    Read more about this build...
     
  2. Mark Carew

    Mark Carew OpenBuilds Team
    Staff Member Moderator Builder Resident Builder

    Joined:
    Jun 28, 2013
    Messages:
    2,745
    Likes Received:
    2,410
    What an awesome Build @Mark Rehorst ! this thing looks like it could print a life size human! lol
    Very cool and thank you for taking the time to share it to the OpenBuilds community :thumbsup:
     
  3. Mark Rehorst

    Builder

    Joined:
    Aug 18, 2018
    Messages:
    9
    Likes Received:
    22
    Thanks! I "finished" building it about a year ago, but of course, with this sort of thing, you're never really finished. I revisit and modify different parts of the design frequently, as well as test extruders, hot ends, blowers, etc.
     
    Michael.M and Mark Carew like this.
  4. adonai

    adonai New
    Builder

    Joined:
    Apr 6, 2018
    Messages:
    2
    Likes Received:
    0
    Hi Mark, could you share your config.txt file used with smoothieware board, I'm trying to do corexy same like yours but have many problems with bltouch sensor end stepmotors speed and configuration.
    Thank you for you patience. ;-)
     
  5. Michael.M

    Michael.M Veteran
    Staff Member Builder Resident Builder

    Joined:
    Jan 21, 2017
    Messages:
    432
    Likes Received:
    264
    Holy smokes! That's impressive. Nice work.
     
  6. Kyo

    Kyo Veteran
    Staff Member Builder Resident Builder

    Joined:
    Feb 27, 2014
    Messages:
    673
    Likes Received:
    699
    Very nice build mark, I have been following this build on the reprap forums and your blog for some time. I really like your belt driven Z-axis and build plate leveling system. I can see this system adapted to C-beam easily. I might just have to order a Rino and work up a cad model. Thanks for sharing here as well. :thumbsup:
     
  7. Kevon Ritter

    Kevon Ritter Veteran
    Builder

    Joined:
    Apr 30, 2015
    Messages:
    597
    Likes Received:
    293
    The Dentist strikes!
     
  8. Mark Rehorst

    Builder

    Joined:
    Aug 18, 2018
    Messages:
    9
    Likes Received:
    22
    I didn't use any bed sensing or autoleveling (not needed at all) in this printer, so my smoothieware config file wouldn't help you much.

    I wrote a blog post on configuring corexy printers including endstops, etc., but then added a newer post when I converted to a Duet controller. In the new post I reconfigured to put the origin of the printer at the center of the bed. Putting the origin at the center makes it easy to set up multiple slicers for the printer.

    Motor config is simply crunching the numbers- if you use 200 step/rev motors and 16:1 ustepping, you'll have 3200 steps/rev. If you have 16 tooth drive pulleys and 2 mm pitch belt, the belt will move 32 mm/rev. 3200steps/rev / 32 mm/rev = 100 steps/mm.

    If you check the blog posts listed above, you'll see that you can put the endstops anywhere you like, but the printer has to be set up for right hand rule coordinates. With the smoothieboard, there are endstop inputs for min and max on each axis. You have to be sure you plug the endstops into the correct inputs, based on which end of each axis they are mounted.

    Read through both of those blog posts before you configure the machine. I think it will save you a lot of time and trouble.
     
    #8 Mark Rehorst, Aug 26, 2018
    Last edited: Aug 26, 2018
  9. Mark Rehorst

    Builder

    Joined:
    Aug 18, 2018
    Messages:
    9
    Likes Received:
    22
    UMMD and me will be at the MIlwaukee MakerFaire at the end of September. Come by and see the machine in action and say hello!
     
  10. Mark Rehorst

    Builder

    Joined:
    Aug 18, 2018
    Messages:
    9
    Likes Received:
    22
    Thanks! There are links to CAD models of the machine on the blog page, which include the Rino, so you can just grab it. The original design was done using DesignSpark Mechanical, but someone was able to convert it to a STEP file so I imported it into Fusion360 and I posted a link to that as well. My future design releases will be using Fusion360.

    I have made many, mostly small changes to the design since those files were posted. I changed to GT2 belts in the Z axis, changed the drive pulleys to 60 teeth, that led to changes in the Z axis belt clamps and I redesigned the Z axis top pulleys so they could be mounted with a single bolt. I've also just recently changed the extruder carriage- I put the motor just above the X axis bearing block, and ran a short tube down to the hot-end. I also added a 500W heater for the chamber, and completely redid the electronics when I installed the Duet controller and Panel Due touchscreen.
     

Share This Page

  1. This site uses cookies to help personalise content, tailor your experience and to keep you logged in if you register.
    By continuing to use this site, you are consenting to our use of cookies.
    Dismiss Notice