Welcome to Our Community

Some features disabled for guests. Register Today.

UltiBots CB3030 CNC

Discussion in 'CNC Mills/Routers' started by UltiBots, Jun 24, 2016.
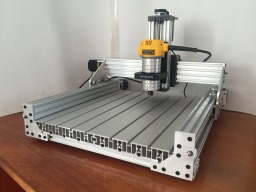
  1. UltiBots

    UltiBots Well-Known
    Builder

    Joined:
    May 8, 2014
    Messages:
    54
    Likes Received:
    74
    UltiBots published a new build:

    Read more about this build...
     
  2. Kyo

    Kyo Veteran
    Staff Member Builder Resident Builder

    Joined:
    Feb 27, 2014
    Messages:
    673
    Likes Received:
    699
    Nice render :thumbsup: I should have those side plate files updated and ready to post soon. Looks like the T-slot table you found is going to work nicely. Good Find!
     
    #2 Kyo, Jun 24, 2016
    Last edited: Jun 24, 2016
  3. EvanBruner

    EvanBruner Well-Known
    Builder

    Joined:
    Mar 26, 2016
    Messages:
    68
    Likes Received:
    66
    Build looks good so far, where'd you find the t slot bed?
     
  4. Kyo

    Kyo Veteran
    Staff Member Builder Resident Builder

    Joined:
    Feb 27, 2014
    Messages:
    673
    Likes Received:
    699
    Here is the link he provided over in my gallery. "Link"
    They have some cool options for a bed.
     
  5. EvanBruner

    EvanBruner Well-Known
    Builder

    Joined:
    Mar 26, 2016
    Messages:
    68
    Likes Received:
    66
    Cool, thanks. Wonder if they're any cheaper than misumis offering.
     
  6. UltiBots

    UltiBots Well-Known
    Builder

    Joined:
    May 8, 2014
    Messages:
    54
    Likes Received:
    74
    Evan - In single bed quantities (50cm x 50cm), they are roughly 2X more expensive but... I believe they are 2X better. They are 30mm thick, stable, flat, and have true t-nut slots. We have some on order and expect to test next week.

    Research shows they will work with 6mm t-slot nuts, step clamps, and step blocks from LittleMachineShop.
    Screen Shot 2016-06-24 at 8.15.25 PM.png
     
  7. Buj

    Buj New
    Builder

    Joined:
    Apr 27, 2016
    Messages:
    10
    Likes Received:
    0
    With this type of design, i would have one question/worry that is; the wheels that run on the top rail of the Y axis gets clogged/blocked by debris and hinder the movement in the Y axis. Is this worry valid?

    BTW great job...
     
    #7 Buj, Jun 30, 2016
    Last edited: Jun 30, 2016
  8. 3DMON

    3DMON New
    Builder

    Joined:
    Nov 8, 2013
    Messages:
    51
    Likes Received:
    22
    Looking good Brad!
    Let me know when you get the mister going and cutting. I wanna check that puppy out!
    Shaun
     
  9. UltiBots

    UltiBots Well-Known
    Builder

    Joined:
    May 8, 2014
    Messages:
    54
    Likes Received:
    74
    @Buj I suspect it will be OK as both X-Carve and Shapeoko have exposed wheels and they are quite popular. Not sure yet as this machine has yet to make chips. Currently waiting on t-nuts to secure bed to lower frame. . Will find out soon...

    @3DMON will call you when the CB3030 is relocated to our warehouse. This machine needs a sturdy work bench and compressor before the mister mists ;)
     
  10. jonathan lee

    Builder

    Joined:
    Aug 1, 2015
    Messages:
    6
    Likes Received:
    2
    Love the build, it looks phenomenal :) I am a cnc neewbie and I am panning to soon build my 1st machine. Do you mind putting out a parts list?
     
  11. UltiBots

    UltiBots Well-Known
    Builder

    Joined:
    May 8, 2014
    Messages:
    54
    Likes Received:
    74
    Thanks for your support. This was a fun build. Started with a stock C-Beam Machine Mechanical Bundle, then designed and machined new plates for this build. Learned SO much and still learning... The UltiBots CB3030 CNC BOM is very preliminary but should get you thinking.
     
    #11 UltiBots, Jul 2, 2016
    Last edited: Jul 3, 2016
  12. jonathan lee

    Builder

    Joined:
    Aug 1, 2015
    Messages:
    6
    Likes Received:
    2
    Thank you so much but could you please accept me to the link you sent me on google drive
     
  13. UltiBots

    UltiBots Well-Known
    Builder

    Joined:
    May 8, 2014
    Messages:
    54
    Likes Received:
    74
    @jonathan lee try link again. Permissions are now "Anybody with link can view"
     
  14. GrayUK

    GrayUK Openbuilds Team Elder
    Staff Member Moderator Builder

    Joined:
    May 5, 2014
    Messages:
    1,668
    Likes Received:
    627
  15. UltiBots

    UltiBots Well-Known
    Builder

    Joined:
    May 8, 2014
    Messages:
    54
    Likes Received:
    74
    @GrayUK nice find. They have lots of goodies! I hope to start chipping again soon.

    Thanks for sharing - Brad
    www.UltiBots.com
    ==================
    CB3030 CNC
    Dewalt 611
    Elaire 1/8" Collet
    1/8" Single Flute Carbide End Mill
    Workflow = Fusion 360 & Cam > Chilipeppr > Tinyg
    Feeds & Speeds For 6.5mm 6061 T6 Aluminum Plate
    - All operations = Conventional Milling
    - Cutting = 25"/min (635mm/min), Ramp = 10"/min (254mm/min), Plunge = 8"/min (203.2mm/min)
    - Adaptive (bearing recess) = .4mm multiple depths, 0.2 deg ramp
    - Contour cut (bearing finish) = 0.1mm stepover finish and repeat @ 254mm/min
    - Bore cut (screw holes) = 0.25mm pitch, 0.1mm finish pass and repeat
    - Contour cut (perimeter) = 0.05 deg ramp angle, 0.1mm finish and repeat @ 254mm/min
    - Pocket cut (not used) = 0.25mm rough & 0.2mm finish, 3mm max stepover
     
    #15 UltiBots, Jul 3, 2016
    Last edited: Jul 3, 2016
  16. Julius

    Julius Well-Known
    Builder

    Joined:
    Nov 13, 2015
    Messages:
    193
    Likes Received:
    61
    stop using bits for plastics and you'll be able to cut faster. I can cut faster then that with my first OX and a 4$ china bit. I did 1700mm/min at 0.3mm depth with a 1/8 bit before cut quality suffered and I have a VERY sloppy Z on that machine.
     
  17. UltiBots

    UltiBots Well-Known
    Builder

    Joined:
    May 8, 2014
    Messages:
    54
    Likes Received:
    74
    @Julius - Please share a link to the bits you use. I would like to try them. Thanks - Brad

    BTW... the bits I have been using were detailed by Neo7CNC on his YouTube channel
     
  18. Julius

    Julius Well-Known
    Builder

    Joined:
    Nov 13, 2015
    Messages:
    193
    Likes Received:
    61
    I get them from this guy, this is the bit I was cutting with.
    1/8" Carbide Endmill 4 Flute Flat Bottom Regular

    My Z is too sloppy for longer metal work, but I know my new machine (with a C beam Z) will be able to plow through aluminum like a champ.
     
  19. UltiBots

    UltiBots Well-Known
    Builder

    Joined:
    May 8, 2014
    Messages:
    54
    Likes Received:
    74
    @Julius - thanks for sharing link; placing an order today. Looking forward to > Feeds & Speeds :thumbsup:
     
  20. Savvas

    Savvas New
    Builder

    Joined:
    Nov 15, 2015
    Messages:
    25
    Likes Received:
    86
    Yep this is a great looking machine. I was planing to build something similar with already available components but your plates look a lot more elegant.
     
  21. Barry Danks

    Barry Danks Well-Known
    Builder

    Joined:
    Apr 21, 2016
    Messages:
    113
    Likes Received:
    36
  22. UltiBots

    UltiBots Well-Known
    Builder

    Joined:
    May 8, 2014
    Messages:
    54
    Likes Received:
    74
    @Barry Danks - Thanks for the link. The 2 Flute Carbide 120-2125 End Mill looks good for cutting aluminum plate. What are you cutting, your feeds and speeds, and end mill?
     
  23. Kyo

    Kyo Veteran
    Staff Member Builder Resident Builder

    Joined:
    Feb 27, 2014
    Messages:
    673
    Likes Received:
    699
    First cuts are looking good :thumbsup:
     
  24. Barry Danks

    Barry Danks Well-Known
    Builder

    Joined:
    Apr 21, 2016
    Messages:
    113
    Likes Received:
    36
    @UltiBots

    Sorry don't know how I missed your post. I have used the 1/8" 2 flute and 4 flute when cutting aluminum. The four flute gives a better finish but you have to be real careful about chip loading, I only use it with my mister, but makes a mess :) Feed and speed I generally go by sound
     
  25. C-Line

    C-Line New
    Builder

    Joined:
    Feb 3, 2014
    Messages:
    9
    Likes Received:
    0
    Really great looking build, Brad -- many thanks for sharing it!

    1. I noticed that in the photos the front and rear Y-axis end plates are different (the rear ones have extensions for the motor standoffs), but only the front ones are included on the Github site. Will you be adding the rear ones, or have you decided the extensions are not really necessary?

    2. Will you be offering the plates for sale at your website anytime soon?
     
  26. UltiBots

    UltiBots Well-Known
    Builder

    Joined:
    May 8, 2014
    Messages:
    54
    Likes Received:
    74
    @C-Line - I have uploaded the latest files to our GitHub. We plan to sell pre-production plates for $80. The raw materials are ≈ $40, setup time ≈ 1 hr, and machine time ≈ 4 hrs. These will be machined on our UB3030 CNC and will not meet machine shop tolerances. You will need to do some prep work to them; deburr the edges, ream through holes, and tap motor holes. Please email sales )at( ultibots dotcom or call 772-257-one thousand if interested.
     
  27. C-Line

    C-Line New
    Builder

    Joined:
    Feb 3, 2014
    Messages:
    9
    Likes Received:
    0
    Thanks, Brad -- that seems very reasonable.
     
  28. C-Line

    C-Line New
    Builder

    Joined:
    Feb 3, 2014
    Messages:
    9
    Likes Received:
    0
    I've been reviewing the BOM (which I realize is a work in progress) and came across a few things I couldn't figure out.

    On the Y-axis, which wheels get the eccentrics? Also, the 8mm spacers are used only on the fixed wheels, correct? (BOM shows enough for all wheels). And why use the 2X 1mm spacers with the 6mm eccentrics instead of just using 6mm spacers on the fixed wheels?

    Sorry if these are simple-minded questions, but this is my first build with this system!
     
  29. UltiBots

    UltiBots Well-Known
    Builder

    Joined:
    May 8, 2014
    Messages:
    54
    Likes Received:
    74
    @C-Line - please refer to the source files on our GitHub and the image below. The eccentrics go in the 7.2mm holes. Essentially the upper 2 wheels and the lower 2 mini wheels.


    Regarding spacers... Our prototype used 6.5mm plate which needed 8mm spacing to keep the mini wheel screws from from contacting the C-Beam. The BOM will be updated soon.
     
  30. C-Line

    C-Line New
    Builder

    Joined:
    Feb 3, 2014
    Messages:
    9
    Likes Received:
    0
    Thanks, that makes sense after looking at the plate drawings.

    Will the pre-production plates be 6mm thickness? Also, what is your approximate lead time for a set of those?
     

Share This Page

  1. This site uses cookies to help personalise content, tailor your experience and to keep you logged in if you register.
    By continuing to use this site, you are consenting to our use of cookies.
    Dismiss Notice