Welcome to Our Community

Some features disabled for guests. Register Today.

The Artist Formerly Known as Prints

Discussion in '3D printers' started by evolver56k, Mar 27, 2017.
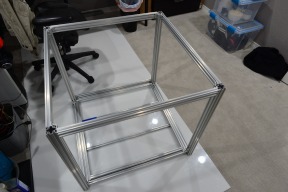
  1. evolver56k

    Builder

    Joined:
    Jul 12, 2016
    Messages:
    4
    Likes Received:
    13
  2. MaryD

    MaryD OpenBuilds Team

    Joined:
    Apr 13, 2016
    Messages:
    649
    Likes Received:
    639
    Can't wait to see this!
     
  3. evolver56k

    Builder

    Joined:
    Jul 12, 2016
    Messages:
    4
    Likes Received:
    13
    Started out with 11 uncut pieces of V-slot

    Set up the miter saw with a blade capable of cutting nonferrous metals. I also added a 1500mm section of 40x40 as a fence:


    It's bolted through on both sides of the blade from the fence mounting holes built into the factory fence. Then I cut the fence in two, not moving either side afterwards and added an adhesive steel tape measure with the zero line on the left side of the saw kerf:


    This allows me to then use the entire length of 40x40 to accurately measure and place a stop block on the appropriate measurement:


    So, I can make the repeated length cuts on all the pieces without having to measure or accidentally cut the wrong side of measure line.


    Clamping the piece to be cut to avoid any movement while the blade is running (and safety goggles this thing throws tiny bits of aluminum all over).

    After all cuts are made, 19 pieces for the frame assembly:


    Attached Files:

  4. beardyblair

    beardyblair Well-Known
    Builder

    Joined:
    Aug 1, 2016
    Messages:
    59
    Likes Received:
    72
    I will hold off on my big printer until you progress a bit further. My plan is to use C-Beam for the uprights.

    Looking forward to watching this!
     
  5. evolver56k

    Builder

    Joined:
    Jul 12, 2016
    Messages:
    4
    Likes Received:
    13
    This seems really solid using the 4040s as the uprights, I've gotten pretty far with the cube today after work. I've severely underestimated the quantities of screws and nuts though. I ended up using hex bolts with lock washers to hold the inner corner brackets on all the beams, and the black screws for the plates.

    Squaring up all the beams was a major pain and took the most time. I started on one top corner and worked my way around, then flipped the cube over and did the same for the bottom beams.


Share This Page

  1. This site uses cookies to help personalise content, tailor your experience and to keep you logged in if you register.
    By continuing to use this site, you are consenting to our use of cookies.
    Dismiss Notice