Welcome to Our Community

Some features disabled for guests. Register Today.

TACIT RONIN CNC - Flood Coolant Enabled C-Beam

Discussion in 'CNC Mills/Routers' started by alex_b, May 17, 2016.
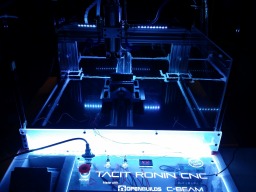
  1. alex_b

    alex_b Journeyman
    Staff Member Builder Resident Builder

    Joined:
    Jan 31, 2015
    Messages:
    48
    Likes Received:
    109
    alex_b published a new build:

    Read more about this build...
     
    Giarc and GrayUK like this.
  2. Mark Carew

    Mark Carew OpenBuilds Team
    Staff Member Moderator Builder Resident Builder

    Joined:
    Jun 28, 2013
    Messages:
    2,741
    Likes Received:
    2,407
    Alex - your Builds are amazing. This is beyond words! I believe this Build is going to help so many people. We have a lot of Builders asking how they can cut carbon fiber and this will be a great resource for them to look to. Thank you for taking the time to put such a great, complete Build together and thank you for all the kind words.
    Your friend,
    Mark
     
    MaryD likes this.
  3. alex_b

    alex_b Journeyman
    Staff Member Builder Resident Builder

    Joined:
    Jan 31, 2015
    Messages:
    48
    Likes Received:
    109
    @Mark Carew Glad it might help people! I've found that there is a multitude of info online about cutting metal and wood but cutting composites seems to be somewhat of a dark art in the general cnc community. I hope to do my part to change that because I think carbon fiber and G10 have really growing potential. I have a couple more upgrades planned to increase rigidity in the near future too. (those new dual c-beam plates are awesome.) Our trusty OX can finally go back to cutting wood as this C-Beam design has been a great workhorse over the last while. And to be honest, with the high rpms composites need to be cut at, not many commercial machines would even be up for the types of cutting we do.
     
    GrayUK, MaryD and Mark Carew like this.
  4. David the swarfer

    David the swarfer OpenBuilds Team
    Staff Member Moderator Builder Resident Builder

    Joined:
    Aug 6, 2013
    Messages:
    3,219
    Likes Received:
    1,813
    awesome!
     
  5. snokid

    snokid Journeyman
    Builder

    Joined:
    Oct 11, 2014
    Messages:
    335
    Likes Received:
    104
    Wow impressive for sure!!!!
     
  6. MaryD

    MaryD OpenBuilds Team

    Joined:
    Apr 13, 2016
    Messages:
    649
    Likes Received:
    639
    Great video production to boot. A+.
     
  7. alex_b

    alex_b Journeyman
    Staff Member Builder Resident Builder

    Joined:
    Jan 31, 2015
    Messages:
    48
    Likes Received:
    109
    Thanks everyone! Will be uploading a couple more vids of full pallet runs for some carbon fiber jobs we've done recently.
     
  8. alex_b

    alex_b Journeyman
    Staff Member Builder Resident Builder

    Joined:
    Jan 31, 2015
    Messages:
    48
    Likes Received:
    109
    Made an update to the build today, more pics in the post. Significant increases in rigidity by bolting a v-slot to the back of the X-Axis C-Beam and swapping in the double-wide gantry plate on the Z-Axis.

    2016-05-20 20.51.22.jpg 2016-05-20 20.53.59.jpg
     
  9. Davey Rance

    Builder

    Joined:
    Mar 4, 2015
    Messages:
    32
    Likes Received:
    16
    Great build. Are you controlling the spindle from Tiny G or doing manually? If you are doing it from the TinyG are you doing all 3 options (On, Direction, Speed) As i am about to do the same i have just been working on getting all the tubing in place for my spindle and trying to figure out how i can control it all from the TinyG
     
  10. alex_b

    alex_b Journeyman
    Staff Member Builder Resident Builder

    Joined:
    Jan 31, 2015
    Messages:
    48
    Likes Received:
    109
    I'm just controlling the spindle manually, start, stop, rpm adjust, etc. I believe it is possible to hook up the spindle to the TinyG as there is an array of PWM connections on the inverter. The inverter manual with these spindles describe the pwm connections fairly well I believe.
     
  11. Julius

    Julius Well-Known
    Builder

    Joined:
    Nov 13, 2015
    Messages:
    193
    Likes Received:
    61
    Sorry for ignorance, but what are those electrical quick connects you are using?
     
  12. alex_b

    alex_b Journeyman
    Staff Member Builder Resident Builder

    Joined:
    Jan 31, 2015
    Messages:
    48
    Likes Received:
    109
    For most of my electrical connections I used a ratcheting crimping tool and ferrule crimping connectors. Makes connecting stepper motors to the pin terminal quite easy. Got them off of ebay I believe. Inverter connections I used crimping ring terminals from a local hardware store. Just have to match the wire gauge to the connectors and away you go!
     
  13. Julius

    Julius Well-Known
    Builder

    Joined:
    Nov 13, 2015
    Messages:
    193
    Likes Received:
    61
    Thanks. All sorted now. I ended up buying a bunch of 0.1 pitch terminals that I'll just plop into all of the female pins and use it that way! My new shield is ALL male pinned already so I got some 20awg f/f jumpers that I can splice together to the stepper motors (all the other jumpers are 30awg, too thin for splicing)

    The play in the C beam has become apparent in my machine as I tried alu again, so do you feel like if I bought the XL plate and added 4 Xtreme wheels to the outside as well as the inside 4 that it'd get rid of all or most of that? Do you have a file for the one you made (or the spacing to add outside wheels)?

    Also curious where you got the vice, all the ones on ebay have like 200$ in shipping fees estimated. No thanks!
     
  14. Julius

    Julius Well-Known
    Builder

    Joined:
    Nov 13, 2015
    Messages:
    193
    Likes Received:
    61
    Thanks. All sorted now. I ended up buying a bunch of 0.1 pitch terminals that I'll just plop into all of the female pins and use it that way! My new shield is ALL male pinned already so I got some 20awg f/f jumpers that I can splice together to the stepper motors (all the other jumpers are 30awg, too thin for splicing)

    The play in the C beam has become apparent in my machine as I tried alu again, so do you feel like if I bought the XL plate and added 4 Xtreme wheels to the outside as well as the inside 4 that it'd get rid of all or most of that? Do you have a file for the one you made (or the spacing to add outside wheels)?

    Also curious where you got the vice, all the ones on ebay have like 200$ in shipping fees estimated. No thanks!
     
  15. alex_b

    alex_b Journeyman
    Staff Member Builder Resident Builder

    Joined:
    Jan 31, 2015
    Messages:
    48
    Likes Received:
    109
    I think the custom X-plate I made definitely helped the rigidity. I also bolted a spare V-Slot extrusion directly to the back of the C-Beam to shore things up even more. The next thing that I noticed gave a large rigidity improvement was the double wide Z gantry plate. I don't cut a lot of metal so I can't really say how much this improved my axial cutting/plunging ability but it definitely helped improve radial cutting forces. The X-Plate file I used is in the resources section here. It can be tweaked at will in Fusion if that is your CAD of choice. The new thicker X gantry plate in the parts store would also definitely be an improvement over the default 3mm universal plate in the original C-Beam.

    The low profile vice I just picked up locally, (for the same aforementioned issue you had) from Acklands-Grainger up here in Canada.
     
  16. Julius

    Julius Well-Known
    Builder

    Joined:
    Nov 13, 2015
    Messages:
    193
    Likes Received:
    61
    I'll definitely look into the longer C beam plate. My limit switch is about 40mm from the top and that area can be filled with plate and another set of mini wheels.

    The plate I meant was the alu one you made that allows for wheels to also be on the outside of the C beam. All I really need is the hole spacing you used, (DERP. Just remembered C beam is 80mm so it'd be exactly the same as my gantry plates. Ignore me!)


  17. Julius

    Julius Well-Known
    Builder

    Joined:
    Nov 13, 2015
    Messages:
    193
    Likes Received:
    61
    I'll definitely look into the longer C beam plate. My limit switch is about 40mm from the top and that area can be filled with plate and another set of mini wheels.

    The plate I meant was the alu one you made that allows for wheels to also be on the outside of the C beam. All I really need is the hole spacing you used, (DERP. Just remembered C beam is 80mm so it'd be exactly the same as my gantry plates. Ignore me!)


  18. John Christian Lien

    Builder

    Joined:
    Dec 14, 2016
    Messages:
    20
    Likes Received:
    9
    Great build! After looking at the pictures and the video i still cant figure out how you mounted the spindle clamp to that extra alu plate :\
     
  19. alex_b

    alex_b Journeyman
    Staff Member Builder Resident Builder

    Joined:
    Jan 31, 2015
    Messages:
    48
    Likes Received:
    109
  20. Bernard L Gannon

    Builder

    Joined:
    Feb 26, 2018
    Messages:
    4
    Likes Received:
    2
    Ronin guy, (Alex),

    Your build was recommended to me as I had inquired about building a gantry for low pressure abrasive waterjetting. This build is super, I'm so impressed. I have built and engineered many wjet specialty systems ranging from low pressure cutting to boulder cutting gantries on mining gage tracks. I used to cut alot of fiberglass for a fixture designer in the printed circuit board mnfg. business. I also cut alot of carbon. I would think that the a jet would be super for cutting carbon fiber and very possibly could be powered by a 5k to 7k power washer. I'll study your design some more and may have questions. If you want to pursue low pres. abwajet feel free to contact me. [email protected]
     
    Paul Stoller likes this.
  21. alex_b

    alex_b Journeyman
    Staff Member Builder Resident Builder

    Joined:
    Jan 31, 2015
    Messages:
    48
    Likes Received:
    109
    Hey Bernard,

    Thanks for the compliment!! The waterjet project sounds awesome! I do a lot of pocketing and 3D features in carbon fiber and G10 so that why I prefer cnc. But for cutting flat CF panels, I don't think the speed of a waterjet can be beat. I'll send you a dm, love to hear what you have in mind! cheers
     
  22. wnsanders

    wnsanders New
    Builder

    Joined:
    Dec 27, 2018
    Messages:
    1
    Likes Received:
    0
    Great work here! I've built a 1510 with the controllable spindle and the upgrades. My next build is a smaller mill to cut aluminum, and ideally it will be water or oil cooled. Which spindle did you use, and how are you preventing the water from destroying the spindle?
     
  23. alex_b

    alex_b Journeyman
    Staff Member Builder Resident Builder

    Joined:
    Jan 31, 2015
    Messages:
    48
    Likes Received:
    109
    Been awhile since I've had this machine up, but I still use the same spindle on my current BlackBox build. Underneathe the "dust" shoe, I laser-cut a sheet rubber gasket that fits directly undeneath the spindle which keeps most of the water away. But I find as long as you dry off your spindle daily after use and give it a spray of lubricant/anti-rust, you have no issues. I use pure water for fiber composites but if you use a proper coolant mix for cutting aluminum/metals, you won't get anyt rust issues.

    Spindle type is a standard HY 2.2kW chinese spindle. Many different resellers out there but they are all virtually the same and all use the same HY VFD. Something to look out for is a 110V version if you don't have a 220V supply. Hope that helps!
     

Share This Page

  1. This site uses cookies to help personalise content, tailor your experience and to keep you logged in if you register.
    By continuing to use this site, you are consenting to our use of cookies.
    Dismiss Notice