Welcome to Our Community

Some features disabled for guests. Register Today.

Rotary CNC

Discussion in 'CNC Lathes' started by Jon Norris, Apr 4, 2016.
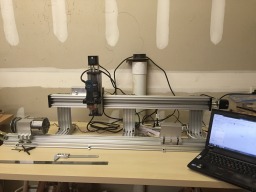
  1. Jon Norris

    Builder

    Joined:
    Feb 14, 2016
    Messages:
    27
    Likes Received:
    48
    Jon Norris published a new build:

    Read more about this build...
     
  2. stargeezer

    stargeezer Journeyman
    Builder

    Joined:
    Feb 20, 2015
    Messages:
    328
    Likes Received:
    117
    A very cool concept. If you can without too much effort, how about posting your design image so that we can roll it around to other views. If you're not comfortable with doing that, I completely understand.

    I've been tossing around a lathe idea for some time and I'm looking for inspiration to push me to the build bench.

    Thanks again,
    Larry
     
  3. Jon Norris

    Builder

    Joined:
    Feb 14, 2016
    Messages:
    27
    Likes Received:
    48
    Here you go. This was my very first attempt at Sketchup so I was just focusing on the main framework and not worrying about showing all the little connectors. I initially overengineered things and had a much bigger framework, but Rick 2.0 helped me strip it down to what he considered to be something that was strong enough without going overboard. Anyway, as you can envision, it will be held together with a bunch of cast corners and T nuts. Also, per Rick's suggestion, I'm switching the gantry plate on the X axis from the small one that comes with the bundle to the larger universal gantry, but that isn't shown in this Sketchup file.
     

    Attached Files:

    Ted Moyer likes this.
  4. stargeezer

    stargeezer Journeyman
    Builder

    Joined:
    Feb 20, 2015
    Messages:
    328
    Likes Received:
    117
    Thanks Jon, I can't wait to dig into it.
     
  5. stargeezer

    stargeezer Journeyman
    Builder

    Joined:
    Feb 20, 2015
    Messages:
    328
    Likes Received:
    117
    Hi Jon. I was wondering if you had any pics of your machine yet? A few pics might answer some minor questions that I have.

    Thanks again for a great build.
    Larry
     
  6. Jon Norris

    Builder

    Joined:
    Feb 14, 2016
    Messages:
    27
    Likes Received:
    48
    Larry, I just finished putting it together (mostly) and got it wired up on Tuesday. Still have a bit of work to do before I attempt some cuts with it, but I'm happy with progress. Is there something particular you want pics of? I can shoot some when I get back to the house.
     
  7. stargeezer

    stargeezer Journeyman
    Builder

    Joined:
    Feb 20, 2015
    Messages:
    328
    Likes Received:
    117
    I'm mostly concerned about how the z axis is connecting to the machine. Mostly, I'm just very curious hows it going.
     
  8. Jon Norris

    Builder

    Joined:
    Feb 14, 2016
    Messages:
    27
    Likes Received:
    48
    My Z axis connects to the X axis exactly the way they show in the C Beam machine construction video. The vertical C Beam for the Z axis is bolted to a Universal Gantry Plate, and that is moved by the X Axis. I took a lot of guidance from that video and just modified where needed. I'll try to get some pictures of it soon. In the meantime, I'm shopping for router bits, and I'm about to cough up the $700 for VCarve so I can start cutting.
     
  9. stargeezer

    stargeezer Journeyman
    Builder

    Joined:
    Feb 20, 2015
    Messages:
    328
    Likes Received:
    117
    I'm not so sure I'd go that way, unless you have too. The Ox is a much better machine. IMO
     
  10. stargeezer

    stargeezer Journeyman
    Builder

    Joined:
    Feb 20, 2015
    Messages:
    328
    Likes Received:
    117
    Boy, I sure miss-read that post Jon. :oops:o_O

    Vcarve is a great program.
     
    Joe Santarsiero likes this.
  11. Joe Santarsiero

    Joe Santarsiero OB addict
    Staff Member Moderator Builder

    Joined:
    Oct 30, 2014
    Messages:
    902
    Likes Received:
    196
    Looking forward to seeing your work Jon.

    How do you plan on aligning the Z and A axis?
    What's the overall height of the rotary axis components as received?
    I've been debating with myself over these rotary axis packages and homebrewed solutions utilizing reduction gearboxs. The latter of which I'd have to consider the motor to gearbox coupling and gearbox to some kind of chuck (that probably hasn't been invented yet!). I have about 6" from Z to table and I'm wondering if one of these guys might bolt right between or if I'll have to raise the machine.

    Keep us updated on your successes and failures.

    Joe
     
  12. Jon Norris

    Builder

    Joined:
    Feb 14, 2016
    Messages:
    27
    Likes Received:
    48
    Stargeezer, no worries at all.

    Joe, sorry for the delay responding. I didn't see your comment until just now. I've got everything aligned pretty well. I'll try to explain what I did, and I still need to shoot some better pics of things, but I'll try to get that done soon.

    First off, for the rotary components, I got them on ebay from China. There are some tiny ones on there, but this is one of the larger ones. The chuck itself is 100mm, and the center of it sits at 65mm high, so giving it a little clearance on top too, it fits in a space of about 130mm -- about 5.5 inches. If you want the link to the exact one I bought, let me know.

    Alignment wasn't too tricky. The rotary components have a slight groove in their bases that is 40mm wide. I took a piece of CBeam with the open side facing up and dropped in a piece of 40x40 rail. It fits perfectly and is held together by some cast corners on each end. That piece of 40mm rail fits right into the groove on the headstock and tailstock bases, and they slide on it just as they would on a traditional lathe bed. I've got the headstock bolted into place, but the tailstock needs to move to accommodate different sized work pieces, so it's screwed into a couple tee nuts so I can loosen and move when needed. Anyway, I used the live center on the tailstock for alignment. I put a small bit in my router, moved X all the way to one end, lowered my Z axis until it was the same height as the point on the tailstock center, and then moved the X/Z assembly slightly forward or backward until the bit and the point on the center touched. Move everything to the other end and repeat. The trickiest part was adjusting the height of the X axis on each end to get it perfectly perpendicular to the lathe bed, but I've got it about as close to perfect as I can manage. If you use a piece of 40mm wide beam to line up your headstock and tailstock, that will raise everything up just a little, and it might mean that you have to raise your Z axis a little bit. Just depends on how you set everything up.

    Anyway, I've spent the last two weeks tweaking and experimenting since this is my very first attempt at CNC. So far, everything is working like a dream, mostly thanks to VCarve being a great piece of software. I just started using the machine for a basic production job yesterday, and I've got to generate some more Gcode this morning for the next step in my production process. All in all, this has been a great investment, and I think it's going to revolutionize my work, especially once I get code written for all of my projects and can just let the machine do its work instead of constantly experimenting.
     
    eddiejr and Joe Santarsiero like this.
  13. Jon Norris

    Builder

    Joined:
    Feb 14, 2016
    Messages:
    27
    Likes Received:
    48
    Here are a few pics:
    Rotary-cnc1.jpeg Rotary-cnc2.jpeg Rotary-cnc3.jpeg Rotary-cnc4.jpeg Rotary-cnc5.jpeg
     
    snokid, stargeezer, Rick 2.0 and 3 others like this.
  14. Joe Santarsiero

    Joe Santarsiero OB addict
    Staff Member Moderator Builder

    Joined:
    Oct 30, 2014
    Messages:
    902
    Likes Received:
    196
    That's pretty sweet Jon.
     
  15. eddiejr

    eddiejr New
    Builder

    Joined:
    Feb 15, 2016
    Messages:
    73
    Likes Received:
    9
    Nice build. Did you get it from "prettyworkshop"? Head: 4 jaw and Tail: type C, correct? Before undertaking this build, did you consider converting an existing lathe to CNC (i.e. HF, Grizzly, Jet, etc.)? Thanks for sharing. -Eddie
     
    #15 eddiejr, Jun 12, 2016
    Last edited: Jun 12, 2016
  16. Jon Norris

    Builder

    Joined:
    Feb 14, 2016
    Messages:
    27
    Likes Received:
    48
    Eddie, my headstock and tailstock came from a seller called gold-bucket. They're based in China, but have a warehouse in California, so shipping is much faster. The headstock does have a 4 jaw chuck. It cost a little more, but I needed that so I could grab square blanks a little easier.

    I thought very briefly about converting an existing lathe to CNC, but it just didn't make sense for what I was doing. I've got 4 lathes in my workshop set up for different purposes, but I wanted this CNC to be set up more for instrument-specific carving than traditional turned work. I've got a Vega duplicator on one of my lathes, and I even thought about trying to convert it too since it's basically a router on a horizontal axis, but it was a lot faster and easier to just build this machine from scratch. This CNC is rounding my square blanks before doing the carving, so it completely replaces the duplicator. I'll probably sell the duplicator, and it'll cover a decent chunk of the cost of building this machine.
     
  17. Bridge Port

    Builder

    Joined:
    Aug 8, 2016
    Messages:
    5
    Likes Received:
    16
    Would love to see some photos of the woodwinds that you are making.
     
  18. Matt Miller

    Builder

    Joined:
    Jul 5, 2014
    Messages:
    9
    Likes Received:
    2
    video in action would be awesome!
     
    Giarc and snokid like this.
  19. Giarc

    Giarc OpenBuilds Team
    Staff Member Moderator Builder Resident Builder

    Joined:
    Jan 24, 2015
    Messages:
    2,892
    Likes Received:
    1,609
    Hmmm... My spindle goes all the way to the front edge of my CNC build. Maybe I should mount a head and tail stock at the front. I have the required z travel if necessary. I could just have a switch which changes the Y axis to the rotary axis. Now you have me thinking of how to modify before I am even 100 percent finished.:thumbsup:
     
    Jon Norris likes this.
  20. Jon Norris

    Builder

    Joined:
    Feb 14, 2016
    Messages:
    27
    Likes Received:
    48
    I'll get some pics when I have a chance. I'm in the middle of crazy festival season right now -- 4 shows in the next 5 weeks.

    I'll get some video at some point as well. At the moment, it's pretty boring. I'm basically taking square blanks that have been hollowed, turning them round on the CNC, and then drilling pilot holes for finger holes. Then the flutes go to some other machines for other processes, and then sound mechanisms and tuning are done by hand. It's a LOT more productive than doing all the rounding on the lathe though. This machine alone has probably cut my production time in half.

    Another quick update: I just bought a little laser engraver module from JTech that I'll be adding in order to burn on my logo, date, key of the instrument, etc. I've been doing that by hand as well, using a series of torch-heated brands, most of which I cut myself with a little jeweler's saw.
     
    eddiejr, Bridge Port and Giarc like this.
  21. elcanadian

    Builder

    Joined:
    Sep 26, 2016
    Messages:
    1
    Likes Received:
    0
    Hi Jon, I was wondering if you would possibly share the settings you used for the tinyg? I have what looks to be a very similar rotary axis and a Tinyg but am not sure of some of the settings. In particular the $4tr and $ara values, the documentation has had me going in circles :).
     
  22. selkov

    selkov New
    Builder

    Joined:
    Dec 3, 2014
    Messages:
    34
    Likes Received:
    0
    Ok, now you did it. Now I got to build one too!
    Can you share the links where you bought the head stock and tail stock?
    Also the engraver.
    I do not do woodwinds but my application is basically the same.
    And how would you feel about being my mentor on this build as I copy you?
    I have never yet built a unit but what I want is what you built with the addition of the z axis [x,y, and z].
    Gonna need to start saving $ for the build, what did it all total out to - without the software and spindle?
     
  23. Jon Norris

    Builder

    Joined:
    Feb 14, 2016
    Messages:
    27
    Likes Received:
    48
    The TinyG documentation for rotary setup is definitely lacking. I'll get those settings for you next time I fire up the machine.
     
  24. Jon Norris

    Builder

    Joined:
    Feb 14, 2016
    Messages:
    27
    Likes Received:
    48
    Just replied to your private message with details. I'll try to get all the relevant links together at some point and update the build documentation. Three more weeks of festival season and then I'm home for a few months so I can catch up on all of this and hopefully have time to shoot a little video for people who are interested.
     
  25. selkov

    selkov New
    Builder

    Joined:
    Dec 3, 2014
    Messages:
    34
    Likes Received:
    0
    Thanks
     
  26. Bill Morgan

    Builder

    Joined:
    May 16, 2017
    Messages:
    1
    Likes Received:
    0
    Hi:
    I have started a CNC router project to make woodwinds. I was thinking, I could use disks of wood with the conic bore cut into the center of each disk. These disks then glued together in plywood fashion, to make the blank. Then the blank would be turn on a CNC lath like you have design. I am building this piece mill, and so far got the Y axis build.
    Bill
     
  27. cureac

    cureac New
    Builder

    Joined:
    Mar 1, 2014
    Messages:
    18
    Likes Received:
    27
    add a guide rail on the x-axis and another guide rail to the bottom of the x-axis for better stiffness. Take a look at my YouTube channel
     
  28. cureac

    cureac New
    Builder

    Joined:
    Mar 1, 2014
    Messages:
    18
    Likes Received:
    27
    Cam software : deskproto multiaxis hobby 20170919_194129.jpg 20170919_194227.jpg 20170919_194204.jpg 20170919_194129.jpg 20170919_194238.jpg
     
  29. Dam

    Dam New
    Builder

    Joined:
    Aug 13, 2017
    Messages:
    2
    Likes Received:
    0
    Hi, pls write what lenght is of cbeam linear rails you cut? photo attached
     

    Attached Files:

  30. Tim Clingenpeel

    Builder

    Joined:
    May 13, 2015
    Messages:
    2
    Likes Received:
    6
    Can you provide a build list of the rails or a pdf of your sketchup design? I use Solidworks and it will not open the .skp file. I have designed a manual lathe using angle iron, tubing and flat stock, but I think the Openbuilds rail system will be a lot more robust and used friendly.
    Thank you - Tim c
     

Share This Page

  1. This site uses cookies to help personalise content, tailor your experience and to keep you logged in if you register.
    By continuing to use this site, you are consenting to our use of cookies.
    Dismiss Notice