Welcome to Our Community

Some features disabled for guests. Register Today.

Ox Stainless with ballscrews

Discussion in 'CNC Mills/Routers' started by LarsTveito, Mar 7, 2017.

  1. LarsTveito

    Builder

    Joined:
    Mar 4, 2017
    Messages:
    19
    Likes Received:
    23
    LarsTveito published a new build:

    Read more about this build...
     
  2. Gunnar Norum

    Builder

    Joined:
    May 7, 2016
    Messages:
    2
    Likes Received:
    0
    Cool.. looking forward to folliwing build.. I have a 1x1.5 m Stainless Ox myself, and are thinking of upgrading from belts.
     
  3. LarsTveito

    Builder

    Joined:
    Mar 4, 2017
    Messages:
    19
    Likes Received:
    23
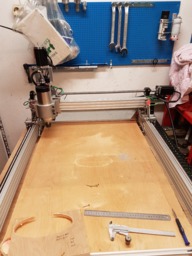
    The table was done today. Used 15 mm plywood instead of 22, due to incredible price of the thicker one. I think 15 mm will do. Also made a shelf underneath, as I have limited space in my workshop. A little doubtful about this, as it tends to fill up with crap. I also mountet two electrical tubes under the table, just to be able to run hidden wiring for power in case I should need it sometime.

    2017-03-08 20.46.03.jpg

    I also got to start with the assembly. I need to assemble the frame and gantry in order to figure out the mounting spots for the ballscrews, so I can order them to exact length. 2017-03-08 22.26.31.jpg 2017-03-08 22.51.35.jpg
    2017-03-08 22.51.39.jpg
     
    swohnrade likes this.
  4. LarsTveito

    Builder

    Joined:
    Mar 4, 2017
    Messages:
    19
    Likes Received:
    23
    Got a little done today, tapped the ends of the main rails and mounted the subframe. Had to take i apart after first assembly due to fixing the end beam in the flat position instead of vertical. A lot of screws to reposition. Next is to finish the gantry in order to figure out the lengths and mounting points for the ballscrew, so I can order these.
    2017-03-10 21.10.14.jpg
     
  5. Josh Rupp

    Josh Rupp New
    Builder

    Joined:
    May 22, 2015
    Messages:
    9
    Likes Received:
    1
    Cool build happening! I'm curious what gauge of stainless you opted for on your plates?
     
  6. LarsTveito

    Builder

    Joined:
    Mar 4, 2017
    Messages:
    19
    Likes Received:
    23
    Thay are made of 3 mm stainless.
     
  7. LarsTveito

    Builder

    Joined:
    Mar 4, 2017
    Messages:
    19
    Likes Received:
    23
    Got a cabinet for the electronics sourced, an old enclosure for some ventilation systems that was obsolete. Right size and sturdy cabinet. Startet with the wiring to the drivers and controller card.


    2017-03-21 22.27.00.jpg 2017-03-22 22.52.56.jpg
     
  8. LarsTveito

    Builder

    Joined:
    Mar 4, 2017
    Messages:
    19
    Likes Received:
    23
    Wiring of the drivers ready. Now it is just sensors and power supply in to the box remaining, then the control cabinet is done.

    2017-03-23 22.17.45.jpg
     
    snokid likes this.
  9. GrayUK

    GrayUK Openbuilds Team Elder
    Staff Member Moderator Builder

    Joined:
    May 5, 2014
    Messages:
    1,668
    Likes Received:
    627
    LarsTveito.
    I would really like to see some form of cooling in that box. It's going to get pretty warm in there.
    Ideally, depending on where you plan to have it, a good sized fan sucking in from the bottom and exhausting across those drivers and out the side / back top. :rolleyes:
    Gray
     
  10. LarsTveito

    Builder

    Joined:
    Mar 4, 2017
    Messages:
    19
    Likes Received:
    23
    Yeah, it's a well enclosed box, so I have to have some sort of ventilation. I'm going to mount it on the side of the table, so I figure a fan on one of the sides and intake holes under each drive should do it. I just have to finish mounting all of the power supplies, so I can see where the best location for that fan will be.
     
  11. Bad Sequel

    Bad Sequel Well-Known
    Builder

    Joined:
    Aug 19, 2015
    Messages:
    83
    Likes Received:
    32
    @LarsTveito Looks like a Biltema tapping kit underneath your table..

    Hvor i gamlelandet holder du til?
     
  12. LarsTveito

    Builder

    Joined:
    Mar 4, 2017
    Messages:
    19
    Likes Received:
    23
    Holder til i Lier utenfor Drammen. :)
     
  13. LarsTveito

    Builder

    Joined:
    Mar 4, 2017
    Messages:
    19
    Likes Received:
    23
    Got some ballscrews in the mail today, so now I can start to make brackets for attaching them. Started with the spindle mounting plate. Had to extend the wheel holders, so I can fit the ballnut mounting housing behind the v-slot-plate. Added some ekstra holes on top so I can add an extra set of wheels if necessary later. Still a little bit nervous about the weight of the 2.2 kw spindle, it seems heavy compared to the extrusions that are going to hold it.
    2017-04-04 18.58.36.jpg 2017-04-04 18.58.45.jpg
     
  14. LarsTveito

    Builder

    Joined:
    Mar 4, 2017
    Messages:
    19
    Likes Received:
    23
    Starting to testfit the ballscrews, need to make brackets for the ends, and spacers and mounting bracket for the gantry nut.

    2017-04-06 23.08.56.jpg
     
    GrayUK and Bad Sequel like this.
  15. LarsTveito

    Builder

    Joined:
    Mar 4, 2017
    Messages:
    19
    Likes Received:
    23
    Made spacers for the ball-screw mount to gantry. 47.5 mm long, 18 mm diameter. Next is a mounting plate. Made them quite big since they are going to transfer loads sideways. This is for one side, then I need four more for the other side. I'll try to make a short video of how I made them later.

    2017-04-07 19.45.57.jpg
     
    GrayUK likes this.
  16. Joe Santarsiero

    Joe Santarsiero OB addict
    Staff Member Moderator Builder

    Joined:
    Oct 30, 2014
    Messages:
    902
    Likes Received:
    196
    I did something similar. This part was no fun for me.
    Are you attaching the nut block to the gantry plates?
     
  17. LarsTveito

    Builder

    Joined:
    Mar 4, 2017
    Messages:
    19
    Likes Received:
    23
    Here are the attachment finished, just need some other bolts, the short ones are too long, and the long ones are too short, so this is just to see how it turned out. I plan to center it on the gantry plate, and drill and tap directly in the plate. As it is stainless steel, I think M6 with 3 mm deep threads should hold up fine.


    2017-04-07 23.02.25.jpg 2017-04-07 23.02.30.jpg I
     
    Joe Santarsiero likes this.
  18. LarsTveito

    Builder

    Joined:
    Mar 4, 2017
    Messages:
    19
    Likes Received:
    23
    Here is a short video of the turning of the spacers.
     
    Gunnar Norum and Bad Sequel like this.
  19. LarsTveito

    Builder

    Joined:
    Mar 4, 2017
    Messages:
    19
    Likes Received:
    23
    20171231_153621.jpg 20171231_153616.jpg 20171231_153611.jpg 20171231_153607.jpg Slow progress on this one, been a while since last update. Started mounting ballscrews now, gantry is almost finished.
     
    #19 LarsTveito, Dec 31, 2017
    Last edited: Jan 1, 2018
    Gunnar Norum likes this.
  20. LarsTveito

    Builder

    Joined:
    Mar 4, 2017
    Messages:
    19
    Likes Received:
    23
    Some more progress, mounted the spindle mount today. Had to make my own version of t-nuts, took some 10x2 mm brass flat bar, cut to length, drilled and tapped for M5. Then aluminum t-profile to bolt into the mount and to the t-nuts. The t-nut goes all behind the mount in one piece, so both top and bottom nut is connected to the same flat bar. Drilled the holes in the t-profile oversize by one mm, so I can adjust the spindle clocking.

    You can also see one of my limit-switches there.
    20180114_143618.jpg
     
    GrayUK likes this.
  21. LarsTveito

    Builder

    Joined:
    Mar 4, 2017
    Messages:
    19
    Likes Received:
    23
    20180121_135907.jpg 20180121_135903.jpg 20180111_223649.jpg 20180103_224410.jpg 20180103_224404.jpg 20180103_224353.jpg 20180103_224347.jpg 20180103_224339.jpg 20171231_153621.jpg 20171231_153616.jpg 20171231_153611.jpg 20171231_153607.jpg Now I am actually almost done. Mounted the spindle, mounted the motors, and mounted the limit switches. All is connected and up and running.

    I have a few small tasks left. Need to attach the VFD to the table, attach the frame to the table top, and mount home switches. Also some strapping of wires to get the build a little more tidy.
     
    GrayUK likes this.
  22. LarsTveito

    Builder

    Joined:
    Mar 4, 2017
    Messages:
    19
    Likes Received:
    23
    Short video of first run. Now I have to explore feeds and speeds.

     
    GrayUK and Joe Santarsiero like this.
  23. GrayUK

    GrayUK Openbuilds Team Elder
    Staff Member Moderator Builder

    Joined:
    May 5, 2014
    Messages:
    1,668
    Likes Received:
    627
    Excellent looking machine!! :thumbsup: Definately something to be proud of! :thumbsup:
    When you organise your feed and speeds, try to make sure your spindle reaches its max set speed before contact with the material. Sets up a good clean start. :D
    May the chips fly for you. :thumbsup::thumbsup::thumbsup::thumbsup::thumbsup::thumbsup:
    Gray
     
    LarsTveito likes this.
  24. LarsTveito

    Builder

    Joined:
    Mar 4, 2017
    Messages:
    19
    Likes Received:
    23
    Mounted and wired the home switches, so now the build is complete for now. Surprisingly easy to connect them in Linuxcnc, or have I just gotten more familiar with it? Worked on first try. Now I can start making parts, and ponder about improvements...

    20180131_235324.jpg 20180131_235317.jpg 20180131_235314.jpg 20180131_235306.jpg 20180131_235301.jpg 20180131_235253.jpg
     
  25. LarsTveito

    Builder

    Joined:
    Mar 4, 2017
    Messages:
    19
    Likes Received:
    23
    First project made. A collett holder for my ER20 colletts. It cuts good when I got the feed and cutting dept right. It did not like heavy cuts, and not alternating between climb and conventional milling. Not stiff enough for that. You can see the difference in surface finish. The big pocket was cut at full depth at 20 mm, but on the second try I only took 2 mm width of cut, and only climbmilled.

    It is made of pine wood, so not the best to get good surface finishes, but ok for this use.

    20180204_143920.jpg 20180204_143207.jpg 20180204_143158.jpg 20180204_143138.jpg 20180204_143135.jpg 20180204_143131.jpg
     
    Christer, Giarc and GrayUK like this.

Share This Page

  1. This site uses cookies to help personalise content, tailor your experience and to keep you logged in if you register.
    By continuing to use this site, you are consenting to our use of cookies.
    Dismiss Notice