Welcome to Our Community

Some features disabled for guests. Register Today.

OpenXY

Discussion in '3D printers' started by Keith Davis, Nov 30, 2015.
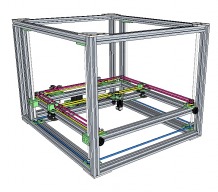
  1. Keith Davis

    Keith Davis Veteran
    Builder

    Joined:
    Dec 11, 2013
    Messages:
    506
    Likes Received:
    393
    Keith Davis published a new build:

    Read more about this build...
     
  2. Lukas K

    Lukas K New
    Builder

    Joined:
    May 30, 2014
    Messages:
    1
    Likes Received:
    0
    You could extend the back frame/compartment a bit and throw your electronics/filament etc. in there as well. Very nice clean design!
     
  3. Keith Davis

    Keith Davis Veteran
    Builder

    Joined:
    Dec 11, 2013
    Messages:
    506
    Likes Received:
    393
    Thanks Lucas.

    Another 50mm deep and I can fit the PSU, controller and a spool back there with the bowden driver above the spool. But, another 70mm and I can fit a second spool, second bowden driver, and use a Chimera hot end for dual extrusion. I think I'll probably produce it the 70mm deeper so I can convert from single to dual extrusion on the same unit.

    A nice thing about this overall fixed bed design is the bed can sit only 10mm off the bottom, reducing overall height. Which also eliminates room for putting the PSU and controller below the bed as is common on X axis bed designs.
     
    MaryD likes this.
  4. Don Juggler

    Builder

    Joined:
    Nov 6, 2015
    Messages:
    2
    Likes Received:
    1
    This is a really nice design. You can probably make the Z axis less likely to skip by putting an idler between the threaded rods. See picture below with and without the table.

    Z-Axis.png
    Z-Axis2.png
     
  5. Keith Davis

    Keith Davis Veteran
    Builder

    Joined:
    Dec 11, 2013
    Messages:
    506
    Likes Received:
    393
    Hi Don

    I've done a bit more design work on this that incorporates points you and Lukas have made.

    [​IMG]

    This type of design (fixed bed) is rather expensive to build so I'm thinking that the only way to commercialize it would be to add acrylic panels to make it a full boxed design. That would be purely cosmetic because the OpenBuilds wheels makes it already far quieter than a fully boxed design like Ultimaker. I'm still trying to talk myself into building it, or any fixed bed with a coreXY, due to the expense.
     
    Lukas K likes this.
  6. Carl Feniak

    Carl Feniak Journeyman
    Builder

    Joined:
    Mar 18, 2014
    Messages:
    654
    Likes Received:
    246
  7. Keith Davis

    Keith Davis Veteran
    Builder

    Joined:
    Dec 11, 2013
    Messages:
    506
    Likes Received:
    393
    Thanks Carl. I would assume that is probably where I got my copy of the Unnamed+mechanism.jpg.
     
  8. saltygator

    Builder

    Joined:
    Nov 30, 2016
    Messages:
    2
    Likes Received:
    0
    Ok Keith, let's build this thing. I have been searching for a design for my first build and this one has everything i want. I have a CTC 3d and I'm looking to move up.
     
  9. Keith Davis

    Keith Davis Veteran
    Builder

    Joined:
    Dec 11, 2013
    Messages:
    506
    Likes Received:
    393
    Afraid you'll have to go on without me for now. Next few months I'm starting up a new business (has nothing to do with any of this) and It's probably going to sap all my creativity.
     
  10. saltygator

    Builder

    Joined:
    Nov 30, 2016
    Messages:
    2
    Likes Received:
    0
    I'm new here. Is it ok if I grab your initial work and post it as the beginning of my build? Of course, giving you credit.
     
  11. Keith Davis

    Keith Davis Veteran
    Builder

    Joined:
    Dec 11, 2013
    Messages:
    506
    Likes Received:
    393
    Absolutely! Use any part you want. Just list my build in your Inspired By section

    And, I like the OpenXY name for that Unnamed-mechanism it uses. So, if you want to continue calling this lay-out OpenXY (as opposed to the CoreXY design) feel free to do so.
     
    MaryD likes this.
  12. MaryD

    MaryD OpenBuilds Team

    Joined:
    Apr 13, 2016
    Messages:
    649
    Likes Received:
    639
    Keith, Good luck on your new venture. Hope it doesn't take you away from us for too long!
     
  13. Keith Davis

    Keith Davis Veteran
    Builder

    Joined:
    Dec 11, 2013
    Messages:
    506
    Likes Received:
    393
    Mary, if it works the way we fantasize it will, I wont be back, I'll be in Jamaica. On the other hand.....

    One of the reasons for taking time off is talk of 25 to 50% tariffs on Chinese imports has caused some Chinese 3d printer companies to drop prices just in their US sales. That's a "dumping" aimed at running US manufacturers out of business before those tariffs hit them. I can hibernate cheaper than sell at a loss until they get those tariffs.

    Today I'm finishing up a 15 page, 100 image tutorial for DIY building a TrueUp Glide. I expect to rework the TrueUp's build here this weekend with links to that tutorial.
     
    MaryD likes this.
  14. GinoTheCop

    GinoTheCop Journeyman
    Builder

    Joined:
    Jan 28, 2016
    Messages:
    150
    Likes Received:
    196
    Neat design. I liked it from the very first day I seen it.

    I did implement your design in Fusion 360. Designed some custom plates for connections and steppers etc.

    You can have a look from here. Hope you like it and maybe it gives you few ideas (Please note I have never designed nor used a 3D printer till now)

    I might build this one when I have enough funds for it.

    [​IMG]

    And following is the BOM report from Fusion;

    Part name // Quantity
    8mm Acme Anti Backlash Nut Block // 4 //
    8mm Acme Screw // 4 //
    90 Hidden Tee Nut // 24 //
    Aluminum Spacer 20mm // 9 //
    Aluminum Spacer 3mm // 4 //
    Aluminum Spacer 6mm // 22 //
    Aluminum Spacer 9mm // 4 //
    Custom Anti-Backlash-Connector // 4 //
    Ball Bearing 5 x 10 x 4 // 24 //
    Ball Bearing 8 x 16 x 5 // 8 //
    Belt-X // 1 //
    Belt-Y // 1 //
    Belt-Z // 1 //
    Cover-Front // 1 //
    Cover-Side // 2 //
    Cover-Top // 1 //
    Custom-Belt-Press // 2 //
    Custom-Connector // 8 //
    Custom-Mini-Plate-X // 2 //
    Custom-Mini-Plate-Y // 4 //
    Custom-Plate-Nema-17 // 2 //
    Custom-Plate-Nema-23 // 1 //
    Custom-Plate-Nema-23-Bottom // 1 //
    Custom-Pulley-Plate-A // 2 //
    Custom-Pulley-Plate-B // 2 //
    Custom-X-Pulley-Block // 1 //
    E3D v6 HotEnd // 1 //
    GT2_16T-Pulley // 1 //
    GT2_20T-Pulley // 6 //
    Heat-Bed-300X300 (?) // 1 //
    L-Bracket-Double // 8 //
    LCD+Control Card // 1 //
    Lock Collar 8mm // 4 //
    M3X14-RHS // 4 //
    M3X60-SHS // 4 //
    M5X08-LPS // 68 //
    M5X10-LPS // 48 //
    M5X20-LPS // 8 //
    M5X25-LPS // 8 //
    M5X30-LPS // 8 //
    M5X35-LPS // 21 //
    M5X40-LPS // 12 //
    M5X6-SetScrew // 96 //
    Mini Eccentric Spacer 6mm // 6 //
    Nema 17 Stepper Motor // 2 //
    Nema 23 Stepper Motor // 1 //
    Nema-17 (Extruder) // 1 //
    Nylon Insert Lock Nut M5 // 40 //
    Precision Shim 10 x 5 x 1 // 48 //
    Precision Shim 8 x 5 x 1 // 40 //
    PSU // 1 //
    Shim Washer 8mm // 12 //
    Smooth Idler // 26 //
    Tee Nut // 89 //
    V-Slot 20x20x468 // 1 //
    V-Slot 20x20x478 // 1 //
    V-Slot 20x20x500 // 3 //
    V-Slot 20x20x535 // 2 //
    V-Slot 20x40x478 // 1 //
    V-Slot 20x40x480 // 2 //
    V-Slot 20x40x500 // 6 //
    V-Slot 20x40x625 // 2 //
    V-Slot 20x40x645 // 2 //
    Xtreme Mini V Wheel // 12 //
     
    #14 GinoTheCop, Dec 22, 2016
    Last edited: Dec 22, 2016
    Mika Sihvonen and Mark Carew like this.
  15. Keith Davis

    Keith Davis Veteran
    Builder

    Joined:
    Dec 11, 2013
    Messages:
    506
    Likes Received:
    393
    WOW!!! A good idea put in the right hands becomes really GREAT Gino!

    I love the changes you've made - particularly the X axis carriage/extruder. And the double-back positioning of the two rear idlers for the Z belt.

    I'm assuming a controller board box opposite the PSU on the back wall, and also maybe converting the front panel into a door.

    Downloading the SKP file now........
     
  16. GinoTheCop

    GinoTheCop Journeyman
    Builder

    Joined:
    Jan 28, 2016
    Messages:
    150
    Likes Received:
    196
    Glad you like some of the ideas Keith!

    Yes front panel needs a few more touches (surely a door) and rear plus bottom covers with a set of neat feet as well maybe.
     
  17. GinoTheCop

    GinoTheCop Journeyman
    Builder

    Joined:
    Jan 28, 2016
    Messages:
    150
    Likes Received:
    196
  18. Helmi

    Helmi New
    Builder

    Joined:
    Dec 9, 2016
    Messages:
    2
    Likes Received:
    0
    Has anyone yet had a closer look at these designs or tested them? They look really interesting. I'm going to build a Diode laser and this design looks quite smart for that. I thought about building a CoreXY design but this may be a good alternative although it's quite a bit more complex and costly due to the amount of idlers - but definitely a nice approach.
     
  19. Keith Davis

    Keith Davis Veteran
    Builder

    Joined:
    Dec 11, 2013
    Messages:
    506
    Likes Received:
    393
    I built the XY carriage (no box & Z) to explore different ways to mount wheels. The design works with ordinary X & Y firmware settings, which reduces the constant calculation required for CoreXY and a real reduction in controller board temperatures. I use 2 F605zz bearings to create idlers which keeps idler cost down around $1 per idler pair.I never built the box to follow thru (got distracted). I got the idea from a drawing published by the legendary RichRap (Richard Horne) who I think built a XY carriage also. It was originally used in a Rikadenki brand Pen Plotter Old-school Scientific Pen Plotter Teardown
     
  20. Helmi

    Helmi New
    Builder

    Joined:
    Dec 9, 2016
    Messages:
    2
    Likes Received:
    0
    Thanks, Keith. I know Richard of course - quite for a long time even.

    Thanks for your explanation. I'm not worried about CoreXY performance or board temperature. I've already done different 3d printers with CoreXY and they always ran smooth and pleasantly. I think i'd prefer CoreXY over this design because it's just a bit simpler mechanically.

    I've just loaded the F3D files from @GinoTheCop into Fusion360 today - awesome work man. I wish I'd have the time to plan my laser project as detailled as you did it. Would love to publish it later but I guess du to time constraints I'll have to do it quite more basic in planning.
     
  21. GinoTheCop

    GinoTheCop Journeyman
    Builder

    Joined:
    Jan 28, 2016
    Messages:
    150
    Likes Received:
    196
    Thanks @Helmi

    I guess no matter how detailed the initial plan, at some point something will always not be right when building it. So as long as you are ok with basics you can always go around design problems. Thats the process of product development and it is impossible to get it all right at first run.

    Good luck with your project.
     
  22. Adam Filipowicz

    Adam Filipowicz Journeyman
    Builder

    Joined:
    Dec 21, 2014
    Messages:
    259
    Likes Received:
    129
    I like this build and its similar to my TitanXY config. that I have built.
    CoreXY seems simpler
     
  23. Vic-the real one

    Builder

    Joined:
    Jan 6, 2017
    Messages:
    2
    Likes Received:
    0
    Like this design. How does moving this much mass in the z axis compare to conventional moving bed?
     
  24. Keith Davis

    Keith Davis Veteran
    Builder

    Joined:
    Dec 11, 2013
    Messages:
    506
    Likes Received:
    393
    By "conventional" design, I'm assuming you mean a Y axis moving forward and back, rather than the Y moving up and down.

    I don't even know how to compare the two. The same size motor moves this Z axis in this design as is used to move a Y axis in a conventional design.

    The main difference is in comparing this design's Y mass to the mass of the Y in a conventional design. The much heavier mass movement in a conventional design limits the speed and acceleration/deceleration compared to the OpenXY or CoreXY designs. With a OpenXY or CoreXY design you can print as fast as your extruder can heat up and push filament because the X & Y masses are insignificant.
     
  25. Vic-the real one

    Builder

    Joined:
    Jan 6, 2017
    Messages:
    2
    Likes Received:
    0

    Thanks, Never built yet so not sure myself :) If you're xy remained at top and z build moved up, what might the weight difference be between a build platform with just z and your original xy frame complete?
     
  26. Keith Davis

    Keith Davis Veteran
    Builder

    Joined:
    Dec 11, 2013
    Messages:
    506
    Likes Received:
    393
    The frame structure would be the same, so the difference would be the build plate, heat bed and mirror (2.5 lbs, not including object being printed) vs the X axis and extruder (2.5 lbs)
     
  27. invitro

    invitro New
    Builder

    Joined:
    Jul 14, 2016
    Messages:
    1
    Likes Received:
    0
    Hi @Keith,

    Nice job, in fact we did a similar design like you do for our commercial printer but instead of using the core-xy gantry, We are using UM like gantry and you're right, this design have a fix weight rather than using moving bed on Z- axis but a little bit expensive when we build it. Good luck for your design and nice design.
     
  28. FherraZ

    FherraZ New
    Builder

    Joined:
    May 8, 2014
    Messages:
    6
    Likes Received:
    0
    Guys!! Is this really going to happen? I have ALWAYS wanted (well since 2013 to be precise) a static build plate on a CoreXY moving Z, and this is it!!!
     
  29. Keith Davis

    Keith Davis Veteran
    Builder

    Joined:
    Dec 11, 2013
    Messages:
    506
    Likes Received:
    393
    Take a look at Josh Pierce's design for a stationary bed. He's completed his. This design here is too expensive to build for my taste and I abandoned it.

    Josh's build - CoreXY W/ Fixed Build Plate & Enclosure

    Josh's printer -
    [​IMG]
     
    RBR likes this.
  30. FherraZ

    FherraZ New
    Builder

    Joined:
    May 8, 2014
    Messages:
    6
    Likes Received:
    0
    Thank you, I like more the aesthetics of your design, so, if you could share your files with me I will greatly appreciate it
     

Share This Page

  1. This site uses cookies to help personalise content, tailor your experience and to keep you logged in if you register.
    By continuing to use this site, you are consenting to our use of cookies.
    Dismiss Notice