Welcome to Our Community

Some features disabled for guests. Register Today.

MyCNC

Discussion in 'CNC Mills/Routers' started by MattiasN, Jun 23, 2015.
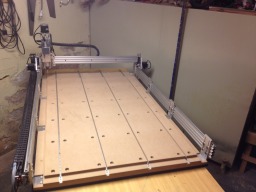
  1. MattiasN

    MattiasN New
    Builder

    Joined:
    Mar 26, 2015
    Messages:
    12
    Likes Received:
    25
  2. Mark Carew

    Mark Carew OpenBuilds Team
    Staff Member Moderator Builder Resident Builder

    Joined:
    Jun 28, 2013
    Messages:
    2,741
    Likes Received:
    2,407
    Great looking build @MattiasN
    Thanks for sharing :thumbsup:
     
  3. Mark Carew

    Mark Carew OpenBuilds Team
    Staff Member Moderator Builder Resident Builder

    Joined:
    Jun 28, 2013
    Messages:
    2,741
    Likes Received:
    2,407
    BTW is that a carbon fiber spoiler board?
     
  4. MattiasN

    MattiasN New
    Builder

    Joined:
    Mar 26, 2015
    Messages:
    12
    Likes Received:
    25
    Thanks :)
    it´s Veneer i think and it´s 18mm thick

    The spindle im going to get is this http://ugracnc.com/CNC-SPINDLES/Milling-Spindle-0.75-kW-220-V.html
    it Weight 2.8 kg so not to heavy i think and it have ER16M collet but it cost much :/

    and i did buy 4 of this 1600mm to http://www.fine-tools.com/t-nutschiene.html

    i have a CNC Pen Write Holder and i did buy it from here https://www.rockcliffmachine.com/product/cnc-pen-holder/
    but i have not yet test it :)


    Here you can see both sides of the spoiler board

    19118763095_3977a4d9fa_o.jpg 19092590446_c91947828d_o.jpg
     
    #4 MattiasN, Jun 24, 2015
    Last edited: Jun 24, 2015
    Mark Carew likes this.
  5. Mark Carew

    Mark Carew OpenBuilds Team
    Staff Member Moderator Builder Resident Builder

    Joined:
    Jun 28, 2013
    Messages:
    2,741
    Likes Received:
    2,407
    Thanks for the update on the veneer @MattiasN It looked just like carbon fiber to me on the first set of pics :)
    The spindle is very nice indeed!
    I have been looking for an easy way to make a sharpie holder for testing out the machines on their Hello Worlds and this gives some good ideas, thank you.
    Again thank you again and please keep us up to date.
     
  6. Mark Carew

    Mark Carew OpenBuilds Team
    Staff Member Moderator Builder Resident Builder

    Joined:
    Jun 28, 2013
    Messages:
    2,741
    Likes Received:
    2,407
    Tom Allen likes this.
  7. MattiasN

    MattiasN New
    Builder

    Joined:
    Mar 26, 2015
    Messages:
    12
    Likes Received:
    25
    Thanks for the link going to check it out :)
     
  8. Darus

    Darus New
    Builder

    Joined:
    Mar 9, 2015
    Messages:
    22
    Likes Received:
    1
    Awesome built and prints! What software did you use for the prints?
     
  9. MattiasN

    MattiasN New
    Builder

    Joined:
    Mar 26, 2015
    Messages:
    12
    Likes Received:
    25
    Tom Allen likes this.
  10. Shannon Jardine

    Builder

    Joined:
    Sep 17, 2015
    Messages:
    22
    Likes Received:
    1
    MattiasN Awesome build. I am just starting out and this looks like the build I want to me or similar to it. Would you happen to have a parts list or a partial parts list. I am gathering information for a 1500mm x 1500mm laser cut table. Thank you
     
  11. MattiasN

    MattiasN New
    Builder

    Joined:
    Mar 26, 2015
    Messages:
    12
    Likes Received:
    25
    Hi i did use

    20 x 80 VSlot - 2 @ 1500mm
    20 x 60 VSlot - 2 @ 1000mm (join it together with 3 Low Profile Screws M5 maby it was 60mm you can allways cut down :) )
    20 x 60 VSlot - 1 @ 500mm (For the Z but i did cut it down to 265mm)
    20 x 40 VSlot - 1 @ 1000mm (Cable Chain Rest)
    20 x 40 VSlot - 1 @ 1500mm (Cable Chain Rest and 2 90 Degree Joining Plate to hold it )
    Xtreme V Wheel Kit - 26
    Smooth Idler Pulley Wheel Kit - 2

    i recommend 4 9mm Aluminum Spacers here between the two wheels between the two wheels 9mm if you are going to join the two 20 x 60 VSlot - 2 @ 1000mm
    here is two images you see how i did join it 2 20 x 60 VSlot Joining other sid i did tap 2 20 x 60 VSlot Joining

    GT3 Aluminum Timing Pulley - 20 Tooth - 3 (but i did put bigger M5 Set Screws on it 4mm )

    spacers between the wheels it´s up to you but take the same dimensions Eccentric Spacer and normal Spacer

    i did use 4.2mm drill for tapping M5 screws if i remember right

    and i did buy 8 V-Slot, Openrail, C-Beam, Openbuilds OX CNC Brackets

    here i have more pictures Mattias Norberg
     
    #11 MattiasN, Mar 11, 2016
    Last edited: Mar 11, 2016
  12. Rob Mitchell

    Rob Mitchell Well-Known
    Builder

    Joined:
    Nov 29, 2015
    Messages:
    105
    Likes Received:
    35
  13. MattiasN

    MattiasN New
    Builder

    Joined:
    Mar 26, 2015
    Messages:
    12
    Likes Received:
    25
    Thank you :)
     
  14. Jelton Mentore

    Builder

    Joined:
    Jun 4, 2016
    Messages:
    7
    Likes Received:
    1
    are you using Stepper Motor Drivers with your NEMA23. Is it mandatory for that size of OX- 1000x1500mm
     
  15. MattiasN

    MattiasN New
    Builder

    Joined:
    Mar 26, 2015
    Messages:
    12
    Likes Received:
    25
    Hi i use Gecko G540 it´s all in one it have the controller + Stepper Motor Drivers
     
  16. treoer

    treoer New
    Builder

    Joined:
    Dec 29, 2014
    Messages:
    25
    Likes Received:
    0
    This is the same size i want to build, you have some powerful motors. Have you tried cutting wood and soft metals, how
    well does the vslot frame belt system hold up when cutting solid materials?
     
  17. MattiasN

    MattiasN New
    Builder

    Joined:
    Mar 26, 2015
    Messages:
    12
    Likes Received:
    25
    Hi i have not yet test to cut soft metals
    i have only done some halftone
    but i think that spindle is perfect for this machine
    the Y axis with the L Brackets does very good job to get the Y axis very stable and i think it´s the easiest way to do that

    hmm for the X axis i think this method like a ladder horizontal is maby very good and stable way
    then you have upper and lower X axis that together creates a wider Linear Rail then example 20 x 80 Linear Rail so wider is better :) and it does less stress on the vslot wheels to then maby it can hold a bigger spindle to :)
    for this i think two 40x40 Linear Rail is very good upper and lower
    [​IMG]
     
    #17 MattiasN, Jan 11, 2017
    Last edited: Jan 11, 2017
  18. treoer

    treoer New
    Builder

    Joined:
    Dec 29, 2014
    Messages:
    25
    Likes Received:
    0
    I have got everything except the frame. The spindle i got is 1.5kw but its round require mount weight 3kg. I like your one fit nicly on 40x60. I was worry my spindle will be too heavy. I already have the plates so cant change to 20x80 for x now.

    Did you buy a L plates or machine it your self? They are either rare or expensive compare with building with a base frame.
     
  19. MattiasN

    MattiasN New
    Builder

    Joined:
    Mar 26, 2015
    Messages:
    12
    Likes Received:
    25
    Hi i did buy them from chrisclub1 on ebay Angle Brackets for the OX CNC (seen at Openbuilds) and other rail projects | eBay
    but you maby find cheaper on some hardware store
     
  20. treoer

    treoer New
    Builder

    Joined:
    Dec 29, 2014
    Messages:
    25
    Likes Received:
    0
    Thank you for your reply!

    I am thinking to do it another way, by joining 2080 with 2040 like a L shape have 2 cross beam under the 2040 at the same position as your middle L-plates,locking the side beams in place.

    what did you do to stop the v-wheel nut and screw hitting the plate when traveling on the 2080 beam? I think its stick out by 5mm? Did you turn the bolt the other way or use low profile nut and bolt?

    I see your machine have been upgraded since beginning. do the current design still have the 4 beams below the bed? And did the t-slot rail to it?
     
  21. Giarc

    Giarc OpenBuilds Team
    Staff Member Moderator Builder Resident Builder

    Joined:
    Jan 24, 2015
    Messages:
    2,892
    Likes Received:
    1,610
    I did something similar to what you are considering. I mounted my Y axis to the bench top like the picture below and it is rock solid. The 1/8 inch aluminum plate for both sides is way cheaper than those brackets, though not necessary the way you are considering, If I understand it right. I pay between $3 and $3.50 per pound for aluminum. It may be more or less depending on your locale. I go right to a metal yard and don't order it online. Much cheaper that way. I wanted the Y supported the entire length and this allowed me more places to fasten it to the table top.
    [​IMG]

    If you want more info, a more detailed description is here: Lead Screw Driven Ox Derivative (850x1500)
     
  22. treoer

    treoer New
    Builder

    Joined:
    Dec 29, 2014
    Messages:
    25
    Likes Received:
    0
    This look great, it good to know it does work. I live in UK everything is expensive here, so I want to get it right first time and leave room for upgrade option further in time.

    Mike
     
  23. Gary Caruso

    Gary Caruso OpenBuilds Volunteer
    Staff Member Moderator Builder

    Joined:
    May 19, 2016
    Messages:
    1,183
    Likes Received:
    530
    Nice looking build, I like your t-track spoil board.
    That spindle is nice and compact, gets the bit very close to the v-slot which is ideal
     
  24. MattiasN

    MattiasN New
    Builder

    Joined:
    Mar 26, 2015
    Messages:
    12
    Likes Received:
    25
    Hi i was lazy i did just grind the nut so it does not hit the plate

    Giarc that look´s very stable and much cheaper a great Idea


    Gary Caruso thanks :)
    between the spindle and 20 x 60 VSlot Linear Rail there is only a very slim steel plate
    so the spindle is mounted on the slim steel plate and the steel plate is mounted to the 20 x 60 VSlot so it get´s very compact :)


    #24 MattiasN, Jan 13, 2017
    Last edited: Jan 13, 2017
  25. Giarc

    Giarc OpenBuilds Team
    Staff Member Moderator Builder Resident Builder

    Joined:
    Jan 24, 2015
    Messages:
    2,892
    Likes Received:
    1,610
    Those halftone images are awesome! Did you paint the wood white first? Then cut? Or am I not looking at it right? I would like to try it.
     
  26. MattiasN

    MattiasN New
    Builder

    Joined:
    Mar 26, 2015
    Messages:
    12
    Likes Received:
    25
    Hi thanks :) i use Melamine White Panel like this and paint with black
    stain
    this is the black stain i use and Melamine White Panel[​IMG] [​IMG]
     
    #26 MattiasN, Jan 13, 2017
    Last edited: Jan 13, 2017
  27. Giarc

    Giarc OpenBuilds Team
    Staff Member Moderator Builder Resident Builder

    Joined:
    Jan 24, 2015
    Messages:
    2,892
    Likes Received:
    1,610
    Thank you. I wonder if white paint would work. I may try it just as a practice run before using the Melamine. I have a white house and a white fence, so plenty of white paint. ;)
     
  28. MattiasN

    MattiasN New
    Builder

    Joined:
    Mar 26, 2015
    Messages:
    12
    Likes Received:
    25
    ok:) you can use then black Melamine Panel and mask it and then paint with white paint
    but if it´s white stain paint then no need to mask because stain does not stuck on Melamine so you can just wipe it clean
     
    Moag and GrayUK like this.

Share This Page

  1. This site uses cookies to help personalise content, tailor your experience and to keep you logged in if you register.
    By continuing to use this site, you are consenting to our use of cookies.
    Dismiss Notice