Welcome to Our Community

Some features disabled for guests. Register Today.

My Ox

Discussion in 'CNC Mills/Routers' started by Robert.sims, Feb 22, 2015.

  1. Robert.sims

    Builder

    Joined:
    Jan 22, 2014
    Messages:
    29
    Likes Received:
    18
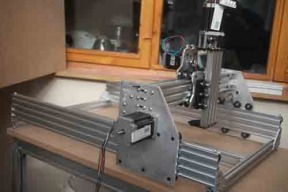
    Robert.sims published a new build:

    Read more about this build...
     
  2. GrayUK

    GrayUK Openbuilds Team Elder
    Staff Member Moderator Builder

    Joined:
    May 5, 2014
    Messages:
    1,668
    Likes Received:
    627
    Looking good Robert. :thumbsup:

    If you haven't already done this yet, may I suggest you bolt the two "X" axis cross members together to increase strength and to reduce any chance of flex. :)
    Likewise, if you haven't already decided to, try using two belts for the "Y" and "X" axis. One on top the other.
    See: http://www.openbuilds.com/threads/fitting-dual-belt.1086/
    This helps eliminate any chance of stretch in the belt. :thumbsup:

    Two cheap, but sound methods, of improving the basic Ox. :thumbsup:

    Good Job
    Gray
     
  3. Robert.sims

    Builder

    Joined:
    Jan 22, 2014
    Messages:
    29
    Likes Received:
    18
    Hi Gray
    Thanks for the link.
    I haven't done that but it looks a good idea so I think I will order some more belt
    Bob
     
  4. sgspenceley

    sgspenceley Veteran
    Builder

    Joined:
    May 27, 2014
    Messages:
    249
    Likes Received:
    292
    Your build looks great Robert, have funt cutting something special!
     
  5. Robert.sims

    Builder

    Joined:
    Jan 22, 2014
    Messages:
    29
    Likes Received:
    18
    I will if I can get the axis,s setup the x and the y are not playing ball .
    set the Z up no problem
    Bob
     
  6. Robert.sims

    Builder

    Joined:
    Jan 22, 2014
    Messages:
    29
    Likes Received:
    18
    I have just had a thought I may be wiring the motors up incorrectly.
    upload_2015-2-22_13-17-41.png
    I have mine wired as bipolar parallel. should they be bipolar series?
    any body help out there please.
    bob
     
  7. Robert Hummel

    Robert Hummel Custom Builder
    Moderator

    Joined:
    Nov 14, 2013
    Messages:
    978
    Likes Received:
    715
    I would suggest parallel but both should work, what drivers are you using? Sorry if you already stated
     
  8. Robert.sims

    Builder

    Joined:
    Jan 22, 2014
    Messages:
    29
    Likes Received:
    18
    Hi Robert
    I am Using
    DQ452MA on the Z
    and
    CW230 on X and Y
    I have nema 24 425oz 3 amp on all axis 1.8 deg 1/8 (1600) microstep

    Bob
     
  9. Robert Hummel

    Robert Hummel Custom Builder
    Moderator

    Joined:
    Nov 14, 2013
    Messages:
    978
    Likes Received:
    715
    I would first change up to 1/16 due to the fact you have the power in your motors in turn you should see smoother operation.
    Second running the motors in series increases winding resistance lowering the motors current rating.
    Run them parallel for taking advantage of their full specs
     
  10. Robert.sims

    Builder

    Joined:
    Jan 22, 2014
    Messages:
    29
    Likes Received:
    18
    Hi Robert
    I will give that a try tonight.
    Thanks
    Bob
     
  11. Serge E.

    Serge E. Journeyman
    Builder

    Joined:
    May 6, 2014
    Messages:
    730
    Likes Received:
    252
    YourOX is looking good ... Did the kit also include the table as I see it is also using V-slot or similar extrusion ?
     
  12. Robert.sims

    Builder

    Joined:
    Jan 22, 2014
    Messages:
    29
    Likes Received:
    18
    Hi Sarge
    No the board didnot come with the kit. I made it out of 3/4 MDF.
    holes drilled at 50mm centres and the blind nuts hammered into the underside.
    Yes I am using Vslot it came in the kit.
    Bob

    @Robert Hummel
    "I would first change up to 1/16 due to the fact you have the power in your motors in turn you should see smoother operation.
    Second running the motors in series increases winding resistance lowering the motors current rating.
    Run them parallel for taking advantage of their full specs"


    robert
    Did that and it made no difference.
    So I had a cup of coffee and a think.
    Why did the Z axis work OK and not the others?
    So I stripped down the contol box and put the z driver onto the x axis hey presto it worked.
    I then had a closer look at the driver for the x and y.
    :banghead::banghead::banghead: the clever chinese used "0" for on and "1" for on for the dip switches. So I was running the motors at .9 of an AMP.
    My fault I should read the instructions first.

    Thanks
    Bob
     
  13. Robert Hummel

    Robert Hummel Custom Builder
    Moderator

    Joined:
    Nov 14, 2013
    Messages:
    978
    Likes Received:
    715
    Lol well know that with them wired par you will be taking full advantage of your motors :)
    Good to hear you solved it, always a little thing that puts a wrench in the mix :confused:
     
  14. Tweakie

    Tweakie OpenBuilds Team
    Moderator

    Joined:
    Jan 18, 2014
    Messages:
    784
    Likes Received:
    326

    Hi Bob,

    I have forgotten who it was that first said " If all else fails, read the instructions " but with the Chinese to English translations it is not always that easy to understand. Nevertheless I am pleased you found the problem and have it sorted. :thumbsup:

    Tweakie.
     
  15. Robert.sims

    Builder

    Joined:
    Jan 22, 2014
    Messages:
    29
    Likes Received:
    18
    thanks Tweakie
    i wont know till the weekend if it all works ill let you know
    bob
     
    sgspenceley likes this.
  16. Robert.sims

    Builder

    Joined:
    Jan 22, 2014
    Messages:
    29
    Likes Received:
    18
    It's alive
    it works thanks to you all for your help.
    I have just got to figure out how to load videos now
    bob
     
    GrayUK likes this.
  17. GrayUK

    GrayUK Openbuilds Team Elder
    Staff Member Moderator Builder

    Joined:
    May 5, 2014
    Messages:
    1,668
    Likes Received:
    627
    Congrats Robert. :thumbsup::thumbsup:
    May you have many happy hours making chip!!

    Gray
     
  18. Robert.sims

    Builder

    Joined:
    Jan 22, 2014
    Messages:
    29
    Likes Received:
    18
    Cheers Gray
    now to finish of
    limit switches,
    estop
    ETC
    now to strip it down as the extra belts have just arrived.
    bob
     
  19. sgspenceley

    sgspenceley Veteran
    Builder

    Joined:
    May 27, 2014
    Messages:
    249
    Likes Received:
    292
    Congrats, chips away!
     
  20. Robert.sims

    Builder

    Joined:
    Jan 22, 2014
    Messages:
    29
    Likes Received:
    18
    Hi All
    The first phase of the build is complete. Rails screwed together, double belts fitted, (Thanks Gray) Estop and limit switches done. bracket for water cooled spindle made and fitted.
    The first job the machinne did was to make the brackets to hold the switches.
    All seems to work fine.
    Now to make my guitar.
    PICT0683.JPG PICT0684.JPG PICT0685.JPG PICT0689.JPG
     
    #20 Robert.sims, Mar 22, 2015
    Last edited by a moderator: Mar 22, 2015
    GrayUK likes this.
  21. Robert.sims

    Builder

    Joined:
    Jan 22, 2014
    Messages:
    29
    Likes Received:
    18
    Mark Carew, Robert Hummel and GrayUK like this.
  22. Tweakie

    Tweakie OpenBuilds Team
    Moderator

    Joined:
    Jan 18, 2014
    Messages:
    784
    Likes Received:
    326
    :cry: It was a good effort though. ;)

    Nice work with that Outrunner. :thumbsup:

    Tweakie.
     
  23. GrayUK

    GrayUK Openbuilds Team Elder
    Staff Member Moderator Builder

    Joined:
    May 5, 2014
    Messages:
    1,668
    Likes Received:
    627
    Looks really good Bob. :thumbsup::thumbsup:
    Don't be a stranger, even it all goes well. :D
    Go for the Chips!! :nailbite:

    Gray
     
  24. Robert.sims

    Builder

    Joined:
    Jan 22, 2014
    Messages:
    29
    Likes Received:
    18
    Hi All
    It's been a while but I have been busy at work.
    I have made a few things on the OX . But now I needed to make a couple of curcuit boards.
    so i needed to make a proper bracket for the Brushless motor.
    so made one on my 3D printer.
    here are some pics.


    1.JPG

    1.JPG 3.JPG
    2.JPG
    4.JPG 5.JPG 6.JPG 7.JPG

    I will upload the sketch and the STL if anybody is interseted

    All the best
    Bob
     
    GrayUK and Mark Carew like this.
  25. Mark Carew

    Mark Carew OpenBuilds Team
    Staff Member Moderator Builder Resident Builder

    Joined:
    Jun 28, 2013
    Messages:
    2,757
    Likes Received:
    2,428
    Well done Bob!
    What are your thoughts on the outrunner vs. the VFD spindle?
    Thank you for sharing these awesome pictures :thumbsup:
    Mark
     
  26. Robert.sims

    Builder

    Joined:
    Jan 22, 2014
    Messages:
    29
    Likes Received:
    18
    Hi Mark thanks for the kind words.
    I haven't had chance to use the VFD for long as I have a problem with Mach 3 tripping I have tried all the usual
    cures but have not had much luck yet. I will keep trying.
    as for the outrunner it seems to be excellent I have made a couple of signs with it without a problem.
    now i have made the proper bracket for it I plan to use it more. I also use a router which has given me no problems.
    Except noise

    Bob
     
  27. Robert.sims

    Builder

    Joined:
    Jan 22, 2014
    Messages:
    29
    Likes Received:
    18
    Hi All
    I am after some advice please.
    I am about to start cutting some aluminnium plate on the OX and i am looking for some advice on feeds and speeds.
    the cutter is a 4 flute 6mm dia end mill the plate is 3 mm thick.
    Can someone advise on the feed rate of the cutter for this aplication.

    Thanks
    Bob
     
  28. Paruk

    Paruk Journeyman
    Builder

    Joined:
    Jul 13, 2014
    Messages:
    397
    Likes Received:
    149
    Hi Robert, Mark posted a link under resources about cutting aluminium. Read it before you start with it. Forget about the 4 flute! It won't get the chips out, resulting in melting material into your bit and BANG! says the bit. Max 2 flute, preferable 1 flute with an OX I would say. The rest you can find in the feed & speeds of CNC cookbook.
     
    GrayUK likes this.

Share This Page

  1. This site uses cookies to help personalise content, tailor your experience and to keep you logged in if you register.
    By continuing to use this site, you are consenting to our use of cookies.
    Dismiss Notice