Welcome to Our Community

Some features disabled for guests. Register Today.

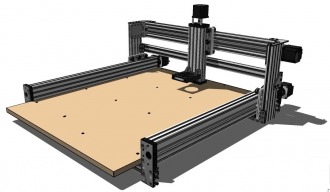
Metalguru's C-Beam 750

Discussion in 'CNC Mills/Routers' started by Metalguru, Jul 10, 2016.

  1. Metalguru

    Metalguru Veteran
    Builder

    Joined:
    Dec 29, 2015
    Messages:
    752
    Likes Received:
    547
    Metalguru published a new build:

    Read more about this build...
     
    MaryD likes this.
  2. Julius

    Julius Well-Known
    Builder

    Joined:
    Nov 13, 2015
    Messages:
    193
    Likes Received:
    61
    think the alu rails will be ok with the steel wheels?
     
  3. Metalguru

    Metalguru Veteran
    Builder

    Joined:
    Dec 29, 2015
    Messages:
    752
    Likes Received:
    547
    Hey Julius:

    Long time no speak.

    Dunno. That's an experiment for now. I hope they will work out, but if not I can easily go back to the extreme v-wheels. I think if I keep them clean and lubricated with Dri-Slide or something similar they will work... For now I just have the top load bearing wheels in steel, the bottom adjustable one are EVW's. Got the tension set pretty light as well.
     
  4. Metalguru

    Metalguru Veteran
    Builder

    Joined:
    Dec 29, 2015
    Messages:
    752
    Likes Received:
    547
    I was also thinking about machining something like the OpenRail that would have a v shaped top section, but would fit tightly into the v-slot to support the center of the wheel. This could be either aluminum or steel, but it would double the bearing surface on the wheel. Might be a nightmare to get the tolerances worked out though. Something like this:

    wheel.jpg
     
  5. Rick 2.0

    Rick 2.0 OpenBuilds Team
    Staff Member Moderator Builder Resident Builder

    Joined:
    Dec 20, 2013
    Messages:
    2,890
    Likes Received:
    1,545
    This suggestion was from a post a while back, using square steel bar set in with JB Weld or something similar. It would provide steel to steel contact very inexpensively but would definitely mess with hole spacing for the wheels.

    Rail Suggestion.jpg
     
    MaryD likes this.
  6. stargeezer

    stargeezer Journeyman
    Builder

    Joined:
    Feb 20, 2015
    Messages:
    328
    Likes Received:
    117
    I've considered placing a 10mm hardened drill rod in the upper and lower V-rails for that purpose too, but have held off due to the need for special gantry plates. It's a small problem, but but I'd still need several hours to make the design, but right now I just don't have the time. (I currently have a 1000x1500 C-Beam under construction. Shhhhh!)

    The nice thing about using rods is that I've got a lot on hand and the rod can be held in place with a few dobs of hot glue in the V-rail below the rod. There's not a lot of holding power there, but once the gantry V-wheels are positioned onto them.
     
  7. Metalguru

    Metalguru Veteran
    Builder

    Joined:
    Dec 29, 2015
    Messages:
    752
    Likes Received:
    547
    Hmmmm, stargeezer, drill rod, never thought of that. Might be an idea. If you got it just the right diameter, or perhaps did a smaller diameter with a spacer underneath it, you may not need to alter the wheel spacing at all.

    A 1000x1500 C-Beam design? How do you deal with the whip on the leadscrews? And where do you get 1500+ mm lead screws from? The design I posted here can be made in 500x500, 750x750, or 1000x1000mm flavors, (or any mix of the above) but I am holding off on the 1000x1000 because the 8mm leadscrew is just too floppy and I haven't found a source for 12mm or larger in the lengths I need.

    Metal
     
  8. Metalguru

    Metalguru Veteran
    Builder

    Joined:
    Dec 29, 2015
    Messages:
    752
    Likes Received:
    547
    I was just messing around with this. It seems a 6mm rod would be just about exactly the right size to put in the slot. It takes most of the pressure from the wheels, but still allows the wheel to remain centered in the v-slot. That little groove down the middle of the slot helps too. As you say, the pressure from the wheel holds it in place nicely.

    I don't have a 6mm rod, but 1/4" (6.35mm) is a bit too big, but 15/64 (5.95mm) is in the Goldilocks Zone. It's a bit tight, but with the XL C-Beam Gantry plates I have, there is still plenty of room for adjustment on the eccentric spacers to allow for this. Perhaps not if you used steel wheels on both sides, but certainly if you only used them on the top load bearing side.

    We might be on to something big here! McMaster has 6mm drill rod in up to 6' lengths, for around $3.00/foot in A2 tool steel ( 8116K35 ), or in O1 tool steel for $1.50/ft(88625K65). Next time I place an order I'll get a few pieces to play with.


    wheel1.jpg


    MG

    Mods: Rick 2.0 perhaps we should move these posts to their own thread? This has application elsewhere...
     
    #8 Metalguru, Jul 11, 2016
    Last edited: Jul 11, 2016
    GrayUK likes this.
  9. stargeezer

    stargeezer Journeyman
    Builder

    Joined:
    Feb 20, 2015
    Messages:
    328
    Likes Received:
    117
  10. Metalguru

    Metalguru Veteran
    Builder

    Joined:
    Dec 29, 2015
    Messages:
    752
    Likes Received:
    547
    You are right, stargeezer, they are pretty cheap!... I'll keep them in mind.

    You turn those with the standard steppers, or the high torque?
     
  11. stargeezer

    stargeezer Journeyman
    Builder

    Joined:
    Feb 20, 2015
    Messages:
    328
    Likes Received:
    117
    I know this is your build a move might be in order if we go many more cycles I think. :)

    But in answer, yes. I have used nema 23 steppers as light as 170 ozin and as big as nema 34 920 ozin (as I recall). I'm using the 34's on the Y axis of the C-Beam I'm building because The gantry is going to be carrying up to two spindles with much more weight. the goal is to to have the ability to cut two identical items at a time, with the second spindle being removable unless needed. Of course that will narrow the X axis path to half it's normal size, but to double the output will be worth it, in my mind.
     
  12. Metalguru

    Metalguru Veteran
    Builder

    Joined:
    Dec 29, 2015
    Messages:
    752
    Likes Received:
    547
    So, just a bit more of an update on the Steel V-Wheel idea above. I ordered some 6mm drill rod from McMaster, and tried it out. Just placed it loosely in the bottom of the v-rail. It seems to work pretty good. I do have a few thousandths clearance between the v-wheel and the v-slot on the outside edges. The v-wheel does seem to self center the rod to a certain extent as it travels down the slot.


    20160724_160612.jpg


    I put my dial gage on the gantry plate and reefed on it a bit, seems I have about +/- 10 thou movement on the top of the plate. Obviously the rod is moving a bit.


    20160724_160625.jpg


    Looks pretty well centered by my calibrated eyeball. Just need to figure out some way to make sure it stays that way all the time. BTW, there is plenty of adjustment in the eccentrics to remove any play in the wheels.


    20160724_160701.jpg


    C-Beam with the end plate removed. If only that little groove in the center of the v-slot was a little deeper, we'd be in business... Maybe a bed of epoxy would do the trick. Have to make up some extra carriages to space along the c-beam during curing to hold it in place...

    Thoughts? Anyone? Anyone? (FBDO)
     
  13. EvanBruner

    EvanBruner Well-Known
    Builder

    Joined:
    Mar 26, 2016
    Messages:
    68
    Likes Received:
    66
    Love the idea, been thinking of doing this myself since I hate babying the poly v-wheels when cutting aluminum. I would lay in the epoxy, place the rod and then use something like these with a bunch of clamps to keep it centered during curing.

    The wheels don't rub on the extrusion at all?
     

    Attached Files:

  14. Metalguru

    Metalguru Veteran
    Builder

    Joined:
    Dec 29, 2015
    Messages:
    752
    Likes Received:
    547
    No, they don't appear to. I can slip a piece of paper between each "cheek" of the wheel and the extrusion, so there is at least 4 or 5 thou clearance.

    I've been trying to think of some way of machining the little groove in the center of the v-slot out just a bit, so the rod lays perfectly in the exact center. If it was just a few thou deeper, it would hold the rod in the center and allow the outside edges of the wheel to just kiss the side rails to keep it centered... No epoxy needed.

    Hmmmm, how about a v-groove bit in the router table?

    MG
     
  15. Rick 2.0

    Rick 2.0 OpenBuilds Team
    Staff Member Moderator Builder Resident Builder

    Joined:
    Dec 20, 2013
    Messages:
    2,890
    Likes Received:
    1,545
    I would suggest setting up a gantry plate with regular wheels that grip the sides of the V-slot and then mounting the router on the gantry plate with the v-bit protruding through. This will guarantee both consistent alignment and depth.
     
  16. Metalguru

    Metalguru Veteran
    Builder

    Joined:
    Dec 29, 2015
    Messages:
    752
    Likes Received:
    547
    Yeah, I just tried the router table thing and it's not very consistent. I didn't have a v-groove bit small enough to fit in the slot, so I used a ball nose bit. Results inconclusive, the rod doesn't seem to sit well in the rounded slot. Definitely needs to be a V.

    Good idea with the router "trolley", Rick, that might work. be hard to get close to the ends, though. Have to get a suitable bit first.
     
  17. Rick 2.0

    Rick 2.0 OpenBuilds Team
    Staff Member Moderator Builder Resident Builder

    Joined:
    Dec 20, 2013
    Messages:
    2,890
    Likes Received:
    1,545
    Try a 6 wheel gantry plate with the bit centered between the middle pair of wheels. You'll always have 4 wheels still in contact with the rail keeping it centered as you run it on and off the ends.
     
  18. Metalguru

    Metalguru Veteran
    Builder

    Joined:
    Dec 29, 2015
    Messages:
    752
    Likes Received:
    547
    I just remembered a couple of old woodworking tricks.

    1. If you run a work piece down a fence on a table saw, router, or whatever to form a groove in it, you just flip the piece end for end (without changing anything else) and run it again. This absolutely guarantees that the slot is in the center of the work relative to the two sides. (this assumes that the slot was approximately in the center in the first place, less than the width of the cutter off.)

    2. You can make a jig to center things by taking a straight piece and drilling 3 evenly spaced holes in it in a line. Put a dowel in each end hole, and your cutting device in the center. Place it on top of the work, with a dowel on each side, and rotate it until the dowels contact the work on each side. The center hole will be in the exact center of the work. You can slide this whole thing down the edge of the work and the center hole will remain aligned to the center of the work as long as the dowels contact the edges. This method does depend somewhat on how accurately you drill the holes in the jig. You could make this jig with v-wheels on a build plate just as well.

    Still have to find a router bit small enough to get into the slot on the v-slot.
     
  19. Rick 2.0

    Rick 2.0 OpenBuilds Team
    Staff Member Moderator Builder Resident Builder

    Joined:
    Dec 20, 2013
    Messages:
    2,890
    Likes Received:
    1,545
  20. Metalguru

    Metalguru Veteran
    Builder

    Joined:
    Dec 29, 2015
    Messages:
    752
    Likes Received:
    547
    Yeah, should work. Thanks Rick.

    I was just playing in the shop, and set this up on the X axis. Too much play in the in/out movement of the gantry plate. I've got at least +/-.025" movement in and out on the gantry plate. The rod moves back and forth in the groove.

    Definitely have to have some way to firmly fix the rod in place. It'll have to wait for more experimentation till I get a bit ordered.

    I was hoping this would work right out of the box, but it seems it will need some more experimentation...
     
  21. Metalguru

    Metalguru Veteran
    Builder

    Joined:
    Dec 29, 2015
    Messages:
    752
    Likes Received:
    547
    Hey guys:

    So, after completing this build (mostly), I gotta say I'm a bit disappointed in the stiffness of the unit. It's pretty good as far as the gantry and Y axes go, but the X/Z axis has a disappointing amount of torsional flex. The C-beam is pretty stiff in terms of flexing perpendicular and parallel to it's length, but it flexes a lot with torsional or twisting forces. This means that the Z axis is pretty flexible of you reef on it at the top or bottom, and moves back and forth quite a bit.

    I was thinking about an HD version of this machine that doubles up on the wheels and gantry plates (double wheels and a gantry plate on each side of the c-beam), but it's pretty much moot. Adding these enhancements would do nothing for the rigidity of the machine since almost all the flex is in the c-beam itself and not the carriage.

    Anyone have any ideas as to how to take out some of this flex? I have seen builders put threaded rods longitudinally through the extrusions and tension them up to supposedly give better rigidity, but I'm not sure that this would make much difference for torsional flex. I thought about adding an additional 20x80 on the back of the c-beam, or even another c-beam, but it is difficult to fasten the two together with enough strength to form a single member. I suppose I could drill holes through and bolt them together in a few places.

    I tried tying the c-beam and the cross brace together with some 7 hole plates on the back side, but it didn't really make much difference despite using a 20x60 for the brace instead of the 20x40 shown. Might try a 40x40...

    I tried this on my C-Beam Machine Too build and it also flexes quite a bit rotationally on the x axis despite having double wheels and front and rear gantry plates.

    BTW, I gave up on the steel wheels for now until I can come up with a solid mounting arrangement for the steel rod.

    Thoughts?
     
  22. EvanBruner

    EvanBruner Well-Known
    Builder

    Joined:
    Mar 26, 2016
    Messages:
    68
    Likes Received:
    66
    As far as I can tell, the weakness of the X-Z interface is the wheels. After doubling my x gantry plate setup for a "sandwhich" the flex was reduced considerably, but still is present. This led me to believe the beam wasnt flexing torsionally, rather the wheels were moving in the rail guides.

    You can test it yourself by putting a dial indicator against the center of the x axis rail and applying force to the top of the z axis. If it is flexing torsionally, you should get a reading of at least a few thou. Repeat the reading with the indicator tip toward the end of the beam and see if you get the same flex. If the flex is the same, your gantry is moving and the test isn't conclusive. If the reading is much smaller, then the test was good and youll know it was bending torsionally. Attached a photo of the test if you decide to do it.
     

    Attached Files:

  23. Metalguru

    Metalguru Veteran
    Builder

    Joined:
    Dec 29, 2015
    Messages:
    752
    Likes Received:
    547
    Hey EvanBruner:

    No, I meant the torsional flex was front to back, i.e in the y plane, not the x plane. If I pull forward on the top of the Z axis, I can actually see the c-beam twisting forward at the top. Pushing sideways (parallel to the X plane) does not result in any movement, at least that I can see.

    I will try the dial indicator test when I get back in the shop in the morning.
     
  24. Metalguru

    Metalguru Veteran
    Builder

    Joined:
    Dec 29, 2015
    Messages:
    752
    Likes Received:
    547
    I was also thinking that some of the flex you are talking about (clockwise/counterclockwise) might be due to the cheap wheel bearings. They are just cheap Chinese ABEC1 bearings, which is the lowest quality available. I was wondering if ABEC3 or ABEC5 bearings would show any visible improvement. There is an Ebay seller in the US - trbrcbearing that has pretty good prices on ABEC3 and 5 M105's, less than a dollar apiece. He also has flanged 688zz's at around $1 each as well.
     
  25. EvanBruner

    EvanBruner Well-Known
    Builder

    Joined:
    Mar 26, 2016
    Messages:
    68
    Likes Received:
    66
    I think were talking about the same kind of flex but my drawing wasnt good enough, is this the flex you are talking about?
     

    Attached Files:

  26. Metalguru

    Metalguru Veteran
    Builder

    Joined:
    Dec 29, 2015
    Messages:
    752
    Likes Received:
    547
    Yeah. If you are standing in front of the machine, the x axis goes left to right, and the Y axis goes front to back.

    If I pull on the top of the Z axis, towards the front of the machine, the top of the x c-beam (and the top of the Z axis) comes toward me, and the bottom goes away from me. As I can actually see the c-beam twisting, I know it has nothing to do with the wheels.
     
  27. EvanBruner

    EvanBruner Well-Known
    Builder

    Joined:
    Mar 26, 2016
    Messages:
    68
    Likes Received:
    66
    Ah I see. The only way I see to fix that would be more extrusion. I'll be doubling up the X axis on my build and attaching them together with some plates. It's not the perfect setup for resisting torsion but it should be really helpful. You could do something like that but it would require new plates pretty much all around.

    Since you only have a single set of wheels on your x axis you could just add some extrusions behind the beam mounted perpendicular to the c beam crossection. That would give you a lot more torsional resistance and you would only need extrusion and two new plates. Like this:
     

    Attached Files:

  28. Metalguru

    Metalguru Veteran
    Builder

    Joined:
    Dec 29, 2015
    Messages:
    752
    Likes Received:
    547
    hmmm. That's a lot of extra real estate. It should work, though. I have a couple of ideas I want to try. I'll keep you posted.

    I think perhaps a 20x80 flat on the back might work. Or, a 40x40 in the center of the c-beam with corner brackets top and bottom...

    I'll try some stuff in the morning.

    Thanks Evan.
     
  29. stargeezer

    stargeezer Journeyman
    Builder

    Joined:
    Feb 20, 2015
    Messages:
    328
    Likes Received:
    117
    The strongest gantry I have assembled consisted of two 2080 extrusions with a 3/8 steel flat sandwiched between and the assembly bolted together with a double roll of 3/8" bolts, nuts and heavy flat washers. I also drilled the bolt holes 100mm apart and used a drill that was just big enough to allow the bolt to pass through the hole.

    I have considered sandwiching the two pieces of 2080 between two steel flats, but so far I've not tried it. This might work better using a C Beam with a 2040 filling the void of the C-Beam.
     
  30. Metalguru

    Metalguru Veteran
    Builder

    Joined:
    Dec 29, 2015
    Messages:
    752
    Likes Received:
    547
    Hmmm, interesting, stargeezer. I did think about a sandwich before, just not steel, but perhaps 1/4" aluminum. I think you would probably get the most bang for the buck using extrusions though, they are much stiffer and lighter than just a flat plate. Have to make some attempt to keep the moving mass and inertia down to a reasonable level.

    Perhaps 3 or even 4 20x80's bolted together. I think the bolts are where you get the strength, though. Perhaps a piece of V slot bolted to a heavy duty 80/20 rail would do the trick. Maybe even a steel plate sandwiched in between with v-shaped edges so you could use steel v-wheels on it.

    The main issue with this approach is that the OpenBuilds wheeled gantry now becomes the weak point of the system, and it becomes increasingly difficult to build gantries with wide enough wheel spacing to make them strong enough. Also, the M5 axles start to become a big limiting factor, with ever increasing lengths for wide spaced wheels.

    I think it will require some experimentation. Thanks for your input!
     
    #30 Metalguru, Jul 28, 2016
    Last edited: Jul 29, 2016

Share This Page

  1. This site uses cookies to help personalise content, tailor your experience and to keep you logged in if you register.
    By continuing to use this site, you are consenting to our use of cookies.
    Dismiss Notice