Welcome to Our Community

Some features disabled for guests. Register Today.

Maximus 3D Printer

Discussion in '3D printers' started by mytechno3d, Jul 16, 2014.
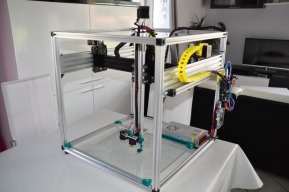
  1. mytechno3d

    mytechno3d Veteran
    Builder

    Joined:
    Dec 15, 2013
    Messages:
    108
    Likes Received:
    311
  2. Seul Kee

    Seul Kee New
    Builder

    Joined:
    Mar 10, 2014
    Messages:
    16
    Likes Received:
    1
    Wow, it is a big one! That must be why you named it as 'MAXIMUS'.
    Nice name!

    What do you want to print with this printer?

    I wish you could post as much info as possible!
     
  3. mytechno3d

    mytechno3d Veteran
    Builder

    Joined:
    Dec 15, 2013
    Messages:
    108
    Likes Received:
    311
    I have 2 ideas in Mind.
    1 frame for my hexacopter and 1 copy of a Game of throne castle.
    I will also try to give any information needed to build this 3d Printer,
     
  4. Mark Carew

    Mark Carew OpenBuilds Team
    Staff Member Moderator Builder Resident Builder

    Joined:
    Jun 28, 2013
    Messages:
    2,741
    Likes Received:
    2,407
    Now this is a nice size machine and it looks fairly easy to build. :thumbsup: Will you have a model and parts list soon? I need to build a new 3D printer and this one is a great size.
    Thank you for sharing
    Mark
     
    ernesto ortiz likes this.
  5. Seul Kee

    Seul Kee New
    Builder

    Joined:
    Mar 10, 2014
    Messages:
    16
    Likes Received:
    1
    I will be looking forward to seeing your hexacopters out of this machine!
     
    ConroePowderCoating likes this.
  6. mytechno3d

    mytechno3d Veteran
    Builder

    Joined:
    Dec 15, 2013
    Messages:
    108
    Likes Received:
    311
    I will post a part list soon.
    Yes this printer is fairly easy to build and at a pretty good price.
    I will also try to make a solidwork assembly for this machine but it is a real challenge for me because i'm not really familiar with any 3D software.
     
  7. Lee Saferite

    Builder

    Joined:
    Apr 29, 2014
    Messages:
    32
    Likes Received:
    5
    Almost a good design for an enclosed print space so you could keep the whole thing heated.
     
  8. angelo

    angelo New
    Builder

    Joined:
    May 26, 2014
    Messages:
    16
    Likes Received:
    4
    Verry Cool, a big compliment.
    If you print with a faster speed, swings the Z axis ?
    I have a simular Idea with an Router and a Printer combination...
     
  9. Seul Kee

    Seul Kee New
    Builder

    Joined:
    Mar 10, 2014
    Messages:
    16
    Likes Received:
    1
    I personally wish you to make a 3D design in SketchUp so that I can also take a look
    since I do not have SolidWork at the moment.

    But it is just my wishful thinking!
     
  10. ernesto ortiz

    Builder

    Joined:
    Jul 10, 2014
    Messages:
    1
    Likes Received:
    0
    Awesome build!
     
  11. mytechno3d

    mytechno3d Veteran
    Builder

    Joined:
    Dec 15, 2013
    Messages:
    108
    Likes Received:
    311
    Hello
    This print was made at 50mm/s for perimeter , 60 mm/s for infill and 40 mm/s for solid infill.
    I will try at higher speed for my next print.
    I slow down acceleration in Marlin at 1500 mm/s2 instead 3000
     
  12. Seul Kee

    Seul Kee New
    Builder

    Joined:
    Mar 10, 2014
    Messages:
    16
    Likes Received:
    1
    Wow, Congratulations!

    I hope you to learn a lot from your Maximus build experience.

    Thanking you in advance!
     
  13. blindflight

    blindflight Well-Known
    Staff Member Builder Resident Builder

    Joined:
    Sep 19, 2013
    Messages:
    53
    Likes Received:
    56
    Very nice build.. are you using a leveling probe to calibrate your table in the start of your video ?
    Thanks
     
  14. Mark Carew

    Mark Carew OpenBuilds Team
    Staff Member Moderator Builder Resident Builder

    Joined:
    Jun 28, 2013
    Messages:
    2,741
    Likes Received:
    2,407
    The new video is great! Well done on this build. :thumbsup: I think this size machine is sure to become the norm in a lot of shops.
     
  15. Dat Chu

    Dat Chu New
    Builder

    Joined:
    Feb 9, 2014
    Messages:
    22
    Likes Received:
    0
    Your build is fantastic. It shows some of the best components and how to use OpenBuilds to great effect. I can't tell from the video and images how you keep the belt tension. Is it under a bolted down angular connector?
     
  16. Funk

    Funk New
    Builder

    Joined:
    Sep 25, 2014
    Messages:
    4
    Likes Received:
    0
    Beautiful. I would like to build this model with a dual head. What software do you use?
     
  17. mytechno3d

    mytechno3d Veteran
    Builder

    Joined:
    Dec 15, 2013
    Messages:
    108
    Likes Received:
    311
    I'm using repetier host and a Marlin for Firmware.
    Adding a second head is not difficult if you have a cnc , you just have to make a different head holder , and it's done ...
     
  18. Funk

    Funk New
    Builder

    Joined:
    Sep 25, 2014
    Messages:
    4
    Likes Received:
    0
    Thanks for the info. I use SolidWorks almost every day, so I may draw it as I build it.
     
  19. Marty H

    Marty H New
    Builder

    Joined:
    Sep 10, 2014
    Messages:
    3
    Likes Received:
    0
    I built the Printer based off your design. The structure assembly and electronics went pretty smooth (thanks to you). However I am having a hell of a time getting any combination of software to do anything. I went with the RAMPS 1.4 board and have tried sprinter and Marlin, with Cura, replicator and repetier. You wouldnt happen to have any suggestions?
     
  20. Funk

    Funk New
    Builder

    Joined:
    Sep 25, 2014
    Messages:
    4
    Likes Received:
    0
    Marty, I am currently at a similar point in my build. I am planning to install my motors make all my final electrical connections this weekend.
    I'm curious what kinds of problems you are encountering. I am also going to use RAMPS 1.4 with Marlin and Repetier. Last weekend I did a test wire-up but couldn't get my motors to spin manually. I haven't had time to investigate the problem yet.
     
  21. mytechno3d

    mytechno3d Veteran
    Builder

    Joined:
    Dec 15, 2013
    Messages:
    108
    Likes Received:
    311
    I use a Rambo 1,2d board with a Marlin Firmware ( last version with auto level ) , to slice models and control the printer , i use Repetier host .
     
    Mark Carew likes this.
  22. Marty H

    Marty H New
    Builder

    Joined:
    Sep 10, 2014
    Messages:
    3
    Likes Received:
    0
    Right now the best I have been able to do is get the hot end to heat and read the temp and the z axis to move down. Other than that the X-Y and Extruder motor wont seem to do anything with either manual control or with running a program.
     
  23. brbubba

    brbubba New
    Builder

    Joined:
    Dec 2, 2014
    Messages:
    22
    Likes Received:
    5
    Very nice design! I'm working on a build that takes some design queues from this while maintaining zero extrusion cuts and as few printed parts as possible. Ideally I'd like to see 60 mm base sidewalls so you can hide all the electronics under the build plate. That being said, design wise, was there a reason you didn't utilize the entire build platform for printing?
     
  24. Marty H

    Marty H New
    Builder

    Joined:
    Sep 10, 2014
    Messages:
    3
    Likes Received:
    0
    Picked up a Rambo board but still having issues with the electronics. Can you post a copy of your Marlin file and do I have to have end stops attached to make it work?
     
  25. brbubba

    brbubba New
    Builder

    Joined:
    Dec 2, 2014
    Messages:
    22
    Likes Received:
    5
    OP, do you have any links or info discussing the automated leveling head? I'm assuming you just re-used someone's open-source design, but I'd like some info regarding part and code implementation. Thanks!
     
  26. Val Cocora

    Val Cocora Well-Known
    Builder

    Joined:
    May 19, 2014
    Messages:
    172
    Likes Received:
    27
    stay away from sketchup, it was designed originally for architects, and its precision is 1/16.
    if you want higher precision, use a cad software such as the solid works you mentioned.
     
  27. Rick 2.0

    Rick 2.0 OpenBuilds Team
    Staff Member Moderator Builder Resident Builder

    Joined:
    Dec 20, 2013
    Messages:
    2,852
    Likes Received:
    1,524
    Through the model info dialogue box, you can set Sketchup to 1/64" if you wish to work in inches and up to 6 decimal places if you work in millimeters.
     
  28. Mark Carew

    Mark Carew OpenBuilds Team
    Staff Member Moderator Builder Resident Builder

    Joined:
    Jun 28, 2013
    Messages:
    2,741
    Likes Received:
    2,407
    More info here:http://sketchucation.com/forums/viewtopic.php?f=15&t=48294
    It seems you can build bigger and then scale down if need be.
    Hope this helps
     
  29. Val Cocora

    Val Cocora Well-Known
    Builder

    Joined:
    May 19, 2014
    Messages:
    172
    Likes Received:
    27
    Hi Mark,

    I prefer using good ole' autocad, I set the precision to 1/1000 mm, but the system works internally with 32 digits after the decimal separator. Not that I would need it, just pointing out the precision bracket here.
     
  30. Mark Carew

    Mark Carew OpenBuilds Team
    Staff Member Moderator Builder Resident Builder

    Joined:
    Jun 28, 2013
    Messages:
    2,741
    Likes Received:
    2,407
    I agree Val when you want precision you have to go with the better cad packages. I too am an autocad guy :)
    Mark
     

Share This Page

  1. This site uses cookies to help personalise content, tailor your experience and to keep you logged in if you register.
    By continuing to use this site, you are consenting to our use of cookies.
    Dismiss Notice