Welcome to Our Community

Some features disabled for guests. Register Today.

LCD Based SLA Resin Printer

Discussion in '3D printers' started by evilc66, May 3, 2016.
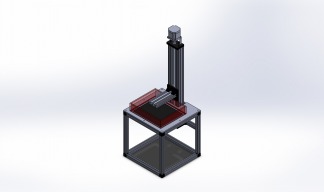
  1. evilc66

    evilc66 Journeyman
    Builder

    Joined:
    Jan 9, 2015
    Messages:
    392
    Likes Received:
    153
    evilc66 published a new build:

    Read more about this build...
     
  2. Franco Ponticelli

    Builder

    Joined:
    Dec 4, 2013
    Messages:
    65
    Likes Received:
    14
    That is very interesting. How do you plan to drive the display?
     
  3. evilc66

    evilc66 Journeyman
    Builder

    Joined:
    Jan 9, 2015
    Messages:
    392
    Likes Received:
    153
    The iPad display uses a protocol called eDP. It's a derivative of DisplayPort that was designed to replace LVDS, but it can be driven from a standard DisplayPort with an adapter. I picked up one from Adafruit, but there is another one from a Japanese vendor called Abusemark. I have a Dell Latitude e6410 that has DisplayPort and have verified that it works at full resolution under Windows 7.

    Software wise I will be using Creation Workshop. I'm still trying to figure out what they deal is with that as far as licenses go. It was created by the guy that runs the buildyourownsla.com forum, and was free for the longest time. It seems as though it was recently bought by some larger corporation and they are now charging a fairly steep price for it. It's like $500 for a single license to buy it outright, but you can get a "developer" license that's $99 a year. That's not bad, but a far cry from it being free not all that long ago. I managed to find one of the last free versions, but I don't know yet what features it may be missing from the latest paid version. There's a 30 day trial of the pay version, so I will give it a shot. If it works well, I don't have a problem paying $99 a year.

    The Creation Workshop software does all your slicing, image projection, and machine movements. It supports multiple displays, so I can set up the print on the primary display, and send the "print" to the iPad display. It's Ramps/Sprinter/Marlin compatible, so it makes getting the machine to move super simple.
     
    #3 evilc66, May 3, 2016
    Last edited: May 3, 2016
  4. Franco Ponticelli

    Builder

    Joined:
    Dec 4, 2013
    Messages:
    65
    Likes Received:
    14
  5. evilc66

    evilc66 Journeyman
    Builder

    Joined:
    Jan 9, 2015
    Messages:
    392
    Likes Received:
    153
    That's the board I'm using. It's the only other alternative to the AbuseMark one to go from DP to eDP. Problem is, there is no way to convert from HDMI to DP. This has apparently been tried to oblivion and just does not work. And to top it all off, the HDMI port on the Pi is limited to 1080p. I was looking at the alternative video interfaces like the DSI (the same port that the official Raspi LCD uses) port and the DPI port (connected using the 40 pin GPIO header), but no one has made a commercial offering to do the conversion. That's why I didn't use nanoDLP. To use nanoDLP you would have to limit yourself to a 1080p panel.

    I know that stepping down to 1080p isn't losing all that much resolution and detail, but the iPad screens are about $35 shipped on ebay. I've seen some small 1080p HDMI displays, but they are every bit as expensive as an iPad display with the eDP to DP adapters.
     
  6. Franco Ponticelli

    Builder

    Joined:
    Dec 4, 2013
    Messages:
    65
    Likes Received:
    14
    That all makes sense. Maybe it might be worth considering porting NanoDLP to an alternative board that support Display Port.
     
  7. Redmayne

    Redmayne New
    Builder

    Joined:
    Mar 19, 2016
    Messages:
    14
    Likes Received:
    1
    I too have been all through the build your own sla forum and a few other groups . I'm all but to the point of ordering parts as well. Photocentric has joined the Google group I'm in. I asked if the unmodified ipad would work and they said not as well as one with the touchscreen removed. But past that the abusemark driver does seem to be the way to go.
    But with the touchscreen removed they said their resin cures at abut 65 seconds. That time doesn't seem unreasonable to me in order to able to cure a layer the size of an ipad screen. S
     
  8. evilc66

    evilc66 Journeyman
    Builder

    Joined:
    Jan 9, 2015
    Messages:
    392
    Likes Received:
    153
    That's what I was thinking too. 65 seconds per layer is still far faster than any hobby level FDM printer, and that number can be reduced considerably with modifications to the screen to support a standalone backlight. I was considering looking into replacing the factory backlight LEDs with blue ones, but I'm not sure how readily available side mount LEDs of that size in blue are. That by itself would cut the cure time down significantly.

    Franco, I'd thought about that. I haven't come across a single board computer similar to a Raspberry Pi or Beaglebone Black with a DisplayPort. That's not to say they don't exist, but they are certainly rare in comparison. One Reddit post recommended a Samsung Chromebox which apparently is pretty easy to install Linux on, but then you don't have any GPIO. It's also 5 times more expensive than a Pi. Much more horse power though.
     
  9. Franco Ponticelli

    Builder

    Joined:
    Dec 4, 2013
    Messages:
    65
    Likes Received:
    14
  10. evilc66

    evilc66 Journeyman
    Builder

    Joined:
    Jan 9, 2015
    Messages:
    392
    Likes Received:
    153
    Possible. I have the laptop already, and like I said before, I at the very least have one of the last revisions of the free version.
     
  11. Franco Ponticelli

    Builder

    Joined:
    Dec 4, 2013
    Messages:
    65
    Likes Received:
    14
    Yeah, it is certainly a good starting point. CW (at least the free version) is really not great but gets the job done.
     
  12. Bad Sequel

    Bad Sequel Well-Known
    Builder

    Joined:
    Aug 19, 2015
    Messages:
    83
    Likes Received:
    32
    Very interesting build. Hope you are successful!
     
  13. evilc66

    evilc66 Journeyman
    Builder

    Joined:
    Jan 9, 2015
    Messages:
    392
    Likes Received:
    153
    I found a few sources today for LEDs that look like they could be a drop in replacement for the LEDs used in the backlight, and I can get them in 470nm and 395nm. Seems like a lot of work to remove all those LEDs (84!) and replace them compared to just opening up the back and shining much higher power LEDs through the screen. Anyway, I need to still find out how much the polarizer attenuates UV and violet light.
     
    DelPatron likes this.
  14. evilc66

    evilc66 Journeyman
    Builder

    Joined:
    Jan 9, 2015
    Messages:
    392
    Likes Received:
    153
    Well, almost everything has been ordered. Only thing left is the resins, and I'm going to hold off on that until I can get an idea on what the LCD polarizer will let through in terms of light wavelength.
     
  15. Franco Ponticelli

    Builder

    Joined:
    Dec 4, 2013
    Messages:
    65
    Likes Received:
    14
    How will you measure that?
     
  16. evilc66

    evilc66 Journeyman
    Builder

    Joined:
    Jan 9, 2015
    Messages:
    392
    Likes Received:
    153
    With my highly calibrated eyeballs ;)

    No, I have an Ocean Optics USB4000 spectrometer. I won't be able to get an absolute reading (I would need an integrating sphere for that), but I will be able to see the relative change in intensity that the sensor sees as I place the LCD between the light source and the sensor with a white image on the LCD at the time. From some of the reading I have been doing on polarizing films, I should be able to get down to 400nm, but the the intensity will be greatly reduced. Stepping up to 420nm allows a ton more light through (comparative to 400nm) though. It will be interesting to see how well the UV cure resins react. Will a lower intensity shorter wavelength light work better than a higher intensity long wavelength light? The difference in absorbtion from 400nm to 420nm is considerable based on the MakerJuice G+ technical datasheet. One example I was looking at changed the transmittance of the film from 10-15% at 400nm to 25-30% at 420nm. I have a couple of decent 400nm, 420nm, and 430nm LEDs that I can use for this test.

    Good thing LEDs are cheap :)
     
  17. Franco Ponticelli

    Builder

    Joined:
    Dec 4, 2013
    Messages:
    65
    Likes Received:
    14
    Good thing you really know this stuff! ;) I have built a traditional DLP printer and failed to have it working properly, so I am really looking at alternatives.
     
  18. evilc66

    evilc66 Journeyman
    Builder

    Joined:
    Jan 9, 2015
    Messages:
    392
    Likes Received:
    153
    Well, I don't claim to know it all. I'm still learning as I go, but I have a decent handle on light and optics principles. I've done a lot of work over the last 10 years with high power LED lighting for reef aquarium applications, as well as fluorescent (traditional, as well as induction fluorescent), gas arc (metal halide, HPS, etc...), and plasma induction lighting, which is the reason I have a nice spectrometer in my possession.

    Much like my work with LEDs, I share what I can as I learn. I'm looking forward to getting this put together so that we can all benefit from this new avenue of rapid prototyping.
     
    staccers and Paul Stoller like this.
  19. StressTest

    Builder

    Joined:
    Apr 7, 2016
    Messages:
    1
    Likes Received:
    1
    I am really looking forward to this project and to where it leads with this particular technology... Ever since I saw the capabilities (especially the resolution) of these kinds of printers I've wanted to build one, so coming here today and seeing there was already a project starting, I'm very excited and optimistic!
     
    Paul Stoller likes this.
  20. evilc66

    evilc66 Journeyman
    Builder

    Joined:
    Jan 9, 2015
    Messages:
    392
    Likes Received:
    153
    I was in the same boat. The DLP projector based printers looked so cool, but were huge, and expensive. I can build this entire printer for a little more than the projector alone, and a much smaller overall machine size. As soon as 4K and 8K LCDs become reasonably priced, the level of detail will be nuts, with a build size to match.

    So, FEP film showed up yesterday (thanks McMaster Carr!). LCDs and adapter board is already here. Acrylic for the vat will be here Tuesday. Arduino Mega and Ramps 1.4 board arrived on Wednesday. Just waiting for the Openbuilds order to ship (nudge nudge guys ;) )
     
    aladwig likes this.
  21. evilc66

    evilc66 Journeyman
    Builder

    Joined:
    Jan 9, 2015
    Messages:
    392
    Likes Received:
    153
    Looks like my Openbuilds order will be here tomorrow! I won't be able to touch it until next week though, as I'm heading off for a short vacation starting Thursday :(
     
  22. Mohammadroid

    Builder

    Joined:
    Aug 4, 2015
    Messages:
    2
    Likes Received:
    1
    Another try of LCD based 3d printers :)
    I am eager to see your results

    Be careful of heat generated from LEDs
     
  23. evilc66

    evilc66 Journeyman
    Builder

    Joined:
    Jan 9, 2015
    Messages:
    392
    Likes Received:
    153
    Don't worry. I've dealt with much higher power led setups than this will ever see. Cooling won't be a problem. I'd much rather have the array further away from the LCD. This will do two things. First, it will keep the LCD cooler and allow for more airflow between the LEDs and the LCD. Second, it will help to more evenly distribute the light giving more consistent curing over the build area.
     
    staccers likes this.
  24. staccers

    staccers New
    Builder

    Joined:
    May 15, 2016
    Messages:
    6
    Likes Received:
    0
    As Franco Ponticelli i failed with my dlp setup, for me it was the cost of a projector so basically everything is setup for CW combined with a imagesource of something.

    i found this thread interesting cause you'r using the same tech as the OLO printer for mobiles, whats your spec for the moment? i like details and i can read this in the thread :)
    1. FEP film
    2. LCD display
    3. LCD adapter board
    4. LED 430nm OR 420nm OR 400nm
    5. Arduino Mega
    6. Ramps 1.4
    7. Acrylic vat
    8. spectrometer
     
  25. evilc66

    evilc66 Journeyman
    Builder

    Joined:
    Jan 9, 2015
    Messages:
    392
    Likes Received:
    153
    Not sure what else you want to know that hasn't been spelled out in the build description.

    X/Y resolution will be 96 microns (+/- a smidge) based on the mechanical data of the LCD (viewing area is 196.61mm x 147.44mm at a resolution of 2048x1536). Z resolution will be dependent on how repeatable I can get with the acme lead screw. I'm setting the system up for 1/16th microstepping (2.5 micron with the OB lead screw and anti-backlash nut), but I don't feel that I can get repeatable single step resolution due to the friction associated with an acme screw and a delrin nut. 4 steps (10 micron) might be a little more doable, but I think that will be the best I could do. This will require some experimenting. Of course, a ball screw would be ideal, but one of the goals for this project was to use as many OB parts as possible. Of course, if you want to build a machine similar to this you would be free to change out the linear actuator to a ball screw equipped setup.

    If you are looking for other specific details, please ask.
     
    staccers likes this.
  26. evilc66

    evilc66 Journeyman
    Builder

    Joined:
    Jan 9, 2015
    Messages:
    392
    Likes Received:
    153
    Well, I managed to get some work done over the weekend.

    [​IMG]

    The actuator isn't in it's final position, and the whole thing has not been squared, but it's a start.

    I ended up picking up one of those Harbor Freight drill/tap combo kits to speed up the tapping process. They worked quite well once you get the clutch on your drill set up right. It's just a matter of setting it lose and then slowly upping the torque to where you feel comfortable. I used WD-40 as a tapping lubricant, as I didn't have any tapping fluid.

    The whole frame and actuator went together in under two hours (including tapping all the 250mm extrusions). Not too bad. Maybe this week I'll have it moving under it's own steam.

    Next on the list of things to do:
    1. Bevel bottom edges of the acrylic for the vat
    2. Print corner braces for the acrylic for glueing
    3. Lay out top plate for LCD mounting
    That should keep me plenty busy.
     
    AndreMerc likes this.
  27. nate campbell

    Builder

    Joined:
    Apr 26, 2015
    Messages:
    47
    Likes Received:
    17
    You can't go to low on the LEDs, LCDs don't pass UV wavelength. There has been quite a bit of research into this idea over at buildyourownsla.com. Essentially no one has had good results using an LCD and UV cure resins. There are some people (including me when I have time...) experimenting with the daylight resins from photocentric.
     
  28. evilc66

    evilc66 Journeyman
    Builder

    Joined:
    Jan 9, 2015
    Messages:
    392
    Likes Received:
    153
    Hopefully I will have some empirical evidence soon once I get around to getting the spectrometer out. Then we will be able to definitively see where the dropoff point is for short wavelength filtering.
     
  29. evilc66

    evilc66 Journeyman
    Builder

    Joined:
    Jan 9, 2015
    Messages:
    392
    Likes Received:
    153
    I got the spectrometer on the LCD over the weekend, and got results I wasn't expecting.

    Both 405nm and 420nm were attenuated about the same, down to about 3%. That in itself wasn't entirely unexpected. But when I tried shining a white LED flashlight through the screen, the results didn't get much better. I'm wondering if there is another layer that's needed that I may have taken out, because I can't believe for a second that the stock backlight could outperform a high intensity flashlight shining through the same screen. I'll have to do some more poking.
     
  30. Redmayne

    Redmayne New
    Builder

    Joined:
    Mar 19, 2016
    Messages:
    14
    Likes Received:
    1
    I think all the layers have to be removed from what I understand.
     

Share This Page

  1. This site uses cookies to help personalise content, tailor your experience and to keep you logged in if you register.
    By continuing to use this site, you are consenting to our use of cookies.
    Dismiss Notice