Welcome to Our Community

Some features disabled for guests. Register Today.

Kyoujin Mk1

Discussion in 'CNC Mills/Routers' started by ymilord, Jun 25, 2016.
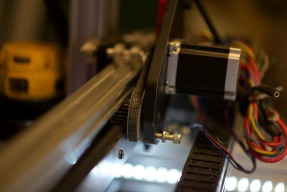
  1. ymilord

    ymilord Journeyman
    Staff Member Builder Resident Builder

    Joined:
    Oct 2, 2014
    Messages:
    77
    Likes Received:
    159
    ymilord published a new build:

    Read more about this build...
     
  2. ymilord

    ymilord Journeyman
    Staff Member Builder Resident Builder

    Joined:
    Oct 2, 2014
    Messages:
    77
    Likes Received:
    159
    _YMJ4510.jpg Current setup. I still need to change out the wasteboard, Add the 20x80 for the new rotary. And spacers for the supports.
     
    #2 ymilord, Jun 25, 2016
    Last edited: Jul 22, 2016
  3. Julius

    Julius Well-Known
    Builder

    Joined:
    Nov 13, 2015
    Messages:
    193
    Likes Received:
    61
    Very nice! Do you mind sharing the dimension of how high the spindle is on the Cbeam? I'll be mounting mine like that too and want 2.5-3" of usable travel.
     
  4. Julius

    Julius Well-Known
    Builder

    Joined:
    Nov 13, 2015
    Messages:
    193
    Likes Received:
    61
    Is the double mount necessary? Notice any improvement? How did you shim it?
     
  5. ymilord

    ymilord Journeyman
    Staff Member Builder Resident Builder

    Joined:
    Oct 2, 2014
    Messages:
    77
    Likes Received:
    159
    IMG_1331.jpg
    I get about 6" clearance when the Z is homed. But this is mostly due to height of the Y/X endplates.
     
    #5 ymilord, Jun 26, 2016
    Last edited: Jul 22, 2016
  6. ymilord

    ymilord Journeyman
    Staff Member Builder Resident Builder

    Joined:
    Oct 2, 2014
    Messages:
    77
    Likes Received:
    159
    I think so. I didn't have to shim it for the DW611.
     
  7. ymilord

    ymilord Journeyman
    Staff Member Builder Resident Builder

    Joined:
    Oct 2, 2014
    Messages:
    77
    Likes Received:
    159
    2016-06-23.jpg 2016-06-25.jpg Mocking up the rotary and another glamour shot.
     
    #7 ymilord, Jun 26, 2016
    Last edited: Jul 22, 2016
  8. ymilord

    ymilord Journeyman
    Staff Member Builder Resident Builder

    Joined:
    Oct 2, 2014
    Messages:
    77
    Likes Received:
    159
  9. ymilord

    ymilord Journeyman
    Staff Member Builder Resident Builder

    Joined:
    Oct 2, 2014
    Messages:
    77
    Likes Received:
    159
    IMG_1362.jpg 2 hr shake down / first ops. 25 sheets of lexan.
     
    #9 ymilord, Jun 27, 2016
    Last edited: Jul 22, 2016
  10. ymilord

    ymilord Journeyman
    Staff Member Builder Resident Builder

    Joined:
    Oct 2, 2014
    Messages:
    77
    Likes Received:
    159
    2016-06-27 (2).jpg 2016-06-27 (1).jpg 2016-06-27.jpg More pictures.
     
    #10 ymilord, Jun 28, 2016
    Last edited: Jul 22, 2016
    GrayUK and EvanBruner like this.
  11. ymilord

    ymilord Journeyman
    Staff Member Builder Resident Builder

    Joined:
    Oct 2, 2014
    Messages:
    77
    Likes Received:
    159
    IMG_1410.jpg IMG_1387.jpg Endstops installed & the tool offset probe.
     
    #11 ymilord, Jul 5, 2016
    Last edited: Jul 29, 2016
  12. ymilord

    ymilord Journeyman
    Staff Member Builder Resident Builder

    Joined:
    Oct 2, 2014
    Messages:
    77
    Likes Received:
    159
    ZZ6166D50E.jpg

    Next step is the wasteboard and the tool offset probe. (The probe has been milled out. Just need to sort out the electronics and the macro for tool changes)
     
  13. EvanBruner

    EvanBruner Well-Known
    Builder

    Joined:
    Mar 26, 2016
    Messages:
    68
    Likes Received:
    66
    Those are nice endstops, I'm gunna pick some up. Tired of breaking switches. Did you jut put a resistor to step down the voltage? Some research shows a 3.3k resistor should give 5v on a 24v supply.
     
  14. ymilord

    ymilord Journeyman
    Staff Member Builder Resident Builder

    Joined:
    Oct 2, 2014
    Messages:
    77
    Likes Received:
    159
    I didn't have too. My BoB supports 24V inputs.
     
  15. EvanBruner

    EvanBruner Well-Known
    Builder

    Joined:
    Mar 26, 2016
    Messages:
    68
    Likes Received:
    66
    Oh man, I wish mine could do that. Cheers.
     
  16. Mark Carew

    Mark Carew OpenBuilds Team
    Staff Member Moderator Builder Resident Builder

    Joined:
    Jun 28, 2013
    Messages:
    2,742
    Likes Received:
    2,407
    @ymilord This is truly an amazing machine and Build, well done my friend! So many great ideas to learn from on this.
    Thank you for taking the time to share :thumbsup:
     
  17. ymilord

    ymilord Journeyman
    Staff Member Builder Resident Builder

    Joined:
    Oct 2, 2014
    Messages:
    77
    Likes Received:
    159
    Started work on the new wasteboard and the Tool Offset Probe.

    The bottom of the probe was milled out with the 'Hog' and as a test I cut the top ring out with 'Kyoujin'
    Worked out pretty well.


    IMG_1545.JPG IMG_1563.JPG IMG_1561.JPG IMG_1560.JPG
     
    #17 ymilord, Jul 29, 2016
    Last edited: Aug 6, 2016
    sunil, Mark Carew, Moag and 1 other person like this.
  18. ymilord

    ymilord Journeyman
    Staff Member Builder Resident Builder

    Joined:
    Oct 2, 2014
    Messages:
    77
    Likes Received:
    159
    Inductive Sensors in action.


    Mark Carew, GrayUK and Moag like this.
  19. ymilord

    ymilord Journeyman
    Staff Member Builder Resident Builder

    Joined:
    Oct 2, 2014
    Messages:
    77
    Likes Received:
    159
    Finally swapped out the bed.

    IMG_1616.JPG

    I goofed and kicked the endstop while walking on the bed when I was tightening the M5 screws at the rear of the machine. Not a big deal for now as I have double endstops for both sides of Y (I do have replacements on hand- just a bummer that it happened :/)

    IMG_1615.jpg

    IMG_1617.JPG

    49214651484__5A1062AA-03F6-4F74-9E68-8391F458BC0A.JPG

    Encoders for that closed-loop awesomeness. 2048PPR /w Index. It also has a 90 & 180 phase. These same encoders will be used on the Hog.

    IMG_1581.JPG

    Getting close. Once the bed is finalized and squared up. Then i'll cut out the inserts that will go in between the slats. After that, I am going to be rewiring and moving the electronics to a rackmount 8U drawer and switching over from my C10 board to a Mesa setup.
     
    #19 ymilord, Aug 6, 2016
    Last edited: Aug 6, 2016
  20. ymilord

    ymilord Journeyman
    Staff Member Builder Resident Builder

    Joined:
    Oct 2, 2014
    Messages:
    77
    Likes Received:
    159
    Nope. Already at the lowest point. The upper mount is in the middle.
     
  21. ymilord

    ymilord Journeyman
    Staff Member Builder Resident Builder

    Joined:
    Oct 2, 2014
    Messages:
    77
    Likes Received:
    159
    Got the probe mounted.

    IMG_1618.JPG

    IMG_1623.jpg
     
  22. dean knipping

    Builder

    Joined:
    Mar 24, 2015
    Messages:
    84
    Likes Received:
    16
    ok....do you have any info on that tool probe? I am not at that point yet but can see how that will make life a LOT easier for zeroing out tools and I love the design you are using
     
  23. ymilord

    ymilord Journeyman
    Staff Member Builder Resident Builder

    Joined:
    Oct 2, 2014
    Messages:
    77
    Likes Received:
    159
    There is a Arduino Nano with a small ring of neopixel inside. I am passing ground thru the chassis of the DW611 (soon to be a DW618 /w SuperPID) Once the tool touches the probe the signal drops to the ground- Then AVR relays that signal to LinuxCNC.

    When M6 T<Tool Number> is requested. The machine auto raises Z to a 'safe height' then moves into the tool change position. After I've changed the tool, I press a button to tell LCNC that I've made the tool change. Then the gantry moves above the probe and checks the offset from the last tool used. Then auto continues the op. Since the machine is now closed loop, the Z offset is super accurate.

    The other features of the probe is status messages. i.e. Machine enabled is a slow pulse green. E-Stop active is a hard flash, Tool changes The blue/white pattern in the video plus may more. The Touch probe (which I have not milled out yet) uses the same code as the tool offset probe minus the alert messages. One big advantage is adjustable sensitivity.
     
    eddiejr likes this.
  24. ymilord

    ymilord Journeyman
    Staff Member Builder Resident Builder

    Joined:
    Oct 2, 2014
    Messages:
    77
    Likes Received:
    159
    The Mesa stuff arrived last week. I got the 6i25 + 7i85s. This will give me four differential StepGens & four encoder inputs on the breakout board (on the left)
    The IDC header will give me one more StepGen and one more encoder input for my A Axis & a crap ton of GPIO's (inputs, outputs and drains). I'll still use my C10 board connected to my parallel port for even more GPIO. i.e. Automatic tool change or Vacuum table control.

    IMG_1631.JPG

    When I removed the old waste board it started to bend upwards like a taco. The board has been on there for about 2.5 years. It has been resurfaced many, many times.
    To avoid warping I opted to use a PVC material in place of the MDF I was using before. Since it is plastic- It should stay flat/true 'forever'

    IMG_1626.JPG

    Kyoujin will have 9 removeable/replaceable slates. This way if one gets damaged, I can just replace that one row vs. having the replace the whole board. Not show here, The board will be form fitted and recess in the 'slot about 7mm.

    IMG_1627.JPG
     
    Joe Santarsiero and GrayUK like this.
  25. ymilord

    ymilord Journeyman
    Staff Member Builder Resident Builder

    Joined:
    Oct 2, 2014
    Messages:
    77
    Likes Received:
    159
    Made a change on the type of encoders I'll be using for the closed loop portion of the build. I found this low profile radial encoders that are 2048PPR /w indexing.

    I changed up my endplates to accommodate them.

    IMG_1708.JPG IMG_1710.JPG IMG_1704.JPG
     
    Ronald van Arkel, Evan F and Kyo like this.
  26. Mark Carew

    Mark Carew OpenBuilds Team
    Staff Member Moderator Builder Resident Builder

    Joined:
    Jun 28, 2013
    Messages:
    2,742
    Likes Received:
    2,407
    Really neat encoders @ymilord I have not seen this style before. :thumbsup:
     
  27. ymilord

    ymilord Journeyman
    Staff Member Builder Resident Builder

    Joined:
    Oct 2, 2014
    Messages:
    77
    Likes Received:
    159
    @Mark Carew - It's a common type / Style. What new is the price point. That particular encoder is programmable. 48 to 2048PPR is 5000 RPM mode or 48 to 128PPR on 15,000 RPM mode.

    In the previous post I forgot to add this image. This was cut out on the Hog.

    IMG_1703.JPG 2016-08-19.jpg

    Fusion 360 model.

    2016-08-15.jpg
     
    eddiejr and Kyo like this.
  28. Joe Santarsiero

    Joe Santarsiero OB addict
    Staff Member Moderator Builder

    Joined:
    Oct 30, 2014
    Messages:
    902
    Likes Received:
    196
    Neat encoders. I wasn't aware of this style either. Do they just clamp onto the screw?
     
  29. ymilord

    ymilord Journeyman
    Staff Member Builder Resident Builder

    Joined:
    Oct 2, 2014
    Messages:
    77
    Likes Received:
    159
    @Joe Santarsiero

    IMG_1706.JPG IMG_1707.JPG

    On the encoder end there is a 'socket' that mates up to the collar.

    The kits comes with adapters that can go from 2mm to 8mm.
     
    #29 ymilord, Aug 20, 2016
    Last edited: Aug 20, 2016
  30. ymilord

    ymilord Journeyman
    Staff Member Builder Resident Builder

    Joined:
    Oct 2, 2014
    Messages:
    77
    Likes Received:
    159


    Small test of the X Axis. Basically jogging out to 25mm & a couple random distances then back to G54 P1.
     
    swohnrade likes this.

Share This Page

  1. This site uses cookies to help personalise content, tailor your experience and to keep you logged in if you register.
    By continuing to use this site, you are consenting to our use of cookies.
    Dismiss Notice