Welcome to Our Community

Some features disabled for guests. Register Today.

iTopie RepRap

Discussion in '3D printers' started by skarab, Feb 12, 2015.
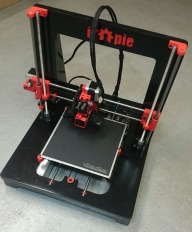
  1. skarab

    skarab Journeyman
    Builder

    Joined:
    Jan 5, 2014
    Messages:
    96
    Likes Received:
    141
    skarab published a new build:

    Read more about this build...
     
  2. Tweakie

    Tweakie OpenBuilds Team
    Moderator

    Joined:
    Jan 18, 2014
    Messages:
    784
    Likes Received:
    326
    Brilliant work @skarab , a beautiful looking machine. :thumbsup:

    Tweakie.
     
  3. lucdepauw

    lucdepauw New
    Builder

    Joined:
    Dec 13, 2014
    Messages:
    3
    Likes Received:
    0
    Hi, I'm interested to build the itopie, I've cloned the github archive and viewed the dxf files included. Only the top view is present, so I have no idea what the depth is for the pockets ? I'm viewing this in libreCAD. currently have no sketchup at hand on my ubuntu box.
    If you need help in the project feel free, as I was to achieve the same stuff just when I saw you project popping up at the openbuild site....
    I've got an original Felixprinter 3D (v1) (broken head, reason I want a prusa i3) and 2 CNC machines at hand (140 x 70 cm build area (nema23) and 60 x 40 cm (nema17)). The Felix and the smaller colinbus cnc were all build from kit.
     
  4. Mark Carew

    Mark Carew OpenBuilds Team
    Staff Member Moderator Builder Resident Builder

    Joined:
    Jun 28, 2013
    Messages:
    2,741
    Likes Received:
    2,407
    Machines making machines :thumbsup: Well done skarab, your builds always impress
     
  5. skarab

    skarab Journeyman
    Builder

    Joined:
    Jan 5, 2014
    Messages:
    96
    Likes Received:
    141
    Thank you guys :)

    @lucdepauw thank you for the interest in the project, any help is gladly accepted.
    For the pockets : 6mm (for 16mm MDF) and 4mm for the "washer" milled on the Y idler (optional).

    Peace.
     
  6. skarab

    skarab Journeyman
    Builder

    Joined:
    Jan 5, 2014
    Messages:
    96
    Likes Received:
    141
  7. lucdepauw

    lucdepauw New
    Builder

    Joined:
    Dec 13, 2014
    Messages:
    3
    Likes Received:
    0
    I'm redrawing the design to 15mm as 16mm is hard to find, will post the design when finished. Currently printing all the parts, question what extruder design did you use ? I'm using 1.75mm fillament so had my eyes on this one:
    http://www.thingiverse.com/thing:127138
     
  8. skarab

    skarab Journeyman
    Builder

    Joined:
    Jan 5, 2014
    Messages:
    96
    Likes Received:
    141
  9. lucdepauw

    lucdepauw New
    Builder

    Joined:
    Dec 13, 2014
    Messages:
    3
    Likes Received:
    0
  10. Derick

    Derick New
    Builder

    Joined:
    Oct 2, 2015
    Messages:
    1
    Likes Received:
    0
    Great build. I am new to all of this and have a few questions for you. I currently work in a university machine shop with access to a very large cnc plasma, some manual mills, and full welding setups and multiple 3d printers. We have a large amount of 1/4" steel that I can use to for personal projects and I was wanting to cut the frame out of that and weld it together. My question is how do I adjust the frame generator to properly and then export the appropriate .dxf files?
     
  11. Mark Carew

    Mark Carew OpenBuilds Team
    Staff Member Moderator Builder Resident Builder

    Joined:
    Jun 28, 2013
    Messages:
    2,741
    Likes Received:
    2,407
    @skarab What paint where you using for this and did you prim it first. The paint job came out really nice looking. :thumbsup:
     
  12. skarab

    skarab Journeyman
    Builder

    Joined:
    Jan 5, 2014
    Messages:
    96
    Likes Received:
    141
    ****, too long time I did not come here. Sorry for the lack of responsiveness, many projects and not enough time.

    @Derick You must use the frame generator, everything is explained in the build manual, but feel free to ask me if something is not clear.

    @Mark Carew Yes i prim it first, MDF drinks a lot of paint. Then I sprayed two coat of paint and one or two layer of lacquer.

    BTW Thomas Sanladerer just released the first video of a mini series on building a 3D printer at home. Good thing the model presented is a iTopie :)


    Peace.
     
    Mark Carew likes this.
  13. Mark Carew

    Mark Carew OpenBuilds Team
    Staff Member Moderator Builder Resident Builder

    Joined:
    Jun 28, 2013
    Messages:
    2,741
    Likes Received:
    2,407
    skarab likes this.
  14. Luis Vallejo

    Builder

    Joined:
    Jun 23, 2016
    Messages:
    3
    Likes Received:
    0
    I have noticed that the x end motor and x end idler dont have a hole where the m8 threaded rod goes... is this expected in the STL? Should we just drill the hole?
     
  15. skarab

    skarab Journeyman
    Builder

    Joined:
    Jan 5, 2014
    Messages:
    96
    Likes Received:
    141
    As you want, if the rods are cut to the proper length, adjustment holes are unnecessary.
     
  16. Luis Vallejo

    Builder

    Joined:
    Jun 23, 2016
    Messages:
    3
    Likes Received:
    0
    Hey Skarab,

    Thanks for your reply and awesome work with the iTopie.

    I meant the threaded rods the ones that go through the m8 nut. I believe you are referring to the smooth rods?

    Oh wait nevermind I just realized its quite thin, so it wont print.

    Cheers
    Luis.
     
    #16 Luis Vallejo, Jun 30, 2016
    Last edited: Jun 30, 2016
  17. Luis Vallejo

    Builder

    Joined:
    Jun 23, 2016
    Messages:
    3
    Likes Received:
    0
    Hey JustinTime thanks for your reply.

    Yes there is a hole but in the mesh (stl) doesn't go through all the way, but I checked the thickness and its less than what the printer can do so most likely will not print.

    as you can see in the image. When you threaded the rod through the plastic part do you used much force? In this image looks like the diameter of the hole is 8.5mm enough for the rod to go through unthreaded?

    Thanks for your assistance.
    Untitled picture.png
     
  18. skarab

    skarab Journeyman
    Builder

    Joined:
    Jan 5, 2014
    Messages:
    96
    Likes Received:
    141
    It is the support, otherwise the part will not print well, you should remove it with a knife.
     
  19. Marcelo Lafarciola

    Builder

    Joined:
    Mar 12, 2019
    Messages:
    6
    Likes Received:
    0
    What is the hotbed size?
     
  20. Marcelo Lafarciola

    Builder

    Joined:
    Mar 12, 2019
    Messages:
    6
    Likes Received:
    0
    Do you have the hotend assembly?
     
  21. Chip Stewart

    Builder

    Joined:
    Mar 13, 2019
    Messages:
    3
    Likes Received:
    1
    Found Thomas Sanladerer's videos a couple of weeks ago and decided it's time to finally start my build.

    I have some spare 19mm thick melamine left over from a kitchen project. I covered it with blue painters tape, did the conversion program, printed out the plans on about 8 sheets of paper using Inkscape, glued the paper to the tape, and cut everything out with a jigsaw. So far, so good. Now I've got some NEMA17 steppers and toothed belts from some old printers, and some bearings from who-knows-where and will put them to use. Since I don't have a 3D printer yet, I'll make the plastic parts out of wood for now, then print them later.

    I have a very excited 8 year old and a 7 year old who can't wait for me to finish! I'll post pics after its done. Anyhow, looks like a great community here, and I look forward to being past of it.

    Chip
     
    #21 Chip Stewart, Mar 13, 2019
    Last edited: Mar 16, 2019
    Giarc likes this.
  22. Giarc

    Giarc OpenBuilds Team
    Staff Member Moderator Builder Resident Builder

    Joined:
    Jan 24, 2015
    Messages:
    2,892
    Likes Received:
    1,609
    I remember starting to watch that series on Thomas Sanladerer's YouTube channel. I must have missed the video where he finished it.
     
  23. Chip Stewart

    Builder

    Joined:
    Mar 13, 2019
    Messages:
    3
    Likes Received:
    1
    Okay, the build is complete, and I did my first print last night:
    20190410_145622.jpg
    I'll consider the fact that it printed at all as a triumph, but it obviously has some problems. I noticed during the print job that the nozzle seemed to be scraping the printed work. So, what do you think I need to adjust?

    Thanks,
    Chip
     
    #23 Chip Stewart, Apr 10, 2019
    Last edited: Apr 10, 2019

Share This Page

  1. This site uses cookies to help personalise content, tailor your experience and to keep you logged in if you register.
    By continuing to use this site, you are consenting to our use of cookies.
    Dismiss Notice