Welcome to Our Community

Some features disabled for guests. Register Today.

GuitarMakerOX

Discussion in 'CNC Mills/Routers' started by Julius, Feb 2, 2016.
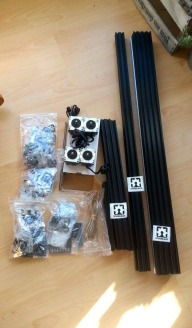
  1. Julius

    Julius Well-Known
    Builder

    Joined:
    Nov 13, 2015
    Messages:
    193
    Likes Received:
    61
    Loop and stargeezer like this.
  2. stargeezer

    stargeezer Journeyman
    Builder

    Joined:
    Feb 20, 2015
    Messages:
    328
    Likes Received:
    117
    I enjoy building guitars and have been thinking about this build for a while - so much so that I've been hording parts to build one. I really like abalone inlay in the frets and have been scribbling some dragon designs to inlay forever. The notion of scanning my sketches, turning them into G-code and cutting them has this old guy excited! Computer controlled electric guitar!!!!! Rock and Roll!
     
  3. Loop

    Loop New
    Builder

    Joined:
    Feb 1, 2016
    Messages:
    2
    Likes Received:
    0
  4. DaveC3

    DaveC3 New
    Builder

    Joined:
    Sep 29, 2015
    Messages:
    3
    Likes Received:
    3
    I made a Telemaster on my OX 1000 x750. The only issue I had was in the Z axis travel with a long bit, barely made it through the 1.75" body. I dropped the spoil board down by turning the two center support rails horizontal which gave me an additional .75" of travel. The top of the spoil board is now flush with the front and back rails. I could have cut half the depth and flipped it over but did not want to chance making an registration error and ruining a expensive wood.
     
  5. Loop

    Loop New
    Builder

    Joined:
    Feb 1, 2016
    Messages:
    2
    Likes Received:
    0
    Hey DaveC3, thanks for the info. Turning the center rails sounds like a good solution.
     
  6. Mark Carew

    Mark Carew OpenBuilds Team
    Staff Member Moderator Builder Resident Builder

    Joined:
    Jun 28, 2013
    Messages:
    2,742
    Likes Received:
    2,407
    Following along @Julius We have a guy here at OpenBuilds (Keith) who is excited about your Build as he is looking to make his own guitars as well. :thumbsup:
     
  7. DaveC3

    DaveC3 New
    Builder

    Joined:
    Sep 29, 2015
    Messages:
    3
    Likes Received:
    3
    Here is a picture of the TeleMaster. Three piece alder.
     

    Attached Files:

    Joe Santarsiero, Mark Carew and Loop like this.
  8. Julius

    Julius Well-Known
    Builder

    Joined:
    Nov 13, 2015
    Messages:
    193
    Likes Received:
    61
    Why was your Z an issue? I have about 67mm of Z travel with 1.5" of spoilboard, enough to mill 2 blanks at once! lol
     
  9. DaveC3

    DaveC3 New
    Builder

    Joined:
    Sep 29, 2015
    Messages:
    3
    Likes Received:
    3
    I only have aprox 4" from the bottom of the Z axis to the face of the lowered spoil board. With a 1.75" guitar blank it only gives me 2.25" clearance. My bit is a long .25" end mill. If I push it up all the way into the collet it just clears the top of the blank with the Z up all the way. In the attached picture the grey board is the lowered spoiler board. I add an additional board (brown MDF) to cut the small stuff. It may help if I were to get taller gantry plates.
     

    Attached Files:

  10. Julius

    Julius Well-Known
    Builder

    Joined:
    Nov 13, 2015
    Messages:
    193
    Likes Received:
    61
    I think I get it now, but you can always prop the frame up ;)
    My first issue when assembling was the plates. I assumed they would be higher, so I had only about 70mm of usable travel or so, as well as the fact the x gantry wheels can touch the Y belt pulley when closer to the edge! I may make taller ones, who knows. If I swapped them, I'd design them set back so the collet is in line with the front of the plates, and would increase the work area a bit.


    Here are the mods, so far.
    Limit switches. Off of ebay for 20c a pop, and mounts made on the machine based off the shop's design.

    Used a cut 15mm M5 screw in the Z axis, and cut it to not touch the block. I also reverse mounted the acme nut on teh Z so the nylocks push INTO the gantry, and not just sit on the nuts. Worth the 3 hours of re-mounting my Z? Who knows?!

    For the X, space is valuable so I decided to just drill+tap the gantry itself! The switch should not be going anywheres.

    Needed something black, think, flexible, and adhesive to cover the frame since I got tired of vacuuming them out everyday. Electrical tape works great, and doesn't have as much contrast as in the photo. Also put it on my X.

    Changed the tension system. I cut a 4mm wide brass shim (0.25mm thick or so) and taped it on both ends. It acts as a washer between the bolt and the belt, since I saw it was pressing VERY deep into the belt and last thing I want it to re-order this for 6mm of length... Currently thinking of some system to pull it from outside the frame, like an X carve so I dont have to use the vice grip+pivot method for tightening the belt.

    Cut a slot in the gantry, to fix the belt outside the X rail. Not sure how you would do this without?! Can we add this to the official model please? I also added 2 wheels closer to the pulley with an M5 30mm and some washers. This reduces some of the crazy backlash this machine would have.

     
  11. thecableguy

    Builder

    Joined:
    Oct 24, 2014
    Messages:
    16
    Likes Received:
    3
    So you say that adding extra wheels closer to the pulley reduces backlash? Mine's got a stupid amount of backlash, around 10 thousandths. Useless for doing tight inlays. Did you add wheels to the Y axis as well?

    Brian
     
  12. Julius

    Julius Well-Known
    Builder

    Joined:
    Nov 13, 2015
    Messages:
    193
    Likes Received:
    61
    Yes, it does help as well as increases pulley/belt contact. I might add some idler's to my Y IF I decide to not retrofit some lead screws on the outside. Be sure youre belts are tight and your motors powered and you shouldn't have that much backlash.

    Limit switches are wired up, and added a terminal block to power both Y motors now. Headerpins + jumpers are in the mail and should be here in 2 weeks. I could use raw soldered wire but I may as well wait.

    Also debating adding an acme rod to both Y rails and power it like the Z, depending on the budget. Openbuilds has highway robbery prices for shipping to Canada (@Mark Carew, can we talk about that? I paid 44$ for a 9x6 bubble mailer that wasnt even sent express and all it had was 9' of belt and a coupler......)
     
  13. Julius

    Julius Well-Known
    Builder

    Joined:
    Nov 13, 2015
    Messages:
    193
    Likes Received:
    61
    So, back on Dec 2nd [ordered my OB store stuff Nov 30th for black friday) I bought 10M of g3 belt on ebay for 30$. Didn't arrive by Jan 7th, so I ordered some express from the store and even paid 45$ for the 9 feet, and 45$ in shipping (I was excited, can you blame me? The frame was sitting for 2 weeks at this point).

    On Feb 12 the china belt finally arrived, 3 hours before I went on a 7 day vacation. First day back, I went to tighten the belts and guess what..... MY X AXIS BELT BROKE. Thank GOD for the extra 30feet I now had in storage :p This belt is better then the store variety, it just seems thicker by 0.5mm, a hair wider, and did NOT stretch at all in a 48 hour period! Good to know I have a lifetime supply or can make a bigger machine next year :)

    Anyways, with that drama I had a spark of creativity! Lets be honest, the idea of a Tnut/bolt SUCKS for holding a belt down, and just causes there to be an indent. I tried a brass shim before, but that also just bent!
    So, here it is. Cut a 3/3 L connector in half (obviously a 3 Hole Joining Strip Plate would work better if you had the foresight), and use a 25mm and some nylock/washers as a pivot/hook for the belt. Zip tie it Xcarve style around it, and pull the bolt away to tighten it. One bolt did work the first time, but I switched to the 3 hole so I dont have to worry or check on it.

    Sorry for the shite photos, I took em on my way out for the day. My switches are soldered up, but waiting for header pins/dupont adapters around March 18th to connect them. Not sure if I'll be doing much homing anyways by the looks of it so far.

    Y rails, side photo

    Y rail, top view

    X axis, side view. Used a corner adapter to change the angle. Added 2 washers and a nylock afterwards.Had to add+tap a m3 bolt into the gantry plate to stop the 90* bracket from twisting.
     
    #13 Julius, Feb 21, 2016
    Last edited: Feb 21, 2016
  14. Julius

    Julius Well-Known
    Builder

    Joined:
    Nov 13, 2015
    Messages:
    193
    Likes Received:
    61
    Seems like somethings wrong in the code that made it do that half cut, but everything else is aweseome. 3 minutes on the machine compared to 5 hours by hand. Love being able to make an adjustment of a mm or so and know it'll take 3 minutes to re-make, not an hour like my old "by hand" method. Might be upgrading to 1m by 1m soon, in talks with a local company who needs 16x30 templates cut out and would pay for my rails. Whats the best source for lead screws? I might go C beam + 8mm acme so I can use the standard couplers and end plates.

    Till next time! I'm doing lots this week

     
  15. Julius

    Julius Well-Known
    Builder

    Joined:
    Nov 13, 2015
    Messages:
    193
    Likes Received:
    61
    This build had some more mods done to it, I will post them at the end of the month before I unassemble it all! I have a buyer for this, and am making my 2nd machine. A 1605 ballscrew powered, 1000x1000 machine, with all plates made by my own design to accommodate.

    OX Balls - 1605 Ballscrew Powered 1000mmx1000mmm OX derivative
     
  16. Julius

    Julius Well-Known
    Builder

    Joined:
    Nov 13, 2015
    Messages:
    193
    Likes Received:
    61
    Got it hooked up to KeySticks today

     
    Synths and GrayUK like this.

Share This Page

  1. This site uses cookies to help personalise content, tailor your experience and to keep you logged in if you register.
    By continuing to use this site, you are consenting to our use of cookies.
    Dismiss Notice