Welcome to Our Community

Some features disabled for guests. Register Today.

Grizzly G0758 Benchtop Mill Conversion

Discussion in 'CNC Mills/Routers' started by Rob Taylor, Oct 25, 2018.
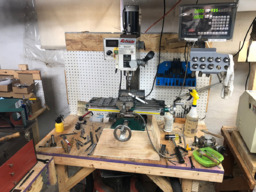
  1. Rob Taylor

    Rob Taylor Master
    Builder

    Joined:
    Dec 15, 2013
    Messages:
    1,470
    Likes Received:
    746
    Rob Taylor published a new build:

    Read more about this build...
     
  2. Rob Taylor

    Rob Taylor Master
    Builder

    Joined:
    Dec 15, 2013
    Messages:
    1,470
    Likes Received:
    746
    Current thoughts and considerations:

    Motors:

    Geared NEMA 23s would likely be higher acceleration, but I'm somewhat dubious on their relevance here given the dovetail ways. If it were a linear rail conversion as well, inertial matching would be more relevant. As it is, I have the gibs snugged up a bit and it's relatively stiff to move, but runs a boring head quite nicely. Any motor is going to have a time starting and stopping, and I suspect that overall, the higher momentum and higher intrinsic torque (ie. the diameter of the rotor coils) are a slightly better option. Time will tell.

    Originally I was going to go with DMM 400W servos running off of DYN4 (200v class! I hate power supplies!) controllers. This may prove to be a necessary (read: highly desirable) future upgrade, but of course there isn't exactly a shortage of what I can do with three NEMA 34 closed-loop steppers on another project. It was cancelled to basically halve the budget. $1500 on motors alone is no joke. $700 isn't particularly light as it is. But I didn't want to not have servo feedback, even if it was limited to the motor-controller loop. The difference in smoothness and power handling is apparently rather significant.

    Controller

    This was originally going to be LinuxCNC running through a Mesa 6I25 & 7I76 FPGA parallel IO card and breakout. In the interests of time, budget and convenience, I'm revising that to (at least initially) Grbl being fed from bCNC. I've already played with bCNC and like it a lot, it's what will be running the laser to begin with (I may end up moving to a more portable RasPi based solution on that one eventually). LinuxCNC is more like a real CNC controller environment with more I/O and macro support, which is nice, but this mill is a working machine, and I need it down for as little time as possible while I figure out LinuxCNC dual-booting, the setup of the Mesa boards and then the setup of the environment itself. Later I'll have the luxury of having time to build a dedicated machine and plug it in when it's ready, if it becomes worthwhile.

    Grbl (if you actually bother reading the Wiki) is fast and easy to work with, and all I need to buy is a $20 Arduino (if I don't already have something suitable lying around!). It's plenty powerful enough for any low-speed 3-axis project, which is all this is. It'll run a variable-speed spindle. It WON'T run a toolchange cycle, but bCNC can, so it still works. Initially toolchanges will be manual anyway, facilitated by a foot-operated power drawbar (mmm, two-hands!). So all I'll need is an optional stop, realistically.

    Enclosure

    I'll be rigidifying and adding mass to the body with steel plates and gussets all over the place (whilst still allowing for head/column tramming), to which I'll weld square steel tubing in a couple of spots where distortion is allowable, off of which I can create a full enclosure with chip capture and coolant filtration. This, of course, isn't planned for early in the process. Making chips is the order of the day; I need a minimum viable product.

    Spindle

    I'll almost certainly convert this thing to belt drive at some point, if for no other reason than because plastic gears are terrible and noisy, but also because the spindle bearings should be rated to somewhere in the vicinity of 5000 rpm (maybe...). I'd like to at least squeeze 4000 rpm out of the existing motor (no idea of its base RPM as yet) with appropriate gearing if I can, to make 1-2mm/~1/16" end mills a little more viable.

    Upgrading spindle bearings can spectacularly backfire depending on the quality of the spindle to begin with, which of course with Chinese drop-shipped products is highly variable. Frequently they rely on the slop in low-grade bearings to mask the eccentricities in grinding. I'd love to upgrade to ABEC 5 oil-drip bearings and get 12k out of the spindle, but there's a non-zero chance that simply won't work.

    Currently it's limited to 2000 rpm, which is mostly fine at the minute, but smaller ball nose end mills tend to be used heavily in modern CNC production for 3D contouring (barrel cutters notwithstanding) and I have a distinct suspicion I may end up doing a fair bit of that. Slotting down to 0.028" has also been on the cards for this mill. Of course, the runout could potentially preclude going that small, but I don't want to rule anything out until I've tested it.

    There is the option of going to a servo drive spindle which I've looked into a fair bit. Originally I was looking at the 750W DMMs with gearing to get up from 3000 rpm (depending on how continuous that 5000 max rpm rating is), but realised a normal brushless 8k spindle motor replacement made much more sense at a similar pricepoint. I could always add an encoder to the spindle shaft if I had to have something like rigid tapping, but I doubt this machine will ever see anything like a BT30 spindle, which would be a major advantage of a servo drive.

    Drawbar

    The cylinder should do up to around 1800lbf, and I'll be doing a 3/4" R8 TTS-style system, keeping it simple. I haven't settled on what my drawbar force is going to be yet. I saw a lot of 2000-4500lb discussion, which is a fair range, and then recently saw some talk of 700lb, which seems quite low. In any case, appropriate leverage and travel isn't going to be an issue for the cylinder I have, it's mostly just a case of figuring out which Belleville washers to buy and how to arrange them.

    The G0758 has a threaded spindle end which fits the drawbar retainer (gotta be able to unscrew against something if/when the collet sticks), which I should fairly easily be able to turn some kind of inverted-top-hat collar for (or even just reshape the part itself, come to think of it), against which the cylinder can actuate. Of course, you can't just mount the cylinder directly to the body and press down on the drawbar, unless you really hate your spindle bearings! It has to be more like a pair of scissors, keeping the force only on the rotating element of the spindle.

    Once I figure out how many tools I typically use for a project, building some kind of carousel toolchanger should be fairly straightforward as long as either bCNC or GRBL could send it simple one-byte commands. The point is to maximize hands-off and maximize production capacity within the limits of the base machine.

    So what next?

    Mainly motor mounts, screw/nut mounts and other stuff to get the CNC portion of the whole thing working. The power drawbar really needs a powered z-axis to work, since I couldn't feasibly use it with the spline-driven quill moving up and down into the head. In a week or so I should be shipping in a pile of 1/2" and 3/8" steel plate to start the body upgrade, though I may make the motor mounts aluminum since it's easier to machine more precisely and reduces the supported/cantilevered weight where the motors attach. I lose negligible strength and gain a little vibration, but it's unlikely to be a problem. And I can always CNC-machine new plates after the fact!

    That'll do it for now, feel free to discuss iron vs extrusion and all that good stuff, this isn't really intended to be purely a build log if there's actually something to talk about.
     
  3. Rob Taylor

    Rob Taylor Master
    Builder

    Joined:
    Dec 15, 2013
    Messages:
    1,470
    Likes Received:
    746
    Fixed the images! I think the server ate them, but should be good now.
     
  4. CNCMD

    CNCMD Journeyman
    Builder

    Joined:
    Jul 29, 2017
    Messages:
    148
    Likes Received:
    114
    I have a g0758 and have considered converting it, so I'm interested to see this project.
     
  5. Rob Taylor

    Rob Taylor Master
    Builder

    Joined:
    Dec 15, 2013
    Messages:
    1,470
    Likes Received:
    746
    Like I described on the build page, it's a great machine for what it is, it's seen some pretty heavy use for me and just keeps on trucking. Definitely looking forward to having it run itself!
     
  6. gstprecision

    Builder

    Joined:
    Nov 2, 2018
    Messages:
    20
    Likes Received:
    2
    I am also very interested in this build. I am almost finished with my Plate maker and I could then jump right in making the motor mounts for it.

    Can't wait for updates.
    Thanks
    GST
     
  7. Rob Taylor

    Rob Taylor Master
    Builder

    Joined:
    Dec 15, 2013
    Messages:
    1,470
    Likes Received:
    746
    I had originally hoped to have it finished by the end of the year. With all the other projects I have on the go and trying to finish up, I suspect I'm gonna be starting it in January!

    The steel plates are here, however. So is the genuine Arduino Uno. Only remaining items on the list (until I add more things, like toolsetters!) are aluminum plate for the motor mounts, Belleville washers for the drawbar, and grease nipples for the ball nuts, of which only the aluminum plate is super vitally pressing to getting the build started.
     
  8. Rob Taylor

    Rob Taylor Master
    Builder

    Joined:
    Dec 15, 2013
    Messages:
    1,470
    Likes Received:
    746
    Minor update for some notes to get them out of my head: I was doing some research yesterday and it looks like the target drawbar force is 2500lbf; perfectly adequate for a machine this small. I saw a calculation that approximated the leverage and friction of the R8 collet, and essentially pullout force is just over half of the drawbar force; 2500lbf would give somewhere in the vicinity of 1300lbf of pullout resistance, good up to around 3/8". Apparently Tormach set their machines somewhat lower than this from factory; probably more in the 1500-2000lbf range, though my rough estimate for their three-stage drawbar cylinder force is around 3000lbf.

    Actuation distance on the drawbar/washer stack itself needs to be in the vicinity of 0.060"/1.5mm. Since my cylinder is good up to around 1800lbf (I believe at 150psi), I can comfortably operate it at around 800-1000lbf (closer to a more comfortable 90psi shop air standard) and make up the difference with a relatively minor leverage advantage. My cylinder has a full inch/25mm of travel, so if necessary an adjustable stop screw can be used to limit its travel and avoid over-compressing the spring stack.

    Belleville washers are intended to be used within a narrow range of motion where their force/travel distance (Hooke's law; manufacturers provide the spring constant data) is amenable to the surrounding system. So I need to design a stack that travels a minimum of 1.5mm, provides 2500lbf of tension when torqued down with a preset nut and remains capable of compressing under my cyclinder's lever advantage up to the 1.5mm point. This is where it gets a little tricky, but I'll play with some ideas and see what I like the look of. I don't want an enormous stack; the height of it has to be bridged by the framework holding the cylinder bracket to the "spindle-grabbing fork" (technical term) that lives under the spindle cap. The longer the distance, the more this connection has to be beefed up to avoid it excessively bending under working load. So the shorter the stack is whilst still providing the required specifications, the better.

    Also, since it looks like the laser is going to need the Arduino Uno (because I kept blowing pins, as non-optocoupled systems tend to do), I'll pick up an Arduino Mega for this project. It seems that @Sonny Jeon has done all he can to squeeze every last drop of performance and capability out of the Uno's storage capacity, and future updates will be primarily to the Mega line (and possibly some ARM forks?). It'll be nice to add more functionality to the mill over time if this is indeed the case.
     
    gstprecision likes this.
  9. Rob Taylor

    Rob Taylor Master
    Builder

    Joined:
    Dec 15, 2013
    Messages:
    1,470
    Likes Received:
    746
    Another relatively minor update, squeezing a little bit of mill conversion work in between other jobs and projects. Soon this is gonna be the main get-it-done-at-all-costs project, though!

    Got the motors working with a copy of grbl, everything was nice and straightforward, no programming or setting adjustments required:

    IMG_0644.jpg

    That's x and y running at 48V, z daisy-chaining off the 120VAC mains input on the MeanWell supply. The LCD readout behind the smoked cover on the AC driver shows the lead/lag on the encoder as the spindle moves, which is kinda fun to watch.

    I might have changed my mind on the controller though?

    IMG_0640.jpg

    Haven't committed to it 100% either way yet, since bCNC is capable of toolchanging, though the lack of additional or passthrough I/O in grbl is a little problematic. With only coolant and airblast really to speak of, adding additional macro functions is basically impossible if I needed to. And I may yet decide to add a 4th axis, so grbl would be right out then.

    Of course, like I originally said, having a minimum viable product to actually start making things could be an overriding factor. It only takes an hour or two to get grbl happily running, whereas I suspect the learning curve on LinuxCNC is going to be a fair bit more substantial.

    Either way, I have a Mesa 5i25 PCI parallel card on the way (I want to leave the single PCIe slot open for a GPU if necessary for system performance, which the LinuxCNC requirements page suggests) and a SainSmart 5 axis C10-like breakout board (I'm still aiming for inexpensive, at least initially) on the way. Even if I end up sticking with grbl, these will be pressed into service in future on a different machine, so they're worth having.

    In only-tangentially-related news, I made this toolpost holder for the lathe the other day to get rid of the compound slide because it was introducing too much chatter:

    Photo Feb 22, 10 40 40.jpg

    How straightforward and successful that was makes me feel pretty confident about building a 4th axis myself, and of course solidifying the lathe takes it one step closer to CNC conversion itself... We'll see!
     
  10. joe williams

    joe williams Well-Known
    Builder

    Joined:
    Nov 9, 2015
    Messages:
    100
    Likes Received:
    59
    Looks like you've got several projects going at once!...But, unlike me, it sounds like you're getting them done! Looking good!:thumbsup:
     
  11. Rob Taylor

    Rob Taylor Master
    Builder

    Joined:
    Dec 15, 2013
    Messages:
    1,470
    Likes Received:
    746
    Ha! Let's not get too carried away, I'm between two months and two years behind schedule depending on which project you're looking at! :ROFL:

    But recently I'm finding that slow and steady really does get stuff done... Just do a little bit on something while you're thinking about it, and you end up feeling much happier about overall progress. The smaller bites are frustrating, or can be, but in the end it's worth it.
     
    gpkon66 likes this.
  12. joe williams

    joe williams Well-Known
    Builder

    Joined:
    Nov 9, 2015
    Messages:
    100
    Likes Received:
    59
    I know what you mean...I made some new cabinets in both bathrooms and added a set in the kitchen....that is I built the boxes in place and installed the face frames. We proceeded to load them up and use them, no worries, I'll get the doors made next week...1 -1/2 years later the doors are finally on! I hope my WorkBee build doesn't suffer the same fate!
     
  13. Giarc

    Giarc OpenBuilds Team
    Staff Member Moderator Builder Resident Builder

    Joined:
    Jan 24, 2015
    Messages:
    2,892
    Likes Received:
    1,610
    That describes my kitchen remodel precisely.
     
  14. joe williams

    joe williams Well-Known
    Builder

    Joined:
    Nov 9, 2015
    Messages:
    100
    Likes Received:
    59
    we won't talk about how many cans of paint I have here waiting to go on a wall. So @Rob Taylor, is that tig welded?
     
  15. Rob Taylor

    Rob Taylor Master
    Builder

    Joined:
    Dec 15, 2013
    Messages:
    1,470
    Likes Received:
    746
    Sounds like my wife's house projects!

    Yep! TIG. The round was turned top and bottom, and then the plate was bored and turned on the front side to accept the OD of the round. The bore was so it could also be welded up on the inside:

    Photo Feb 21, 14 37 56.jpg

    Then the base of the plate was turned down by chucking the round back up to ensure that the top and bottom would be flat and parallel with each other. The bolt pattern was done with the DRO on the mill. The internal bore was countersunk and tapped so it would take the M8 machine screw that matches the original Grizzly top slide stud, which I welded in place on top (because I couldn't reach the bottom). The result is what you saw above!

    I've been meaning to do a quick write-up on the welding lathe/positioner I made that I did these welds with (hence why they look well beyond anything I can normally do :ROFL:) in the Other Builds section. I'll get to it at some point soon. Simple project, but a fun little Arduino build that's actually useful.
     
    joe williams likes this.
  16. Rob Taylor

    Rob Taylor Master
    Builder

    Joined:
    Dec 15, 2013
    Messages:
    1,470
    Likes Received:
    746
    Things got a little carried away here. I was only intending to take a poke around at the saddle and take some measurements...

    Photo Feb 28, 15 43 02.jpg

    1204 screw should go in the X pretty nicely, though the nut is a little tall for the setup. I may make use of that little pocket on the right, we'll see. I don't want to perforate the saddle and overly weaken it, but something's definitely gonna have to change. Unless I just go nuts and buy linear rails, of course...

    Photo Feb 28, 16 48 24.jpg

    1605 just squeaks in, which I wasn't absolutely expecting. And the nut should fit in the setup quite nicely once I get rid of some of those slot walls.

    Photo Feb 28, 18 19 39.jpg

    Well, things certainly escalated there. The nice thing about a big ol' chunk of mild steel on the top of the head casting is... I can actually weld (at least in part; since it's heavily in shear, proper fasteners would also be sensible) the air cylinder assembly on top of the drawbar there.

    Photo Feb 28, 18 17 09.jpg

    Check out that heckin' chonker of a bearing! I don't recall that being mentioned in the manual...

    The big question overall here, of course, is "how do I mill a mill without a mill?" The answer, I suspect, is to get the milling attachment back out for the lathe... :cry:
     
  17. Rob Taylor

    Rob Taylor Master
    Builder

    Joined:
    Dec 15, 2013
    Messages:
    1,470
    Likes Received:
    746
    Weekend Update!

    Got the head off, interesting two-part lead nut assembly, which I'm going to replicate for the ball screw assembly because it's the only way to make the whole thing removable!

    Photo Mar 01, 08 13 53.jpg

    That's the two chunks of iron on the right there. One is the lead nut with a stud, and the other is a block with a bore to fit the stud and two M8 tapped holes that can fit onto the nut-stud after the nut has already been inserted into the column. It's a little tricky, but seems to work ok.

    Got the new (narrower, lower, heavier) stand put together and the concrete block set on top:

    Photo Mar 01, 08 14 04.jpg

    That used to be the surface plate bench, but I cut about 16 inches out of the main joists each side of the bridging/cross-bracing and now the whole thing's only about 3ft wide, which is nice. Trying to avoid adding too much horizontal space, so I may not even deck all of it either, and have some spots available for hoses and cables to drop down. The hollow at the front should let me get almost right up to the table (or put the y-axis stepper at a very uncomfortable height, time will tell!).

    Started the ball screw multi-part connector assembly...

    Photo Mar 02, 18 37 44.jpg

    There's a section of M8 stainless screw in there, plug welded top and bottom to the mild with ER309, then zipped around with regular ER70S2. Recently I through-bored it and tapped it M6, so hopefully there's still some of that screw holding up in there! I'm considering all of this to be replaceable if required, though. Right now I just want the machine working, and then it can make its own parts as necessary, even if it's at a slower pace.

    Photo Mar 03, 06 49 53.jpg

    There's 3-5 thou of wobble here and there, but it's really hard to tell if it's the screw or the setup. I'll have to try again later, but since the screw is floating anyway, it may not even end up making a difference.

    Then lots of things went wrong...

    Photo Mar 03, 08 54 21.jpg

    Photo Mar 03, 09 40 46.jpg

    Made notes and counts in case of disaster...

    Photo Mar 03, 10 37 29.jpg

    But then I made a tool and everything was good! 13.7mm outside, 10.1mm inside, give or take, for 1605 screw. Much easier to repack and adjust a couple balls here and there with that thing. It went back on nice and smoothly, and back to it!

    Photo Mar 03, 11 12 46.jpg

    Lots of layout for this, without a DRO!

    Photo Mar 03, 14 38 22.jpg

    Bearing flange mount and motor mount ready to duplicate. Then just gotta add some standoffs. All the boring is being done on the lathe in the 4-jaw. I'll probably remake a thicker one of these in 1/4" or 5/16" steel once the mill is working.

    Photo Mar 03, 18 31 50.jpg

    The other side of the nut assembly tacked up! The big radius/chamfer is for the welds. This is about 0.001" bigger than the stud above (0.7386" vs 0.7374", ish), which is great for fitting but I don't like the slop, hence why I added the core M6 thread. So this will get screwed on... Somehow. Through the head, probably, I'll have to make a reduced-head M6 screw... Or just drill a little extra out of the screw slot in the head. Gonna build these welds up as much as possible since there's a little room in the dovetail gap and it would help hold the M8 screw threads that will actually hold this on to the head.

    The head connection is a little confusing, I imagine, I'll get better pictures later. But that's all for now. Progress is happening!
     
    joe williams likes this.
  18. Rob Taylor

    Rob Taylor Master
    Builder

    Joined:
    Dec 15, 2013
    Messages:
    1,470
    Likes Received:
    746
    Lots of progress made! Gonna try and show what ended up being a fairly complex, non-linear process as quickly and simply as possible. Obviously if something isn't clear, just bring it up!

    Photo Mar 06, 06 17 11.jpg

    Using a tap as a transfer punch, haha. Not the most accurate method, but didn't end up being a problem.

    Photo Mar 06, 07 11 47.jpg

    I found the magic screw to remove the head! So this is the actual "carriage", I suppose. The slot and pocket is where it attaches to the lead nut...

    Photo Mar 06, 07 18 40.jpg

    This is the reverse side, inside the dovetail, and the connection block which is bored the other side. That allowed for a floating connection (in and out, so the exact screw angle isn't super important) with the head. Obviously for a manual mill, that's fine; you're typically setting and locking the head, then using the quill for fine feed and height setting. For a CNC mill, that can't work, because the head must be accurately positionable in real time. So I have to try and create a similar type of fastening, but with a more precise depth and greater adjustability.

    Note the grubscrews, which allow you a fine downfeed to set your nut height and tension your screws against. I hadn't originally seen them and wasn't sure how I was going to perfectly set the height- by feeding shims into the slot, maybe?- but they're really the heart of the connection!

    Photo Mar 06, 07 44 07.jpg

    I decided against using the bore, so I'm adding material back in so that I can add more screw holes!

    Photo Mar 06, 07 47 38.jpg

    Enough material to do the job!

    Photo Mar 06, 08 02 17.jpg

    Wasn't critical on this face skim, but how I was dialling in the bores for exact positioning. Having a lathe and a drill press really saved the day here!

    Photo Mar 06, 17 10 38.jpg

    The finished partial nut bracket. Head coupling? That might work.

    Photo Mar 07, 13 02 07.jpg

    QCing the motor mount standoffs on the surface plate. Even though I wasn't using a rigid coupler, I wanted the whole thing to be really consistent.

    Photo Mar 07, 14 03 47.jpg

    Dammit. Almost!


    Photo Mar 07, 15 31 59.jpg

    This thing really saved me, even though I haven't used it in well over a year, maybe two.


    Photo Mar 07, 15 43 59.jpg

    Trying to figure out the exact order everything had to fit together to actually be accessible, tightenable, and clearanced!

    Photo Mar 07, 15 45 36.jpg

    Love this finished assembly! Threaded holes on the bearing plate, tightened up, and M6 clearance holes on the motor plate with counterbores. Worked through the eventualities in my head and realised this was the way to go.

    Photo Mar 07, 16 11 44.jpg

    Relieving the mounting plate screw heads holding the standoffs on.


    Photo Mar 07, 16 44 40.jpg

    These originally screwed together directly, but they're all gonna take one M6 screw through the core, then two additional M6s holding the coupling directly to the head. This keeps things accessible later on. This has to be set fairly perpendicularly to the column, because the head carriage has to lift over it (without the gib) and then set down over it. It's a little awkward, but a very solid fit.

    Note in the background the screws I tapped into the column. These, and another one on the back of the column, pinch the floating nut plate inside the column in a specific location. Part of setting it up was to get a consistent drag on the head carriage once the gib was reinstalled by adjusting the angle of the screw. Could it just be left floating? Probably. Seems a little not-quite-best-practice to me though.

    Photo Mar 07, 16 52 27.jpg

    Hard to screw on the ballscrew lock nut with all those in the way. These went back on, then the motor plate, and it was good. And done!

    Tested with bCNC over grbl (will have to remember to reset the values when I use it for the laser again!) and it moves incredibly smoothly with plenty of power. Very authoritative. Will be interesting to see how much lash it ends up delivering under z load in a material. Fortunately, it's pretty rare, even in 3D contouring thanks to roughing/finishing passes, to see any significant z loading except during drilling, when backlash is somewhat irrelevant (at least, at these levels) anyway. Depending on how well I repacked the balls, it should be comfortably under a thou of lash regardless of load levels, even if it does become apparent. But that's what tumblers are for! :D
     
    Gary Caruso and sharmstr like this.
  19. joe williams

    joe williams Well-Known
    Builder

    Joined:
    Nov 9, 2015
    Messages:
    100
    Likes Received:
    59
    Looks like a lot of fun problem solving and creative solutions! The assembly with the stand-offs is a cool looking piece! Keep it up!
     
  20. Rob Taylor

    Rob Taylor Master
    Builder

    Joined:
    Dec 15, 2013
    Messages:
    1,470
    Likes Received:
    746
    Oh, you can say that again! Plenty of standing and staring at something for 20 minutes pondering all possible options.The standoff bracket was my favourite piece until the concept for the Y axis bracket popped into my head, fully-realized. It executed perfectly- the motor swivels on the lower screws, pivoting onto the belt and applying tension before being locked in place by the top screws. Tensioning is easy, assembly is easy, belt changing is easy. Lovely little piece of engineering.

    So, I, er... Made some progress.

    Photo Mar 11, 12 40 23.jpg

    The giant ball nut isn't gonna play nice with this casting...

    Photo Mar 11, 15 03 16.jpg

    ...So days of drilling and grinding ensued.

    Photo Mar 15, 07 58 52.jpg

    While I was figuring out exactly how I was going to attach the screw to the casting, I got started on the nut bracket. Not the biggest fan of the undercut in this one, but it's more than strong enough for the job. It's super overcooked, but it's also invisible in the end, so...

    Photo Mar 17, 11 18 52.jpg

    Intermediate plate, was the answer! Something along these lines... Who says the screw needs to attach to the casting?!

    Photo Mar 18, 08 29 38.jpg

    Getting creative to cut out shapes in half inch plate...

    Photo Mar 18, 10 39 37.jpg

    Over-under. Nice. Shame the concrete stand gets in the way or that motor would be flipped around under the plate!

    Photo Mar 18, 16 06 03.jpg

    Top brackets on!

    Photo Mar 19, 15 51 32.jpg

    Main brackets on! I learned the valuable skill of "letting your welds cool between passes" this month. Pretty helpful. Makes all the difference in the world to the final appearance!

    Photo Mar 21, 04 08 47.jpg

    Bracket wasn't getting me as much travel as I'd like, about 4-1/4". NFG! Time for desperate measures.

    Photo Mar 21, 06 18 57.jpg

    This "making it up as you go along" lark gets pretty hairy sometimes.

    Photo Mar 21, 14 23 21.jpg

    Er... Sure. Hey, welding practice is welding practice!

    Photo Mar 25, 09 56 16.jpg

    One of my least favourite parts. Figuring out actually where the x axis was compared to the overall planes.

    Photo Mar 25, 14 32 08.jpg

    Got there in the end.

    Photo Mar 25, 16 23 37.jpg

    The X axis bearing/motor mount end was the bane of my existence on this project.

    Photo Mar 25, 16 23 37.jpg

    Trying to get everything exactly dimensioned so that assembly is easier.

    Photo Mar 25, 17 53 57.jpg

    Started this out with a boring bar, got impatient.

    Photo Mar 25, 18 18 19.jpg

    Almost finished.

    Photo Mar 27, 07 37 18.jpg

    Testing screw height, tail end.

    Photo Mar 27, 09 17 21.jpg

    Testing screw height, head end. What a time this was.

    Photo Mar 27, 14 26 44.jpg

    Bondo-squishing the nut mounting face with JB Weld SteelStik.

    Photo Mar 27, 16 26 17.jpg

    Noice.

    Photo Mar 29, 16 13 47.jpg

    This bolt pattern transfer was about as nerve-wracking as you'd imagine. No second chances, no later adjustments!

    Photo Mar 30, 13 29 47.jpg

    Three batteries, two teeth, and probably some melty brush brackets later, got the nut reliefs for the top base plate in.

    Photo Mar 31, 12 05 04.jpg

    Re-jiggered the table. I'll mount the PC tower another way.

    Photo Mar 31, 13 07 51.jpg

    A less-successful transfer, but still works fine.

    Photo Mar 31, 13 18 52.jpg

    Old electrical box from Habitat. Dunno what the system was, but I'm gonna have to play with those caps sometime!

    Photo Mar 31, 14 56 11.jpg

    Assembly in progress!

    Photo Mar 31, 17 39 10.jpg

    Then spent half a day making the stupid X-axis bracket work.

    Photo Apr 01, 17 10 51.jpg

    Done!

    March 1st-April 1st. Not bad. Plenty still left to do, but can be done at a less breakneck pace, now. Electrical is relatively straightforward, will probably get to that over the next few days, and other upgrades and additions will have to be done over a period of several months. As long as this thing's working, it's all good!

    If Stepconf in LinuxCNC pretty much gets me up and running, I'll go that way. Otherwise, I'll load bCNC on the LinuxCNC box and grbl it until I'm ready to move the wires over to the parallel breakout. It's kinda difficult to really get a grip on exactly what needs to be done to get LinuxCNC working with a machine, discussion and documentation is pretty lacking. I'll probably end up doing a step-by-step once I more fully understand it.

    On that front, I added a $12 Radeon R5 240 to the LinuxCNC box and got my 63 microsecond (not super great, but usable) jitter/latency time down to 11 microseconds (pretty excellent) by taking the graphics load off the CPU/motherboard. So that was cool!

    Fingers crossed I'm making first cuts with this thing in a week or so.
     
    joe williams likes this.
  21. ljvb

    ljvb Well-Known
    Builder

    Joined:
    Feb 14, 2019
    Messages:
    276
    Likes Received:
    87
    Pictures are awesome.. nice write up.. however.. I am going to have to put in the obligatory...

    This thread is useless without video :)
     
  22. Rob Taylor

    Rob Taylor Master
    Builder

    Joined:
    Dec 15, 2013
    Messages:
    1,470
    Likes Received:
    746
    Ha! I knowingly went into this not shooting video because video quadruples the amount of time a project takes. I'd still be on with this in June if I'd gone that route.

    There are a handful of phone video bits and pieces on my IG and in the featured story if you have an account to see it: Rob Taylor-Case (@robtaylorcase) • Instagram photos and videos

    There may be an overview video at some point later in the year where I just quickly go over the whole thing once it's at a point I'm happy with, we'll see. But for this machine, work was the priority, not content.
     
  23. Rob Taylor

    Rob Taylor Master
    Builder

    Joined:
    Dec 15, 2013
    Messages:
    1,470
    Likes Received:
    746
    Super quick update.

    The pretty version, including stand! The big space is for the coolant tank.

    Photo Apr 02, 08 14 08.jpg

    Got most of the electronics into the enclosure. Just need to mount the 5-axis parallel breakout board, and then I can start wiring up!

    Photo Apr 03, 12 48 13.jpg

    Found a relatively inexpensive source of low-profile toolsetting switches a while back after a lot of research because . Metrol, a Japanese company, makes ultra-high precision limit switches. This one, the P11DDB-DULD, is intended as a touch plate; IP67 with a carbide contact plate, and 0.5um (0.0005mm) repeatability. Best of all, only $150! Probably because it's pretty small and no-frills- no fancy body, built in overtravel limitation, or anything like that.

    Photo Apr 04, 18 17 50.jpg

    They do other general limit switches, which would be great as genuinely usable home switches, but I'm aiming at more consistent touch probing (which is a whole rabbit hole in itself... Soon!).

    I looked into LinuxCNC a bit more, and it seems like the built-in calibration wizard, StepConf, makes things about as easy as grbl for 3/4 axis machines and lathes (Not sure why it can't do 5-axis, too many possible variables, I guess). So no manually writing HAL entries, at least for now (toolchanging, glass scale reinstallation, etc notwithstanding).

    Not sure how much progress I'm gonna make this weekend with family coming in, but I think this thing should be making its first (second?) chips by the end of next week!
     
  24. Shtf45acp

    Shtf45acp New
    Builder

    Joined:
    Mar 17, 2019
    Messages:
    5
    Likes Received:
    0
    I joined this forum to ask you a few questions. I'm really looking into buying the G0758 mill. I don't really want the larger G0704 but I've noticed a lot of the mods for the G0704 looks like they will work on the G0758. I'm curious as to how long the factory Z axis lead screw is? And if the column slot can be made longer to utilize the possible entire length of the column if the mill head is flipped. Thanks!
     
  25. Rob Taylor

    Rob Taylor Master
    Builder

    Joined:
    Dec 15, 2013
    Messages:
    1,470
    Likes Received:
    746
    Mill is currently on hold for a couple of weeks, for multiple reasons. It did, however, cut its first chips, in aluminum and solid cast urethane. Other than an odd z+4 offset after toolchanges that can't be seemingly fixed (which Stefan Gotteswinter may have alluded to on his recent shop tour?) by re-touching-off, everything has gone well.

    Necessary adjustments upcoming:

    • The Sainsmart ST-V3 5-axis CNC breakout and separate DB25 terminal breakout are not very practical. I'm gonna go ahead and get the Mesa 7i76 daughterboard so I can use the proper mesaflash settings and get a predicatable pinout, as well as sufficient I/O (expanadble to 2x7i76 + serial boards if necessary!) to run all the additional bits and pieces like the jog controller and toolchanging.
    • The column needs significantly more reinforcement. I'm gonna have to get another 10x22" steel plate for that, so it can accommodate the future column-lift. Later this year(?) I think I'll take it up 5-6", which will allow for a) palletization and automation as needed, b) linear rail conversion, c) 5-axis.
    • Glass scale reinstallation. I have a z-scale on the way as well, and splitters/breakouts to wire them all in are already here. This should help me narrow down the weird tool offset issue.
    • Limit switches and Metrol touch switch still need installation
    • I need to start the enclosure. If nothing else, this can just be a coolant tray for now, it just needs to be framed such that it can be added to over time.
    • Pneumatic drawbar. I can't believe I used even a manual mill for this long changing tools by hand.
    So that's why there's a short pause on the project, to gather parts and materials.

    The current future additions list is currently more or less what you'd expect:

    • Column raise
    • Carousel (or chain magazine?) toolholder for ATC
    • 8000rpm brushless spindle + spindle bearing replacement
    • Flood coolant
    • A axis
    • Automatic lubrication distribution

    I'll get pictures of the last few weeks up here soon. Here's the couple parts I made (just messing about in Fusion 360, nothing specific):

    Photo Apr 16, 17 42 28.jpg

    Poor finish is from a cheap HSS 2-flute endmill, but in general it did well.

    Photo Apr 19, 06 10 14.jpg

    This is where the serious z-offset issues were happening. Not sure what's going on yet. Both parts have some geometry that didn't appear to be in the simulation, but I'm not overly concerned about that just yet. These were more proofs-of-motion than proofs-of-accuracy, so I'm happy.

    I didn't either, 350lb is a lot of machine if you need to be able to move it around a residence (though a decent moving dolly/hand truck would probably make short work of it, in retrospect). I also objected to being forced to pay for a stand I didn't want.

    If I was to do it over again now, I'd get the G0704, for one simple reason: the spindle-to-table distance and head travel. Z-height is at a premium in any machine, and the G0758 is pretty close to the line. The rest of the machine is really kinda similar to the G0704. I'd just throw a bench grinder on the stand or something. If the G0758 is all the machine you can fit/carry/power/etc, it's absolutely a useable, pretty impressive little unit. It'll take heavier cuts than you expect, leave cleaner surfaces than you expect, work larger parts than you expect, everything. The 2000rpm limit is unfortunate, but that seems to be common across most modern R8 machines. Thanks, Bridgeport. Even with a boring head, I typically had 0.5-1.5" of space left to work with on the z axis, so nothing specific to complain about too much, but if you need to move the head to get a tool on, you NEED at least XY glass scales on there for repeatability and speed. It's pretty tough otherwise.

    I wouldn't elongate the column slot, personally; they've ridden it pretty close to the line in terms of column rigidity as it is. Besides, it's not low-end space you need, it's extra height, and the slot comes pretty close to the top. Unless you mean the head flipped sideways, in which case, I guess you could, but I wouldn't necessarily count on its rigidity performance. In general, 8" of travel has never been the issue for me, it's always been the fact that that travel starts with the collet nose almost right on the deck. Wish they'd cut it off a couple inches higher and given us a bigger column.
     
    #25 Rob Taylor, Apr 27, 2019
    Last edited: Apr 27, 2019
  26. Shtf45acp

    Shtf45acp New
    Builder

    Joined:
    Mar 17, 2019
    Messages:
    5
    Likes Received:
    0
    No I meant flip the gib part of the head upside down. They do it on the G0704. Bison Workshop on YouTube has the G0758 and flipped it. He gained several inches up on the Z Axis. The problem is when you do that you lose the same amount of down travel. On the G0704 the guys cut the column slot down farther to gain the down travel back.

    My problem is I'd like to keep it a manual mill. If the lead screw for the Z axis isn't long enough I'll have to make a new one or pickup the threads and extended it.

    You have done some amazing work on this mill. I ordered mine today. I can't wait to get it and start modifying it. I also have the Grizzly G0768 8x16 lathe. There is quite a bit I haven't been able to do without a mill.
     
  27. Rob Taylor

    Rob Taylor Master
    Builder

    Joined:
    Dec 15, 2013
    Messages:
    1,470
    Likes Received:
    746
    I actually took a pic of the original Z leadscrew last night, but forgot to post it:

    Photo Apr 27, 16 52 35.jpg

    It comes to basically the bottom of the slot, as I recall. Fine for flipping the Z, but not long enough for extending the slot.

    I wouldn't flip it, personally, it's already kinda low on rigidity as a small machine, and then removing all that flaked bearing surface from the head/carriage contact sounds like a pretty dubious idea to me. I'd build an adapter plate before I did that, not particularly difficult with a boring head.

    What I'm going to do for z-height is build a new block, welded from 1" or 3/4" steel plate/bar, screwed into the existing threaded holes in the base and then rest the column on top. Either 1) I drill and tap the underside of the column and screw in from below, or 2) I make an extension flange at the front so the column can screw into it like normal. That would pull the column back 3/4", which would actually be good; the spindle's just a hair forward of where I'd like it at the minute. It'll also have two large column support braces; 10x22" right angle triangles welded to the base and then screwed into the narrow part of the column at the back. There'll be enough slop between the braces and the block to tram in the "floated" column, maybe epoxy shim it too, I'm not sure.

    It would be nice if the column was a screw-in-from-top type like some of the larger import bench mills!

    I have the G4000 9x19 lathe. It was as much machine as I could get for the price without going too heavy, either. I'm considering a substantial overhaul on that, too; DRO, CNC conversion, 3-phase spindle motor (I have a two-horse sitting around for it, just need a VFD), maybe a turret toolpost to make it into a "real" CNC lathe. Figuring out how to automate a 5C collet chuck would be great, too; the thru-spindle is too small to add a rear drawbar, so it would have to be at the spindle nose. A little tricky, but doable, I think.

    I also want manual machines on-tap, but drive-by-wire is gonna have to be the order of the day for a little bit until I have a more permanent and larger space.
     
  28. Shtf45acp

    Shtf45acp New
    Builder

    Joined:
    Mar 17, 2019
    Messages:
    5
    Likes Received:
    0
    The adapter plate isn't a bad idea at all. It actually would help keep the entire gib plate on the column. When you flip the column the gib plate extends up past the end of the column. A lot of guys make spacers for the the bottom of the column and the head of the mill for the G0704. Again since it the G0758 basically the same design as the G0704, you could use the same mods. I also plan on mounting it on top of a 1/2" plate with large gussets to help stabilize or brace the column.

    I like manual machines lol, idk call me crazy but CNC gets to complicated for me to understand.

    I almost bought the G4000 but decided against it for the G0768 because of the variable drive. Another reason I wanted to get a mill is to the head stock off my lathe and bore it out for larger bearings. That will let me make a larger spindle and open up the spindle bore to 1.5". There is a lathe on Ebay that is the same design as the G0768 with 38mm spindle bore. It doesn't have a reversing lead screw gear box though and is a metric lead screw.
     
  29. Shtf45acp

    Shtf45acp New
    Builder

    Joined:
    Mar 17, 2019
    Messages:
    5
    Likes Received:
    0
    Have you had any problems tramming your mill? I finally just got it all cleaned up and back together. Something isn't right in the gib locks. Unless I keep the gib locked down so it is barely moveable up and down, I can't keep it trammed.
     
  30. Rob Taylor

    Rob Taylor Master
    Builder

    Joined:
    Dec 15, 2013
    Messages:
    1,470
    Likes Received:
    746
    Zero issues as far as I can tell; column and head were done with a new granite square I got specifically for the job. Everything seems to be within a couple tenths per inch at most.

    Do you have the gib in backwards? I Sharpied on mine which gib came from which axis and in what orientation as I removed them from the machine, in case it made a difference going back in (I don't know how tapered they are).
     

Share This Page

  1. This site uses cookies to help personalise content, tailor your experience and to keep you logged in if you register.
    By continuing to use this site, you are consenting to our use of cookies.
    Dismiss Notice