Welcome to Our Community

Some features disabled for guests. Register Today.

Expanded Routy using 290 build instructions

Discussion in 'CNC Mills/Routers' started by jkalberer41, Apr 4, 2016.
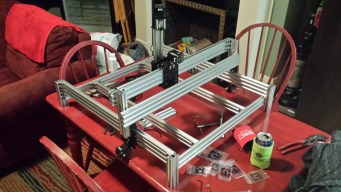
  1. jkalberer41

    Builder

    Joined:
    Jan 12, 2016
    Messages:
    34
    Likes Received:
    3
    jkalberer41 published a new build:

    Read more about this build...
     
  2. jkalberer41

    Builder

    Joined:
    Jan 12, 2016
    Messages:
    34
    Likes Received:
    3
    I'm using an arduino and CNC shield to run my steppers. I flashed GRBL to the arduino and installed the shield and drivers. I'm trying to test the steppers using GRBL Panel, but they haven't moved. I must be missing an important step here. Was I correct to flash the arduino before I installed the shield and drivers?
     
    #2 jkalberer41, Apr 4, 2016
    Last edited: Apr 5, 2016
  3. jkalberer41

    Builder

    Joined:
    Jan 12, 2016
    Messages:
    34
    Likes Received:
    3
    Turns out the drv8825 I was testing off of was defective. Replacement is on the way. Is the best way to tune these in just using an ammeter? Ronald van Arkel says he tuned his to .7A using a 24V power supply and the same setup, is this a good rule to go by or is it case-by-case?
     
    #3 jkalberer41, Apr 7, 2016
    Last edited: Apr 8, 2016
  4. Ronald van Arkel

    Staff Member Builder Resident Builder

    Joined:
    May 7, 2014
    Messages:
    472
    Likes Received:
    245
    Hello,

    I've changed my screen name from puntoMX to Ronald van Arkel some time back, so people won't get confused ;).

    Thank you for posting your build. looks like you didn't build it 100% like it was explained in the manual, like drilling out the corner brackets, but it looks like it came together well. You followed the right procedure for flashing the Arduino Uno, to bad you had a damaged driver.

    I've got some links for you with images to how to adjust the driver with a volt-meter (or multi):
    A4988 vs DRV8825 Chinese Stepper Driver Boards - RepRapWiki This page shows where the measure points are, that's the 3rd pin on the IC and the "middle" pin on the pot-meter.
    DRV8825 Adjust Stepper Current - my home fab this link explains what you should measure and and calculate the amperage of 0.7A, that translates in 0.35v reference voltage between the 2 points.

    Keep up the build!

    -Ronald
     
  5. Ronald van Arkel

    Staff Member Builder Resident Builder

    Joined:
    May 7, 2014
    Messages:
    472
    Likes Received:
    245
  6. jkalberer41

    Builder

    Joined:
    Jan 12, 2016
    Messages:
    34
    Likes Received:
    3
    I've got them tuned to .35V, but in the last link he tuned to .58V, is there an advantage to that?
     
  7. Ronald van Arkel

    Staff Member Builder Resident Builder

    Joined:
    May 7, 2014
    Messages:
    472
    Likes Received:
    245
    It's just an example, and it looks like he's using a 12vDC power supply. He also uses an example of 70% of the maximum rated current of the NEMA17 1.68A motor, but this doesn't count for your build altrough the rated current is the same.

    You are using a 24vDC PSU, isn't it? As a reference I would go for 0.7A thus the 0.35v.

    -Ronald
     
  8. jkalberer41

    Builder

    Joined:
    Jan 12, 2016
    Messages:
    34
    Likes Received:
    3
    Excellent, they seem to be running much more smoothly than before. When I flashed the Arduino, the baud was 115200, but it will only work with the setting at 9600. Is this normal?
     
  9. Ronald van Arkel

    Staff Member Builder Resident Builder

    Joined:
    May 7, 2014
    Messages:
    472
    Likes Received:
    245
    Good to hear, they might need a bit of tweaking later on when you start cutting... but that's later.

    About the 9600, must be the older GRBL 0.8, 0.9 should be 115200.
     
  10. jkalberer41

    Builder

    Joined:
    Jan 12, 2016
    Messages:
    34
    Likes Received:
    3
    I'm using the newest version, it was flashed at 115200. Strange, I might have to do it over.
     
  11. jkalberer41

    Builder

    Joined:
    Jan 12, 2016
    Messages:
    34
    Likes Received:
    3
    I got all of that figured out. The new driver is in and its all running smoothly. The steppers seem lethargic, however. It may just be the gcode I used, but I'm testing with a mid-to-gcode music code. I figured this would be easiest for me to see if they were properly running based on the sound. It definitely does not sound like the Star Wars cantina song, I can tell you that for sure.
     

Share This Page

  1. This site uses cookies to help personalise content, tailor your experience and to keep you logged in if you register.
    By continuing to use this site, you are consenting to our use of cookies.
    Dismiss Notice