Welcome to Our Community

Some features disabled for guests. Register Today.

Dragon Too Plasma Cutter

Discussion in 'Laser Cutters' started by Metalguru, Mar 31, 2017.
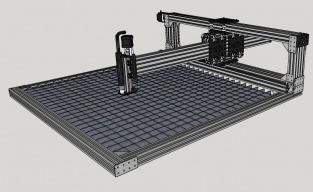
  1. Metalguru

    Metalguru Veteran
    Builder

    Joined:
    Dec 29, 2015
    Messages:
    752
    Likes Received:
    545
    Paul Stoller likes this.
  2. Tracy Ranson

    Tracy Ranson Well-Known
    Builder

    Joined:
    Nov 4, 2014
    Messages:
    88
    Likes Received:
    32
    I am in the process of building a plasma cutter and I really like your concept. If you don't mind sharing your files that would be awesome!
     
  3. Metalguru

    Metalguru Veteran
    Builder

    Joined:
    Dec 29, 2015
    Messages:
    752
    Likes Received:
    545
    I'll try to get them up. I've had problems with putting up large Sketchup files on this list before, I'll see how it goes.

    MG
     
  4. Metalguru

    Metalguru Veteran
    Builder

    Joined:
    Dec 29, 2015
    Messages:
    752
    Likes Received:
    545
    Seems to have worked OK. Note that this is a SketchUp 2017 file, it will require 2017 to open it. Also note that there are a lot of small parts and details missing, it's just a concept. Let me know if you find any errors.

    MG
     
    Tracy Ranson likes this.
  5. mytechno3d

    mytechno3d Veteran
    Builder

    Joined:
    Dec 15, 2013
    Messages:
    108
    Likes Received:
    311
    Hello
    Really nice project , i was thinking to build somethink like this to complet my CNC plasma cutting table for smaller cuts .
    I will start this project next week and let you now the progress of the project .
     
  6. Mark Carew

    Mark Carew OpenBuilds Team
    Staff Member Moderator Builder Resident Builder

    Joined:
    Jun 28, 2013
    Messages:
    2,742
    Likes Received:
    2,407
    Nice idea @Metalguru this is going to be really cool to see in action.
     
  7. Metalguru

    Metalguru Veteran
    Builder

    Joined:
    Dec 29, 2015
    Messages:
    752
    Likes Received:
    545
    Yeah, post the build on the builds page so we can see how it turns out!

    MG
     
  8. mytechno3d

    mytechno3d Veteran
    Builder

    Joined:
    Dec 15, 2013
    Messages:
    108
    Likes Received:
    311
    Construction has begun ... if i have some time in the afternoon i will post some pictures . :):):)

    I was thinking of putting a floating head for the torch support, but I will instead use an inductive sensor. (

    to reduce the weight at the end of the arm )
     
  9. mytechno3d

    mytechno3d Veteran
    Builder

    Joined:
    Dec 15, 2013
    Messages:
    108
    Likes Received:
    311
    DRAGON2.jpg DRAGON2PLASMA.jpg

    Aluminium plates were cut with my other plasma cutting table .
    Cutting aluminium with plasma work fine but the results are not as good as with steel .

    To be continued ...
     
    #9 mytechno3d, Apr 25, 2017
    Last edited: Apr 25, 2017
  10. Metalguru

    Metalguru Veteran
    Builder

    Joined:
    Dec 29, 2015
    Messages:
    752
    Likes Received:
    545
    I like those custom side plates. Going to be a bit difficult to adjust your eccentrics, no?

    Can't wait to see it in action...
     
  11. mytechno3d

    mytechno3d Veteran
    Builder

    Joined:
    Dec 15, 2013
    Messages:
    108
    Likes Received:
    311
    Adjust the eccentrics is not a problem because the 2 custom plates are mount after the adjustement of the 2 carriers of the Y axis .
    But if something go wrong or move , effectively , you will have to remove the 2 custom plates to re-adjust the eccentrics .

    I just started a new post on the builds page .
    Dragon too Plasma cutter Mods (MetalGuru idea)
     
  12. Giarc

    Giarc OpenBuilds Team
    Staff Member Moderator Builder Resident Builder

    Joined:
    Jan 24, 2015
    Messages:
    2,892
    Likes Received:
    1,610
    Put a cutter at each end and you can cut two identical parts at once. :thumbsup: It would help balance it, too.
     
  13. mytechno3d

    mytechno3d Veteran
    Builder

    Joined:
    Dec 15, 2013
    Messages:
    108
    Likes Received:
    311
    Picture of the floating head at the end of the arm :

    IMG_20170502_082025.jpg
     
  14. Metalguru

    Metalguru Veteran
    Builder

    Joined:
    Dec 29, 2015
    Messages:
    752
    Likes Received:
    545
    Why do you need 2 sets of carriages for the torch? Isn't that a lot of extra weight?

    MG
     
  15. mytechno3d

    mytechno3d Veteran
    Builder

    Joined:
    Dec 15, 2013
    Messages:
    108
    Likes Received:
    311
    I use this kind of assembly to detect the sheet of steel and set the "Zero" of my Z axis .
    You can see a full assembled floating head on this picture ( this is my other cutting table )

    z floting head.jpg

    When the torch is on the sheet of steel , the second carriage move up to the endstop .
    An offset is set in Mach3 , this is how i set to 0 my z axis .

    The extra weight is not really big .
    Another way to do this could be using an omic torch sensor on the torch itself ( i will explore this solution .. )
     
  16. Metalguru

    Metalguru Veteran
    Builder

    Joined:
    Dec 29, 2015
    Messages:
    752
    Likes Received:
    545
    Ah, I see. Seems a bit complicated, you could just use an inductive proximity sensor or even just a microswitch to detect the material to be cut...

    MG
     
  17. mytechno3d

    mytechno3d Veteran
    Builder

    Joined:
    Dec 15, 2013
    Messages:
    108
    Likes Received:
    311
    To keep a precise "zeroing" of the Z axis , the touching point must be as close as possible of the torch .
    On my last try with an inductive sensor or with a simple endstop , the life expectancy of the sensor was very limited .
    This is why i use this kind of solution .
    Extra weight is around 200g .

    The wiring is now finished (as expected , it was not really easy .. but it's done .. )
     
  18. Metalguru

    Metalguru Veteran
    Builder

    Joined:
    Dec 29, 2015
    Messages:
    752
    Likes Received:
    545
    So, I'm not clear on how this works. It looks like there is a microswitch on your outside carriage, do you lower the inside carriage down until the torch contacts the work, and lifts the second floating carriage until the microswitch contacts? Then lift the inside carrage a fixed amount to set the torch height?

    Why would the sensor life of an inductive sensor be limited? Does the electrical field from the torch affect it? Spatter? Wear and tear from contacting the table?

    Some photos with the torch attached might be helpful. A video of it in action would be even better...

    Thanks
    MG
     
  19. Redneck darrell

    Builder

    Joined:
    Jun 30, 2016
    Messages:
    13
    Likes Received:
    0
    How do you wire the plasma cutter to the cnc. Meaning from my tinyg to the switch on my hypertherm 30. I have looked everywhere and can't seem to find any information.
     
  20. Metalguru

    Metalguru Veteran
    Builder

    Joined:
    Dec 29, 2015
    Messages:
    752
    Likes Received:
    545
    Use the Spindle control output, and wire it to a 5v relay module. Wire the relay NO contacts across the contacts on your plasma cutter that normally go to the torch switch. Use M3 g-code to turn on, M5 to turn off.

    MG
     
  21. Redneck darrell

    Builder

    Joined:
    Jun 30, 2016
    Messages:
    13
    Likes Received:
    0
    Perfect thank you so much that's what I have been missing. I use fusion 360 so m3 and m5
    G-code is built into the cutting mode so that's taken care of, but thanks again that was a big help.
     
  22. Redneck darrell

    Builder

    Joined:
    Jun 30, 2016
    Messages:
    13
    Likes Received:
    0
    What amp relay is needed?
     
  23. Metalguru

    Metalguru Veteran
    Builder

    Joined:
    Dec 29, 2015
    Messages:
    752
    Likes Received:
    545
    Should just need a small relay, probably way less than 1A. You could measure the current on your normal torch switch by just shorting a current meter across the connector pins and see how much current is drawn.

    MG
     
    Redneck darrell likes this.
  24. igorko55

    igorko55 New
    Builder

    Joined:
    Feb 8, 2020
    Messages:
    2
    Likes Received:
    0
    very nice project you have from this and detailed drawings and electronics assembly thank you
     

Share This Page

  1. This site uses cookies to help personalise content, tailor your experience and to keep you logged in if you register.
    By continuing to use this site, you are consenting to our use of cookies.
    Dismiss Notice