Welcome to Our Community

Some features disabled for guests. Register Today.

DIY Flywheel Camera Slider

Discussion in 'Other Builds' started by Beam, Jun 7, 2017.
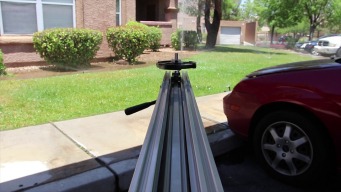
  1. Beam

    Beam New
    Builder

    Joined:
    May 12, 2017
    Messages:
    5
    Likes Received:
    9
    Anthony Bolgar likes this.
  2. MaryD

    MaryD OpenBuilds Team

    Joined:
    Apr 13, 2016
    Messages:
    649
    Likes Received:
    639
    With this video, anyone can make a camera slider!
     
    Beam and Anthony Bolgar like this.
  3. Anthony Bolgar

    Anthony Bolgar Journeyman
    Builder

    Joined:
    Jan 14, 2016
    Messages:
    354
    Likes Received:
    198
    What a nice simple solution.
     
    Beam likes this.
  4. Beam

    Beam New
    Builder

    Joined:
    May 12, 2017
    Messages:
    5
    Likes Received:
    9
    Thank you :)
     
  5. Beam

    Beam New
    Builder

    Joined:
    May 12, 2017
    Messages:
    5
    Likes Received:
    9
    Thanks :)
     
  6. Mark Carew

    Mark Carew OpenBuilds Team
    Staff Member Moderator Builder Resident Builder

    Joined:
    Jun 28, 2013
    Messages:
    2,741
    Likes Received:
    2,407
    @Beam this was a really great build to watch! Well done my friend thank you so much for sharing this with everyone. Your skillz are amazing. :thumbsup:
     
    Beam likes this.
  7. Beam

    Beam New
    Builder

    Joined:
    May 12, 2017
    Messages:
    5
    Likes Received:
    9
    Oh wow! Thank you man :)
     
    Mark Carew likes this.
  8. Rob Taylor

    Rob Taylor Master
    Builder

    Joined:
    Dec 15, 2013
    Messages:
    1,470
    Likes Received:
    746
    Looks good! Inertia is definitely the killer feature of proper video sliders, and it looks like it got delivered here- the test shots were nice! I like the 1/4-20 T-nut idea too, I definitely had problems with the aluminum's thread holding capability- but it's designed for extrusion, not machining. These days I'd just do steel angle brackets t-nutted to the sides, but if there's a quarter inch available in the slots, this is a pretty low-profile solution.

    Only thing I'd say is watch the video editing (a lesson I'm working on learning myself, also)- I found myself skipping back and forth to find out what was going on because you lingered on things that didn't really need to be and left processes that didn't need precise description at original speed. Could hack that 41 minutes down to about 15 and make it more engaging and watchable without too much issue, I suspect.

    That Dremel shot still took me back though, haha!
     
  9. Beam

    Beam New
    Builder

    Joined:
    May 12, 2017
    Messages:
    5
    Likes Received:
    9
    Thank you very much for the feedback! I love your videos. :)
     
    Rob Taylor likes this.
  10. Anthony Castelluci

    Builder

    Joined:
    Sep 19, 2017
    Messages:
    3
    Likes Received:
    3
    This is great. I have a Sony FS5 and returned the 1st slider I bought as the plate and 5/8" screw attachment seemed really weak.

    However, I only want to take this so far, in that, I do not feel I need to add the flywheel mechanism now. I simply am buying the parts to allow me to have a nice manual slider.

    That said, does anyone have ideas about giving the first stage a finished look and functionality. My idea are to have feet on the bottom, (no problem, I can find those and attach them). Also want to create attachment points to be able to loft the slide between 2 stands. I have a pair of Newner stands with a 5/8" opening in the top with a side screw tensioner.

    Oh wow...I just built it in my head. ****! This is like LEGO! Yeah< I can use a tap wrench to make a 5/8" rod to fits into the C-rail, and then That will fit into the into the stand. This way I can securely lock each into place so my $6,000 camera set up stays safe.

    Also looking at adding short 8" legs with hemispherical rubber feet. This will allow me to run the slide on a tilt and get elevated trucking shots.

    Also will want to add more lengths of c-beam, in the future to make long tracking shots.

    Also hit me that if the Xtreme Solid Wheels can hold 25lbs each, then making a wheel pod for 4 corners of a full sized dolly using 6 wheels on each pod, would give you 600 lbs max. Which means, I could build a full sized dolly and use C-Beams as the track.

    But I am digressing heavily here. Really, if anyone can help me with some ideas on getting the C-Beam secured to these stands, I would be grateful. https://www.amazon.com/gp/product/B073WVJ7C7/ref=oh_aui_detailpage_o01_s00?ie=UTF8&psc=1

    Here are the parts I have in my shopping cr so far.

    [​IMG] C-Beam® Linear Rail
    Length: 1500mm
    Change options
    Remove
    $39.00
    $39.00

    [​IMG] C-Beam® Gantry Plate - XLarge
    Remove
    $14.95
    $14.95

    [​IMG] Low Profile Screws M5
    Length: 35mm
    Change options
    Remove
    $4.25
    $4.25

    [​IMG] Low Profile Screws M5
    Length: 10mm
    Change options
    Remove
    $3.20
    $3.20

    [​IMG] Low Profile Screws M5
    Length: 20mm
    Change options
    Remove
    $3.40
    $3.40

    [​IMG] Tee Nuts (25 Pack)
    Remove
    $4.95
    $4.95

    [​IMG] Eccentric Spacer
    Length: 6mm
    Change options
    Remove
    $2.00
    $4.00

    [​IMG] Aluminum Spacers
    Size: 6mm
    Change options
    Remove
    $0.20
    $0.80

    [​IMG] Xtreme Solid V Wheel™ Kit
    Remove
    $6.75
    $27.00
     
    #10 Anthony Castelluci, Sep 20, 2017
    Last edited: Sep 20, 2017
  11. GrayUK

    GrayUK Openbuilds Team Elder
    Staff Member Moderator Builder

    Joined:
    May 5, 2014
    Messages:
    1,668
    Likes Received:
    627
    Great idea! Good video! Very "MacGyver"! :D
    Hope it gives you long service.
    Well done. Good job. :thumbsup::thumbsup:
    Gray
     
    Anthony Bolgar likes this.
  12. Anthony Castelluci

    Builder

    Joined:
    Sep 19, 2017
    Messages:
    3
    Likes Received:
    3
    Used this to build my manual slider. The only difference is I had to buy a 3/8 inch tap as I used a Manfrotto MVH 500AH flat bottom head. The reason I chose this head is that I have the ball mount version of this head, the Manfrotto MVH 500A. And these heads have what Manfrotto calls their "Bridging System". And this is a mounting plate and quick release system that I have attached to my Sony FS5. So now I can lock into and out of each Head quickly and easily so there is no issue on set. It's fast and professional.

    Want to thank Open Builds and Beam a thank you for the great ideas & great products. The camera sliders for $500+ are laughable compared to what I built.
     
    MaryD and GrayUK like this.

Share This Page

  1. This site uses cookies to help personalise content, tailor your experience and to keep you logged in if you register.
    By continuing to use this site, you are consenting to our use of cookies.
    Dismiss Notice