Welcome to Our Community

Some features disabled for guests. Register Today.

C-Beam XL - TinyG - Aluminium Plate - Dewalt 611

Discussion in 'CNC Mills/Routers' started by jamesdjadams, Jan 31, 2017.
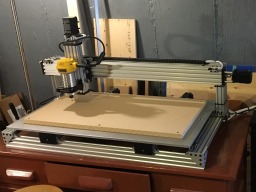
  1. jamesdjadams

    jamesdjadams Well-Known
    Builder

    Joined:
    Nov 1, 2016
    Messages:
    40
    Likes Received:
    48
    Darathy likes this.
  2. jamesdjadams

    jamesdjadams Well-Known
    Builder

    Joined:
    Nov 1, 2016
    Messages:
    40
    Likes Received:
    48
    Hi Everyone,

    I'm exploring different options for my spoiler board setup and clamping system. Does anyone have any suggestions or ideas to share? What has worked for you? What hasn't? I am thinking about re-surface the cutting area using the mill which will leave a pocket in the board and then drilling holes along the perimeter for clamps. I'm open to using double sided tape so long as it won't leave residue on the spoiler board and work piece.

    -Jamie
     
  3. snokid

    snokid Journeyman
    Builder

    Joined:
    Oct 11, 2014
    Messages:
    335
    Likes Received:
    104
    what I mostly do is just screw the piece down to the spoiler board with drywall screws. simple cheap and easy....
    Bob
     
    Giarc and jamesdjadams like this.
  4. Giarc

    Giarc OpenBuilds Team
    Staff Member Moderator Builder Resident Builder

    Joined:
    Jan 24, 2015
    Messages:
    2,892
    Likes Received:
    1,610
    I have found this to work best as well.
     
    jamesdjadams likes this.
  5. Mark Carew

    Mark Carew OpenBuilds Team
    Staff Member Moderator Builder Resident Builder

    Joined:
    Jun 28, 2013
    Messages:
    2,741
    Likes Received:
    2,407
    jamesdjadams likes this.
  6. jamesdjadams

    jamesdjadams Well-Known
    Builder

    Joined:
    Nov 1, 2016
    Messages:
    40
    Likes Received:
    48
    Thanks Mark. You guys have a great site going on here. It is immensely helpful.
     
  7. PhotoSgt85

    PhotoSgt85 Well-Known
    Builder

    Joined:
    Jul 27, 2015
    Messages:
    54
    Likes Received:
    66
    Have you tried cutting aluminum on this? I have an XL as well but am having some issues and wanted to get others opinions as well as feeds and speeds.
     
  8. jamesdjadams

    jamesdjadams Well-Known
    Builder

    Joined:
    Nov 1, 2016
    Messages:
    40
    Likes Received:
    48
    Hi @PhotoSgt85

    I haven't tried aluminum yet. I suspect that it will be OK if taken very slowly. I plan on doing some in the next few weeks. I'll let you know my results.

    Have you noticed lines appearing inside your wheels, almost like cracks? Maybe it's normal? I've only run the machine for about 10 hours or so..

    Let me know how it works out for you if you beat me to it!

    Cheers,
    -Jamie
     
    Morb likes this.
  9. PhotoSgt85

    PhotoSgt85 Well-Known
    Builder

    Joined:
    Jul 27, 2015
    Messages:
    54
    Likes Received:
    66
    I do have some scoring along the inner edges of the wheels but that is merely the bearing point of the V slot on the wheel. I wouldn't say they are cracks, so perhaps you are seeing something different than I am. I just had all three axes off the machine today as they seem to be coming loose when I run, but I think that was partially a controller issue with driving the steppers I have since resolved and a few times of overshooting the travel (I have the end stops but haven't wired them in yet) . I think slowing it down is the way to go as the overall stiffness of the XL may not be ideally suited to aluminum as say the standard C Beam Machine. This also means I will likely pursue a stiffening campaign after this Delta 3D printer job I am trying to cut.

    -PhotoSgt85
     
    Morb and jamesdjadams like this.
  10. Jacques D

    Jacques D New
    Builder

    Joined:
    Oct 9, 2016
    Messages:
    49
    Likes Received:
    13
    Hello James,

    I am building a 3D printer using C-beam linear actuators. I also have a side-to-side play at the interface between the acme screws and the bearings. Is the plumber's tape trick still holding and working ? Or has it worn out over time ?

    Very nice build by the way ! I will probably do the same "electronic box" as you, i find it very clean !

    Thank you !
    Jacques
     
    Morb likes this.
  11. jamesdjadams

    jamesdjadams Well-Known
    Builder

    Joined:
    Nov 1, 2016
    Messages:
    40
    Likes Received:
    48
    Hi @Jacques D!

    The plumbers tape is still holding but building the actuators with better fitting tolerances would be the ticket.. You can epoxy the bearings into place which is something that I may take on one of these days. I haven't explored any options beyond the tape to make a better fit between the lead screw and the bearing.

    Thanks for checking out my build and I look forward to seeing yours. I may build a 3D printer soon too. I keep seeming to need one!

    Cheers!
    -Jamie
     
  12. mcbuilder22

    Builder

    Joined:
    Jan 12, 2015
    Messages:
    45
    Likes Received:
    24
    Do you think using longer C-beam to get more than a 13" wide cut area is feasible?

    I'm needing to extend it at least 2 inches but if it's no issue I would extend it to 24" so I could load and cut 24"x24" pieces

    Thanks
     
  13. PhotoSgt85

    PhotoSgt85 Well-Known
    Builder

    Joined:
    Jul 27, 2015
    Messages:
    54
    Likes Received:
    66
    jamesdjadams likes this.
  14. Robert Bailey

    Robert Bailey Well-Known
    Builder

    Joined:
    Mar 23, 2015
    Messages:
    117
    Likes Received:
    71
    look at mine, the cutting area is 24,24 inches
     
  15. mcbuilder22

    Builder

    Joined:
    Jan 12, 2015
    Messages:
    45
    Likes Received:
    24
    I've seen them like that style. I'm asking about simply using the XL style kit but extending it.
     
  16. Julius

    Julius Well-Known
    Builder

    Joined:
    Nov 13, 2015
    Messages:
    193
    Likes Received:
    61
    now waiiiiiiit a minute
    Where in the HRM are you? I didnt have any thought until I saw the Metals R Us link! Im just 20 minutes from dartmouth
     
    Morb likes this.
  17. Moniker

    Moniker New
    Builder

    Joined:
    Sep 15, 2017
    Messages:
    7
    Likes Received:
    0
    Awesome write-up I am building my cbeam right now just got the box and going to open it up. Studying the install instructions so I kind of have a heads up before I actually do the build. Thanks for the tips, what is the size of the aluminum plate that's an awesome idea I was going to go with MDF but I think I'll do this instead.
     
  18. jamesdjadams

    jamesdjadams Well-Known
    Builder

    Joined:
    Nov 1, 2016
    Messages:
    40
    Likes Received:
    48
    Hi Moniker, Sorry for the delay getting back to you. We've recently moved and life has been busy! I don't recall the exact dimensions of the aluminum plate but I tried to keep it as large as possible for mounting clamps and things. Now that my new wood-shop is finally getting setup, I will be getting back at this machine and posts! I made a couple of push stick with it over the weekend.

    Check it out:


    [​IMG]

    -Jamie
     
  19. jamesdjadams

    jamesdjadams Well-Known
    Builder

    Joined:
    Nov 1, 2016
    Messages:
    40
    Likes Received:
    48
    Hi @Julius, I live near the Nova Scotia / New Brunswick border but make trips down your way now and then! Nice to know there are other "locals" on here. haha
     
  20. Mark Carew

    Mark Carew OpenBuilds Team
    Staff Member Moderator Builder Resident Builder

    Joined:
    Jun 28, 2013
    Messages:
    2,741
    Likes Received:
    2,407
    Great Build @jamesdjadams :thumbsup: Thank you for taking time to do such a nice post on it.
    btw those push sticks make a great project as well!
    Looking forward to all the cool projects you come up on your machine.
    Question, what did you use to shim your 611 in the router mount?
    Thanks again for all your help to the community
    Mark
     
  21. jamesdjadams

    jamesdjadams Well-Known
    Builder

    Joined:
    Nov 1, 2016
    Messages:
    40
    Likes Received:
    48
    Hi @Mark Carew, Thanks for the words of encouragement!

    As for the shim, it's a 3D printed component created by @Jimmybuckets (link). I have attached the particular .stl file that I used.

    [​IMG]


    -Jamie
     

    Attached Files:

    #21 jamesdjadams, Dec 11, 2017
    Last edited: Dec 11, 2017
  22. Kevon Ritter

    Kevon Ritter Veteran
    Builder

    Joined:
    Apr 30, 2015
    Messages:
    597
    Likes Received:
    292
    The first thing I did was make a v-slot table. From there, I made custom spoilers depending on the task. Both types have cut outs that allow bolt access from above the spoiler. A simple four bolts will hold down more than this machine can handle.

    I have a few made from acrylic for machining aluminum. This allows me to machine while flooded. These are made with very long slots that allow me to hold anything that can be placed on the spoiler. Granted it was only made for up to a 6"x8" plate, but it could be applied to the entire 13"x13" area.

    Then I have a standard MDF spoiler that is smaller than my cutting area. Being able to machine the entire area has been one of my better decisions. This allows me to place larger material than the pocketed spoiler would allow, without having to worry about it being off level.
     

    Attached Files:

    Morb likes this.
  23. Kevon Ritter

    Kevon Ritter Veteran
    Builder

    Joined:
    Apr 30, 2015
    Messages:
    597
    Likes Received:
    292
    You have an aluminum base. You can always use the machine to drill it's own grid. Then tap them to the standard m5 thread.

    Cut your spoiler with holes to accommodate your grid, and that's that.
     
    Morb likes this.
  24. Kevin Henning

    Builder

    Joined:
    Mar 18, 2016
    Messages:
    25
    Likes Received:
    2
    I am using a particle board spoil board, so I use particle board screws on thicker pieces, but on thinner stuff like 6 mm plywood and lexan sheets I often use some wire nails, along with potentially some double sided tape. Wouldn't recommend it though for anything thicker or harder than that.
     
  25. Sprags

    Sprags Well-Known
    Builder

    Joined:
    Nov 23, 2017
    Messages:
    154
    Likes Received:
    13
    Your photos and the instructions you include look really good. Thank you for posting them.

    Unfortunately your build inspired me to ask a question.

    Not to hijack this thread but I am looking to build a CBM XL and I am curious about some of the step you have in your build. Is there a need to modify the c-beam extrusions that I get with the kit as far as cutting them to length as well as drilling and tapping ...or is that only necessary if someone buys the parts individually from OpenBuilds parts store?
     
  26. GrayUK

    GrayUK Openbuilds Team Elder
    Staff Member Moderator Builder

    Joined:
    May 5, 2014
    Messages:
    1,668
    Likes Received:
    627
    It is vital that you measure all lengths of aluminium supplied by Openbuilds.
    They will not be too short, but they may well be longer than expected.
    So there is a likelihood of your needing to adjust the lengths precisely.
     
  27. Sprags

    Sprags Well-Known
    Builder

    Joined:
    Nov 23, 2017
    Messages:
    154
    Likes Received:
    13
    Exactly how precise is vital?

    I have to ask since a mitre saw seems to the recommended tool to use to cut everything to length. And since mitre saws are typically used for carpentry and woodworking the saw in it self has limitations. I'm guess you're going to say + or - .015 inches at best where perhaps + or - .020 to .025 inches is maybe actually more realistic.
     
  28. Kevin Henning

    Builder

    Joined:
    Mar 18, 2016
    Messages:
    25
    Likes Received:
    2
    Sprags, there is a good description of the issue in the thread "The best cutting and squaring method??" in "General Talk". It also goes into a jig that can be used to square the ends of the cuts.
     
  29. GrayUK

    GrayUK Openbuilds Team Elder
    Staff Member Moderator Builder

    Joined:
    May 5, 2014
    Messages:
    1,668
    Likes Received:
    627
    Yes. Go the router way :thumbsup::thumbsup:
     
  30. Gary Caruso

    Gary Caruso OpenBuilds Volunteer
    Staff Member Moderator Builder

    Joined:
    May 19, 2016
    Messages:
    1,183
    Likes Received:
    530
    I've always considered a decent table saw to be a basic human necessity ;) (tell your wife that's from the World Health Organization)
    Dimensional accuracy isn't important it's getting ends square and "the same length" where they need to be.
     
    Kevin Henning likes this.

Share This Page

  1. This site uses cookies to help personalise content, tailor your experience and to keep you logged in if you register.
    By continuing to use this site, you are consenting to our use of cookies.
    Dismiss Notice