Welcome to Our Community

Some features disabled for guests. Register Today.

C-Beam to C-Beam XL Upgrade

Discussion in 'CNC Mills/Routers' started by SBLabs, Dec 6, 2016.
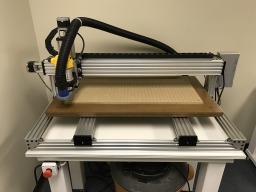
  1. SBLabs

    SBLabs Well-Known
    Builder

    Joined:
    Aug 16, 2016
    Messages:
    33
    Likes Received:
    49
    Kerry Veith published a new build:

    Read more about this build...
     
  2. Mark Carew

    Mark Carew OpenBuilds Team
    Staff Member Moderator Builder Resident Builder

    Joined:
    Jun 28, 2013
    Messages:
    2,741
    Likes Received:
    2,407
    Great job on this upgrade Kerry! Thank you for taking the time to put together such a detailed Build, this is a great help :thumbsup::thumbsup::thumbsup:
     
    SBLabs likes this.
  3. SBLabs

    SBLabs Well-Known
    Builder

    Joined:
    Aug 16, 2016
    Messages:
    33
    Likes Received:
    49
    Thanks @Mark Carew ! We are really happy with how the build turned out. Everything is almost dialed in, but there's always stuff to change and upgrade, lol.
     
    #3 SBLabs, Dec 6, 2016
    Last edited: Dec 6, 2016
    Mark Carew likes this.
  4. khalid tubail

    Builder

    Joined:
    May 13, 2014
    Messages:
    6
    Likes Received:
    1
    dear friend
    i like your project and i am exciting to do like.
    i checked all parts you added, why you added two same items with different description.
    C-Beam XL Upgrade.PNG
     
  5. SBLabs

    SBLabs Well-Known
    Builder

    Joined:
    Aug 16, 2016
    Messages:
    33
    Likes Received:
    49
    Copy and paste error. Thanks for catching this. Updated.
     
    MaryD likes this.
  6. SBLabs

    SBLabs Well-Known
    Builder

    Joined:
    Aug 16, 2016
    Messages:
    33
    Likes Received:
    49
    GrayUK likes this.
  7. Giarc

    Giarc OpenBuilds Team
    Staff Member Moderator Builder Resident Builder

    Joined:
    Jan 24, 2015
    Messages:
    2,892
    Likes Received:
    1,610
    Those look really nice!

    What kind of stain, and did you have to use wood conditioner (or whatever it is called) prior to staining the pine? I found with lighter stains on pine I had to or they would get blotchy.
     
    SBLabs likes this.
  8. SBLabs

    SBLabs Well-Known
    Builder

    Joined:
    Aug 16, 2016
    Messages:
    33
    Likes Received:
    49
    No special prep done. Just a good sanding. I think it's minwax brand from lowes. Ebony. I used a sponge brush to put it on. Let it sit for 30 seconds and wipe it off. The signs have 2-3 coats that way. Thanks for the feedback!

     
  9. GrayUK

    GrayUK Openbuilds Team Elder
    Staff Member Moderator Builder

    Joined:
    May 5, 2014
    Messages:
    1,668
    Likes Received:
    627
    Excellent work SBLabs.
    We spend an awful lot of time building, and ironing out problems with our machines, and perhaps not enough time just looking at, and enjoying, some of our finished products. :rolleyes:
    Not enough people get around to showing us some of their finished work. :(
    Even a simple sign is an inspiration to us all. :D
    Well Done and Thanks. :thumbsup:
    Gray
     
    SBLabs likes this.
  10. SBLabs

    SBLabs Well-Known
    Builder

    Joined:
    Aug 16, 2016
    Messages:
    33
    Likes Received:
    49
    Thanks for the positive feedback! Even though the signs are simple. We have overcome a lot of little battles getting all the kinks worked out. It seemed until yesterday every time we tried a different style project the machine would have an issue(mostly on the mks sbase config file). I think we are ready to start digging into the metals soon. Cheers!
     
  11. SBLabs

    SBLabs Well-Known
    Builder

    Joined:
    Aug 16, 2016
    Messages:
    33
    Likes Received:
    49
    @Mark Carew I'm having somes issue with my X Axis and I hope you can shed some light/point me in the right direction on finding a solution. A lot of this is still new to me, i'll do my best to make sense talking about the problem below.

    The issue: When cutting 3d projects the x axis will hang in one spot, make a horrible grind sound and skip steps throwing the whole project off. The acceleration on the board we are using is set as mm/second/second. The board config default was at 3000, I initially dialed it back to 300. Everything seemed fine, then the issue happened again. I turned it down to 100 mm/s/s and all of my projects have been running great. I came in today to run a successful project a second time and it happened again. I thought it was a fluke since it worked fine the first time around. I ran it again and again and I was able to get it to stop when I turned the acceleration all the way down to 25 mm/s/s. I feel like this is really slow, but I don't know the standards on acceleration. Web searches provide a ton of mixed feedback on the topic. Another observation is that the lead screw is getting scorching hot where there are a lot of back and forth movements on the design.

    Some background...
    We are using the mks sbase board (I know it's a knockoff smoothie board and we are going to upgrade at some point, but it's what I have to work with for now.)
    1/32 Microstepping
    Nema 23 Stepper Motors
    Not using external stepper drivers at this point (potentially part of the problem)
    The X Axis was not moving the correct distances so I adjusted the steps per mm to 795 and it seems spot on now (this is likely unrelated to the issue), Y and Z are set to 800 steps per mm.

    So after all that gibberish the questions I am really trying to solve are:
    A. Does the acceleration 25/mm/s/s make sense?
    B. Should I lubricate the lead screw in any way? (I'm wondering if the friction is causing the motor to overheat/skip steps)
    C. Does this kind of thing happen when the stepper motor is going bad?

    I have attached my config file for reference if need be.
     

    Attached Files:

  12. Darathy

    Darathy New
    Builder

    Joined:
    Jul 12, 2016
    Messages:
    74
    Likes Received:
    21
    Sounds like the leadscrew nut is rubbing against the leadscrew too much. is either too tight(if you have antibacklash one) ,the threads have gotten so worn that the leadscrew turned and is stuck somewhere in between or there is so much dirt in there it cant turn right.
     
  13. Mark Carew

    Mark Carew OpenBuilds Team
    Staff Member Moderator Builder Resident Builder

    Joined:
    Jun 28, 2013
    Messages:
    2,741
    Likes Received:
    2,407
    Hello SBLabs
    Up front you should know I have not used the mks board and I do not use 1/32 micro stepping.
    Guys, please feel free to jump in with your input on this issue especially if you have more of a related set up on your machine.
    Hope this helps SBLabs
     
  14. SBLabs

    SBLabs Well-Known
    Builder

    Joined:
    Aug 16, 2016
    Messages:
    33
    Likes Received:
    49
    @Darathy thanks for the tips.

    @Mark Carew I had thought there needed to be a slight angled pressure between the two nut blocks to act as the backlash prevention and take out any slop that may be in there? I might have made this up in my own mind, lol. What is the best way you have found to set the nut blocks (two in tandum) correctly? I was going to loosen the screws on both nut blocks, turn the lead screw a few times, then tighten them both back up.

    Attached is a photo of the feeds/speeds I have set on the 3d toolpath. I'm a fan of being more conservative to achieve better results. But open to suggestions if something seems off.
     

    Attached Files:

  15. Darathy

    Darathy New
    Builder

    Joined:
    Jul 12, 2016
    Messages:
    74
    Likes Received:
    21
    Heres how openbuilds does it at 11:33min :
     
  16. Mark Carew

    Mark Carew OpenBuilds Team
    Staff Member Moderator Builder Resident Builder

    Joined:
    Jun 28, 2013
    Messages:
    2,741
    Likes Received:
    2,407
    We have found in a live build by OpenBuilds Member Brady (Kirk Woodworking) he ran into binding issues with the tandem nut blocks if they were tweaked or angled at all. It seems that when tightening these down at the last turn of the screw they want to angle a bit, so its just something to look out for when putting them in tandem.
    Not angled, but in-line toward each other or away from each other just a little will keep the slop out.Justs watch out for that angle when tightening down the screw.
    Hope this helps.
     
  17. SBLabs

    SBLabs Well-Known
    Builder

    Joined:
    Aug 16, 2016
    Messages:
    33
    Likes Received:
    49
    I think I'm getting close to figuring this out. Whenever I loosen both nut blocks, or just one of them the axis moves completely free along the entire axis. As soon as I snug up the second one at all it takes out the slop and it takes a slight more effort to turn(still fairly easy). However, there is a spot right in the middle of axis where it becomes very hard to turn unless i have at least one nut block completely loose. Upon looking closely the screw wobbles pretty bad in that area. I'm guessing if I can get the screw straightened my issues will go away. Any tips on straightening the screw out at all? I'll probably just use a vice and a flat table and work it till i can get it to roll smoothly. It makes sense that motors crap out under the heavy load with high acceleration. Thanks again for all the tips.
     
  18. Jestah

    Jestah Well-Known
    Builder

    Joined:
    Dec 4, 2013
    Messages:
    148
    Likes Received:
    84
    Sounds like a binding issue but a few other things to keep in mind is to maybe try and drop your micro stepping down a little and see if that helps. While having massive amounts of microsteps is nice the loss of torque can be a killer.

    Also watch for is also overheating on your chips, usually an axis just goes dead till it cools or shudders and it cools then overheats, shutsdown and cools again..... so not really sounding like your issue but worth checking.

    I am trying to find a video of a friend who showed how to get very good results getting a bent ball screw true using some skateboard wheels and a DTI. I will post up if I can track it down.
     
  19. SBLabs

    SBLabs Well-Known
    Builder

    Joined:
    Aug 16, 2016
    Messages:
    33
    Likes Received:
    49
    @Jestah Thanks for your feedback. I wasn't aware that the higher number of microsteps reduced the amount of torque. I feel like that might be something I change in the near future if other adjustments don't fix the issue.

    When I first started having this issue, the first thing I did was use an infrared thermometer on the entire control board and the motors and everything was more than cool enough.

    I'd love to see the video if you can find it! I will likely be using a vise*, a flat surface, and a lot of patience to try and straighten it out little bits at a time.

    My game plan is going to be to try and straighten the screw out and re-test. I will also lubricate the screw. I am wondering if anyone has tried graphite (like the kind used to lubricate locks)? I'm leaning toward that or the silicone spray that @Mark Carew mentioned above. If the combination above doesn't resolve the issue, then I will change the micro-stepping.

    I want to thank everyone again for the help! I know helping a newbie can be frustrating at times, so I really really appreciate it.
     
    #19 SBLabs, Jan 9, 2017
    Last edited: Jan 9, 2017
  20. Rick 2.0

    Rick 2.0 OpenBuilds Team
    Staff Member Moderator Builder Resident Builder

    Joined:
    Dec 20, 2013
    Messages:
    2,852
    Likes Received:
    1,524
    I hope you meant vise... :)
     
    SBLabs and Giarc like this.
  21. SBLabs

    SBLabs Well-Known
    Builder

    Joined:
    Aug 16, 2016
    Messages:
    33
    Likes Received:
    49
    I've always said my vice is drinking beer, I guess we'll see which I use and update the post accordingly. :D:ROFL:
     
    GrayUK and Rick 2.0 like this.
  22. Jestah

    Jestah Well-Known
    Builder

    Joined:
    Dec 4, 2013
    Messages:
    148
    Likes Received:
    84
    This is the vid I was thinking of

    www.youtube.com/watch?v=mRtIxG2co5w

    Don't worry about being new and asking questions, we were all there once and I often cringe when I think of my first few builds!
     
    SBLabs likes this.
  23. SBLabs

    SBLabs Well-Known
    Builder

    Joined:
    Aug 16, 2016
    Messages:
    33
    Likes Received:
    49
    After about 4 hours or so of messing with this....

    When I took the lead screw off, it really wasn't that bent or twisted. I tweaked the one area that looked the worst and left the little spots alone (I didn't want to make it worse).

    With the two nut blocks: I found that if I tighten one all the way, I can't go past barely snug on the other or it binds. I am really really leaning toward replacing with a single anti-backlash block in the middle. I'm not happy that there is either too much slop or binding, no happy medium to be found. The lead screw just isn't straight or rigid enough for the dual block system. If I had bigger motors I'm sure I could power through it, but I would rather do it right.

    I also found that with the 1000mm lead screw, any pre-load adds a ton of wobble to the screw. Event the littlest bit.

    I switched to 1/16 stepping. I didn't really notice more torque or less precision so I'll leave it there. Everything seems to be running at the same temperatures.

    For now I think I'm good to go. I might try and switch out the nut blocks for a single anti-backlash this weekend or next week. I'm just dreading taking everything all apart, again lol.

    Thanks again everyone for your help on getting through this issue. I would've lost my mind without the help. I've learned alot more about the machine than I expected. Cheers!
     
  24. Jestah

    Jestah Well-Known
    Builder

    Joined:
    Dec 4, 2013
    Messages:
    148
    Likes Received:
    84
    @SBLabs I wonder if you have nut blocks that are not centered exactly in the block or if your end mounts/nut block standoffs are not the correct height. Having even one of the items out of line can cause issues to a spinning screw.

    I test this by mounting the screw in the nut block(s) and one end in a end-plate bearing. slide it too far one way so that other end is not quite in the bearing and then watch/feel as you slide back onto the other bearing. If it floats in, things are lined up, if it hits or when you spin the screw and the far end wobbles would suggest your alignment between the 3-4 fixing points is not concentric. To fix this shim the nut blocks using washers, spacers or coke cans (makes cheap and quite good thin shim stock) to line every thing up.

    This method may be worth a go before you grab a new nut block as it will suffer the same issues (maybe a little less) if your alignment is out.
     
  25. SBLabs

    SBLabs Well-Known
    Builder

    Joined:
    Aug 16, 2016
    Messages:
    33
    Likes Received:
    49
    @Jestah That is actually on my to do list before I take everything apart. The other thing I noticed... It appears that the center point of where the blocks are mounted is not direct in line with where the end plate bearings are mounted. When the Z axis is centered it looks like both ends of the screw are higher than the middle of the axis where the blocks are mounted. I need to measure a few more times to verify, but if this is really the case I'm lost on how to adjust.

    Side note. I ran the most recent project that I had failing, with the acceleration set a little higher than it was when it failed. It completed successfully. So while I am not perfect yet, I think I am past the worst of the issues.

    Thanks!!
     
  26. Robert Wallace

    Builder

    Joined:
    Dec 19, 2016
    Messages:
    3
    Likes Received:
    0
    Hi @SBLabs,

    I'm getting to build the "C-Beam Machine XLarge Mechanical Bundle" and looking at the electronics. Got few questions:

    1) The order page on the XL bundle recommends the Nema23 High Torque motors. Do the Nema 23 on your build have any issues?
    2) Have you tried milling any aluminum?
    3) I was looking at the TinyG, but the price and feature look good on the smootieboard. What's your take on the controller board?

    Love the detail of your build. I'm new to this and trying to soak up as much information as I can.

    Regards,

    Robert
     
  27. Jestah

    Jestah Well-Known
    Builder

    Joined:
    Dec 4, 2013
    Messages:
    148
    Likes Received:
    84
    If the blocks are lower than the ends it is an easy fix! take the bolts off the block so it floats add then try different thickness packers to get them as close to level as possible. If its the other way around ... ill have to have a think on that as off the top of my head the only option would be to skimm the block down a little...

    Glad to hear your over the hump and on the home stretch and your starting to make headway with your build! I was plagued with overheating drive issues when I started and it had me stumped for a long time but once sorted it's been a joy to cut on my Ox since.
     
    SBLabs likes this.
  28. SBLabs

    SBLabs Well-Known
    Builder

    Joined:
    Aug 16, 2016
    Messages:
    33
    Likes Received:
    49
    So far the Nema 23's seem to be doing fine. Dialing in the acceleration and this recent issue with the lead screw binding have been our two biggest battles. Fortunately there is a great support system here on the forums for us. We have done a few very basic test cuts on aluminum with no problem. I haven't dived into anything intense like 3d work etc yet. If you are going to do the same setup, I would consider setting up external stepper drivers for the motors. While it works good without, I kind of wish we would've put them in at the beginning. The mks board only supports 2.0 amps per. I have them all set at 1.9 to be a little safe. The MKS SBase board is a little finicky on the initial setup and there isn't much documentation on it. That all being said, if you have any questions on the way we wired things, the config, or any anything else. Don't hesitate to ask.
     
    Robert Wallace likes this.
  29. jamesdjadams

    jamesdjadams Well-Known
    Builder

    Joined:
    Nov 1, 2016
    Messages:
    40
    Likes Received:
    48
    Awesome build. Thanks for sharing.

    1) I really like your dust shoe but do not have a 3D printer. Would you be interested in printing one for me? I would compensate you for your time and shipping of course.

    2) How do you affix your stock? Are you using double sided-tape? If so, what brand?

    Thanks!
    -Jamie
     
  30. SBLabs

    SBLabs Well-Known
    Builder

    Joined:
    Aug 16, 2016
    Messages:
    33
    Likes Received:
    49
    @jamesdjadams Let me see if I can find the file for it. It was one we took from thingiverse and made it bigger. If I can find it then sure no problem.

    I use double sided carpet tape on just about every project (via amazon). I also have mounted oak strips on the front and back sides of the spoiler board. I have small wood strips I go across the projects with to hold them down tight or flat (twisted boards). The other method I have found works good is that I run the hold down strips along side the project to stop it from twisting. Here's a pic of the oak strips I installed.
     

    Attached Files:

Share This Page

  1. This site uses cookies to help personalise content, tailor your experience and to keep you logged in if you register.
    By continuing to use this site, you are consenting to our use of cookies.
    Dismiss Notice