Welcome to Our Community

Some features disabled for guests. Register Today.

C-Beam Plate Machine

Discussion in 'CNC Mills/Routers' started by rc3105, Feb 23, 2016.
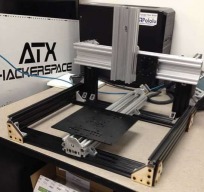
  1. rc3105

    rc3105 New
    Builder

    Joined:
    Apr 24, 2014
    Messages:
    4
    Likes Received:
    5
    rc3105 published a new build:

    Read more about this build...
     
    GrayUK likes this.
  2. Mark Carew

    Mark Carew OpenBuilds Team
    Staff Member Moderator Builder Resident Builder

    Joined:
    Jun 28, 2013
    Messages:
    2,741
    Likes Received:
    2,407
    Really Like the look of the black! Nice work on this build and our apologies on the board we are working to make it much nicer soon!
    Thanks again for the share
     
  3. eddiejr

    eddiejr New
    Builder

    Joined:
    Feb 15, 2016
    Messages:
    73
    Likes Received:
    9
    rc3105: What spindle are you using?
     
  4. rc3105

    rc3105 New
    Builder

    Joined:
    Apr 24, 2014
    Messages:
    4
    Likes Received:
    5
    It's a 450w 48v DC motor (looks like the 300w xcarve without it's mounting bracket) with a mach3 compatible speed controllr. 0-12k rpm based on a dial or a 5v pwm input. Er11 collet

    The motor, mounting bracket, PS & speed controller were about $100 as a set from ebay


    The controller is Grbl .9i on an uno with a Chinese engraving shield and 8825 stepsticks set to .75a

    Motors are 86oz openbuilds nema17 powered by a 19v 7a laptop brick

    Limit switches are 6mm proximity, at 90 degrees to motion so they can't crash. Basically a 1*1 L bracket passes the switch with about .5mm clearance enabling fast seek


    If you look closely you'll see that y&z are leadscrew while x is belted. that's temporary until we get another shipment of leadscrew.


    For folks wondering if Grbl+stepstick has enough power to be useful... It's plenty to snap a 1/4 shank so anything more is silly :)
     
    Tom Allen likes this.
  5. rc3105

    rc3105 New
    Builder

    Joined:
    Apr 24, 2014
    Messages:
    4
    Likes Received:
    5
    The wooden triangles on the outside corners were originally just quick alignment jigs. As I was working on it at the hackerspace several folks said they liked the steampunk vibe that gave it, so they may be expanded with more engraving.

    They're also good at preventing sharp corners from gouging you when loading it in the car. All the sharp corners will be getting MDF bumpers.
     
  6. eddiejr

    eddiejr New
    Builder

    Joined:
    Feb 15, 2016
    Messages:
    73
    Likes Received:
    9
    Thanks for the information. Lots of options with the design.
     

Share This Page

  1. This site uses cookies to help personalise content, tailor your experience and to keep you logged in if you register.
    By continuing to use this site, you are consenting to our use of cookies.
    Dismiss Notice