Welcome to Our Community

Some features disabled for guests. Register Today.

Big Ox Heavy Duty

Discussion in 'CNC Mills/Routers' started by Metalguru, Oct 18, 2016.
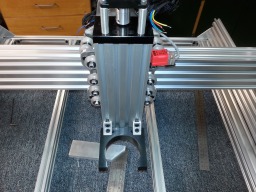
  1. Metalguru

    Metalguru Veteran
    Builder

    Joined:
    Dec 29, 2015
    Messages:
    752
    Likes Received:
    545
  2. Mark Carew

    Mark Carew OpenBuilds Team
    Staff Member Moderator Builder Resident Builder

    Joined:
    Jun 28, 2013
    Messages:
    2,741
    Likes Received:
    2,407
    Really nice looking Build @Metalguru :thumbsup: can't wait to see the first steps of this bad boy.
    Keep up the good work my friend.
     
  3. evilc66

    evilc66 Journeyman
    Builder

    Joined:
    Jan 9, 2015
    Messages:
    392
    Likes Received:
    153
    Man, that's one beefy *******. Looking good @Metalguru. If I ever decide to build an Ox, I think this is the way I would go. I look forward to seeing the progress.
     
  4. MaryD

    MaryD OpenBuilds Team

    Joined:
    Apr 13, 2016
    Messages:
    649
    Likes Received:
    639
    Looks like a nice build. Where did you get the feet for the bottom of the machine?
     
  5. Metalguru

    Metalguru Veteran
    Builder

    Joined:
    Dec 29, 2015
    Messages:
    752
    Likes Received:
    545
    Hi Mary:

    The machine doesn't have "feet". If you are referring to the clear neoprene bumpers for the axes, I guess they technically are feet, but I don't use them for that. They are used as soft bump stops to keep the axis from crashing into the end. I got them at Home Depot.
     
  6. MaryD

    MaryD OpenBuilds Team

    Joined:
    Apr 13, 2016
    Messages:
    649
    Likes Received:
    639
    Ahh, I was reading too quickly, that's a good idea.
     
  7. Gary Caruso

    Gary Caruso OpenBuilds Volunteer
    Staff Member Moderator Builder

    Joined:
    May 19, 2016
    Messages:
    1,183
    Likes Received:
    530
    Following this! Love the changes, is this plate set going to be available on Chris's Ebay page? I don't see it.
     
  8. Metalguru

    Metalguru Veteran
    Builder

    Joined:
    Dec 29, 2015
    Messages:
    752
    Likes Received:
    545
    Should be on there. I think the side plates were $180 the x gantry plate set I don't recall. I will see if i can find it for you a bit later.
     
  9. Metalguru

    Metalguru Veteran
    Builder

    Joined:
    Dec 29, 2015
    Messages:
    752
    Likes Received:
    545
  10. Ronald van Arkel

    Staff Member Builder Resident Builder

    Joined:
    May 7, 2014
    Messages:
    472
    Likes Received:
    245
    Hello @Metalguru,

    Nice build, good photos that will help some people out. Those rubber end-stops are a good idea for the beginner.

    The inductive sensors, how are they holding up when it's close to the spindle? Any false triggers? Just ordered 15 of those to put on the machines I have, they seem to be dirt cheap on e-Bay.

    -Ronald
     
  11. Metalguru

    Metalguru Veteran
    Builder

    Joined:
    Dec 29, 2015
    Messages:
    752
    Likes Received:
    545
    Hey Ronald, Long time no speak, buddy!

    Thanks, I've built enough Ox's to know all the tricks by now.

    The inductive sensors work well, they seem to be pretty robust. And they are really cheap, almost cheaper than limit switches. Speaking of limit switches, I use the limit switch mounting plates from the OB store to mount them, they have the same hole spacing as the micro switches. The screws they come with are crap, throw them away and use 4-40x3/4" instead. A couple of cautionary things, though.
    • They need a 12v power source at least, they will not run off 5v. I add a small wall transformer just to power the inductive sensors, it's a bit of a pain but keeps the wiring simple. Just tie the ground from the 12v supply to the Arduino ground and it works well. I don't think it's a good idea to power them off the 24V supply, because then you have to tie the ground of the Arduino to the Motor supply ground, which is a bad idea noise-wise. Also, the stepper drivers go to all the trouble of opto-isolating the logic inputs from the Arduino, connecting the grounds back together just does not make sense.
    • They have a limited range detecting aluminum compared to steel. They are rated at 5mm distance, but that is with steel, with aluminum it's only about 2mm. But, they work well nonetheless. Worst case, you can use a steel screw as a target to get better response.
    • With the Arduino Nano, you must add .1uF caps from each limit switch input to ground, or the homing cycle does not work properly. Should probably do this with all Arduinos, but the Nano seems to be more sensitive to this.
    • If you use a 12v supply to the inductive sensors, they have an internal weak pullup resistor on the output to the supply voltage. This is not really good for the Arduino to have it's inputs pulled up to 12v, although it seems to have internal protection circuitry and does not blow the inputs. May not be good for the Arduino long term, however, so I usually put a series Schottky diode between the sensor output line and the Arduino input. Cathode towards the sensor output side. Thus the sensor can still pull the line low, but it does not allow the 12V to feed back into the Arduino input.
    I can send you some pics of the mountings if you want. I use the 2 hole angle brackets, the OB part store micro switch brackets, and the odd screw and spacer to mount the sensor and a target for it.

    Take it easy, man.

    MG
     
  12. Lpinney

    Lpinney New
    Builder

    Joined:
    Apr 23, 2016
    Messages:
    8
    Likes Received:
    6
    Beautiful build MG,
    I too bought these plates from Chris Laidlaw on eBay. I have yet to start my build, as I'm temporarily out of space in my shop for it. After viewing your build, I think that I'll be making some modifications to my design.

    Keep up the good work, and thanks for sharing.

    Lee
     
  13. Metalguru

    Metalguru Veteran
    Builder

    Joined:
    Dec 29, 2015
    Messages:
    752
    Likes Received:
    545
    Lpinney likes this.
  14. Ronald van Arkel

    Staff Member Builder Resident Builder

    Joined:
    May 7, 2014
    Messages:
    472
    Likes Received:
    245
    Forgive me for teasing, I would never do that ;). I will, I will, in time, but the build up. This is a build with large plates, some based on the OpenBuilds plates. It will be put up as a study first.

    -Ronald
     
    Lpinney likes this.
  15. getoffmyland

    Builder

    Joined:
    May 17, 2015
    Messages:
    19
    Likes Received:
    13
    nice one.... looks familiar :)
    Water Buffalo - Water jet cut OX+

    I have been busy with life and work but will update my build soon..... just as your looks amazing mine has been better than I imagined
     
  16. Metalguru

    Metalguru Veteran
    Builder

    Joined:
    Dec 29, 2015
    Messages:
    752
    Likes Received:
    545
    Nice one, getoffmyland. I didn't see this when I was looking. There should be lots of builds like this out there, since Chris has said he has sold lots of plate sets like this.

    MG
     
  17. RobertW

    RobertW New
    Builder

    Joined:
    Dec 3, 2016
    Messages:
    45
    Likes Received:
    7
    everytime i try to download your 3d tech big ox zip file it i get an error when i try to open it.
     
  18. Metalguru

    Metalguru Veteran
    Builder

    Joined:
    Dec 29, 2015
    Messages:
    752
    Likes Received:
    545
    Hey Robert:

    Should work now. You are right, there was something wrong with the ZIP file. Make sure to extract the file before you try to run it in SketchUp or you'll get an error.

    MG
     
  19. Gary Caruso

    Gary Caruso OpenBuilds Volunteer
    Staff Member Moderator Builder

    Joined:
    May 19, 2016
    Messages:
    1,183
    Likes Received:
    530
    Got my OX HD plates ordered last night! Chris rocks!
    emailed him here.. [email protected]

    MG, real nice job on the drawing!
     
    Lpinney likes this.
  20. anigeek65

    anigeek65 Well-Known
    Builder

    Joined:
    Sep 16, 2014
    Messages:
    57
    Likes Received:
    50
    Nice build Metalguru, I did something a little similar.. trying to make an OX larger and stronger. I still think the "Z" could bee even stronger on my build. I have a few more Ideas even though I am done with the build, I will always be upgrading and tinkering..
     

    Attached Files:

  21. Metalguru

    Metalguru Veteran
    Builder

    Joined:
    Dec 29, 2015
    Messages:
    752
    Likes Received:
    545
    Yes, I have seen this build... Nice work! Yours is an order of magnitude heavier than mine... I just wanted to beef up the Ox a bit to take out some of the flex and fix the really weak Z axis. It's still a belt drive machine, and you can only do so much on a belt drive system.

    I really like your back to back c-beams. That assembly should be really stiff.

    Why did you make your Z axis so tall? You can only use less than half of your travel before it hits the bed or the front plate...

    Something I am going to try - using two of the OB router mounts one on top of the other to give the router itself much more stability. You can't do this with a Bosch, but the Dewalt DWP611 and also possibly your Makita have enough room to fit into a dual mount.

    MG
     
  22. anigeek65

    anigeek65 Well-Known
    Builder

    Joined:
    Sep 16, 2014
    Messages:
    57
    Likes Received:
    50
    MG, ahh.. you noticed. I wanted it longer for future expansion. I can make taller side plates on the gantry if in the future I wanted to do taller parts. One thing I wish I did was make all the Z axis plates the same height. You can see the one on the rear is only as tall as the C beam. Having all of the plates taller and then bolting them together all the way to the top would make the Z axis stronger. Most of the flex comes from the Z axis plates not the router holder in my case, although your idea for two of them does intrigued me.

    Alan
     
  23. Metalguru

    Metalguru Veteran
    Builder

    Joined:
    Dec 29, 2015
    Messages:
    752
    Likes Received:
    545
    I'm posting a sketchup drawing in Concepts and Ideas on the forum...

    MG
     
    anigeek65 likes this.
  24. Gary Caruso

    Gary Caruso OpenBuilds Volunteer
    Staff Member Moderator Builder

    Joined:
    May 19, 2016
    Messages:
    1,183
    Likes Received:
    530
    My Heavy Duty plate set came in today from Chris! WOW are they perfect, they looked good in the pics but i didn't expect the fine level of debur and finish on these.
    Very pleased! I will do a build thread once AliExpress approves my credit :mad: and I get everything.
     
    Lpinney likes this.
  25. mybuild14

    mybuild14 New
    Builder

    Joined:
    Mar 20, 2014
    Messages:
    23
    Likes Received:
    5
    Metalguru
    Ronald, Metalguru, Nice work. I just got my OX back up and running and wanted to follow your lead on the use of inductive sensors as limit switches. My problem though is how to wire them to my Protoneer Raspberry Pi CNC 2.58 hat and make them work as limit switches. Do you think you could post a wiring diagram showing the way you have them wired with the diode and capacitor sizes, along with sensor type(NPN, PNP, NO or NC)?

    Thank you from all of us attempting to upgrade from conventional contact limit switches.
     
    #25 mybuild14, Dec 24, 2016
    Last edited: Dec 24, 2016
  26. Metalguru

    Metalguru Veteran
    Builder

    Joined:
    Dec 29, 2015
    Messages:
    752
    Likes Received:
    545
    No problem. Perhaps the moderators would see fit to move this to a new thread, as it would be good information for a topic all its own.

    I'm kind of tied up for the holidays, but I will post something the first of the week about the schematics.

    Merry Christmas, everyone!

    MG
     
    mybuild14 and GrayUK like this.
  27. Metalguru

    Metalguru Veteran
    Builder

    Joined:
    Dec 29, 2015
    Messages:
    752
    Likes Received:
    545
    #27 Metalguru, Dec 28, 2016
    Last edited by a moderator: Dec 31, 2016
    mybuild14 likes this.
  28. Leandro Teixeira

    Builder

    Joined:
    Jun 26, 2020
    Messages:
    1
    Likes Received:
    0
    Ideally, for a person to invest in an equipment like this, it should fulfill several functions, such as plotter, 3D printer, CNC and laser cutting. For that, it would be necessary to increase the Z axis and the Y would also be good. Wouldn't an assembly like this work? (See attached sketchup file). Why not? (Note: The sketchup drawing attached is only a draft I did fastly)
     

    Attached Files:

    #28 Leandro Teixeira, Jun 26, 2020
    Last edited: Jun 26, 2020
  29. Metalguru

    Metalguru Veteran
    Builder

    Joined:
    Dec 29, 2015
    Messages:
    752
    Likes Received:
    545
    Now that's just plain silly. That setup would be about as stiff as a wet noodle. It would have Centimeters of flex.

    Multipurpose machines may do everything, but they don't do anything well. They are always a compromise.

    Besides, the Ox has gone the way of the mastodon, it's extinct. Belt drive machines are old news.

    MG
     
  30. mcdanlj

    mcdanlj New
    Builder

    Joined:
    Feb 11, 2018
    Messages:
    2
    Likes Received:
    0
    I wanted to upgrade my 1 meter X 1.5 meter OX to a C-beam gantry, but still wanted the 2060 spindle bed not a C-Beam spindle bed. 1.5 meter is a bit on the long side to move to ball screws in the process of the upgrade, so I compromised on a double facing belt setup.

    Starting from this design, but re-dimensioning almost everything, I made plate variants for a C-Beam gantry that support either 2060 or C-Beam spindle bed. Done with precise dimensions in SolidWorks 2019 academic edition (EAA) and exported to STEP and x_t to facilitate import.

    Projects · Michael K Johnson / C-Beam OX · GitLab

    I also made an adapter so i can keep using my existing OX Suckit dust boot on the new plate set, also available there.

    For the benefit of the next person looking for a variant of that sort! ☺

    Thanks for posting this plate set, it made it a lot easier to come up with my variant! ☺
     

Share This Page

  1. This site uses cookies to help personalise content, tailor your experience and to keep you logged in if you register.
    By continuing to use this site, you are consenting to our use of cookies.
    Dismiss Notice