Welcome to Our Community

Some features disabled for guests. Register Today.

Beefed-up and customized OX build

Discussion in 'CNC Mills/Routers' started by semperfikurt, Feb 21, 2016.
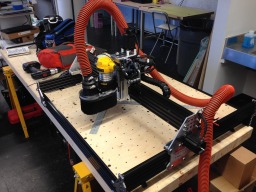
  1. semperfikurt

    Builder

    Joined:
    Jul 11, 2015
    Messages:
    22
    Likes Received:
    51
    semperfikurt published a new build:

    Read more about this build...
     
    Evan F, Gasman and Tom Allen like this.
  2. Julius

    Julius Well-Known
    Builder

    Joined:
    Nov 13, 2015
    Messages:
    193
    Likes Received:
    61
    Sweet!

    Do the X shaped plates on the Y axis really help that much? Tempted to make some, and order some more 65mm M5's to add one to my machine, if it really does anything worthwhile.

    I notice some slop in my Z as well, since it's just V wheel's and causes some witness lines in deep cuts with cheap bits. How much REAL action do you get from it? I need at least 2" for it to be worth thinking of (or can I add smooth rods to the existing design?!)
     
  3. Mark Carew

    Mark Carew OpenBuilds Team
    Staff Member Moderator Builder Resident Builder

    Joined:
    Jun 28, 2013
    Messages:
    2,741
    Likes Received:
    2,407
    Great build updates and mods @semperfikurt These are excellent ideas and they will undoubtedly help many Builders
    Thank you for taking the time to share and post.
     
  4. semperfikurt

    Builder

    Joined:
    Jul 11, 2015
    Messages:
    22
    Likes Received:
    51
    As far as performance goes I am not totally sure how much direct affect the braces inside the Y axis rails have. I can say for certain they do make the entire gantry end plate assembly much sturdier by itself though. It keeps all the bolts squared because they are linked together and there isn't as much assembly fatigue from use. I had this problem a lot on my old machine... lots of sagging bolts that loosened up because the holes in the plates didn't provide very much moment resistance.

    Fair disclaimer though, I am no mechanical engineer. I just prefer the "belt and suspenders" approach to things. After all, Why Kill?... When you can Overkill!

    Can you elaborate on your Z axis question a bit? What are you referring to with "real action?"
     
    Julius likes this.
  5. semperfikurt

    Builder

    Joined:
    Jul 11, 2015
    Messages:
    22
    Likes Received:
    51
    Thanks Mark! This project has been going for so long it feels great to finally have stuff for "show and tell." Lots more content still to post though.
     
    GrayUK and Mark Carew like this.
  6. Julius

    Julius Well-Known
    Builder

    Joined:
    Nov 13, 2015
    Messages:
    193
    Likes Received:
    61
    I think I was confused that night, but when you have the router up so that the bottom of the collet is on the same plane as the bottom Z plate, how much movement can you get?
     
  7. semperfikurt

    Builder

    Joined:
    Jul 11, 2015
    Messages:
    22
    Likes Received:
    51
    I positioned my router in its mount so that the average length of my tools in the collet was the measuring gauge (so extending from the collet about two inches or so). In this case, I can get all of the 4 inches of travel with the tool end, from it being even with the lowest point of the gantry, to touching the surface of the bed with maybe .25" of elbow room in the Z axis travel.
     
  8. Gasman

    Gasman New
    Builder

    Joined:
    Jun 20, 2016
    Messages:
    2
    Likes Received:
    0
    I'm new to the openbuild community and have been going over a few designs. I really like the way you have compartmentalised everything. Any chance you could share the files for the modified plates?
    Many thanks in advance
     
  9. PeterVB

    PeterVB New
    Builder

    Joined:
    Jun 10, 2016
    Messages:
    1
    Likes Received:
    0
    The design seems well thought out and well executed. I like the mods to the Z axis. I am currently researching a router build for my own use and would love to see the rest of the content on yours. Do you intend to post it here or have you posted it elsewhere?
     
  10. semperfikurt

    Builder

    Joined:
    Jul 11, 2015
    Messages:
    22
    Likes Received:
    51
    yeah I can upload them, I finished grad school and am in the process of moving so lots of things in upheaval right now. I will get those uploaded soonest for you guys!
     
  11. semperfikurt

    Builder

    Joined:
    Jul 11, 2015
    Messages:
    22
    Likes Received:
    51
    No I haven't posted it yet, I want to upload the plate files and some more stuff but just haven't gotten to it yet. There are a couple of things I would do differently which I have been marinating on for a bit before posting it all. It's in the process but should be coming shortly!
     
    silopolis likes this.
  12. semperfikurt

    Builder

    Joined:
    Jul 11, 2015
    Messages:
    22
    Likes Received:
    51
    Hey just wanted to touch base, i havent been able to get the part files and assembly models uploaded yet, life is still pretty crazy these days but i havent forgotten about you guys! I should have the part files up to share as soon as i can get my computer set up again!
     
    RGUERI1 and Mark Carew like this.
  13. RGUERI1

    RGUERI1 New
    Builder

    Joined:
    Jun 14, 2016
    Messages:
    5
    Likes Received:
    3
    NICE WORK
     
  14. walckhome

    walckhome New
    Builder

    Joined:
    Aug 17, 2016
    Messages:
    2
    Likes Received:
    1
    Nice Build! Hope you get your computer up and running soon.
     
  15. rlev

    rlev New
    Builder

    Joined:
    Sep 17, 2015
    Messages:
    16
    Likes Received:
    1
    what software tool chain are you using for your pictures?
     
  16. semperfikurt

    Builder

    Joined:
    Jul 11, 2015
    Messages:
    22
    Likes Received:
    51
    I do all of my 3D modeling in Rhinoceros and use the RhinoCAM plugin to generate the cnc programs. For all of my floor plans or topo drawings I basically just pulled linework from my architecture project 3D models and went from there. In order to achieve the different line thicknesses, I adjusted the linework's height in Z by a few thousandths of an inch. The lower the line work the fatter the line (hence more downward pressure on the brush tipped pen.) Run that through RhinoCAM and presto.

    Now the hatched pictures were a bit more involved. I used a Rhino plugin called "Grasshopper." It allows parametric definition and scripting within your 3d models. I essentially created a script that converted an image input file to hatched linework, and then created a single continuous undulating curve from these hatched lines. This way, when I fed that linework into RhinoCAM to generate the cnc toolpaths, it yielded a single toolpath line with approach and retract only at the ends of each line at the edges of the drawing rather than the up, down, up, down, up, down motion I would have had if it was drawing each little dash individually. It saved a truckload of machine time.
     
  17. Emancarrillo

    Builder

    Joined:
    Jun 26, 2015
    Messages:
    1
    Likes Received:
    0
    Awesome write-up. I was going through the photos and noticed and immediately recognized that KOMO. Cool to see other DAAP grads online.

    Really like the bed concept with the ability to swap out smaller plates as they get dinged up.
     
  18. semperfikurt

    Builder

    Joined:
    Jul 11, 2015
    Messages:
    22
    Likes Received:
    51
    Yeah the KOMO is a sweetie. I was working in the RPC at the time so I got all that machine time for free!

    The bed has been an interesting mix of success and failure; there are a couple of problems with it all that I have found through use. The design of it all is not quite matured yet, I think the next iteration of the bed will be the one that really sings. I have been marinating on it for a good while and am thinking about writing all that up, but I haven't modeled it all out yet.
     

Share This Page

  1. This site uses cookies to help personalise content, tailor your experience and to keep you logged in if you register.
    By continuing to use this site, you are consenting to our use of cookies.
    Dismiss Notice