Welcome to Our Community

Some features disabled for guests. Register Today.

7050 Sphinx

Discussion in 'CNC Mills/Routers' started by Michael.M, Jul 15, 2017.
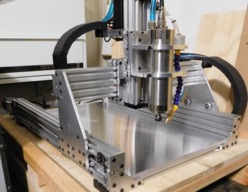
  1. Michael.M

    Michael.M Veteran
    Staff Member Builder Resident Builder

    Joined:
    Jan 21, 2017
    Messages:
    432
    Likes Received:
    263
    Michael.M published a new build:

    Read more about this build...
     
  2. Michael.M

    Michael.M Veteran
    Staff Member Builder Resident Builder

    Joined:
    Jan 21, 2017
    Messages:
    432
    Likes Received:
    263
    Does anyone know the proper amount of tension I should put on the wheels? The eccentric nuts have 6 flat sides and I basically turned each nut 1/6th of a rotation. This made the machine feel fairly solid like the axis wouldn't move if i stood them up vertically. Thanks!

    Michael
     
  3. Rick 2.0

    Rick 2.0 OpenBuilds Team
    Staff Member Moderator Builder Resident Builder

    Joined:
    Dec 20, 2013
    Messages:
    2,852
    Likes Received:
    1,524
    Sounds like you have them a bit tight. As a general rule you should be able to grip a wheel and with a small amount of effort be able to have it slide along the track. When released, the gantry should move easily. If the motion is too stiff, that just requires extra effort on the part of the steppers to overcome.
     
    Chris Laidlaw likes this.
  4. Michael.M

    Michael.M Veteran
    Staff Member Builder Resident Builder

    Joined:
    Jan 21, 2017
    Messages:
    432
    Likes Received:
    263
    Thanks Rick! I'm completely new to this type of linear guide. Im trying to make this machine as tight as possible. Hey I have another question: The leadscrews I bought have an OD of 7.75mm and my flange bearings are exactly 8mm ID. There's definitely a wobble there. Is this normal?
     
  5. Rick 2.0

    Rick 2.0 OpenBuilds Team
    Staff Member Moderator Builder Resident Builder

    Joined:
    Dec 20, 2013
    Messages:
    2,852
    Likes Received:
    1,524
    Yes that's normal. Some members have used Teflon tape to fill the gap which helps prevent rattling.
     
  6. Michael.M

    Michael.M Veteran
    Staff Member Builder Resident Builder

    Joined:
    Jan 21, 2017
    Messages:
    432
    Likes Received:
    263
    Hey Rick what is the proper way to adjust the eccentrics? Is removal of the carriages the only way? I worry that as I create a tighter fit, the wheels will get damaged when entering the cut end of the extrusions.
     
  7. Rick 2.0

    Rick 2.0 OpenBuilds Team
    Staff Member Moderator Builder Resident Builder

    Joined:
    Dec 20, 2013
    Messages:
    2,852
    Likes Received:
    1,524
    Sorry, but I don't really have an answer for that as I haven't built anything C-beam with internal wheels yet. One suggestion however would simply be filing the sharp edges where the wheels enter the rail to protect them.
     
  8. Anthony Bolgar

    Anthony Bolgar Journeyman
    Builder

    Joined:
    Jan 14, 2016
    Messages:
    354
    Likes Received:
    198
    Nice build!
     
  9. Michael.M

    Michael.M Veteran
    Staff Member Builder Resident Builder

    Joined:
    Jan 21, 2017
    Messages:
    432
    Likes Received:
    263
    Thank you Anthony! I really appreciate the comment. :)
     
  10. stargeezer

    stargeezer Journeyman
    Builder

    Joined:
    Feb 20, 2015
    Messages:
    328
    Likes Received:
    117
    Hi Michael, nice looking build. I have found the inside wheels "challenging" :) as well. I basically adjusted the eccentrics all to the same position out of the track - placing the flat with the index line the same direction. Then trying the fit, I'd remove the carriage and make adjustments a flat at a time until I found the best fit. As you discovered, the carriage moves easily when the flats are parallel to the tracks, but adjusting the corners into the edges of the track will cause "problems" as you found. Try to keep all the eccentrics in alignment.

    Perhaps somebody else will have a better plan for all of us. I'm starting a build using C beams (my third project with them) but this one will be using the interior wheels a great more.
     
    Chris Laidlaw likes this.
  11. Michael.M

    Michael.M Veteran
    Staff Member Builder Resident Builder

    Joined:
    Jan 21, 2017
    Messages:
    432
    Likes Received:
    263
    Hi Stargeezer,
    I began my CNC journey with designing my own machine around linear profiles and ballscrews. I soon found out that either I would need someone to cut some plates for me or figure out a way to cut them myself. I pretty much needed a CNC to build a CNC. So I started looking for affordable options that could mill aluminum, slowly.. I saw the plate maker cutting aluminum and then saw the Sphinx thinking this will be, in a way, a larger plate maker. I liked the way the cbeam created a supported linear actuator. I don't have any experience with poly wheels and eccentrics but I think I have the"feel" for adjusting them after dissasembing my machine a handful of times. I'm actually still not 100% satisfied with my adjustments but we'll see. I feel that in order to take full advantage of the cbeam profile, you need wheels riding the inside and outside surface of the cbeam. I found you also had to take into account the the resistance caused by the double antibacklash nuts on top of the resistance from the wheels. I want a solid machine but I don't want to over stress my stepper motors. Do you know if superlube with PTFE oils / grease is ok to use with delrin? Anyway, before I went this route, I was purchasing parts for my self-designed CNC so I have some nice THK linear guides. I may just try to fit them to the Sphinx seeing how I built this machine with the same dimensions. Thanks for the comment.

    Michael
     
  12. stargeezer

    stargeezer Journeyman
    Builder

    Joined:
    Feb 20, 2015
    Messages:
    328
    Likes Received:
    117
    I use superlube on all screws and have not had any issues. Mark says to lightly spray c beam with a silicone lube. I usually use a silicone gun wipe I keep on hand and reapply each time I wipe the machine down.

    On my last build (a 1000x1500 router) I used 1/2" ballscrews and there wasn't room for the internal wheels and that size screw inside the c beam. When I started adjusting the wheels I discovered that even with dual plates I couldn't adjust the wheels over the open part of the C beam as "tight" as the ones over the spine.
     
  13. Michael.M

    Michael.M Veteran
    Staff Member Builder Resident Builder

    Joined:
    Jan 21, 2017
    Messages:
    432
    Likes Received:
    263
    Would you mind sharing your source for the .5" ball screws? I'm very interested in using something like this.
     
  14. Michael.M

    Michael.M Veteran
    Staff Member Builder Resident Builder

    Joined:
    Jan 21, 2017
    Messages:
    432
    Likes Received:
    263
    Is this documented in the morning one of your build? I've been pondering future ballscrew upgrades. I think if I go that route, I will ditch the wheels and use my linear rails. I would basically just be using the cbeam for a ballscrew enclose at that point. This is all just an idea anyway. How well do you think my machine could mill aluminum as it stands? My plan is to use the machine to upgrade itself. Hopefully...
     
  15. stargeezer

    stargeezer Journeyman
    Builder

    Joined:
    Feb 20, 2015
    Messages:
    328
    Likes Received:
    117
    I picked mine up on Ebay. They were from a surplus company thats not around any more. There are several ebay sellers selling 1605 ballscrew kits, such as - Zyltech Antibacklash Ball Screw 1605 w/ Ballnut & BF/BK12 End Support L=850mm

    I've bought several things from this company and found them reliable and if in stock and their shipping is very reasonable.

    I've never posted that build since I'm thinking about re-configuring it. I built it as a hybrid, with a belt drive on the X axis and ballscrews on the y and z axis'. It's worked OK, but the ball-screws are basically trouble free after setup, but the belts are always in need of tweaking.
     
  16. dankarghh

    dankarghh New
    Builder

    Joined:
    Oct 14, 2016
    Messages:
    12
    Likes Received:
    4
    I built a C-beam machine and am currently designing plates to convert to 1605 ballscrews. Unfortunately, at least with traditional ball nut housings, you won't be able to fit the screw inside the C-beam - I have opted to place the screws on the outside of the plates in this instance. I'm also using linear rail in the place of the wheels on the Y axis, but will probably keep the X carriage wheels. I'd be very interested to see if anyones done anything similar
     
  17. Michael.M

    Michael.M Veteran
    Staff Member Builder Resident Builder

    Joined:
    Jan 21, 2017
    Messages:
    432
    Likes Received:
    263
    Hi Dankarghh,

    I will definitely post anything I figure out. I ran into the same issue with the larger ball nuts. I'm debating going with the 12mm screws. I've also read that there are better leadscrews out there.
     
  18. Michael.M

    Michael.M Veteran
    Staff Member Builder Resident Builder

    Joined:
    Jan 21, 2017
    Messages:
    432
    Likes Received:
    263
    The one thing I don't like about leadscrews is the resistance they create when compensating backlash. Add that with the resistance from the wheels and I'm wasting a lot of motor torque
     
  19. stargeezer

    stargeezer Journeyman
    Builder

    Joined:
    Feb 20, 2015
    Messages:
    328
    Likes Received:
    117
    I'm not too sure that you are right on this point, at least in the sizes we are debating. On my router with the 1500mm y axis I am using NEMA 34 640 oz. stepper motors - but at least part of the reason was because I had them on hand. My 1000mm router w/ 1/2" 5 start acme screws and zero backlash nuts works fine with NEMA 23 425oz. motors with lots of power to spare even though there is much more drag and a far heavier x axis gantry than any Ox has.

    While it is true that the 1605 screws will not fit using the Open Build plates, I've just moved the screw placement out of the C Channel by just enough to squeeze in my ballnut with a couple mm of spacing. I also machined as much off the ballnut flange as possible and I used screws on the wheels that were 65mm long, as I recall. That gave me enough length to makeup a double plate carriage with two wheels on each mounting screw. I could not use any wheels inside the C Beam with this size ballscrew, but I consider a total of 14 wheels on each carriage adequate for the load of this gantry.
     
  20. Michael.M

    Michael.M Veteran
    Staff Member Builder Resident Builder

    Joined:
    Jan 21, 2017
    Messages:
    432
    Likes Received:
    263
    I'm just saying that leadscrews with AB nuts have more rotational resistance than a ballscrew. I adjusted my extreme wheels until there was no play which also added a little resistance. I haven't run the machine yet so I don't know how the steppers will handle it. Maybe it won't be an issue. I've been using SketchUp to test fit the different ball nuts and the 1605 nut looks too big. I would prefer the 16mm over the 12mm screw honestly. I have some thk linear rails that I would like to use somehow. (15mm and 20mm) I haven't figured out how to use them without a complete redesign. That would be a bummer considering how much money I have invested in the current setup. Do you have any pictures of how you mounted the 1605 nut? This could really help me. Thanks for all your support on this subject.
     
  21. Michael.M

    Michael.M Veteran
    Staff Member Builder Resident Builder

    Joined:
    Jan 21, 2017
    Messages:
    432
    Likes Received:
    263
    I pushed down on my spindle this morning and it actually moves a little and I'm not sure if it's the end of the leadscrews moving in the flange bearings. I see there's a trick to tensioning them but my screws are too short for that method
     
  22. stargeezer

    stargeezer Journeyman
    Builder

    Joined:
    Feb 20, 2015
    Messages:
    328
    Likes Received:
    117
    I'm afraid that we are traveling right now and it will be a couple weeks before I get back home to take any pics. I'll check my home network server out tonight after my son goes by to reset the NAS. I can't seen to access it today but I might have a couple pics on that, I'm just not sure.
     
  23. Michael.M

    Michael.M Veteran
    Staff Member Builder Resident Builder

    Joined:
    Jan 21, 2017
    Messages:
    432
    Likes Received:
    263
    Anyone know if it would be ok to run my spindle cable in the drag chain next to the stepper and limit cables? All three are shielded with drains running to PSU ground. Thanks.
     
  24. stargeezer

    stargeezer Journeyman
    Builder

    Joined:
    Feb 20, 2015
    Messages:
    328
    Likes Received:
    117
    Micheal, that works fine. The shielding will work fine as long as least one end is grounded. I usually ground both ends, just to be safe.

    On the 1605 ballnuts - in order to get them to fit best, I grind the flange down on two sides, keeping two of the mounting bolt holes. Two is enough to keep everything secure. I do use blue locktite on the flange bolts when I get to the point that I know I won't need to loosen them again.

    I tried to take a pic of them, but they are so covered that I don't have any clear shot of them without taking them apart.
     
  25. Michael.M

    Michael.M Veteran
    Staff Member Builder Resident Builder

    Joined:
    Jan 21, 2017
    Messages:
    432
    Likes Received:
    263
    Hey thanks for the reply. I think I'm going to get comfortable with the machine before I dive into the ballscrew upgrade but I will definitely keep that in mind.

    I've heard of people having issues with noise originating from the spindle cable but I really want to have everything secured in the drag chain. By the way, that vertical mill you made is awesome! Did you anodize your plates?
     
  26. Michael.M

    Michael.M Veteran
    Staff Member Builder Resident Builder

    Joined:
    Jan 21, 2017
    Messages:
    432
    Likes Received:
    263
    Im just waiting on my small radiator for the spindle cooling system and tying up some loose ends but I should be up and running soon. I keep telling myself it will be ready this weekend but every time I work on it, I find something else I want to add or improve.
     
    Chris Laidlaw likes this.
  27. stargeezer

    stargeezer Journeyman
    Builder

    Joined:
    Feb 20, 2015
    Messages:
    328
    Likes Received:
    117
    Anodize? No I didn't. One of these days I'll built up the tub and stuff I need to do that, but not yet. :)
     
  28. Michael.M

    Michael.M Veteran
    Staff Member Builder Resident Builder

    Joined:
    Jan 21, 2017
    Messages:
    432
    Likes Received:
    263
    Oh it looked like the red colored parts were anodized.
     
  29. stargeezer

    stargeezer Journeyman
    Builder

    Joined:
    Feb 20, 2015
    Messages:
    328
    Likes Received:
    117
    Oh, those plates :) Those were a couple that were salvaged from a 3d printer kit I was helping a young friend build. It was such a poorly designed kit that we ended up building him a entirely different design. PLEASE NOTE - The failure of the design was not caused by Open Builds parts or OB designs. The Chinese kit designers completely blew the design by using C Beams in the wrong manner.
     
  30. SCYBUCK

    SCYBUCK New
    Builder

    Joined:
    Sep 11, 2017
    Messages:
    36
    Likes Received:
    13
    Michael M.

    Your Sphinx looks just like mine will look! It will be a straight Kyo Sphinx up until the spindle mount. I will be going with a 2.2 KW water cooled Chinese spindle (so much for making America great again!) with an 80 mm diameter. It looks like you "traded in" the Openbuilds double wide gantry plate for the Blue Ox Z gantry plate and went with the Blue Ox spindle bracket. Good looking machine! Tell me about your speeds and feeds for cutting aluminum.
     

Share This Page

  1. This site uses cookies to help personalise content, tailor your experience and to keep you logged in if you register.
    By continuing to use this site, you are consenting to our use of cookies.
    Dismiss Notice